Replaces
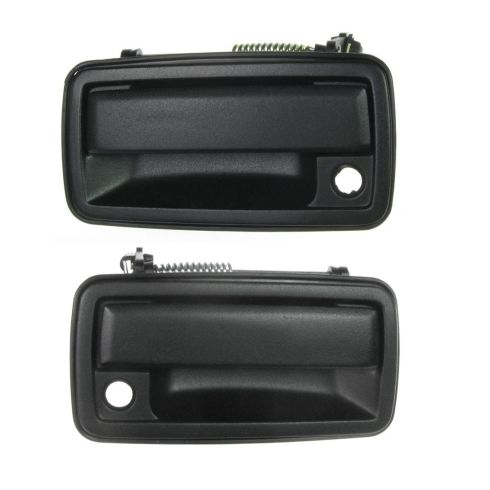
2000 Olds Bravada Front Driver & Passenger Side 2 Piece Exterior Door Handle Set TRQ DHA37033


DHA37033
This part doesn’t fit a . Select from parts that fit.
Specify your vehicle's year, make and model to guarantee fit.
This part doesn't fit a . Select from parts that fit.
Buy in the next and
Orders must be placed by 2pm ET
Recommended for your 2000 Oldsmobile Bravada
Frequently bought together
Specify your vehicle's year, make and model to guarantee fit.
This part doesn't fit a . Select from parts that fit.
Part Details
- (1) Front Driver Side Exterior Door Handle
- (1) Front Passenger Side Exterior Door Handle
- Black
- 2 Piece
- Textured
Specifications
- Driver & Passenger Side
- Front
About TRQ:
TRQ is a trusted brand dedicated to making every repair a success story by combining premium parts with easy installation. Each TRQ part is engineered by a team of automotive experts to meet or exceed OEM standards, delivering enhanced performance and maximum longevity. With rigorous in-house testing, the brand ensures superior fit and function across every product line. TRQ also provides customers with best-in-class, step-by-step installation videos—so you can complete repairs with confidence, whether you're a first-time DIYer or an industry professional.
Attention California Customers:
![]() WARNING: This product can expose you to chemicals including Lead and Lead Compounds, which are known to the State of California to cause cancer, and birth defects or other reproductive harm. For more information, go to www.P65Warnings.ca.gov.
WARNING: This product can expose you to chemicals including Lead and Lead Compounds, which are known to the State of California to cause cancer, and birth defects or other reproductive harm. For more information, go to www.P65Warnings.ca.gov.
Lifetime Warranty
This item is backed by our limited lifetime warranty. In the event that this item should fail due to manufacturing defects during intended use, we will replace the part free of charge. This warranty covers the cost of the part only.
FREE Shipping is standard on Orders shipped to the lower 48 States (Contiguous United States). Standard shipping charges apply to Hawaii, Alaska and US Territories. Shipping is not available to Canada.
Expedited is available on checkout to the United States, excluding Alaska, Hawaii and US Territories as well as P.O. Boxes and APO/FPO/DPO addresses. Final shipping costs are available at checkout.


Created on:
Tools used
- Using a paperclip pry out the clip behind the window crank. Remove the Phillips screw behind the door handle. Remove the door handle bezel. Remove the two 10mm bolts under the door pull. Use a putty knife to pry out the clips around the door panel. Lift the door panel up and off. Pull back the water shield.
- Make sure the window is all the way up. Remove the plastic cap on the outside edge of the door. Remove the two 10mm bolts on the backside of the door handle. Reach up on the inside of the door and push the rod out of the clip. Pull the door handle out and disconnect the other rod. Pull the door handle out.
- Put the door handle up into place. Replace the two 10mm bolts. Reconnect the rods to the back of the handle. Replace the plastic cap.
- Line up the door panel and push it into place. Hit the clips in around the door panel. Replace the door handle bezel Replace the two 10mm bolts. Replace the Phillips screw. Put the clip back into place on the window crank and push the crank into place.
Brought to you by 1AAuto.com. Your source for quality replacement parts and the best service on the internet.
Hi. I'm Mike Green. I'm one of the owners of 1A Auto. I want to help you save time and money repairing and maintaining your vehicle. I'm going to use my 20 plus years' experience restoring and repairing cars and trucks like this to show you the correct way to install parts from 1AAuto.com. The right parts installed correctly: That's going to save you time and money. Thank you and enjoy the video.
In this video, we'll be replacing a door handle, an exterior door handle on a 2001 S-10 Pickup. Same procedure for S-10s, S-15 Pickup, Blazers, Jimmys, front door anyways. The tools you are going to need: If your truck has manual windows, you'll need a window crank removal tool or two paper clips, Philips screwdriver, door panel and clip removal tool or a putty knife and a regular screw driver, 7mm socket and 10mm socket. You do have to remove the door panel, so I'm going to show you that really quickly, go fast motion. Keep in mind we do have a video that's specifically for door panel removal. Just look up S-10 door panel on our channel.
Here we go. Going through the door panel. Remove it with the right tool or remove it with paper clips. Three bolts or one screw and three bolts. Phillips screw for the door handle. Trim plate: remove that. Pull off that trim plate. Remove the two bolts underneath the door pull. Please don't try and work this fast at home. Anyways, I'll stop cracking jokes. Here's the door panel from the back. Show you the kind of ten clips. Basically, you want to put your putty knife or your clip tool in there. Find the clips and then make sure you're prying and putting pressure where the clips are so you don't end up breaking your door panel.
After you've removed all the clips, or gotten the clips away from the door, the door panel just pulls out and that's obviously where you would disconnect your power windows and door locks if you had those. To get to the door handle, you pull the water shield away and then roll up your window. Remove this little trim cap that's on the outside and then you'll see inside there's two 10mm bolts. There and kind of you can see in there. You're going to want to remove those 10mm bolts. Unbolting and bolting on the door handle is not the hardest part. You'll see the tougher part is releasing the rods that connect the door handle to the latch and the door lock to the lock mechanism. There's one of the bolts out. Then, remove the other bolt. There's the other bolt.
We'll change angles here. You pull the door handle away and then I'm going to disconnect the clip that you can hopefully see my finger working in back there. Disconnect the clip for the rod that goes into the back of the lock. It's a little bit difficult to do. You just got to reach your finger in there and pull it away. What I'll do is I'll change angles and you'll be able to see. You could probably do this from the inside of the door. I wasn't able to do it but you can see the clip right there in the middle of the hole. I'm just going to reach in there and flip the rod out. That's what I was struggling to do on the other side. I just couldn't get the rod to come out of the hole. Now that you can the rod just pop out right there.
Up higher is the rod that connects the door handle to the latch mechanism. Not really a good way to film it. Hopefully, you can see my hand just working in there. You basically push the clip back and then the rod comes back and out. Once they're disconnected, fairly easily comes out. You can see that's where the rod goes for the handle and that's where the rod goes for the door locks.
Going to put it back in. We are going to bolt it in. I was not able to. Some of the vehicles I've worked with you can actually remove the door handle from the door most of the way and then disconnect and reconnect the lock and the handle rods and I thought maybe that would be that case on this one, but I could not figure out a way to easily connect those rods before or while the handle is still disconnected. Basically, I resorted to bolting it in first and then contorting myself to reach the rods and get them all into the right place and locked in place. You'll see what I mean in a minute. I'm tightening up. Those bolts you don't have to have too tight. They are going into a plastic handle. You don't have to be that aggressive, just make sure they're tight. You can see this one was pretty easy. This was a rod going into the lock. You can see I reach in with my left hand and get in there and then get the locking tab on it.
The other one I couldn't really film clearly, but what I filmed for you is basically the way I contorted myself to reach up in. You can see with my right hand I'm reaching up in, grabbing that handle, or grabbing the rod, and then with my left hand, I'm moving the door handle up and down until I was able to get the rod in, and that's it. The process is not that difficult. The hardest thing is getting those rods disconnected and reconnected.
Now, I'm putting the door handle back on. Again, we're in fast motion. If you want to see the detailed video of this, like I said, do a search for S-10 door panel on our channel and you'll be able to see that. Don't hesitate to check out our channel for other ones. I have S-10 lights and tailgate handle and we'll be, hopefully have the whole selection of our products we'll have installed videos for.
Once you get the door panel back on, then you're all set.
We hope this helps you out. This video was brought to you by www.1AAuto.com. Your source for quality replacement parts and the best service on the internet. Call us toll free 888-844-3393. We're the company that's here for you on the internet and in person. Thank you very much.
Tools used
- Pry up the window switch panel by hand Disconnect the window switch wiring harnesses Remove the Phillips head screw inside the inside door handle Pry off the trim piece inside the inside door handle by hand Remove the two 7mm bolts inside the door pull Pry out the door panel with a door panel clip tool or putty knife Carefully peel off the water shield
- Pry the plug out of the door with a flat blade screwdriver Remove the two 10mm bolts from the window track Pull the window track down Unclip the lock rod from the door handle Remove the two 10mm bolts from the door handle Twist the door handle off the latch rod from the outside Pull the clip off the latch rod
- Disconnect the lock cylinder from the old handle with a flat blade screwdriver Pull the lock cylinder out of the old handle Pull the felt washer out of the old handle Push the felt washer into the new handle Push the lock cylinder into the new handle
- Clip the door handle onto the latch rod Push the door handle into place Insert the two 10mm bolts into the door handle Put the window track into place Insert the two 10mm bolts into the window track Put the water shield into place Make sure the door is unlocked Test the door handle
- Lift the door panel into place Push in the door panel clips Push the plug into the door Slide on the trim piece inside the inside door handle Insert the Phillips screw into the inside door handle Insert the two 7mm bolts into the door pull Connect the window switch wiring harnesses Push in the window switch panel
Brought to you by 1AAuto.com, your source for quality replacement parts and the best service on the Internet.
Hi, I'm Mike from 1A Auto. I hope this how-to video helps you out, and next time you need parts for your vehicle, think of 1AAuto.com. Thanks.
In this video, we're going to show you how to replace a front outside door handle on this 2003 GMC Sonoma. This is pretty much the same for any '98 to '04 GMC Sonoma or S15 pickup. The tools you'll need are flat blade screwdrivers (both regular and small size), Phillips screwdriver, door panel clip tool or putty knife, 10mm socket with a ratchet and extension, and a flashlight will help as well.
Start by grabbing the front of your switch plate and kind of push back and pull up. It should come out. You want to use a screwdriver. On this one, there's a tab right here that you push, this gray one. Try to put your screwdriver right down in here and pry out. Here there's a tab, and then, here there's a tab. We'll speed it up here as I disconnect those connections. On the middle one, I believe, I did have to use two screwdrivers. I used one to hold the locking tab and the other one to pry up on the connector to pull it off.
Right behind your door handle, there's a Phillips screw. Remove that. Then, this bezel pulls out and unclips. You can bring it off the door handle. Up underneath there, there are two 7mm bolts underneath your door pull, one there and then one right up in there. I'm going to speed up as I remove those two bolts. If you have a door panel clip tool, use that or actually a household putty knife works just as well. Put the tool in the bottom between the door and the door panel. Slide it and find the clip and pull it. If your door panel has been apart before they'll come off pretty easy. There's one right up here as well. The door panel comes right off. You'll want to pull back your watershield to give you access to the inside of the door.
With a flat bladed screwdriver, there's just a little plug here. We have two 10mm bolts here. Now, you want to reach inside and grab hold of this track here and pull it down. It's just important to note how it goes in. You can see, as I pull it down, it comes off right there. I'm just going to lay it down right there for now.
Now, we're going to want to unclip our lock rod, and actually, you can see it. I can't really film it through here, but you can see it pretty well through this hole. Look through at your lock rod. I reach in with my hand. I'm sure you can't see much of that, but I'm going to pull the clip off and then pull the rod out.
There's a 10mm bolt right through there and one through there as well. It's a little harder to see behind that rod. I'll speed it up as I remove those two bolts. I use a 10mm socket with an extension and a ratchet. Undo the bolts and then just try and pull them right out while they're still in the socket.
I'm going to pull it out. Twist it down, and it came out. It shouldn't have come out quite that easy. This little clip comes off. It should be clipped right into there. You'll find when you go to pull your handle out that that rod will still be connected. You just need to remove the clip and disconnect the rod. You'll want to get your lock out of your old handle. Just press on this tab here and push out.
The new handle from 1A Auto is the exact same as the old one. I've got a little felt washer from the old handle. I'm just going to push that right down into place here. Take my lock and push it into place. Put this rod on. Hook this clip down to hold it in place. Kind of push it down in. The window is right back in there. You've got to get it around the window to lock in to place. Generally, you kind of push it into place. I'm going to make sure that I get this first bolt started by hand here. You're going to take this one and put it into your socket. You can usually hit it pretty easily. Tighten these up nice and firm. I'm going to speed it up here as we finish threading those in and tightening them up with our socket, ratchet, and extension. Look back up in there and put the lock on. Put it back in place.
Now, we want to take this window track. What you want to do is look right up in there and make sure your window track is going to pass the door handle and in behind the window. I'm just kind of looking right there at the track. I can see it. I can see it go up into place. Push it right in. Once you push it right in, you should be able to see this hole right here, lined up nicely. Start that bolt. Then, start this bolt. I'm going to speed it up as I get those bolts in, tighten them up, and then put the watershield back in place and ready for a test on the new door handle. Make sure that door is unlocked first.
Reinstall your door panel. Get it into place. Make sure all of your wires are clear. Push the top. You want to push the top against the window and then down onto the door. Push the top on down. Just kind of move it around a little bit to make sure the pins go in. Put the inside handle back on. Force the back in first. It snaps in there. Then, you'll clip this into place. Let's take our 7mm bolts and work them right up in there. Plug everything back in. Again, the back kind of locks in first, and then, the front goes right in.
We hope this video helps you out. Brought to you by www.1AAuto.com, your source for quality replacement parts and the best service on the Internet. Please feel free to call us toll-free, 888-844-3393. We're the company that's here for you on the Internet and in person.

DHA37033
877-844-3393
Monday - Friday 8:00am - 9:30pm ET
Saturday - Sunday 8:00am - 4:30pm ET
Specify your vehicle's year, make and model to guarantee fit.
This part doesn't fit a . Select from parts that fit.


