Replaces


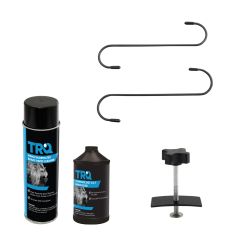
Frequently bought together
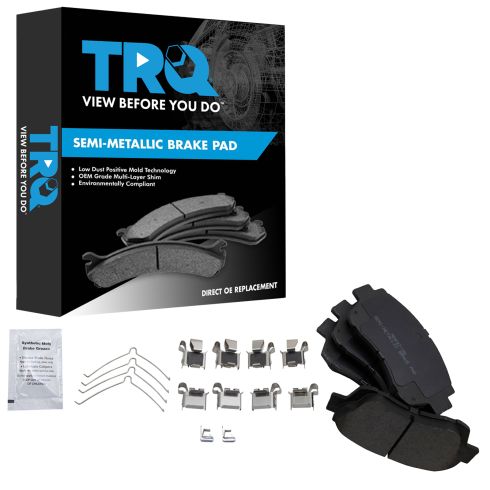
Part Details
Specifications
About TRQ:
TRQ is a trusted brand dedicated to making every repair a success story by combining premium parts with easy installation. Each TRQ part is engineered by a team of automotive experts to meet or exceed OEM standards, delivering enhanced performance and maximum longevity. With rigorous in-house testing, the brand ensures superior fit and function across every product line. TRQ also provides customers with best-in-class, step-by-step installation videos—so you can complete repairs with confidence, whether you're a first-time DIYer or an industry professional.
Product Features
TRQ brake pads are manufactured using premium raw materials and design standards to restore original performance. TRQ brake pads are positive molded and utilize a multi-layer shim for enhanced performance and service life. TRQ’s combination of materials and design ensures a low dust and low noise braking experience. TRQ recommends replacing your brake rotors when you replace your brake pads to ensure even wear of components and improved braking comfort. All products are fit and road-tested in our Massachusetts R&D facility to ensure we deliver on our promise of Trusted Reliable Quality.
Attention California Customers:
 WARNING: This product can expose you to chemicals including Lead and Lead Compounds, which are known to the State of California to cause cancer, and birth defects or other reproductive harm. For more information, go to www.P65Warnings.ca.gov.
Lifetime Warranty
This item is backed by our limited lifetime warranty. In the event that this item should fail due to manufacturing defects during intended use, we will replace the part free of charge. This warranty covers the cost of the part only.
FREE Shipping is standard on orders shipped to the lower 48 States (Contiguous United States). Standard shipping charges apply to Hawaii and Alaska.
Shipping is not available to a P.O. Box, APO/FPO/DPO addresses, US Territories, or Canada for this item.
Expedited is available on checkout to the United States, excluding Alaska, Hawaii.
Final shipping costs are available at checkout.
Created on:
Tools used
Brought to you by 1AAuto.com, your source for quality replacement parts and the best service on the internet.
Hi, I'm Mike Green. I'm one of the owners of 1A Auto. I want to help you save time and money repairing or maintaining your vehicle. I'm going to use my 20-plus years' experience restoring and repairing cars and trucks like this to show you the correct way to install parts from 1AAuto.com. The right parts installed correctly. That's going to save you time and money. Thank you and enjoy the video.
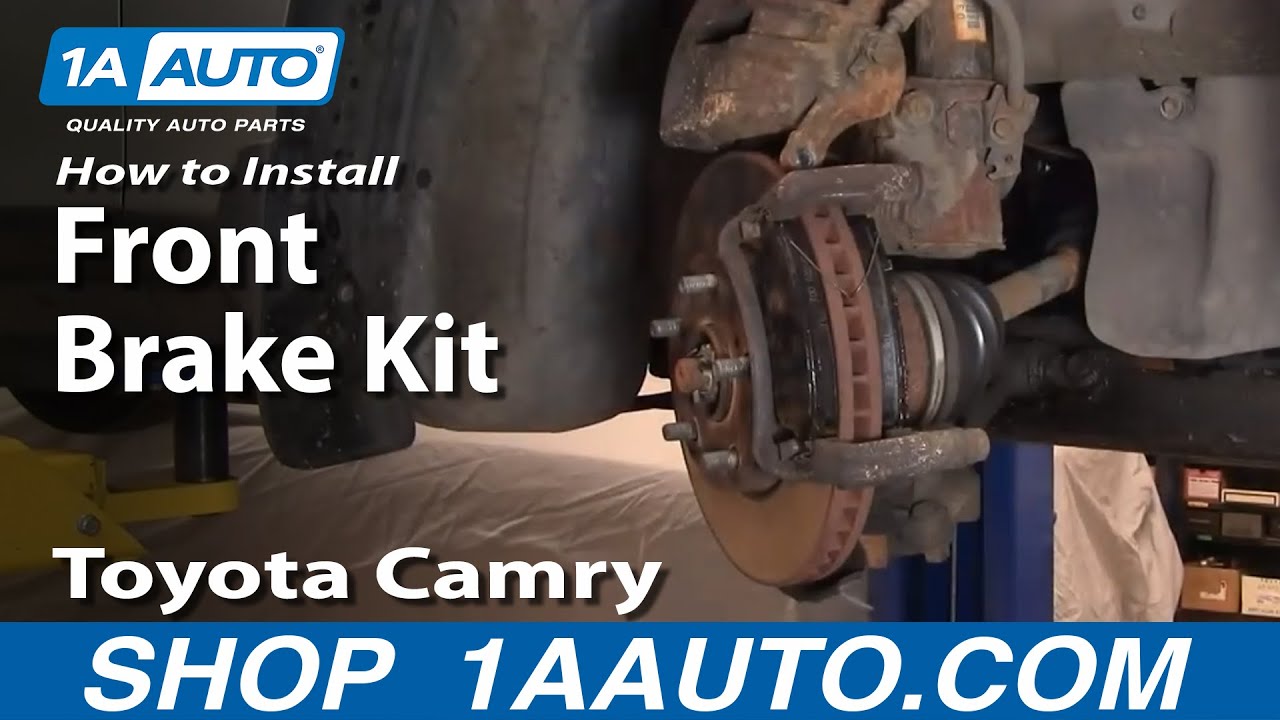
In this video we'll show you how to service the front disc brakes on this 1994 Camry, pretty much the same as any 1992 to 1996 Camry. The tools you'll need are a large flat-blade screwdriver, a 21 mm socket and ratchet or your lug wrench, 14 and 17 mm sockets with ratchet, a torque wrench, a large C-clamp and a jack and jack stands.
First we'll remove the hubcap. Use a large screwdriver or a pry bar. Remove the lug nuts from your wheel. I've got a 21 mm socket and I have an air wrench. You can obviously leave your car on the ground, use your lug wrench or a 21 mm socket and wrench to get them off.
As you can see I've turned the wheels, and to remove the caliper which you need to do to remove the pads you've got two 14 mm bolts, one here and then one up here. You can remove the caliper and the pads and then if you want to replace the rotor, which actually this car the rotors look really good. If you did want to replace the rotors you've got bolts that need a 17 mm bolt here and then one down lower right there.
Remove these 14 mm bolts just using a regular wrench. You can see that it's not hard to do. It's just going to take some pressure but not a ton. The other bolt is removed. Use your screwdriver and pull the caliper right off. Support it up here. Here are my pads. I'm just using my screwdriver to pry them out. You can see that they're pretty well worn, but as I said my disc is nice. What you want to do is just kind of take the back of your fingernail and run it back and forth across there. If it's nice and smooth then you're okay. If it has any deep grooves or gouges in it you'll want to replace them.
If your discs are in bad shape and you want to replace them, it is 17 mm bolts down in here. These ones are going to be quite a bit more torque to get them loose. I always like to hang up and hang down. That's usually the best way to get torque on them, or stand on the wrench. That comes off and once that bracket is off the disc for the rotor generally just comes right off. Just to show you, if you do order new discs from 1A Auto, they are going to go on there just like the originals and work for you. Like I said, these are in good shape, and I'm not a person to waste good discs. I'll put those back on.
One thing you'll want to do is take these little pins out. These look nice. They are well lubricated. They slide well. You can either take them out or just make sure that they slide back and forth with no drag. Tighten these up to the foot panels. Here are the old pads, new pads from 1A Auto. You can see they've got quite a bit more meat on them and they even have the plates and everything. They actually just kind of go down into the little. Just squeeze them together. Next, you're going to want to use a C-clamp and you're going to want to force the piston back into the caliper here. You can see the piston right in there. I'm just going to keep this C-clamp right on there and it goes back in pretty easy without a whole lot of pressure. You probably can loosen up your cap on your brake fluid reservoir and make sure it's not overfull because it will leak out if there is too much in there.
Before you install your caliper you'll want to put this little spring back in. Just kind of keeps them apart so they don't squeeze on the rotor. What we did with that C-clamp is we pushed this piston back in. Now this will go down on there very nice. Now the two 14 mm bolts. These 14 mm bolts you'll need to tighten up to about 25-foot pounds. I've got a wrench holding the stud that they're going into. Okay, and 25-foot pounds is not a lot, but it is the right amount. Let's see here. These don't really do any of the braking. The braking energy is absorbed by that big bracket. These just kind of hold that caliper in place and let it float. Now we'll do the other side and then put the wheel back on and when you put the wheel back on you want to torque the lug nuts to 100-foot pounds and then before you drive your car anywhere you want to get in, start it up and pump the brakes a few times to make sure that piston gets back out and the brakes are working. They'll take a few pumps to the brakes to make sure that everything is back where it should be. Then before you drive your care just put it in gear, make sure the brakes hold then do a stop from 5 miles an hour before you go out and test it on the road.
Here we've put the wheel on. I am just preliminarily tightening up the lug nuts with an air gun, and now I'm tightening them to 100-foot pounds using a star pattern with the torque wrench. Install the center cover; line up the indent on your valve stem there.
We hope this helps you out. Brought to you by www.1AAuto.com, your source for quality replacement parts and the best service on the internet. Please feel free to call us toll free, 888-844-3393. We're the company that's here for you on the internet and in person. Thank you.
Tools used
Brought to you by 1AAuto.com, your source for quality replacement parts and the best service on the Internet.
Hi, I'm Mike from 1A Auto. I hope this how-to video helps you out, and next time you need parts for your vehicle, think of 1AAuto.com. Thanks.
In this video, we're going to show you how to replace the front brake pads and rotors in the 1998 Toyota Camry. This information is the same from '92 to '98, as well as the '99 to 2001 models with 14 inch wheels.
The items you'll need for this repair include a new brake pad and rotor set from 1AAuto.com, a 14mm and a 17mm socket, ratchet, torque wrench, a pair of grove lock pliers, a small steel wire brush, brake cleaner, and some brake grease.
Break all of your lug nuts loose while the vehicle is still on the ground. You're going to need a 21mm socket and a breaker bar. Install your jack under the vehicle. Line it up with the pinch weld. Jack the vehicle up high enough that you can get a stand underneath, making sure you have enough clearance to remove your tire or do whatever you have to do under the vehicle.
Install your jack stand onto this uni-body frame rail under the vehicle. You need to work on the rear of the vehicle, put your jack stand underneath, and just ahead of the lower control arm here right by the tow point. Once the weight is on your stands, give the vehicle a little shake. Make sure that they're on there secure. Repeat these steps on the opposite side.
Make sure that you bring the vehicle up so that when it sits on the other set of jack stands the vehicle will be level. You can now lower your vehicle onto the stands on this side. With the vehicle raised and supported remove your lug nuts the rest of the way. If you need a little more room to work, you can pull the hubcap off. Remove your wheel from the hub.
We've put our vehicle on a lift to make it easier to film for you, but this job can be easily done with a jack and jack stands.
Using a 14 mm socket and ratchet, break the two caliper slide bolts loose. If you remove one fully and then attempt to remove the other, the caliper will swing on the slides. You could rip a brake line or just make it much more difficult to remove your bolts. Once the bolts are out, remove your caliper. Using a bungee cord, mechanic's wire, or zip ties, hang the caliper up and out of the way. Using a flat blade screwdriver, pop the old brake pads out of the caliper carrier. Using a 17mm deep socket, remove the two bolts securing the caliper carrier to the steering knuckle.
Again, you'll just want to crack these loose before removing them fully, so you don't risk the carrier sliding. Support the carrier bracket while you remove the last bolt. Remove the bracket from the spindle. Remove your rotor from the hub.
Here we have our old parts that we removed from the vehicle and our new parts from 1AAuto.com. Our old parts aren't terribly worn out. Still have plenty of life left on these. We pulled them apart to show you that they're exactly the same. You can see we have the same five lug pattern on our rotors. Same diameter, same bore size, exact same pads. Our new ones even come with a new squealer on them to warn you when your brake pads are getting low. Some symptoms of your brake system being damaged is a vibration in the brake pedal, can be caused by a warped rotor.
Having worn down pads can cause a squealing, crunching, or grinding noise and overall poor stopping distance so if your old brake parts are worn out, grinding, or creating a vibration when braking, then these new parts from 1A Auto are going to go in direct fit just like your original equipment and fix you up right.
Using a wire brush, clean all the rust buildup and debris from the hub surface where you'll be installing your rotor. This will insure that the rotor seats on there properly and lays nice and flat so you don't risk warping or damaging any of your brake components. We recommend you wear a dust mask and eye protection to keep the dust and debris from getting into your mouth and eyes once it becomes airborne.
Use a pair of vise grip pliers, slowly compress the piston back into the caliper. Bring it down until it's seated in as far as it will go to make sure that the new pads and rotors clear each other properly. You may want to wire brush down any rust buildup where the pads are going to contact the caliper. Again, be sure to wear eye protection and a dust mask. Wear a dust mask and use a small wire brush to clean the rust buildup from your brake pad shims.
If these are very rotted or corroded, broken, or missing in any way, you'll want to replace them entirely, but ours aren't bad so we can just clean them up, grease them, and re-use them. Hold down the boots for the caliper slides. Remove them one at a time. Clean off your caliper slides. They get caked up in the old grease from other brake jobs. You can use some brake cleaner if it's really built up on there. Ours isn't bad, so we'll just wipe it down. Get it nice and clean. Use some brake grease. Just apply a little bit to your finger. Get a nice coat onto the slide. Reinstall the slide into your caliper carrier. Make sure it pops down and seats onto that boot. Repeat that process for the other one. If these are rusted up or corroded in any way, you are going to want to replace them as well because this is what allows your caliper to center as your brake pads wear down. Again, get a nice thick coat of grease on there. Slide it in until the boot seats back onto it.
Apply a thin coat of brake grease to the surface of the hub. This will prevent the rotor from freezing on there so the next time you do a brake job, it will go a lot smoother and easier. It will also prevent rust from building up meaning that the next time we do a brake job, we won't have to spend as much time cleaning. We can simply wipe the old layer of grease off with a rag. Install your brake rotor onto the hub. You're going to do that backwards so we can spray down the back face of the rotor with some brake cleaner.
Flip it around and install it as it will sit on the vehicle. Spray down the other face and give it a second for all the fluid to evaporate or run off. Reinstall the brake caliper carrier. It sits between the rotor and the spindle. We'll use our 17mm hardware. Start those bolts by hand. Tighten them down with a 17mm socket and ratchet. Using a 17mm socket and a torque wrench, torque your caliper carrier bolts to 79 foot-pounds. Take the new brake pad without the squealer. Put a dab of grease on both ends where it will contact the caliper shims. We'll install those back into the carrier. Repeat that step with the rear pad.
We're going to use the squealer for the rear. Install that into the rear. Now we'll put a little grease on the tip of your finger and coat the backing plate of the pad with it. All this grease is doing is keeping our brakes functioning smoothly, keeping them free of corrosion, making sure they don't make any unpleasant noises when they're operating. Remove the bungee cord or zip tie or mechanic's wire if that's how you choose to secure your caliper out of the way. Compress your slides and slide your caliper into place. Reinstall the two 14mm bolts. Tighten them down with a 14mm socket and ratchet. Using the torque wrench and a 14mm socket, torque your caliper bolts to 25 foot-pounds.
Brake jobs should always be done as a pair, so repeat these steps on the opposite side and check your brakes for proper and quiet operation. Start your lug nuts. Check that they're all seated. Jack up on your pinch weld. Be sure that where you jack isn't going to interfere with your ability to remove the jack stands. Bring the vehicle up until it's off the stands. Remove your stands from under the vehicle.
With the stands clear, lower the vehicle. Move to the other side and repeat these steps. If you've removed the tire, only lower the vehicle until the wheel touches the ground. With partial weight of the vehicle on the ground, torque your lug nuts to 76 foot-pounds in a cross pattern. Then you can remove your jack the rest of the way. To reinstall your hubcap, align this notch with the valve stem on the wheel. Snap it back into place.
Thanks for tuning in. We hope this video helped you out. Next time you need parts for your car, please visit 1AAuto.com. Also check out our other helpful how-to and diagnosis videos.

BFA73610