Replaces
This part doesn’t fit a . Select from parts that fit.
Frequently bought together
Part Details
Item Condition:
New
Attention California Customers:
 WARNING: This product can expose you to chemicals including Lead and Lead Compounds, which are known to the State of California to cause cancer, and birth defects or other reproductive harm. For more information, go to www.P65Warnings.ca.gov.
Lifetime Warranty
This item is backed by our limited lifetime warranty. In the event that this item should fail due to manufacturing defects during intended use, we will replace the part free of charge. This warranty covers the cost of the part only.
FREE Shipping is standard on Orders shipped to the lower 48 States (Contiguous United States). Standard shipping charges apply to Hawaii, Alaska and US Territories. Shipping is not available to Canada.
Expedited is available on checkout to the United States, excluding Alaska, Hawaii and US Territories as well as P.O. Boxes and APO/FPO/DPO addresses. Final shipping costs are available at checkout.


Created on:
Tools used
Brought to you by 1AAuto.com, your source for quality replacement parts and the best service on the Internet.
Hi, I'm Don from 1A Auto. I hope this how-to video helps you out, and next time you need parts for your vehicle, think of 1AAuto.com. Thanks.
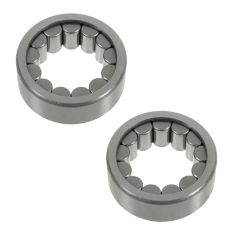
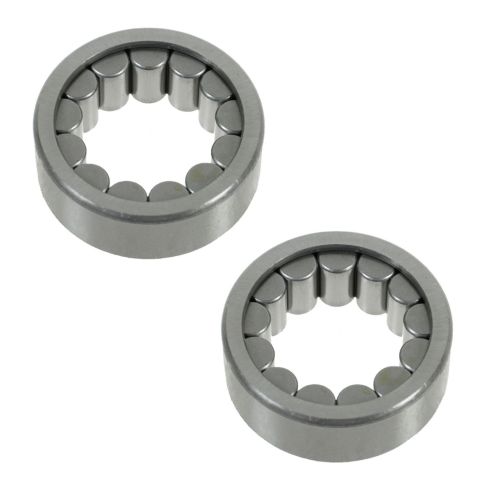
In this video, we're going to show you how to replace the rear axle bearing on this 2002 Chevy Suburban. It's the same part and similar process on these Suburbans from 2000 to 2013. The items you'll need are a new axle bearing from 1AAuto.com and this assortment of tools.
Start off by loosening up these lug nut covers. We'll fast forward as Don does this. Once those are all loosened up, you can pull the hub cab free. Now, you want to loosen the lug nuts preliminarily, raise the vehicle and remove them the rest of the way unless you have air powered tools you can do it while it's on the ground. Now, remove these two 12mm bolts. We'll fast forward as Don does that. Now, to loosen up your rotor, either use a C-clamp to squeeze it or a screwdriver through the middle of it and pry between the caliper and the brake disc and that loosens up the caliper so it comes off easier. Now, pry out the brake pads.
Now, remove these two 18mm bolts. Just use a piece of pipe to help break it free. We'll just fast forward as Don removes those two bolts. Now, pull your caliper bracket off. Pull the rotor off.
Now, on the differential cover, there are 10 to 12 bolts and our are pretty rusty so we use a cold chisel to knock the rust off of each side. These should be 13mm bolts if they're in good shape, we actually end up using a half inch socket because the rust has actually reduced their size a little bit. You'll see later we pound a half inch socket on there and are able to get them all off. We'll just fast forward here as Mike removes that bolt the rest of the way. Then, he's just going to repeat the procedure on each of those other bolts, all the way around the differential cover. For the higher ones, it does get a little more difficult and you will need an extension for your socket and ratchet to actually remove those bolts. Make sure you have a drip pan below the differential cover before you remove the last of the bottom bolts. You just want to remove those. Now, using your chisel, just hammer out on the bottom of the differential cover. Then replace the bolt at the top of the differential cover. Then use your chisel and hammer again on the other side and just let the fluid drain out.
After it's drained for a while, just pry out on the bottom and then remove that bolt and then pull the cover down and out. Now, if any debris falls down inside of here, as you can see right there, you just want to vacuum all of it out. Then take a rag, make sure it's somewhat clean and just wipe everything down and just stick this rag back in there. Then using a razor blade just cut off that old gasket along the outside. Then just use a wire brush to get any leftover residue of the gasket.
At this point, you'll probably want to have your vehicle in neutral, and rotate the chuck around, so you can see that 8mm bolt, right there, and remove the 8mm bolt. Then this pin will come down and out. Now, push your axle in, and then, again, you're going to want to have your vehicle in neutral so you can use the drive shaft and rotate the chuck around so you can see into where the C-clamps are. You can see that there's a clip on either side that holds either axle in. What you want to do is just use a stick magnet to pull the clip out on the axle you want to replace. There it is. Then the axle will just pull free.
The only way to pull a bearing is with the proper tool. You can see this one's actually too big because it doesn't even fit in the opening. This one could work but it's small and it'll end up possibly pulling the bearings right out. This one will be just right and basically, you just back this nut off, stick that in there, make sure it catches, and tighten that up. You actually don't even have to pull the seal out; you can do it all with bearing puller. So, just pull it out, tighten this nut up, this helps so stuff just doesn't go flying.
Take your new bearing, angle it right in and you'll want a good size tool. Go right flush on it and drive it straight in. There's a little line right here; it means it's all the way in. You should be able to see that. We just use a little bit of gear oil to somewhat prime the bearings, just make sure you work it all the way around. Then, carefully put the bearing seal back in, tap it straight in.
Then, slide your axle into place. You want to lift it up, careful not to drag it on the seal too much, you don't want to prematurely wear out the seal. Then once it gets in, into the machined area then grab the axle and I'm actually lifting up the inside of the axle where it goes into the carrier bearings on the inside. You just got to find the right spot. Once you do, it goes right in and then just make sure you push it all the way in so you can get the C-clamp on the other side. Now, put the C-clip back in place, you'll have to make sure the axle is pushed in further than it should go and then once you have it in place, you'll want to pull the axle back out and the C-clamp goes into place.
Now, we're using a new differential cover. So, we have a separate gasket, but if you're using your old differential cover, you want to make sure the RTV goes all the way around and that there's no gaps in it and you can see ours does have a gap but because of the other gasket that won't matter. Make sure you circle each bolt hole. Make sure there's no fluid on the outside here. Then take your differential cover and feed it up into place. You just want to replace the top bolt to hold it in. Then we'll just fast forward as he replaces the rest of the bolts. Make sure for this top bolt that you put this harness back into place then let the gasket sit for a minute if you used RTV and then tighten each of those bolts up. Then you just want to torque each of these to 15 foot-pounds in a crossing pattern.
Now, remove this filler plug, using your 3/8 ratchet and ours is in rough condition so we're just going to hammer the ratchet into place and then just remove that plug. Now, replace the differential fluid and you want to just do this until it starts to pour over the side. When it starts to pour over the side, you can just put your pinky in there and make sure that the fluid is right to the top of the filler hole. If it is then you are all set. It's all the way up there. You can replace your cap. Now, jut tighten it up with your ratchet and you're all set.
Slide your new rotor into place and then twist on a lug nut to just hold the rotor in place while you put the caliper bracket back on. Then put your caliper back into place and replace those two 18mm bolts. We'll fast forward as Don tightens those up. You want to torque these to about 85 foot-pounds.
Push your brake pads back into place. Then, put your caliper back down into place and replace those two 12mm bolts. We'll just fast forward as Don does this and tightens them up. You want to tighten these to about 30 foot-pounds.
Put your wheel back into place and then replace your lug nuts and tighten them preliminarily. We'll fast forward as Don does this. Then, torque each of the lug nuts to 100 foot pounds in a crossing pattern. Then replace that hub cap and tighten up each of your lug nut covers.
Before taking the vehicle out on the road, you want to just pump the brake pedal until it firms up and then do a stopping test from five miles per hour and then 10 miles per hour and you're all set.
We hope this video helps you out. Brought to you by www.1AAuto.com, your source for quality replacement parts and the best service on the Internet. Please feel free to call us toll-free, 888-844-3393. We're the company that's here for you on the Internet and in person.
Tools used
I'm gonna take the center cap off, use a straight-blade screwdriver. Get it off. Use the 22-millimeter socket. Take off the lug nuts. Take the wheel off. Take these two caliper bolts out. I'm gonna use a 12-millimeter socket, and then, a 16-millimeter wrench just to hold the slide from spinning. Loosen these up. Now just use a screwdriver. Pry the caliper off.
And you can use a caliper hanger, just support it from the upper control arm right there. Just make sure there's no tension on the hose. Slide it over here. Take the brake pads off, use the same straight-blade screwdriver. And take an 18-millimeter socket. Take these two caliper bracket bolts up. Take these bolts out. And slide the bracket right off.
Now take the rotor off. It's stuck on there, just take a hammer. Give it a tap in these areas, just try not to hit the studs. Should be loose. Try not to breathe any of that in. Remove the rear wheels and remove the rear brakes on both sides.
Now, I removed the spare tire. You don't need to but it gives you a little extra room. And I need to remove this bar from this side. I'm gonna take this bolt out. And there's a nut on the other side. So use a 21-millimeter wrench or 13/16, and a 21-millimeter socket. Take this out.
I'm just gonna use a pry bar to pry this out. And if it's in your way, just use a bungee cord. Just get that out of the way. Some of these bolts are pretty rusty, so just use a wire brush, try to get some of the rust off. It's always a good idea, before you remove the cover, especially if you have to reuse it, to pull the fill plug out first. Just to make sure you're able to. Because if this fill plug is stuck in there, you're not gonna be able to add fluid. And just use an extension. And you might have to use a screwdriver to clean anything out. Just use a pocket screwdriver, clean some of the rust out. Take a hammer...tap it in there. And pick this out.
I'm gonna take a 13-millimeter socket, an extension. Because these are rusty, I'm gonna hammer these on a little bit...and loosen this up. This one has the brake-line bracket, just grab that and just pull that out of the way a little bit. Try to get some of that extra rust off of there. I'll take these all up. Make sure you have a drain bucket underneath because you're gonna wanna catch the fluid.
Okay, all those bolts are out. Except for the top one, it's just a little loose. Just take a pry bar and a screwdriver and just slowly pry the cover out. Let the fluid drain in your drain bucket. Take that top bolt out...and grab the cover. Just slide it off.
We wanna take this pin off. If your rear differential or the carrier is not indexed so that you can access this, you're gonna have to put the transmission in neutral and rotate the drive shaft until you get to this point. Then use an 8-millimeter wrench, or a socket, and loosen up this pin. Take this bolt out which has got a pin on the end of it that holds that pin in there. And we can just slide this out. Just like that.
So, now make sure your vehicle's in neutral. Then you're gonna rotate the drive shaft. You wanna get to this point where you can see where the clips are gonna be. There you go, push on the axle. Push it in so you can access the clips that hold the axles in. You should be able to access the clips. Use a magnet, try to get the clip out. A little too far. There we go. And slide that out.
You just wanna make sure you don't rotate it because, when you rotate it, you're gonna mess up the spider gears here and it's gonna be very hard to reinstall those. So, then just grab the axle and slide it out. And it might be kind of difficult. You can use a piece of wood to give you a little more leverage. And just carefully slide this. Eventually, it'll be a little bit easier. There we go. Just grab the axle and slide it up.
Now I'm gonna use an axle seal puller. There's many different seal pullers you can try to use. Most of them don't really work that great. This works okay sometimes, but a lot of times it's gonna end up ripping the seal. Let's see. Just like that normally what happens, you know, just try using a pry bar. And there we go. You just wanna be careful not to scratch the inside. Pop it off. You don't wanna scratch that. And it came out good.
Now we're gonna need a bearing removal tool, something similar to this. We'll have to use this in combination with the slide hammer and just slide this in. What happens is, when this slide's in, then you want this to go like this. And then, we'll tighten this washer down and that'll hold it. All right. Now we're gonna slide this out. As you can see, the bearing's starting to move. Here we go. And take the new bearings. And you want an installer that's smaller than the outer case of the bearings but you don't want it so small that it's pushing on the little rollers. So, I'll just slide this in position. Make sure it's nice and flat. Take a hammer and tap it in. It's good.
And you can take a little bit of emery cloth or some sandpaper, even a little scuff pad, and just sand some of this rust away if there's any. Just clean that up. All right. Now take the new seal. You can use a seal installer, just make sure it's big enough to fit on the outside edge of the seal. And if you don't have a seal installer, you can actually just use a block of wood, which actually most of the time works better. And just take a hammer, just give it a tap. Looks good.
Now, before I put the axle in, I'm just gonna take a little bit of the axle lubricant, just pre-lube these bearings. You could do this before you put them in, if you wanted to. And take the axle and just slide it in. And you're gonna wanna hold it up a little bit. It may take a little bit of practice trying to get it to line up in the carrier. There we go. And, if you twist it, just don't twist it too much because you don't wanna mess up those spider gears. You know, just push it in. Now grab this retainer, or a clip, slide that back in position, while you're holding it right there, just take a pry bar, pry it out on the axle. That's good, it's in place. You can do the same procedure for the other side.
All right. So those retainers are back in place. We can turn the drive shaft back to line this pin in, pin up that to line up. And then, make sure you put the hole, so that we could put that other retainer in there. I'm gonna have to tap this a little bit. Use the backside of a hammer or something. And then, take this screw that's got the pin on it. Get that to line up. And tighten this down. And tighten this up. Try to tighten it about how tight it was when you took it out. If you can get a torque wrench in there and you have an 8.6-inch rear end, you're gonna tighten that bolt to 27-foot-pounds. And if you have a 9.5-inch rear end, you're gonna tighten that to 37-foot-pounds.
At this time, you can put the transmission back in park. All right. And you're gonna take a razor blade or a scraper and just scrape off the old gasket material. Do this on the housing. And then, if you're gonna reuse your old cover, you wanna scrape it off the cover as well. You could also use a scuff pad to try to clean some of that up. And then, just use some brake parts cleaner on a rag, wipe it down.
Now take the cover. We have a new cover that we're putting on. Just line the gasket up like that. There's a bigger part of the gasket that goes on the ring side. Slide the cover in place...and then, get all the bolts started. And make sure you pull this bracket over. I'm gonna torque these bolts to 30-foot-pounds. And we're gonna do that clockwise. So, go right around. All right, take this bungee cord down...and slide this bar back into position. The bolt, line the bolts up. You might have to pry the whole axle over a little bit right there. There we go. Take the nut, put the nut on the backside. And tighten this up. Put the wrench on the backside, get that good and snug. Take a 10-millimeter hex bit and loosen up this fill plug. This new cover has a fill plug on it. Or you could always go to the fill plug that's on the differential. If you loosen that one up earlier, make sure you tighten that up. Take that off.
If you have a rear limited slip differential, you're gonna wanna add limited slip fluid additive. And if you're not sure, it doesn't hurt to add some anyway. But you always put that in first. And a lot of times a lot of the fluids have the additive already in it but it's always good to add a little extra anyway. And you're gonna fill up the rear differential until the fluid starts pouring out of the fill hole. To determine what kind of fluid, you can always check your owner's manual. Yep. And you wanna make sure the fluids right up to the bottom of the fill hole. Normally, plug it off for a minute and double-check. Yep. It's right up there. Let that drip out for a second. Now take the fill plug. Get that started. Make sure the gasket's on there. Yeah, and snug this up. That's good.
And take a rag, just wipe off the excess. If you have a little underneath, use a little brake parts cleaner. Now you can reinstall the brakes on both sides and put the wheels on. You're just gonna clean up this surface right here and you can use a wire brush or some type of grinding wheel. Just be careful, you don't wanna take too much material off, just get some of the rust off.
Take a little anti-seize. Just put it on the hub area right here. Yeah, we're just gonna put the rotor on backwards first. And we're gonna clean off the surface. Use a little brake parts cleaner. There is a protective coating on this. Clean that off. You can clean off the inside of the drum area as well for the parking brake. Flip it around and clean off this area as well.
When you go to put the rotor on, you may have to adjust the parking brake. You can spin that wheel either forward or backward and it'll either tighten it or loosen it. Just slide the rotor on, just to make sure it spins good. And then, double check with your parking brake and adjust accordingly. Slide the brake caliper bracket in place, put the bolts in. You can use a little thread locking compound on the bolts.
Now I'm gonna torque these bolts to 122-foot-pounds. Now I'm gonna install the brake pads. Make sure you have the brake-pad warning indicator facing up...on the outside and also on the inside. Now take a brake caliper off. Take the hanger off. I have to compress the caliper, so use a brake caliper compressing tool, just compress it really slow. This is gonna push the fluid through the hoses back through the lines, back up to the master cylinder and into the reservoir. Just go nice and slow. All right, that's compressed. Pull the compressing tool out.
Now we have a new little bracket right here, comes with the brake kit. Just take a straight-blade screwdriver. This little tab right here, just push in on that tab. Slide that off, take the new one. Slide it in there. Just push it, lock it in place so that's in there just like that. That's just gonna push down on the pads to just keep them from rattling around. Slide the caliper over the brake pads in the bracket. Take the two bolts, install the bolts. I'm gonna put some thread-locking compound on those bolts and use my 16-millimeter wrench, 12-millimeter socket, torque these bolts to 31-foot-pounds. And reinstall the wheel. Put the lug nuts on.
Now we're gonna torque these lug nuts to 140-foot-pounds, in a star pattern, to tighten the wheel down evenly. And just go around again. Double check. And reinstall the center cap. Now we're gonna pump the brake pedal nice and slow. There's gonna be an air gap between the caliper piston and the brake pad. So we wanna eliminate that air gap. Once the pedal feels good, then you're all set. Check the brake fluid level in the master cylinder reservoir. There's the minimum line right there and the max line right there. Adjust accordingly.
Tools used
Tools used