Replaces


Recommended for your 2003 Infiniti I35
Frequently bought together
About TRQ:
TRQ is a trusted brand dedicated to making every repair a success story by combining premium parts with easy installation. Each TRQ part is engineered by a team of automotive experts to meet or exceed OEM standards, delivering enhanced performance and maximum longevity. With rigorous in-house testing, the brand ensures superior fit and function across every product line. TRQ also provides customers with best-in-class, step-by-step installation videos—so you can complete repairs with confidence, whether you're a first-time DIYer or an industry professional.
Attention California Customers:
 WARNING: Cancer and Reproductive Harm - www.P65Warnings.ca.gov.
Lifetime Warranty
This item is backed by our limited lifetime warranty. In the event that this item should fail due to manufacturing defects during intended use, we will replace the part free of charge. This warranty covers the cost of the part only.
FREE Shipping is standard on orders shipped to the lower 48 States (Contiguous United States). Standard shipping charges apply to Hawaii and Alaska.
Shipping is not available to a P.O. Box, APO/FPO/DPO addresses, US Territories, or Canada for this item.
Expedited is available on checkout to the United States, excluding Alaska, Hawaii.
Final shipping costs are available at checkout.

Created on:
Tools used
Brought to you by 1AAuto.com, your source for quality replacement parts and the best service on the Internet.
Hi, I'm Don from 1A Auto. I hope this how-to video helps you out, and the next time you need a part for your vehicle, think of 1AAuto.com. Thanks.
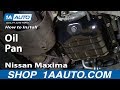
In this video, we're going to replace the oil pan on this 2003 Nissan Maxima with the 3.5 liter V6. This procedure is pretty much the same for any Nissan from the 2000 and 2006 Nissan and Infinity that has this 3.5 liter V6 engine. You'll need a new oil pan from 1AAuto.com, some jack and jack stands, 10mm and 14mm sockets with a ratchet and extension, a fluid catch basin, a torque wrench, and some replacement oil. And if you'd like, probably a good time get yourself a new oil filter and just do a complete oil change at the same time.
You can locate the oil pan the front right of the car under the engine. I'm removing the 14mm drain plug and making sure my oil catch basin is directly underneath. With the oil almost completely drained, I'm just going to reinstall the drain plug loosely. I'm removing 10mm bolts that hold the oil pan to the block. There's 10 of them all the way around. We'll fast forward, here, as Don is removing those bolts. They should come out fairly easily. You're not supposed to tighten them much. You only tighten them up to about 12 foot-pounds when you reassemble it. If you are concerned with the pan falling down, just leave a couple bolts in until you have your catch pan in position and everything.
Usually, these are RTV'd on there, so you can usually just take all the bolts right out and then you'll have to either pry the pan off, or we just use a hammer. Since we're replacing it, we just use a hammer and give it some love-taps until it breaks free of the gasket. Don actually, he was hitting the lower part of the pan. He was not hitting up near the lift or anything. He was hitting the lower part of the pan to break it free.
Using a flatbed razor, scrape off any extra dried RTV/gasket sealant that they used. Apply silicone RTV to the new pan. I'm just going to speed it up as I go around. We use any good quality RTV gasket maker. You can get it at pretty much any automotive place. Just make sure you follow the directions for a good seal. I've scraped clean the bottom of the lock and wiping down, now, to get any residual oil. You can use any kind of automotive cleaner. Once I've done that, the pan's ready to go up.
Reinstall the 10mm bolt finger tight. Come around the back, do the same with one more. I'll just speed up, here, as Don basically put in all the bolts, put in by hand first just to make sure that they go in correctly. Then he goes and basically kind of preliminarily tightens them up using an opposite pattern. One on one side, go to the opposite side, tighten it, and work your way around the pan.
Now, after tightening up preliminarily, we're going to use a torque wrench and tighten them to about anywhere between 12 and 15 foot-pounds. Again, kind of using that opposite method, tighten one, go to the opposite side, tighten the next one, go to the opposite side, and work your way around the pan. Make sure drain plug is installed and tight. Depending on the RTV you use, you make have to wait to fill the crank case. I'm filling the oil back up to the manufacturers recommended level. Just insure your oil level is at the right level by checking it with the dipstick. Then, obviously, check underneath the car. Check every few times you drive it, so just to make sure that you don't get any oil leaking and you've got a good seal on the pan.
We hope this video helps you out. Brought to you by www.1AAuto.com, your source for quality replacement parts and the best service on the Internet. Please feel free to call us toll-free, 888-844-3393. We're the company that's here for you on the Internet and in person.
Tools used
Hi, I’m Mike from 1A Auto. We’ve been selling auto parts for over 30 years!
Raise and support the vehicle. I'm standing at the front of the vehicle. On the passenger side of the vehicle, this is the engine oil pan. On the driver's side of the vehicle, this is the transmission fluid pan. You be very careful when you're under here and you don't get these confused, because you don't want to drain your transmission fluid and then think you've drained the engine oil, and fill up the engine oil after you've changed the transmission oil. Got to make sure you drain the engine oil from this pan here, and then change your filter, and then refill your engine with oil.
Have your drain plan in place. Take that 14-millimeter wrench and remove the drain plug. If you're doing this after the engine's been running, be careful. The oil will be warm or even hot. Reinstall the drain plug. Just hand tight. We're going to change this engine oil pan, 'cause it's very, very rusty. Now, we've already drained the oil, so now is a good time, when you change this pan, to do an oil change. So you should have those things on hand before you remove this oil pan.
I'm going to take a 10 millimeter socket and ratchet. I'm just going to move the drain pan out of the way while I loosen these. These are 10 millimeter. Those are very, very rusty. Just have to work my socket over it. So I'm not going to pull it out fully. I'm going to loosen all of them first. That's about all I can reach with my socket and ratchet.
So now, I'm going to get a box wrench and a ratcheting wrench to get the one that's back here. The one that's over here, here, and here. With these loose, I'm going to switch to a ratcheting wrench. With the bolts on the side with less clearance removed, now I can switch back to the socket and ratchet to get out the easier ones. Pan uses an RTV gasket, so it shouldn't just fall off once you undo the bolts. We'll have to pry it off. That's all the bolts. Now we'll pry the pan off. Got our drain pan at the ready underneath. Going to use a pry bar. There's a little tab back here. I'll try to pry that up, maybe that'll work. I might have to hit it with a rubber mallet. Use a rubber mallet to try to break it free. So just a series of using different pry bars and a cutting knife. I just tried to break the seal on the RTV gasket. This one is just really stuck. There it goes. So, break the seal.
Try to pry against the oil pan and not up inside, because you don't want to damage any of the internal components up in here. That's why you have the drain pan, because there's going to be some oil in the bottom of this. Just going to try to drain that down. This is one of the reasons why you want to pry against this surface here as best you can. Don't stick your pry bar or whatever you're using in here, you can damage this oil pickup. I very carefully lowered it, still oil in the pan. Dump it out. See our oil pan's pretty rotted, it's kind of thin and it could start leaking. So that's why we're replacing it.
I'm going to take a razor blade and clean off all this old RTV, just put it straight up and down and just scrape away, get this nice and clean. As we go to reinstall, we're going to put new RTV on the oil pan. With all the RTV scraped off with the razor blade, I'm going to take some brake parts cleaner and a rag, and wipe down the surface some more. Any bits of RTV that are left out, like that, just take 'em off.
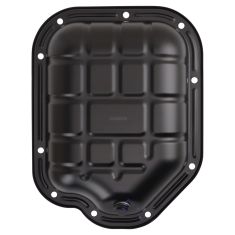
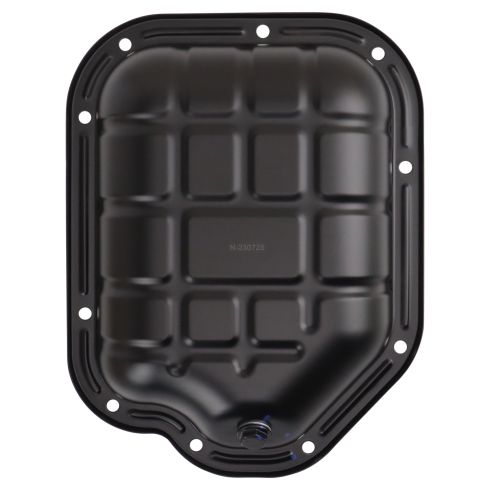
Here's our old pan from our vehicle, and here's our brand-new pan from 1aauto.com. You can see where this pan is. It's bent from where I was taking it off. This is where the RTV silicone was sitting that gave us so much trouble getting it off. You can see it's really rusted and it's starting to get thin in some places. That's why we've decided to replace it. This one from 1aauto.com is an exact match for it, has bolt-holes in all the same places, and already comes with a drain plug installed. I'm going to apply some fresh RTV silicone to the sealing edge here, install it, and it'll work great in our vehicle.
Going to put our RTV silicone bead onto our new oil pan. It's going on the inside of the holes. I'll just sort of take some of this stuff, more towards the inside. You just want a good amount 'cause it'll squoosh down and seal between the steel part of the pan and the upper aluminum oil pan on the engine. I've got my bolts handy. I'm going to take a rag and just wipe this extra oil that's dripped down while it was sitting here. I've already cleaned this surface really nicely with my razor blade and brake parts cleaner. Put our drain plug went towards the back. It's in place. Take one of the bolts. Doesn't matter which hole you start with, just get it up there so it's held in place.
Move our drain pan out of the way. Just continue installing all the bolts. We tighten these in sequence. This will be bolt number one. This will be bolt number two. And those are all tightened. You can see the RTV silicone is squeezed out along the edge. It's formed a nice seal. One last thing I will do, so we want to let this dry for about 30 minutes before we add oil, but one last thing I want to do before we add oil, I'm just going to double-check that this drain plug is tight, even though this pan is new and it did come installed. We just want to double-check that it's tight. Put my 14-millimeter wrench on here, give it a turn, and make sure it feels tight. Yeah, that's good, right there.
This is our new filter. We got a genuine filter from 1aauto.com. We're going to remove the old filter, located up here behind the splash shield. Place the drain pan underneath. Pull the splash shield out of the way, take our oil filter wrench, on the oil filter, turn it off. I'm going to let that drain before I take it off fully. Remove your oil filter. It's very loose, I'm going to take the wrench off of it. Oil filter's loose, and I'm going to remove it. Let it drain into my pan. Place that aside. Make sure the old gasket is not stuck. Nope, it's nice and clean there.
Take our new OEM filter we got from 1aauto.com. It comes with a plastic cover, just kind of heat-shrink on here. Just going to peel it off, throw that away. I'll take a little bit of oil from here, from the oil filter mount, I'll take a little bit of oil from that. Little more. Put it on the O-ring. Wipe my fingers off so they don't slide everywhere. Install the oil filter. And I will get it as tight as I can by hand. And the oil filter's installed.
I'm going to wipe up all the extra oil that leaked out. Just going to take some brake parts cleaner, just clean up some of the spilled oil, and just wipe up anything else with a rag. Fill the engine with the recommended weight and quantity of oil. For this engine it's about four and a half quarts. About four and a half quarts. Run the engine, check for any leaks, let it sit for a few minutes, pull the dipstick. Check your oil level, probably at the high mark.
Thanks for watching. Visit us at 1AAuto.com for quality auto parts, fast and free shipping, and the best customer service in the industry.

OPA07993