Replaces


Recommended for your 2007 Acura RDX
Frequently bought together
Part Details
About TRQ:
TRQ is a trusted brand dedicated to making every repair a success story by combining premium parts with easy installation. Each TRQ part is engineered by a team of automotive experts to meet or exceed OEM standards, delivering enhanced performance and maximum longevity. With rigorous in-house testing, the brand ensures superior fit and function across every product line. TRQ also provides customers with best-in-class, step-by-step installation videos—so you can complete repairs with confidence, whether you're a first-time DIYer or an industry professional.
Attention California Customers:
 WARNING: This product can expose you to chemicals including Lead and Lead Compounds, which are known to the State of California to cause cancer, and birth defects or other reproductive harm. For more information, go to www.P65Warnings.ca.gov.
Lifetime Warranty
This item is backed by our limited lifetime warranty. In the event that this item should fail due to manufacturing defects during intended use, we will replace the part free of charge. This warranty covers the cost of the part only.
FREE Shipping is standard on orders shipped to the lower 48 States (Contiguous United States). Standard shipping charges apply to Hawaii and Alaska.
Shipping is not available to a P.O. Box, APO/FPO/DPO addresses, US Territories, or Canada for this item.
Expedited is available on checkout to the United States, excluding Alaska, Hawaii.
Final shipping costs are available at checkout.
Created on:
Tools used
Hi. I am Micheal from 1A Auto. We've been selling auto parts for over 30 years.
The hood release cable on this vehicle is located on the driver side kick panel, right down on the side of the gas release door is. It's down on the flat part. Pull, and release.
The safety latch is right above the H. Reach in there, move it aside. Bring her up. Now you can put your hood rod in the location which is marked by an arrow. The first step is to remove the power steering reservoir. Just disconnect it from the bracket and set it aside so that we have access to take the serp drive belt off. Serpentine drive belt.
So, that is on a bracket that slides in, so the lock tab has already been pushed off. And it gets rusted sometimes so you have to work it back and forth. And slide it out.
Now you can move it over here, and remember not to disconnect any of the hoses. There's no need. And now to take the serp belt off, the tensioner is right here, and that is the head of it. And you're going to be using a 14 mm wrench. The longer the wrench, the more leverage you can get. And you're going to slide that on. And you're going to go with the tension. So on this, you're going to go, pull the wrench down clockwise. So I'm going to go to the right. Take the tension off the spring so I can take the belt off.
Reach my hand down, slide it off that power steering pulley. The tension is going to pull the wrench back. That is one tight spot. Now I can pull the belt off the rest of the way. Let me get that out of the way. Okay. Now the next step they say is to remove the power steering pump. Now to remove the power steering pump, we're going to use a 12 mm wrench, and get up here and break this top bolt free. Now we can move down to the secondary mounting bolt. So I am going to use a 12 mm socket with a short extension, and it's beyond the vision. So I can see it almost through the pulley.
There we go. Okay. And now we're on. Going to break it free. Now I am going to go ahead and move the upper bolt out the rest of the way, using a ratchet wrench. Beautiful. Finally. So now that the pump is dismounted, we're going to undo the bungee cord and see how much we can get this out of our way. I'm going to remove the AC bracket line right here, just so that I can get a little more flex and accessibility to the power steering. Okay. Let's see what we got here. And you don't want to bend it too much. It is aluminum. It's going to give a little bit.
And now that that's much better. Out of the way. We can, really going to be able to see the serp belt tensioner that we are removing. I'm going to get my bungee cord again and move this out of the way. So, the two mounting bolts for this serpentine belt tensioner is one is here, and the other one is located down in the back. You can barely see it with your eyes. I took awhile looking at this to see how I was going to get to that back bolt, and it's not a normal practice to take a tensioner apart, meaning the actual pulley off of the tensioner, but in this case, this is the way I think we're going to have to remove it and install it. So, I'm putting a 14 mm wrench on the bolt that attaches the pulley to the tension and I'm going to break it free. Once that's broken free, I can just use my fingers, pull the bolt out.
Now I can set that aside. So, the mounting bolts on this are 12 mm sockets, and there's two of them. And after quite a bit of mulling over, I've discovered my quarter inch set is what will fit in there the best. You can barely see it from the back there, and then you are going to break that free. I'm going to go ahead and loosen the front one before I take the back one all the way out. Now I can take the ratchet off and use the extension and socket probably by hand.
Take that out and set it aside. Now I don't know at this point whether the back bolt and the front bolt are the same length or if one is shorter or longer, so I'm going to make sure I place it in order, so I don't mix the two up. I'm going to slide my hand in the back there, find it, and just unbolt it. Okay. She's ready to come out. Let's compare an see if they are the same length. So that's the rear. I'm going to put that on the back side. I'm going to put that in the front. They are. So good. No confusion here.
So, there's three mounting bolts on this serp belt tensioner. You got one here, one there, that's hard to see. You can only really see it with your ... once you get your socket up in there. And then there's a center bolt here, in the center hole of this tensioner. It's 12 mm socket. See if I can get that by hand. Use a deep 12 mm socket. See if I can get in there. Yeah.
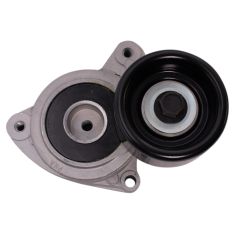
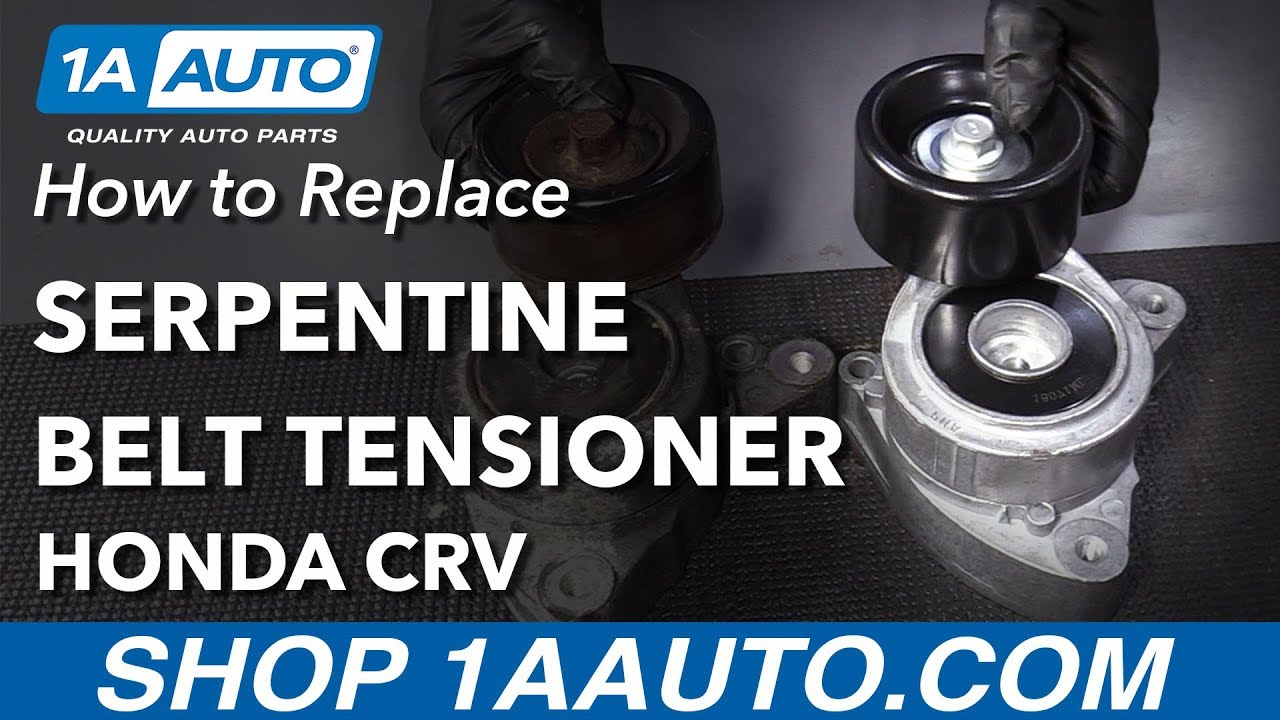
See if that's enough. Okay. And pull that socket out. Pull that bolt out. And that is longer than the other two mounting bolts. So I know that goes in the center, and those two are the outer edges. Now with all of the bolts out of the way, should be able to slide this right up. So here we have a '09 Honda CRV serp belt tensioner. The new one from 1aauto.com, and the factory one. They both have the same height, mounting, drilled hold for the power steering pump, and as you can see, both pulleys are the same diameter for the serp belt. Nice milled aluminum for a flush fit.
Don't forget to get your parts of 1aauto.com.
Okay. So now we're going to install the serp belt tensioner that we bought from 1aauto.com. And I am going to mount the front mounting bolt and the center bolt. And then I have to take the pulley off to get that back bolt in, but I need it to be bolted and firmly in place in order to loosen that up. So we know that the center bolt was the longer bolt of the three. I'm going to put that in first. I'm going to start the front one. I'm going to use a nice little quarter inch set up to snug that down.
Take that extension off. And I don't really want to tighten these up yet because the back hole, you want this tension to move around a little so that you can line that bolt up. So now I am going to have to take this pulley off, the tensioner, in order to install that back bolt, and that's a 14 mm head on that bolt, so I am going to use my quarter inch ratchet. Get in there and I am going to break that free.
Take that off by hand. There's a nut in the back, so if you can put your finger down through here and ensure that nut doesn't get pushed out, because obviously you're going to need that for installation. I'm going to set this aside. And I'm going to get the back mounting bolt. See if I can get my hand back in there and install it. And now I'm just going to come in at this angle. I can feel it, and it's right above there. Perfect. See if I can wiggle this around a little bit. Find the threads. I got it. It's really tight spot. Don't let your fingers get in there. As long as you get a couple turns with it and you feel comfortable, then you can go ahead and put your socket on and turn it in the rest by hand.
So I got my 12 mm quarter inch drive deep socket on there. Tighten that right up with my finger. I'm going to tighten the top one here. That's pretty snug. So is this one. So now I'm going to get ready to torque this down, once I get this center bolt bottomed out and this one. The torque on these mounting bolts is 16 foot pounds, so we're going to give that 3/8 or maybe even a quarter inch torque wrench in there and top those down to 16 foot pounds.
Okay. So 16 foot pounds with these mounting bolts. Okay. Let's hope we can fish it down in the back there. Get my arm out, maybe I can get some throw on it. That was it. Okay. Gonna use a short socket to go inside here. 12 mm. There we go. So now it's time to reinstall the pulley on that tensioner.
So on the old tensioner, I'm going to show you how that mounting nut for this tensioner bolt, how it just goes through. It has a seat in the back. It has a cut out of a hex and that's why I'm going to be bringing my hand down and holding it on the new tensioner so when I start this bolt, it doesn't push it through and you don't lose it in the engine. So now with my hand on there, I'm going to work the other one in. Okay. There we go. I can see now. There we go. Bring that up. Perfect. I'm holding the nut in the back and I can thread this bolt right in and assure myself that that nut is not going to push out, drop into the engine. Okay. Now, the time to torque this, and the torque on this bolt is 43 foot pounds.
So, I can't get a torque wrench in there, so I am going to have to tighten this with a quarter inch ratchet. It's a 14 mm socket, and it's 41 foot pounds is the torque spec, so I'm going to really give it a good ... and that should be good. I mean, I'm pushin' on that tension on the spring and I felt it move about a good quarter inch once it bottomed out. So i feel it's going to be plenty tight enough. So, before I would install the power steering pump, I would get my serp belt diagram, look it up, and start my belt on the bottom pulley so I can see it clearly.
Now I am going to partially install the serpentine belt on the down below part, by the crank and the water pump and the AC. So it's easy access at this point without the power steering pump installed. Okay. Here we go. So, just want to get it on the AC and the crank wind up properly. There we go. I think I got it now. Yep. So thats gotta go around AC, I mean the alternator. Okay. So I've now got that pulled, lined up correctly. I'm just going to set that aside. Get my light out of there and install the power steering pump.
So now with the belt on all the pulleys down below, lined up in the grooves, I'm going to reposition my power steering pump. Okay. Get my mounting bolts. So I'm going to mount the power steering pump. I'm going to put the top bolt in first. Snug that up by hand. There we go. I'm going to use my quarter inch ratchet with 12 mm socket. See if I can get it to start.
Now I'm going to go down below and put the other bolt in. The bottom mounting bolt. This is a tight fit and hard to even see, but I'm going come into this angle. Okay. I got it started. That's good. See if I can get my ratchet wrench in there and start it. Tighten it up instead of a socket. The torque specs on the power steering mounting bolts is 16 foot pounds. So I am just going to snug them up and then I am going to grab my torque wrench.
Now with both mounting bolts snug. It's 16 foot pounds. Then I am going to go to the top. There's a lot of problems with torque wrenches. Sometimes they don't fit in places. See if I get my socket on first, if I can slide the torque wrench in enough. No it's not going to fit in because the head of pulley and the head of torque wrench is too thick. So, in that case, I'm going to tighten it, snug it right now. Going to use a 3/8 ratchet. So make sure I get a good snug on it. So, 16 foot pounds is really not that tight, so a good quarter of a turn. That's guarantee to be fine.
Now we can install the belt. So now that I have my power steering pump mounted and torqued on the top of the engine, I took it to liberty of raising the vehicle and taking down the passenger inner fender well splash guard so I can access the drive belt a lot easier. So I have my serpentine belt tool, 14 mm socket up on the tensioner, and I'm going to push it clockwise and slide the belt on the crank. And let the tensioner back down, and remove my tool. And now I'm going to just double check. You want to make sure it's in every groove and not overlapped on any pulley. Looks great. Now I can reinstall my passenger side splash guard, and lower the vehicle.
So now that I've lowered my vehicle, and remounted the inner fender well shroud, rain shroud, I am going to install the reservoir, and that's simply plastic guide clicks down on this lock. I'm going to line up my hose here, make sure that goes in place. And slide it down. That's in place. Nothing is in the way and now I can take my AC line, bring it back over and remount that. And that was a 10 mm head bolt with a nice big flat washer.
There's no torque for this. It's just a bracket, so we're just going to snug it right down. It's got a nice rubber bushing. And, that's good. And now we're all set. We're done.
Thanks for watching. Visit us at 1aauto.com for quality auto parts, fast and free shipping, and the best customer service in the industry.
Tools used
Hi, I'm Mike from 1A Auto. We've been selling auto parts for over 30 years.
Hey everyone, Sue here from 1A Auto and today on our '06 Honda Element we're going to be replacing a serp belt tensioner. If you need that part or any other part for your car, click on the link below and head on over to 1Aauto.com.
Going to take two of these plastic pins out, there's one. The plastic clips on this car are all busted. They have been since the first day so I'm replacing all of them. Hopefully you don't have this frustration and yours are working properly. I never thought I'd say make sure you're wearing safety glasses when you take plastic clips off. Now with all those clips out of the way we can bring this plastic shield down enough that we can get to the belt, so now I'm going to bring the vehicle down and go from the top.
I'm going to be removing this front mount. I already have a floor jack underneath on this end with a wooden block on it and I'm just snugging on top of the oil pan. Not a big fan about using the oil pan but we're not going to actually be jacking or hoisting anything up, we're just supporting it and we're probably going to move it up like two inches.
First thing I'm going to do is disconnect the three mounting bolts for this and that's a 17 millimeter socket. I already took the liberty of spraying these things down because it doesn't look like they've been off for years. You want that engine supported right now even though you're just loosening these up because the engine will actually start to ... As the mount is on, it will start to pivot down and the bolts will get pressure on them and you could end up crossing threads, stripping it actually.
So I could take the nut and the washer off. Well, there's no washer. Take the nut off the side that's not on this mount and I can still work on the other two bolts. Now I can take the nut off that long stud. This side has a washer definitely. There we go, several washers, and then the bolt. Now with the engine supported I'm going to pull this ... I have to take this ground strap off, 10 millimeter. Now we can really see the serp belt tensioner and how easy it's going to be and the movement that we have.
So a 14 millimeter wrench and I'm going to put pressure on it. Actually, I'm going to pull on it and that releases the tension. Now I can slide the belt off, bring that tensioner down, get the belt out of my way. Now there's a crank down below and the AC compressor and that's why I took that plastic splash shield off earlier. Sometimes because the belt is so wide you just have to twist it and guide it up, pull it out.
There's two mounting bolts to the power steering pump and they're a 12 millimeter socket. They're really easy to get to. There's one right there and then one directly below this pulley. I can just feel it with my hand, so that's a 12 millimeter socket. Once you have those broken free, so now when I take this top bolt off I'm going to set it aside and mentally make a mental note that that's for the top before I pull the bottom one out and then I will make sure that they are the same length before I mix them. This is not something you want to be feeling with what you can't see and you're wondering why it wouldn't tighten up when you put it back together. That's too short.
Let's see if they're the same length, and they are, they're identical so now I know I can use either one on the top or bottom. Now just grab your power steering pump and just set it aside. Clear up, clearly out of the way and here we go. There is a hidden mounting bolt on this and it's right inside here so there's one in front, one inside there, and then one below this pulley. They're all a 12 millimeter socket. One right here. I almost physically cannot see any of these, I can just feel them. I do not want to take the pulley off because that would mean that I would have to take the pulley off the new one to install it and I don't want to do that.
I think I see ... I'm going to need just a slight extension I think. So I ended up using a one inch extension with a 3/4 inch deep socket. Now I can get in there easy. I'm going to get that front mounting bolt out of the way, set that over here. I'm going to grab the one in the back. Take that back mounting screw out of the way or bolt. Now the last one's a center one. That's the longest, can lift it right up out of the way.
Here we have our new serp belt tensioner from 1A Auto. It comes with already mounted pulley bolted on there. This is the factory serp belt tensioner and you can see a lot wrong with this one. They're identical in design except that this one is old and worn out. You can see when I go spin this pulley it stops because it's a sealed bearing and it's not worn out yet. This one the pulley is rusted causing the belt to break down on the back side of the belt and it makes a lot of noise and the bearing is wasted. You can hear that.
If you need this part or any other part for you car, click on the link below and head on over to 1Aauto.com.
So now to install it I'm going to reverse procedure. I'm going to put the center bolt in first that way it will at least keep it centered and will keep the other two mounting holes. Put the front one in first and now the back one. Which if you look you've got them all started, make sure they're not cross threaded and we can take our 12 millimeter socket and start tightening them up.
Now that I have all three mounting bolts snug down I'm going to torque them to the spec and it is 16 foot-pounds. Just double check, it's not that tight but there we go. Now we're ready to put the power steering pump back. This has just the two mounting bolts. We'll keep the threads, install them by hand and then the last mounting bolt is the one on the bottom. Locate it. Tighten that one down.
Once I have both mounting bolts snug down, the torque specs is the same as the tensioner, 16 foot-pounds. Double check. Now we're ready to ... I think I'm going to install the bolts before I put the mount on.
Even though we looked this belt up and I hoped ... You know, I put in that is has power steering AC, I always double check before I go in there and get all frustrated and I basically put my two thumbs in and confirm that they're pretty much the same length. There's no obvious difference here other than that this is worn out and this has got some kinks in it from packaging so now we're clear to go ahead and install this.
So I'm guiding the new belt, keeping it flat as I can so that I can guide it down between the actual car frame or body should I say, and the engine block. These can be a bit frustrating. So I'm going down below and I'm going to make sure that I can root it around the AC and the crank and that I can take the top part of it and bring it around the water pump pulley.
Once you have wrestled with that belt and got it all lined up, can open the top here and the new tensioner is a 15 millimeter, not 14 and you're going to pull the tensioner. Before I let go of this tension I'm going to make sure the belt isn't all grooves, it's not misaligned, and I'm going to bring that tensioner down.
Now it's time to reinstall the mount. First thing I'm going to do is take that ground strap off and line up everything the best I can here before I lower the engine. Just going to snug that, make sure it's out of my way and now with everything pretty much ... At least it's on the long stud. I'm going to lower that engine slowly and let it down in small portions, make sure it lines up. I'm going to put that bolt in before I let that jack completely down and I'm going to thread those other two bolts on ... Nuts on. I'm going to add the washers that were on there and put those on.
Now I can just thread all these ... The bolts and the two nuts down with my 17 millimeter socket and don't forget to tighten up that 10 millimeter. Now it's clear to let the engine the rest of the way down and remove your jack. Now I've got new clips to put in the splash shield. Just line up the holes and push the tab in. There was three that we took out to do the dry belt. There we go.
Thanks for watching. Visit us at 1Aauto.com for quality auto parts, fast and free shipping, and the best customer service in the industry.

BPA03816