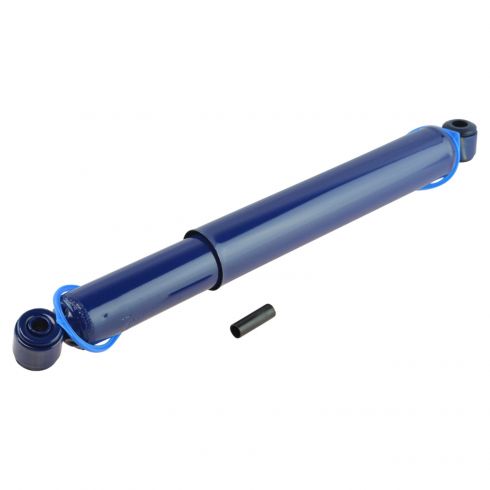
The Monro-Matic Plus® shock absorbers are nitrogen gas charged and feature velocity sensitive valving and all weather fluid, which offers trucks improved comfort at an economical price.
The result: enhanced control with uncompromised ride comfort.
All Weather Fluid: Contains special modifiers to reduce friction and ensure smooth rod reaction.
Full Displaced Valving: Tuned specifically for each application, this valving automatically adjusts to road extremes to provide consistency and ride comfort.
Sintered Iron Piston: Stronger than traditional metals, enhances durability for longer service life.
Nitrogen Gas Charged: For improved ride and handling, helps maintain tire to road contact by reducing aeration.
2" Reserve Tube: More fluid for more consistent performance.
1-3/8" Bore: Lower operating pressure than standard 1" bore units.
5/8" Piston Rod: Heavy-duty nitrocarburized rod* for long service life.
Special Seal: "Self-lubricating" fluid seal designed to retain gas without excessive wear or friction.
* On non-dust shield units only.
Item Condition:New
Lifetime Warranty
This item is backed by our limited lifetime warranty. In the event this item should fail due to manufacturing defects during intended use, we will replace the part free of charge. This warranty covers the cost of the part only.
FREE Shipping is standard on Orders shipped to the lower 48 States (Contiguous United States). Standard shipping charges apply to Hawaii, Alaska and US Territories. Shipping is not available to Canada.
Expedited is available on checkout to the United States, excluding Alaska, Hawaii and US Territories as well as P.O. Boxes and APO/FPO/DPO addresses. Final shipping costs are available at checkout.
How to Replace Rear Shock Absorbers 1998-2011 Ford Ranger with Torsion Bar Suspension
Created on:
Tools used
15mm Wrench
Socket Extensions
15mm Socket
18mm Wrench
18mm Socket
Ratchet
1. Removing the Rear Shock Absorber
Remove the lower 18mm shock bolt with an 18mm socket and 15mm wrench
Remove the upper 18mm shock nut with an 18mm socket and 15mm wrench
Remove the shock from the axle
2. Removing the Rear Shock Absorber
Insert the shock to the axle
Slide the lower bolt into the shock
Tighten the upper 18mm nut to the shock
Tighten the lower 18mm nut to the shock
Hi, I'm Mike from 1AAuto. We've been selling auto parts for over 30 years! We're dedicated to delivering quality auto parts, expert customer service, and fast and free shipping, all backed by our 100% satisfaction guarantee. We've created thousands of videos to help you install our parts with confidence. That saves you time and money, so visit us at 1AAuto.com, your trusted source for quality auto parts.
In this video we're going to be working with our 2001 Ford Ranger. We're going to show you how to remove and replace your rear shocks.
Now these shocks are specific to the four wheel drive torsion bar style trucks, however the process for replacing them in the two wheel drive or coil sprung style should be very similar, as well as being similar to the same generations of Ford Explorers.
If you like this video, please click subscribe. We have a ton more information on this truck as well as many other makes and models. If you need these parts for your vehicle, you can follow the link down in the description over to 1AAuto.com.
Here are the items you'll need for this repair: 15-18mm sockets, ratchet, socket extension, 15-18mm wrenches
It's not necessary to raise and support your vehicle in order to replace your rear shocks however we've put our truck up on the lift to make it easier to show you what's going on. We're going to show you how to remove the passenger side here where the bolts are on the front of the axle at the bottom, as well as in front of the rear axle up at the top there on the frame. However, the driver's side procedure is exactly the same, although the shock is a mirror image of the one we're working with over here.
Using an 18 millimeter socket and ratchet on the nut and a 15 millimeter wrench on the bolt or vice versa, remove the bottom shock bolt. You may have to work the bolt back and forth a little bit to get it out of that bushing. Using an 18 millimeter socket ratchet and extension, remove the nut on the top of the shock at the frame. Pull the bottom of the shock out of the axle, and you can use it to work the top bushing back and forth off of its stud and to remove the shock from the vehicle.
If you're installing your shock absorber with the weight of the vehicle on the tires, you may try to install it as it comes here with this strap on it. Once the bolts are in, you can cut the ends here. Otherwise, if you're installing them at full length like we are, you'll want to compress the shock and remove the loop, allowing it to extend all the way out, at which point we'll install the top back over its stud.
The bottom may have to be compressed up a little and dropped into its opening. Slide the bolt back through. The bolt goes from diff through to the tire. We'll start our 18 millimeter nut there, and you can tighten these in any order you want to, but our 18 millimeter nut for the top got stuck in the socket here, so we'll install that first. Once it's on there tight, use the extension as leverage to wiggle the socket back and forth until it releases from the hardware. Now we can tighten up our bottom bolt with our 18 millimeter socket and ratchet and our 15 millimeter wrench.
Now shocks like most other suspension items should always be replaced in pairs considering the fact that if this shock has traveled up and down enough to wear out odds are the shock on the opposite side of the same axle has traveled the same amount.
Thanks for watching. Visit us at 1AAuto.com for quality auto parts, fast and free shipping, and the best customer service in the industry.
32238
In Stock
Product Reviews
Loading reviews
There are no reviews for this item.
Customer Q&A
No questions have been asked about this item.
Customer service
877-844-3393
Monday - Friday 8:00am - 9:30pm ET Saturday - Sunday 8:00am - 4:30pm ET
Mazda is a registered trademark of Mazda Motor Corporation. 1A Auto is not affiliated with or sponsored by Mazda or Mazda Motor Corporation.See all trademarks.
Enter Vehicle Year Make Model
Specify your vehicle's year, make and model to guarantee fit.
Year
Make
Model
Options
Drivetrain
This part doesn’t fit a . Select from parts that fit.