Replaces
This part doesn’t fit a . Select from parts that fit.
Frequently bought together
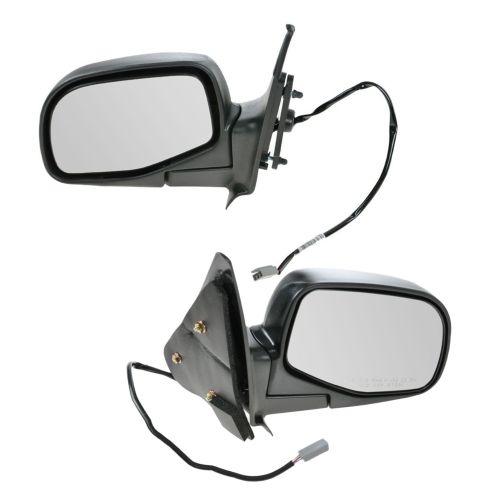
Part Details
TRQ side mirrors and mirror components are designed to match the function, fixture, and performance of the original version for easy installation. TRQ mirrors are DOT certified, comply with all federal safety standards, and are independently lab tested to ensure our products comply with all government regulations. All products are fit and road-tested in our Massachusetts R&D facility to ensure we deliver on our promise of Trusted Reliable Quality.
Product Features
Exact fit - To obtain proper fit and function confirm your vehicle has the exact mirror options listed.
Item Condition:
New
Attention California Customers:
 WARNING: This product can expose you to chemicals including Lead and Lead Compounds, which are known to the State of California to cause cancer, and birth defects or other reproductive harm. For more information, go to www.P65Warnings.ca.gov.
Lifetime Warranty
This item is backed by our limited lifetime warranty. In the event that this item should fail due to manufacturing defects during intended use, we will replace the part free of charge. This warranty covers the cost of the part only.
FREE Shipping is standard on orders shipped to the lower 48 States (Contiguous United States). Standard shipping charges apply to Hawaii and Alaska.
Shipping is not available to a P.O. Box, APO/FPO/DPO addresses, US Territories, or Canada for this item.
Expedited is available on checkout to the United States, excluding Alaska, Hawaii.
Final shipping costs are available at checkout.

Created on:
Tools used
Brought to you by 1AAuto.com, your source for quality replacement parts and the best service on the Internet.
Hi, I'm Mike from 1A Auto. I hope this how-to video helps you out, and next time you need parts for your vehicle, think of 1AAuto.com. Thanks!
In this video, we're going to be working with our 2001 Ford Ranger. We're going to show you how to remove and replace the driver's side-view mirror. This process is going to be very similar on the passenger's side.
If you like this video, please click Subscribe. We have a ton more information on this truck, as well as many other makes and models. If you need mirrors for your Ranger, you can get them through the link down in the description over at 1AAuto.com.
Here are the items you will need for this repair: Phillips screwdriver, flat blade screwdriver, 6-11mm sockets, ratchet, and socket extension.
Open your door, and remove the two Phillips head screws below the door handle. Open the door handle and release this panel from the door. Pry up and remove the electrical connectors from this panel, using a small flat-blade screwdriver to do this. You want to be careful not to break these arms off. This connector is removed by undoing the two Phillips head screws. You might have to just pry carefully to separate this connector with your flat blade. Remove the last connector the same way we did with the first one by prying up on those tabs and popping it off. Remove the Phillips head screw we just uncovered by removing that panel. One more Phillips head screw at the bottom corner here. Lift up on the panel and remove it from the truck.
Remove the four 6 millimeter screws securing the speaker to the door. We'll do this using a socket and ratchet. Remove the speaker from the door, and disconnect the electrical connector at the bottom.
The electrical connector for our mirror is located here, just behind the door speaker on the inside edge of the door. Remove that connector with a small flat blade screwdriver. Remove this cover to access the three bolts for the mirror. These are 11 millimeter. We're going to use a socket, ratchet, and extension. You have one in each opening. Go ahead and remove those. Don't worry if you drop any of the hardware undoing the three 11 millimeter nuts here, because we can reach down through the opening from our speaker, and get them out of the bottom of the door. When removing the last nut, support the mirror from the outside to make sure it doesn't fall. Remove the mirror from the door, and carefully pull the wiring out of the inside of the door.
Reinstall the harness through this hole. Line up the three holes that secure the mirror. We're reinstalling our old mirror because there's nothing wrong with it. These steps will be the same if you're installing a new one. Go ahead and take that socket and extension to make it easier to reinstall our three 11 millimeter nuts. Then we'll just snug them down with our ratchet.
Reconnect our electrical connector. Connect the electrical connector to your speaker. Set it into the door, and reinstall your four 6 millimeter screws. Tighten down your 6 millimeter screws with a socket and ratchet and extension. Re-adhere the cover over the holes for the bottom of the mirror.
These hooks on the inside of the door panel will slide into these slots on the inside edge of the door. Be sure that the wiring harness is pulled through when you start, and that you hook into the weather seal under the window here. Line up the door lock into its hole. With our lock in place, and our door in the weatherstrip at the top of the window, we'll push in there.
Then we can move along, lift up slightly, and push in to engage the rest of our door panel, before reinstalling the first two screws. Reinstall your electrical connectors to the appropriate switches. We'll have to reinstall the two Phillips head screws for our window switch. Once all your switches are reinstalled, line up this panel into your door. Snap the clips back into place and reinstall the two Phillips head screws under the door handle.
Thanks for tuning in. We hope this video helped you out. Next time you need parts for your car, please visit 1AAuto.com. Also check out our other helpful how-to and diagnosis videos.


