Replaces
This part doesn’t fit a . Select from parts that fit.
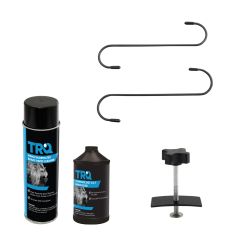
Frequently bought together
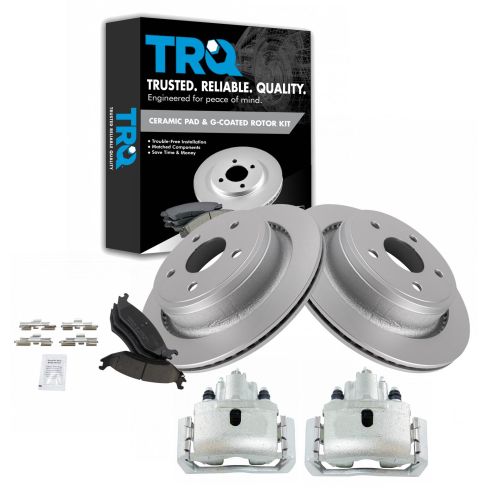
Part Details
TRQ brake kits are designed to restore your brake system to like-new performance. TRQ brake pads are positive molded, thermal scorched, chamfered, and utilize a multi-layer shim for enhanced performance and service life. TRQ G-coated rotors have long-lasting rust prevention, perfect for wheels with large openings that expose the rotor and rotor hat during daily drives. All products are fit and road-tested in our Massachusetts R&D facility to ensure we deliver on our promise of Trusted Reliable Quality.
Product Features
Item Condition:
New
Attention California Customers:
 WARNING: This product can expose you to chemicals including Lead and Lead Compounds, which are known to the State of California to cause cancer, and birth defects or other reproductive harm. For more information, go to www.P65Warnings.ca.gov.
Lifetime Warranty
This item is backed by our limited lifetime warranty. In the event that this item should fail due to manufacturing defects during intended use, we will replace the part free of charge. This warranty covers the cost of the part only.


Created on:
Tools used
Tools used
Now I'm gonna remove the wheel. Take a 22-millimeter socket, remove the lug nuts. And pull the wheel off. Now, we're gonna take the brake caliper off. Use a 12-millimeter socket and take these two caliper bolts off. And grab the caliper. I'm gonna have to wiggle it back and forth a little bit and slide it out. Use a brake caliper hanger and attach it to the coil spring or somewhere that the brake hose is not being pulled on too hard. And just take a straight blade screwdriver, pry out the brake pads. I'm gonna take a 21-millimeter socket and take the caliper bracket bolts off. Pull those bolts off and slide the bracket back.
Now take a hammer and just tap on the rotor in those locations. Make sure you don't hit the studs. Now it's loose from the hub itself, but the brake, the parking brake shoes are holding me up a little bit, so I've got to loosen those up. On the backing shield, there's this little window right here, there's a rubber grommet. Just take your screwdriver, take that off. On the passenger side, this is on the bottom. On the driver's side, it's on the top. And then there's a little wheel right there that it's like a star wheel, it's the adjuster. You can take a screwdriver and just find something that fits or a brake spoon is what they call this. And then to tighten this up, you're gonna go and turn the wheel up just like this. You can grab the rotor and slide it right off.
Now you wanna clean the hub surface. Just use a wire brush or a die grinder. Just clean up some of the rust. I'm gonna take the rotor, put it on backwards first. Take some brake parts cleaner and just clean the rotor. Use a rag, wipe it off. Put the rotor around. Same on this side. And now we wanna adjust this up a little bit. Just us a little...either a screwdriver or a parking brake tool and just tighten it up. I just want it tight enough so that it just drags a little bit. That might be a little too tight. I'm just gonna loosen it. And you can always adjust it later. If it's not tight enough, tighten it up. And take this little cover. Just use a screwdriver or a pick and just insert that. That's good.
Now I'm gonna take the clips off. Take a wire brush, just clean off this area. Do the same on the other side. And take some brake caliper grease and just put it on this point and same on the other side. I'm gonna take these pad clips or pad slides, press that there. Same on this side. Now take the bracket and slide it in position over the rotor. Put the bolts back in. You can put some thread locker adhesive on these if you want to. And then torque these bolts to 132 foot-pounds.
You can put a little grease just where the pads are gonna slide on the slides. That's good. And take the pads themselves, line those up. Do the same on the inside, just like that. Now, take the brake caliper off the hanger. Before we compress the caliper, we have these slide caliper slides. You just take a screwdriver and push these through. Slide those out, clean these off with a little bit of brake parts cleaner, and wipe them down. Take a little brake caliper grease and grease them up. And if they were extremely dirty, you could take these and clean these out in here, but these weren't too bad so I'm just gonna take a little grease, slide those in there, and slide it back in. That's good. And then you can do the same for the other side. Now we wanna compress the caliper, slide the compressor tool in there, and slowly compress the caliper.
All right. Now that the piston's all the way in, now on the passenger side, you're gonna start with the caliper on the top and fold it down. And on the driver's side, it's gonna be opposite, and put the bolts back in and get those started. And then torque these bolts to 24 foot-pounds. And put the tire back up, and the lug nuts. Now, we're gonna torque the wheel, tighten this down to 130 foot-pounds in a star pattern so you tighten the wheel down evenly. Now you wanna pump the brake pedal nice and slow. There's gonna be an air gap between the brake caliper, piston, and the brake pads. And once it feels good, that's good. And you wanna double-check the brake fluid reservoir. Make sure you have plenty of brake fluid. Make sure it's up to the max line. Adjust accordingly.
Tools used
Tools used
Tools used
Okay, friends, one of the first things we need to do is safely raise and support the vehicle. I like to do it with the suspension hanging. Let's remove all five of our lug nuts and the wheel. Looking at the differential here, you're gonna see your center flex hose. Let's take some brake line pinchers and go ahead and pinch this off. For our next step, we're gonna need a nice collection bucket. Put that down on the ground underneath this area right here. This is where your banjo bolt is, and there's gonna be fluid that comes out of this. Just break that free. Now I'm just gonna make it just a little snug so it's bottomed out. Let's continue on by removing these 10-millimeter headed bolts. Grab your caliper, go ahead and take it off. At this point, let's go ahead and remove this banjo bolt completely. Let's empty out our caliper. Go ahead and remove our brake pads. Inspect them real quick. Looks great. Awesome. Let's continue on by removing our caliper bracket by removing these two bolts.
Okay, friends, making our way over to the bench, we're gonna prepare our brand new caliper. To do that, I like to take it completely apart. We'll set this aside for now. Small pocket screwdriver. I'm just gonna take off this boot. We're gonna set it aside because we're gonna need it later. Take off your banjo bolt and make sure you don't lose either of your gaskets that are there. Set that aside for later as well. Let's continue on to the sliders. If you grab on the boot and push on the actual slider itself, you should be able to kind of separate the two. We're gonna slide this out a little bit. You wanna add a little bit of lubricant along here and then try to get some lubricant inside the boot area right there. Make sure you get into the very end right here. There's a little lip. That's where the boot's gonna ride and it's gonna help keep moisture out of there. I'm inside that boot, get in there as far as I can. I especially wanna try to get up into the center area here. Now we'll just go ahead and slide this back in. Perfect. Give it a little wiggle back and forth. Make sure the boot's sitting inside its grooves on both sides. Wipe it down. Do the same to the other slider boot.
Now I've got bolt sliders done. Let's continue on with that caliper grease. We're gonna go along this ear, this ear, and along the caliper piston where the pads are gonna ride. Set this aside. Moving on to the bracket, the next thing we need to do is strip off these tins right here. Take a little bit of that caliper grease and you're gonna go along the areas where the tins are supposed to ride. Take that same tin that you took off of there, slide it back on, do the same to the other side. Perfect. Let's grab all of our parts and make our way back over to the vehicle. The next thing you wanna do is clean and prep your bolts. You wanna make sure that you took off any existing thread locker and, of course, put on some brand new red thread locker. After that, take your brand new bracket right here that we just finished lubing up. Put it on there. We're gonna snug up these bolts and then we're gonna torque them to 100 foot-pounds. Now it's gonna be time to reinstall our pads. There's one. There we are.
Make sure the pads move around freely. Now it's gonna be time to get our caliper on there. If you were to look at it, you can see the bottom area's gonna have this little hooky-do. That's gonna sit down on the outer portion of the bracket. Okay. Slide those sliders. Perfect. Take your new caliper slider bolts, start them both in. We'll snug them up and then we'll torque them to 22 foot-pounds. Okay. The next thing we need to look at is our flex hose. You wanna make sure that you don't have either your gaskets on there on either side and you also wanna make sure the area where the gasket's gonna ride is nice and clear and free of any debris. This one looks good. If it wasn't, you can go out and clean it down with some sandpaper or a brush, whatever you need to do to, but make sure it's clean. Now it's gonna be time to take our brand new banjo bolt. Take one of your little copper crush washers there. We're gonna slide it into the flex hose here, put on your other gasket, and then put it right up into the caliper hole there just like this. So now we're just gonna bottom this out and now we'll torque it to 27 Newton-meters. Let's go ahead and get those hose crimpers off of there.
Now the next thing that we wanna do is go ahead and pump up the brake pedal. You want it to get as firm as possible. That's gonna help force the fluid up inside the caliper where the air is, and then we're gonna open this up and we're just gonna kind of let it gravity bleed for a little bit, work out as much air as possible. Now that we have the brake pedal pumped up, let's go ahead and open our bleeder screw. And we're gonna watch as fluid comes out of this. Just give it a minute. So there we go. We've got fluid coming out of this. It looks like it's coming in a pretty good stream. We wanna just make sure we don't see any more air bubbles. Just give this a couple of loving bonks. You can even try to move these flexibles around a little bit. Once you feel as though you have a pretty steady stream of fluid without air, we'll go ahead and close this and then we'll continue with a manual bleed.
Okay, friends. So the next thing that we need to do is check our brake fluid. You wanna make sure that that reservoir is topped off because we need to continue by bleeding this. To do that, it's gonna be easiest having a second person in the vehicle or, of course, you can continue with a single-person procedure. It's just a little bit different. Essentially, with a second person, what you wanna do is have them inside the vehicle and they're gonna slowly pump up the brake pedal. They're gonna give it three nice low pumps and then hold it on the third. Once they do that, they'll stay holding, we're gonna open up this bleeder screw and fluid's gonna come out. So you need to make sure you have your collection bucket. Once the fluid stops coming out, close it, and then ask them to pump it again another three times slowly and do the same procedure until you don't see any more air coming out of the bleeder screw. With that said, let's get started. Go ahead and pump up the brakes, please.
Okay. So I definitely saw air. Let's go ahead and pump them up again. All right. Let's continue on. Go ahead. That was great. So, on that last one, I didn't see any air bubbles come out, so that tells me that I'm gonna try this one last time. If at that point I don't see any air coming out, then I know that it's good. Let's go ahead and pump it one more time, please. All right. So if you happen to see air like I just did, that just lets you know that you got to do it again. Okay. So now going with the assumption that you've finished bleeding this and you have no more air coming from it, let's go ahead and clean down the area. Take your bleeder screw cover. Go ahead and put it on there. So once you have this bled, of course, you'd wanna go back up under the hood and double-check that brake fluid. Make sure it's nice and full. Let's get the wheel back on here, we're gonna snug it up, then we'll get the vehicle back on the ground and torque the wheels to 130 foot-pounds. Torqued.
Tools used
Now I'm gonna remove the wheel. Take a 22-millimeter socket and remove the lug nuts. And pull the wheel off. Now we're gonna take the brake caliper off. Use a 12-millimeter socket and take these two caliper bolts off. And grab the caliper. You might have to wiggle it back and forth a little bit. And slide it out. Use a brake caliper hanger and attach it to the coil spring or somewhere that the brake hose is not being pulled on too hard. And just take a straight blade screwdriver, pry out the brake pads. Now take a 21-millimeter socket and take the caliper bracket bolts off.
Pull those bolts off and slide the bracket back. Now take a hammer and just tap on the rotor in those locations. Make sure you don't hit the studs. Now it's loose from the hub itself, but the brake the parking brake shoes are holding me up a little bit so I got to loosen those up. On the backing shield, there's this little window right here. There's a rubber grommet. Just take your screwdriver, take that off. On the passenger side, this is on the bottom. On the driver's side, it's on the top. And then, there's a little wheel right there that if...it's like a star wheel, that's the adjuster. You can take a screwdriver and just find something that fits or a brake spoon, it's what they call this. And to tighten this up, you're gonna go and turn the wheel up. Just like this. And grab the rotor and slide it right off.
Now we need to remove these clips that hold the shoes on. I'm just gonna use a right-angle pick. Just get underneath the clip. Then I'm just gonna use a trim tool and just push down on this side of it as I slide the clip up. I'm just gonna take it off the pin. Just like that. And just try to pry this out a little like that. And do the same on the other side. Now I wanna get this adjuster out under here. It's kinda hard to get that spring off with the adjuster on there. So, I'm just gonna take two pry bars and just pry this out and just hopefully the adjuster will fall. There we go. Then with the shoes closer together, then the spring just comes out pretty easily. Grab the spring. Ther's the adjuster just fell out. And slide the spring out. Now there's two springs, there's a spring on the front side and a spring on the backside. And what you're gonna do is just try to get this off of out of this bracket right here. So, I'll use a pry bar and a screwdriver. Just try to pry this out a little bit. Same on this side.
There we go. Pop that spring out. And the other spring, let's pop that one out as well. There's that one. And here's that front shoe and the springs. So these springs, one spring goes on the backside, one spring goes on the front side like that. I'm gonna take these pins out. I am gonna re-use them because I don't have a hardware kit, but I just need to take them out. It's just gonna make putting the new shoes on easier. Put those aside and just take a wire brush and just any of the surface where the shoes touch the backing plate. Just clean those up a little bit. You could put a little grease on there if you want to. Now take the new shoes. Now, there is a top and a bottom and it's gonna be the opposite on the driver's side. There you go like that. So, for this side, this arch area it's gonna go on the top for both shoes.
Now, we want this spring we're gonna put both springs on before and we want one of the springs to end up behind here. So it has to go in behind there. So, it's a little tricky to get it in there. So hook that on right there and then there. The other spring you put it on the outside, right there and right there. So, these are together like this. Now what I'm gonna do is take the shoes and just go like this and then just rotate. This makes it easy, easier. And then take the shoe, and it has to go in between here and here. Just make sure that other spring doesn't pop out. And it's good like that. And then I'll take a screwdriver and just pry this one out, just like that. And there we go. Those are in position. And check your adjuster. If the adjuster doesn't move too easily, you wanna take it apart and just clean those threads up and then put some lubricant on those. This one moves pretty good. Now, I'll just put a little grease on here, just on the threads. To make putting the pins in a little easier, I'm just gonna put this adjuster in. Just pry this apart. You could use a pry bar if you want. That's lined up right there. Now take the pins, sometimes they call these nails. And then going from the back of the shield. And just get it lined up through the shoe. Now I'll just take this retainer and slide it up through here. And I'm sure they have special installers to put these on, but use what you can. I'm just gonna use this trim tool. There we go. It might take a little bit of effort. It's not too bad. Do the same on this other one.
Now I need to put this spring in, but it's gonna be very difficult to get that spring in with the adjuster in there. So, what I'm gonna do is just spread these shoes apart, take the adjuster out temporarily. And I can take the spring, push the shoes together. I'm just gonna use a screwdriver or a tool, get the spring lined up, so that's in there good. Now we can put the adjuster back in position. Just get it past the spring. I have to turn the hub a little bit. Now I'm gonna use two pry bars. Just pry this out a little bit and push the adjuster in place.
Just like that. Now you wanna clean the hub surface. Just use a wire brush or a die grinder. Just clean up some of the rust. And now take your rotor and slide that on. And now we wanna adjust this up a little bit. Just use a little, either a screwdriver or a parking brake tool, and just tighten it up. Just want it tight enough so that it just drags a little bit. That might be a little too tight. I'm just gonna loosen it. And you can always adjust it later. If it's not tight enough, tighten it up. And then take this little cover. Just use a screwdriver or a pick and just reinsert that. That's good. Now take the bracket and slide it in position over the rotor. Put the bolts back in. You can put some thread locker adhesive on these if you want to and then torque these to 132 foot-pounds. You can put a little grease just where the pads are gonna slide on the slides. That's good. And then take the pads themselves. Line those up. Do the same on the inside. Just like that. Now take the brake caliper off the hanger. Now we wanna compress the caliper and slide that compressor tool in there and slowly compress the caliper.
All right. Now that pistons all the way in, now on the passenger side, you're gonna start with the caliper on the top and fold it down and on the driver's side, it's gonna be the opposite. And put the bolts back in and get those started. And then torque these bolts to 24 foot-pounds. And then put the tire back up and the lug nuts. Now we're gonna torque the wheel, tighten this down to 130 foot-pounds in a star pattern so you tighten the wheel down evenly. Now you wanna pump the brake pedal nice and slow. There's gonna be an air gap between the brake caliper piston and the brake pads. And once it feels good, that's good. And you wanna double-check the brake fluid reservoir. Make sure you have plenty of brake fluid. Make sure it's up to the max line. Adjust accordingly.
Tools used
Tools used