Replaces
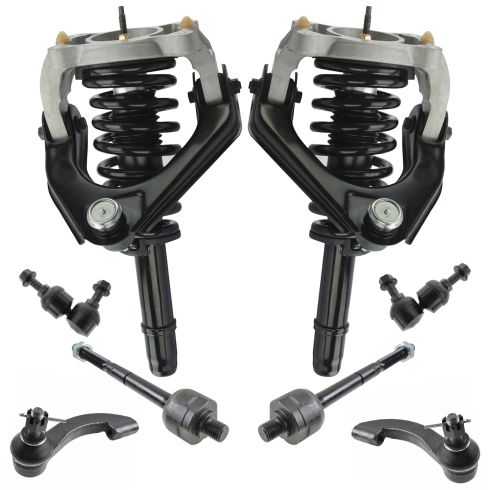
1999 Plymouth Breeze Front 8 Piece Steering & Suspension Kit TRQ PSA59334

PSA59334
This part doesn’t fit a . Select from parts that fit.
Specify your vehicle's year, make and model to guarantee fit.
This part doesn't fit a . Select from parts that fit.
Buy in the next and
Orders must be placed by 2pm ET
Recommended for your 1999 Plymouth Breeze
Frequently bought together
Specify your vehicle's year, make and model to guarantee fit.
This part doesn't fit a . Select from parts that fit.
Part Details
- (2) Front Sway Bar Links
- (2) Front Strut & Spring Assemblies
- (2) Front Outer Tie Rods
- (2) Front Inner Tie Rods
- 8 Piece
Specifications
- Front
About TRQ:
TRQ is a trusted brand dedicated to making every repair a success story by combining premium parts with easy installation. Each TRQ part is engineered by a team of automotive experts to meet or exceed OEM standards, delivering enhanced performance and maximum longevity. With rigorous in-house testing, the brand ensures superior fit and function across every product line. TRQ also provides customers with best-in-class, step-by-step installation videos—so you can complete repairs with confidence, whether you're a first-time DIYer or an industry professional.
Product Features
TRQ suspension kits are manufactured using premium raw materials and coatings for extended service life. Each TRQ suspension component is designed to be a direct, maintenance-free replacement to the stock unit. To extend the life of your steering and suspension components, TRQ recommends replacing components in pairs, sets, or kits. All products are fit and road-tested in our Massachusetts R&D facility to ensure we deliver on our promise of Trusted Reliable Quality.
Replacing struts used to require specialized tools to compress, remove, and transfer the old spring and mount. Our Pre-assembled, complete strut & spring assemblies come with all new parts and make the job much quicker and easier for the do-it-yourself mechanic.
Strut & spring assembly contains:
- Upper Strut Mount
- Strut Bearing
- Coil Spring
- Boot & Bumper Kit
- Gas-charged Strut
Install Tip: When replacing steering components, have a professional alignment performed afterwards. This ensures proper tracking and even tire wear.
Our steering and suspension components are pre-greased and sealed for long life and do not require the extra maintenance typically required by greaseable versions.
Attention California Customers:
![]() WARNING: This product can expose you to chemicals including Chromium (Hexavalent Compounds), which is known to the State of California to cause cancer, and birth defects or other reproductive harm. For more information, go to www.P65Warnings.ca.gov
WARNING: This product can expose you to chemicals including Chromium (Hexavalent Compounds), which is known to the State of California to cause cancer, and birth defects or other reproductive harm. For more information, go to www.P65Warnings.ca.gov
Lifetime Warranty
This item is backed by our limited lifetime warranty. In the event that this item should fail due to manufacturing defects during intended use, we will replace the part free of charge. This warranty covers the cost of the part only.
FREE Shipping is standard on orders shipped to the lower 48 States (Contiguous United States). Standard shipping charges apply to Hawaii and Alaska.
Shipping is not available to a P.O. Box, APO/FPO/DPO addresses, US Territories, or Canada for this item.
Expedited is available on checkout to the United States, excluding Alaska, Hawaii.
Final shipping costs are available at checkout.


Created on:
Tools used
- Loosen the lug nuts with the vehicle on the ground Raise the vehicle with a floor jack Secure the vehicle on jack stands Remove the lug nuts Pull off the wheel
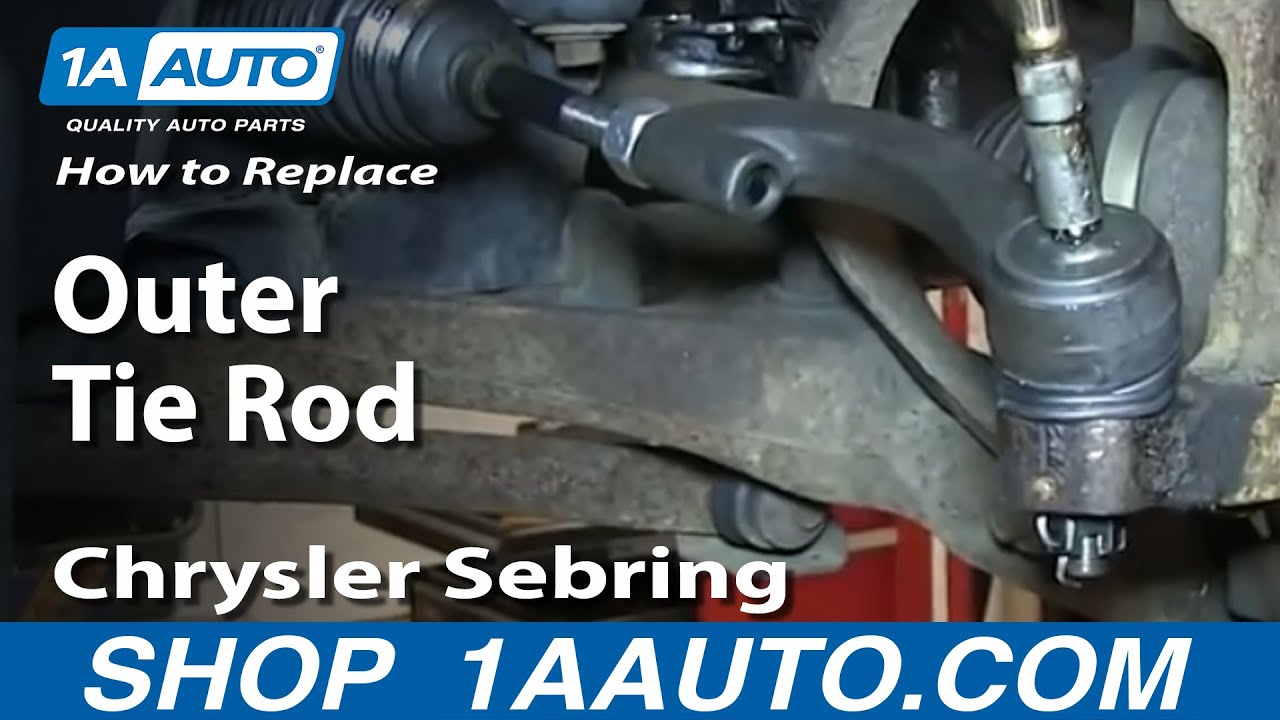
- Use a pair of pliers to straighten the cotter pin and remove it Remove the castle nut with an adjustable wrench Measure the distance from the inner tie rod to the outer tie rod Loosen the nut between the inner and outer tie rod Hammer the knuckle to loosen the outer tie rod Remove the outer tie rod and twist it off the inner tie rod
- Twist the grease filler into the new outer tie rod Twist the outer tie rod to the inner tie rod Measure the distance and make sure it matches the recorded distance Tighten the nut between the inner and outer tie rod Insert the outer tie rod to the knuckle Replace and tighten the castle nut while lining up the cotter pin hole Insert the cotter pin and twist the ends with a pair of pliers Fill up the grease filler with a grease gun
- Slide the wheel into place Start the lug nuts by hand Tighten the lug nuts preliminarily Lower the vehicle to the ground Tighten the lug nuts to 100 foot-pounds in a crossing or star pattern
Brought to you by 1AAuto.com, your source for quality replacement parts and the best service on the Internet.
Hi, I'm Mike from 1A Auto. I hope this how-to video helps you out, and next time you need parts for your vehicle, think of 1AAuto.com. Thanks.
In this video, we're going to show you how to replace the outer tie rod on this 2004 Chrysler Sebring. It's the same process on these Sebrings from 1995 to 2006. It's cheaper if you do this repair yourself, however, you should still go and get a professional alignment done after this repair. The only tools you're going to need include an adjustable wrench, pliers, a hammer, a tape measure, and jack and jack stands.
You want to start off by removing the wheel. You can see we're using power tools, but if you don't have air-powered tools like this, you just want to loosen the lug nuts up while the vehicle's on the ground. Raise it up, and then remove the lug nuts the rest of the way. Then pull the wheel off.
Turn your wheel so that you have better access to the tie rods, and then remove this cotter pin. Use a pair of pliers to straighten it out, and then pull it right out of there. Using your adjustable wrench, remove this capsule nut.
It's important to measure from your inner tie rod to the outer tie rod so that you can remember exactly how far up the outer tie rod is supposed to be. Loosen the nut in between the inner and outer tie rod. With a hammer, hammer the knuckle right here to loosen up your outer tie rod, and now you should be able to pull it up and out. Twist that off of the inner tie rod.
Twist the grease filler into your new outer tie rod and twist your new outer tie rod onto the inner tie rod. Using the tape measure, make sure it's back to exactly where it was. You can see ours is. Then you want to tighten that nut back into place. Now you can replace your capsule nut. When you tighten up the capsule nut, make sure that you have this hole lined up so you can put that cotter pin back into place. Use a pair of pliers and just pry out the ends of it. Using your adjustable wrench, tighten that nut up the rest of the way. Using your grease gun, fill up that grease filler on your outer tie rod.
Fast-forward as Don replaces the wheel. You want to replace the lug nuts, tighten them preliminarily, lower the vehicle, and tighten them the rest of the way. Then torque them to one hundred foot-pounds.
We hope this video helps you out. Brought to you by www.1AAuto.com, your source for quality replacement parts and the best service on the Internet. Please feel free to call us toll-free, 888-844-3393. We're the company that's here for you on the Internet and in person.
Tools used
- Loosen the lug nuts with the vehicle on the ground Raise the vehicle with a floor jack Secure the vehicle on jack stands Remove the lug nuts Pull off the wheel
- Turn the wheels by hand for better access to the tie rod Remove the cotter pin from the outer tie rod with pliers Remove the castle nut from the tie rod with an adjustable wrench Measure the distance from the inner tie rod to the end of the outer tie rod Note that measurement Loosen the nut that connects the outer to the inner tie rod Strike the wheel knuckle with a hammer to loosen the outer tie rod Lift the outer tie rod out of the wheel knuckle Twist off the outer tie rod
- Twist off the nut that connects the outer to the inner tie rod Pull the small boot clamp off the inner tie rod with pliers Pry off the large boot clamp with a hammer and a flat blade screwdriver Pull off the boot Remove the inner tie rod with a pipe wrench
- Twist the new inner tie rod into place Put a wire tie on the large end of the boot Put the boot into place Tighten the wire tie Push on the small boot clamp with pliers Twist on the nut that connects the outer to the inner tie rod
- Twist your outer tie rod onto the inner tie rod Measure the distance from the inner tie rod to the end of the outer tie rod This should be the same measurement as noted in Step 2 Thread the nut that connects the outer to the inner tie rod Push the outer tie rod into the steering knuckle Fasten the castle nut onto the outer tie rod Line up the castle nut with the cotter pin hole Push the cotter pin into place Twist the cotter pin into place with pliers Tighten the nut that connects the outer to the inner tie rod Fill the outer tie rod bearing with bearing grease, using a grease gun
- Slide the wheel into place Start the lug nuts by hand Tighten the lug nuts preliminarily Lower the vehicle to the ground Tighten the lug nuts to 100 foot-pounds of torque in a crossing or star pattern
Brought to you by 1AAuto.com, your source for quality replacement parts and the best service on the Internet.
Hi, I'm Don from 1A Auto. I hope this how-to video helps you out, and next time you need parts for your vehicle, think of 1AAuto.com. Thanks.
In this video, we show you how to replace the inner tie rod on this 2004 Chrysler Sebring. It's the same process on the Sebrings from 1996-2005. Your vehicle will need an alignment after this repair is done. The only tools you'll need for this are an adjustable wrench, pliers, a hammer, a tape measure, monkey wrench, and jack and jack stands.
Start by removing the wheel and tire. If you don't have the benefit of air tools, loosen the lug nuts with the vehicle on the ground. Raise and support the vehicle and then remove the lug nuts the rest of the way, as well as the wheel and tire.
Turn your wheel so that you have better access to the tie rods, and then just remove this cotter pin. Use a pair of pliers to just straighten it out, and then pull it right out of there. Using your adjustable wrench, just remove this castle nut. It's important to measure from your inner tie rod to the outer tie rod so that you can remember exactly how far up the outer tie rod's supposed to be. Loosen the nut in between the inner and outer tie rod. With a hammer, just hammer the knuckle right here to loosen up your outer tie rod, and now you should just be able to pull it up and out, and twist that off of the inner tie rod.
Now, you can twist off this nut as well. With a pair of pliers, just push in this clamp and pull it down. You can see this boot's held on with a wire tie, and we're just clipping a wire tie. In most cases this won't be what you have so we're going to show a different repair here just to show you what you will have. There's a clip underneath and you just stick a screwdriver in there, hit it with a hammer, and that clamp will just pull right off. Using a pipe wrench, remove the inner tie rod. You can see, you just loosen it up and then it twists right out.
Now, take your new inner tie rod and twist it into place. Now, take a wire tie and put it on the end of the boot, and just feed that boot back into place and tighten up that wire tie. It's going to act as that clamp you removed earlier. Using your pliers you can slide that other clamp back onto the front of the boot, and twist that nut on.
Now, take your outer tie rod and twist it back onto the inner tie rod. Now, using the tape measure, make sure it's back to exactly where it was. You can see ours is. Then you want to just tighten that nut back into place and push the outer tie rod back into the knuckle. Now, you can replace your castle nut. When you tighten up the castle nut, make sure that you have this hole lined up so you can put that cotter pin back into place. Then use a pair of pliers, just pry out the ends of it. Using your adjustable wrench tighten that nut up just the rest of the way, and using your grease gun, just fill up that grease filler on your outer tie rod.
I'm going to fast forward here as Don replaces the wheel. You want to replace the lug nuts, tighten them preliminarily, lower the vehicle, tighten them the rest of the way, and then torque them to 100 foot-pounds.
We hope this video helps you out. Brought to you by www.1AAuto.com, your source for quality replacement parts and the best service on the Internet. Please feel free to call us toll-free, 888-844-3393. We're the company that's here for you on the Internet and in person.
Tools used
- Open the trunk Pull back the trunk insulation Pull off the strut cover Remove the two 15mm nuts from the top of the strut Raise and secure the vehicle Apply penetrating oil to the lower strut bolt and nut Remove the 18mm nut from the strut Tap the strut bolt through with a hammer and pick Remove the two plastic clips from the top of the strut
- Lower the vehicle to the ground Loosen the lug nuts with the vehicle on the ground Raise the vehicle with a floor jack Secure the vehicle on jack stands Remove the lug nuts Pull off the wheel
- Pry off the strut with a pry bar Pull the strut down and out over the wheel
- Put the new strut into place over the wheel Pull down the wheel as you push the strut into place Position the strut with a pry bar Hammer the bolt into the strut Fasten the 18mm nut onto the strut bolt Tighten the nut to between 75 - 80 foot-pounds Insert the plastic clips into the top of the strut
- Slide the wheel into place Start the lug nuts by hand Tighten the lug nuts preliminarily Lower the vehicle to the ground
- Fasten the two 15mm nuts onto the top of the strut Tighten the 15mm nuts to between 40 - 45 foot-pounds Replace the strut cover Put the trunk insulation back into place
- Tighten the lug nuts to 100 foot-pounds in a crossing or star pattern
Brought to you by 1AAuto.com, your source for quality replacement parts and the best service on the Internet.
Hi, I'm Don from 1A Auto. I hope this how-to video helps you out, and next time you need parts for your vehicle, think of 1AAuto.com. Thanks.
In this video, we're going to show you how to replace the rear struts on this 2004 Chrysler Sebring. It's the same process on the Sebrings from 2001 to 2006, as well as the Dodge Stratuses from the same time. The items you'll need for this are: mew rear struts from 1AAuto.com, and we do recommend that you change both of them, 15mm and 19mm socket and ratchet, 18mm wrench, a hammer, a pry bar, a pick tool or screwdriver, jack and jack stands, and a torque wrench.
To start off, just go into the trunk here and pull back the insulation, and you'll see, here's the top of your rear strut with two 15mm nuts. We'll just fast forward as Don removes these.
You want to just jack your vehicle up, and then go in behind the wheel here. You'll see this is your rear strut right here. It's secured with this bolt right here. Ours is kind of rusted, so we spray it down with some penetrating oil. Then, using an 18mm wrench, you want to just remove the nut on the other side. Using a hammer and a pick tool or screwdriver, just hit the bolt out. Then, you're going to need to hit the bolt up and over that adjusting link. Up here on the rear strut, you'll see these two clips. You want to just pry out the center on them, and then you can pry out the whole thing. Then the lower part will just pry off also. We'll fast forward as Don does this to the other one.
Now you need to remove the wheel. If you have air-powered tools, you can do this while it's up in the air. Otherwise, lower it just enough so that the wheel stops spinning. Loosen up all the lug nuts, raise it up again, and remove the lug nuts the rest of the way. Then you can just pull the wheel off.
Now, pry that rear strut off, pull it down, and then out over the wheel.
The old strut is on the right. The new strut from 1A Auto is on the left. You can see it's identical. They'll mount exactly the same. The original strut on our vehicle is in fine shape, so we are just going to reinstall it. We're doing this video just to show you how to do it. Feed it right in over the brake drum, and then push it up into place. It helps to have an extra person here just to pull down on the wheel so you can push the strut back into place. Now use the pry bar to pull it down a little bit so you can fit the bolt in, and just hammer that bolt in the rest of the way. We'll fast forward as Don replaces that 18mm nut. You should tighten these to about 75 to 80 foot-pounds. Now reinstall the clips. Just push the center into them, not all the way down, but just into them, and then push the clip into place, and now push the center in the rest of the way. If it's difficult, just use your hammer.
We'll fast forward, here, as Don replaces the wheel and replaces the lug nuts. You want to tighten them preliminarily for right now, and then lower the vehicle.
We're going to continue to fast forward here as Don replaces those two 15-mm nuts in the trunk and tightens them up, and tightens it to 40 to 45 foot pounds. Just replace that cap and put your insulation back into place. Now torque your lug nuts to 100 foot pounds in a crossing pattern, and then you're all set.
We hope this video helps you out. Brought to you by www.1AAuto.com, your source for quality replacement parts and the best service on the Internet. Please feel free to call us toll-free, 888-844-3393. We're the company that's here for you on the Internet and in person.

PSA59334
877-844-3393
Monday - Friday 8:00am - 9:30pm ET
Saturday - Sunday 8:00am - 4:30pm ET
Specify your vehicle's year, make and model to guarantee fit.
This part doesn't fit a . Select from parts that fit.


