Replaces
Part Details
Specifications
1 Year Warranty
This item is backed by our 1-year warranty. In the event this item should fail during intended use, we will replace the part free of charge. This warranty covers the cost of the part only.
This item ships directly from supplier.
FREE Shipping is standard on Orders shipped to the lower 48 States (Contiguous United States).
Shipping is not available to Canada. This item cannot be Shipped to AK Alaska, HI Hawaii, US Territories, P.O. Boxes, APO/FPO/DPO addresses or Expedited due to size limitations.

Created on:
Tools used
Hi, I’m Mike from 1A Auto. We’ve been selling auto parts for over 30 years!
To drain the coolant, I'm going to go down here to the lower radiator hose at the radiator outlet. Undo the spring clamp with a pair of pliers. Pull this hose off.
I already have a drain pan underneath the truck to catch any coolant or all the coolant that will leak out. Release the clamp with a pair of pliers. Work the hose off the radiator. Go back and forth. After you drain this coolant, if you're not going to reuse it, just make sure you dispose of it properly. With the majority of the coolant drained out, I'm going to put the lower hose back onto the radiator so that I can reposition the drain bucket under the water pump. I'm just going to slide it back into place. Not going to clamp it yet.
Before I take the belt off, I want to loosen these four bolts that are holding on the water pump pulley. The belt is holding the pulley in place so it doesn't spin on me as I loosen them. Don't have to take them off all the way, just loosen them. These are 13 millimeter. There is a special tool that goes in here and can hold the pulley, but if you don't have that, using the belt tension to hold it is a good way to remove it. Still wants to spin, but can usually get them loose. See, there it goes.
Using a half-inch breaker bar with a 3/8 drive adapter, going to put it in here at the end of the auto belt tensioner, pull it this way, and pull the belt off. Let the tension go. Take the belt off all the pulleys. Going to remove this idler pulley with a 15 millimeter socket or ratchet. Put this aside. I've repositioned the drain bucket further underneath because I want to catch any coolant that might still be in the water pump here.
I'm going to undo the hose from the bottom of the water pump. This hose runs up and over to the lower part of the radiator hose, so most of the coolant has been removed. But there still might be some residual in there that's going to fall out. Just going to use some pliers. Squeeze the spring clamp. If you can get it, it does have a lock to hold it. But if not, that's okay. Just break it free. It might be easier to pull it out. They do have some tension to them. Slide it down. Just let it go in the hose and work this hose at the bottom of the water pump. It's kind of rusted on there. I'm going to take a pick and just sort of work it around the edge of the hose to try to break it free from the corrosion.
Before I remove this heater hose and the bypass hose, just going to take the pulley off, get it out of the way. Again, this is a 13 millimeter. Put those bolts aside. This may be rusted on here a bit. We'll try to remove it, see if it comes off. Put one of the bolts back in place to hold it. Going to take a dead blow hammer and try to knock it free. Remove that bolt that was holding it so we can see our water pump is sitting here. Now to work on these hoses here. We're going to remove this hose here, again, with my pliers. Grab the spring clamp. There it is.
Just use the two pliers together if you don't have the right tool to get these spring clamps off. We're going to get this one off using the pliers again. We're going to remove this top clamp too from the heater hose. We're going to take the pick and work it around the hose edge, try to break it loose. I'm actually going to loosen this metal heater hose portion here from the bracket, try to give me some more wiggle to it.
This is a 13 millimeter bolt. It just goes to a soft heater hose. It goes back to the firewall. This just goes up and over the alternator. Give myself a little more play here. Perfect. Just put that aside. I'm going to take the pick again and work it around the bottom on this heater hose or bypass hose. Try to break the seal. This one's actually pretty loose. I can pull it right off. I'll put this aside because we're going to reuse this hose and this hose down here is the little bulge part of the pipe here that holds the hose on is pretty far up. It's right about here and there's a bunch of hose under here. It's kind of difficult to pull off, so I'm going to loosen this clamp here at this little gooseneck and pull this hose off of there. I have to move this. Get this down out of the way. I'll bring it up. Free. There you go. Sometimes, you can take a flat bladed screwdriver and try to pry it off just a little bit. You got to be very careful not to remove this hose. Keep working on the hose. You're going to get it off there. We'll worry about getting it off the pump once the pump is out of the vehicle.
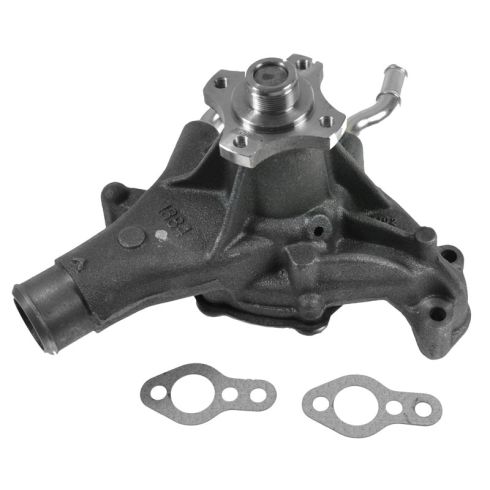
This is our brand new water pump from 1A Auto. Now I'm going to remove on our old water pump. There are two bolts on each side and they're very hard to see from up here. We just want to give you an idea where they are, so they're on either side of the water pump and they go into the block and through some gaskets. We're using a 15 millimeter socket and a good size ratchet. Break these free. I'm switched to a little R extension and this one's pretty loose. So I'm just using my hands to remove it. Go ahead and grab the bolt out. Here's one of the bolts. And remove the final bolt here, and you're going to lose some coolant because it's going to break the seal between the water pump and the block. The water pump's ready to come out.
Grab it and kind of try to wiggle it. If it's stuck, take our dead blow, let it free. Lift it out of the engine compartment. We have our old water pump. Just remove this hose the same way you got it off the other end. Just kind of worked it off with a flat-headed screwdriver or a small pry bar.
Here's our original water pump from our vehicle and our brand new one from 1AAuto.com. It's got the same design with the two bolts holes on either side and the flanges that go up against the head. It's got the lower radiator hose outlet with the heater hose pip, bypass pipe, same style flange for the pulley. There's a little protector here that can come off when you install it. Comes with new gaskets. I've just got some paper towels in there so it doesn't leak coolant while we were looking at this. But this should fit in your vehicle and work great for you. You can reuse your old bolts. These are the bolts for the pulley for the water pump and this is the bolt, one of the bolts that holds it to the engine block, the water pump.
However, you really have to reseal it with the proper sealant or available from 1AAuto.com, you can buy a kit that will come with four new water pump bolts with the correct sealant on them and four new water pump pulley bolts. There are two ports on either side of the block where the water pump meets it. You need to clean the old gas material from both of these. Just going to use a razor blade. I'm actually going to take a small piece of paper towel, just put it in the hole like that. As I clean it, I can keep stuff from falling into the engine. Make sure the surface is nice and clean and repeat the steps for the other side.
If you've got gasket adhesive on hand, you can use it to stick these gaskets in place or you can try to hold the bolts in here while you install it. It's going to be a bit tricky. What I'm going to do, let's see if we can get those bolts to stay there for a second, take some masking tape. Push these through, and we're just going to hold them in with a little masking tape just until they're in place. Do the same for the other side. If you've got that spray on gasket sealer, that's not a bad way to do it. If you don't have it handy, this masking tape should help you out. This way, the gaskets will stay in place, get the water pump lined up, and then I can start to thread in the bolts with my fingers. Water pump up against the engine. Top one caught. Use the socket and extension. We'll get this one caught. Catch the bottom one. Just going to use my ratchet to tighten these down evenly before we torque them.
Torque the water pump mounting bolts to 33 foot pounds. Just going to go opposite. Install the bypass hose. Okay, I got it started on both ends. Just work it down. Grab this clamp, work it down. This clamp and work it down. All right, we're going to take our heater hose. We're going to place it on this pipe first, then we're going to place it back on the water pump. Actually, I'm going to put the clamp on. That's where it goes. Put the hose back onto the water pump. We'll install our clamp. Bring it down with this plastic piece that it's with. Just got to reinstall this bolt that was here. Just a steel bolt going into aluminum, so once I feel it get tight, I'm just going to stop.
Now we'll reinstall the lower radiator hose. Pliers. This hose clamp back into place. We'll reinstall our water pump pulley. Get that lined up. Take our new bolts. Right now, you can make sure that the water pump spins freely, which it does. Line it up like that. Line up our pulley to match. I'm just going to hold onto the pulley and just tighten these down. To reinstall our idler pulley, we'll make sure all these components are here in the back, this little bushing because the bearings going to ride on that. Make sure to thread that in by hand because it is going into aluminum. You don't want to cross thread it and just going to tighten it up. If I feel it get tight, I'll stop. If you don't remember how the belt was routed on the engine, there should be a diagram under the hood.
We're working on the V6, so we're going to use this diagram here. Put this this way. It's going to go up around the power steering pump, up and over the water pump, under the idler, over the crank pulley, up and over the alternator. So it's in the AC compressor, power steering pump. I need to flip this tensioner down. What I'm actually going to do is pop it off the alternator real quick and I can just hold it in place. Grab the tensioner. Pull it down. Pop it back up onto the alternator. Make sure it's seated in the tensioner and the grooves. We'll let the tensioner out. Belt is seated in all the grooves. It's actually not lined up perfectly on the water pump pulley, so I want to just readjust it, at least some of the tension. I can slide it over. Here, it's nice and straight and aligned now. Let the tension back out. The belt is replaced.
I've just got some slip joint pliers in here and reinstalling the clamp on the lower radiator hose. Squeeze it together.
Refill the system with the correct coolant. Open up the reservoir. We'll fill it. Just going to refill it slowly. Let any trapped air bubbles escape. So with the coolant filled to the full cold, going to reinstall the cap, start the truck up, and it may suck some of the coolant back into the system and then I will shut the truck off and recheck the level, top it back off, then start it and let it run to bleed the system and come up to temperature. Just needs to be topped off a tiny bit. So let the engine come up to temperature and make sure the fluid level is correct afterward. Top off as needed.
Thanks for watching. Visit us at 1AAuto.com for quality auto parts, fast and free shipping, and the best customer service in the industry.
Tools used
Hi, I'm Mike from 1AAuto. We've been selling auto parts for over 30 years! We're dedicated to delivering quality auto parts, expert customer service, and fast and free shipping, all backed by our 100% satisfaction guarantee. So visit us at 1AAuto.com, your trusted source for quality auto parts.
In this video we're going to be working with our 1996 GMC Sierra K1500. We're going to show you how to remove and replace your vehicle's water pump.
If you like this video, please click "subscribe." We have a ton more information on this and many other vehicles, and if you need this part for your truck, you can follow the link down in the description over to 1AAuto.com.
Here are the items you'll need for this repair: full metric socket set, 3/8" ratchet, socket extensions, small flat blade screwdriver, adjustable wrench, hammer, torque wrench, impact gun, drain bucket, brake cleaner, paper towels, razor, coolant, funnel
Using a small flat blade screwdriver, pop open the wire retainer on the top of your fan shroud, lift the wire off, and it's long enough that you can just lay it back in the engine bay. You can remove it from the battery, and take it out completely, if you'd like to, but this should give you plenty of room to work.
Remove the seven 10 millimeter bolts along the fan shroud. There should be two on the bottom on each side. Ours is missing two bolts, and then three along the top, and the same two bolt locations on this side. We'll remove these with a 10 millimeter socket ratchet and extension. Once the hardware is removed, lift up, and remove the upper fan shroud from the vehicle.
Remove your radiator cap by pushing down and turning it counterclockwise. At the bottom of the driver's side of the radiator, you'll see a little thumb screw for your radiator drain. Make sure you have a drain bucket underneath there, then reach down and loosen it by hand. Allow your cooling system to drain and then close the drain on the radiator.
We're going to use an adjustable wrench, because we don't have the right size open-end wrench, but that would work as well. As well as, some pipe wrenches. We're going to place that over the clutch fan nut, and then strike it quickly with a hammer.
Using the drive of a three-eighths ratchet – you could also use a three-eighths breaker bar –, go into the slot on the serpentine belt tensioner, and rotate it as far as we can clockwise, to put some extra tension on the serpentine belt. Then, try hitting the wrench again because this should keep the pulley from turning. Once it's loose, you can remove your ratchet, spin the clutch fan off.
Now use a 3/8" drive ratchet to turn the tensioner counter clockwise and remove our serpentine belt. Make sure you have a belt path for this, either under the hood somewhere.
Using a pair of locking jaw or other pliers, compress the clamp, move it off the end of the fitting for the water pump hose and then clamp on there. Twist it a little bit to free it up. Remove that from the water pump. Now, the other one is pretty tricky to get at, so we'll do the bottom hose on our water pump the same way. Remove the bolts and pull it out a little bit before, removing the other hose. Once again, we'll grab the hose with a pair of pliers. Just try to wiggle it, free it up a little bit. Once it's freed up, we'll remove the hose. Make sure there's a drain bucket underneath there.
Remove the four 14 millimeter bolts around the water pump with your 14 millimeter socket, ratchet, and extension. Now, normally the old gaskets tend to bake these on pretty good, so when you remove the bolts it should stay in place as long as you don't bump it. You can then wiggle the pump, pull it out far enough that we can access the last clip here. Remove that hose the same way we did with the first one using our pair of locking jaw pliers. Once everything's off you can remove your water pump from the vehicle. Using a 10 millimeter socket and ratchet, remove the four 10 millimeter bolts and the water pump pulley.
Here we have the old water pump that we removed from our vehicle and our new part from 1AAuto.com. As you can see, these parts are exactly the same with the same large outlet on the bottom. Same four bolt flange for our water pump pulley, the threads for our clutch fan. You have the same two fittings on the top as well as the same two bolt mounting flanges on each side. The water pump impeller is actually behind this plate here. We have the same flange you can see there that'll bolt up to our engine block and allow coolant to pass through our pump.
Our new pump even comes with a pair of new gaskets for installation. So if your old water pump has failed and your vehicle is overheating, this new part from 1A Auto is going to go in direct fit just like your original equipment and fix you up right.
Install your old water pump pulley on to the new pump. We have some new hardware we're going to be installing here. Get those screws going and then tighten them down with the 13 millimeter socket and ratchet. Clean the gasket services for both sides of the engine water pump. It's just these two little two-bolt flanges here. All we're going to do is just get in there with a razor blade. Scrape off any old gasket material, and then wipe it down with a rag or a paper towel and some brake cleaner.
Set your water pump bolts through and place the gaskets onto the bolts. This can get kind of tricky because you want to keep everything in place and get this inlet hose back on. It's much more difficult to do once it's on the vehicle. Slide the clamp back into place. Make sure your gaskets are still in place on the bolts then line up your water pump with a 14 millimeter socket and extension. Get your hardware started. Snug the bolts with a 14 millimeter socket, ratchet, and extension. Torque these bolts to 30 foot-pounds. Reinstall the remaining top hose and clamp as well as the bottom hose and that clamp.
Loop your serpentine belt under the crank pulley. We'll then go under the water pump, around the top, down and under the power steering pump, and over the A/C compressor pulley. On the left, we'll go over the tensioner and over the alternator. We'll then hold down where it will go below the idler pulley.
Using the drive from a 3/8" ratchet, we'll turn the tensioner counter clockwise. Slide the belt under. Take a quick look to make sure everything is aligned. There we go. Put tension back onto our belt. Using your ratchet, put tension on the serpentine belt by rotating the tensioner clockwise. Using your 16 millimeter socket, torque the crank bolt to 74 foot-pounds.
Reinstall the clutch fan and just snug it up by tapping it on with a wrench.
Reinstall your upper radiator fan shroud. Reinstall the seven 10 millimeter bolts secure in your fan shroud. Tighten them down with a 10 millimeter socket and ratchet. Reinstall the wire along the top of your shroud. Lock it back into place.
Fill your vehicle with a 50-50 mix of Dex-Cool coolant. We're using the special funnel to show you how much air actually comes out of the system when you do this, but any old funnel will do at home.
To finish bleeding your cooling system, simply leave the radiator cap off, start your vehicle, and set your defrosters or vents to the lowest fan speed and the highest temperature setting. This will allow the heater core to bleed as well. Just run the vehicle. Keep an eye on the temperature gauge. Let it get up to temp and monitor the coolant level inside of your radiator and top off as necessary. You'll notice that there will be several surges where it sort of burps and an air bubble comes out. It loses some fluid. You top it off and this process will probably repeat a few times.
Thanks for watching. Visit us at 1AAuto.com for quality auto parts, fast and free shipping, and the best customer service in the industry.

252-711