Replaces


Frequently bought together
Attention California Customers:
 WARNING: This product can expose you to chemicals including Butyl benzyl phthalate (BBP)d, which is known to the State of California to cause birth defects or other reproductive harm. For more information, go to www.P65Warnings.ca.gov.
Lifetime Warranty
This item is backed by our limited lifetime warranty. In the event this item should fail due to manufacturing defects during intended use, we will replace the part free of charge. This warranty covers the cost of the part only.
FREE Shipping is standard on Orders shipped to the lower 48 States (Contiguous United States). Standard shipping charges apply to Hawaii, Alaska and US Territories. Shipping is not available to Canada.
Expedited is available on checkout to the United States, excluding Alaska, Hawaii and US Territories as well as P.O. Boxes and APO/FPO/DPO addresses. Final shipping costs are available at checkout.
Created on:
Tools used
Brought to you by 1AAuto.com, your source for quality replacement parts and the best service on the internet.
Hi, I'm Mike Green. I am one of the owners of 1A Auto. I want to help you save time and money repairing and maintaining your vehicle. I am going to use my 20+ years' experience, restoring and repairing cars and trucks like this, to show you the correct way to install parts from 1AAuto.com. The right parts, installed correctly - that's going to save you time and money. Thank you and enjoy the video.
In this video, I am going to show you how to replace tail light harness junction on this 2002 GMC Sierra. The only tools you'll need are a 13mm wrench, screwdrivers, and some penetrating oil. This is the same for a lot of different GM trucks.
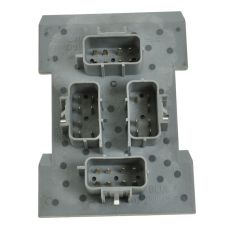
Okay, if you are having some problems with your rear lights. The another place that can go bad is this junction block. This is the back frame, you can see here is my spare tire. Okay and there's four connectors and basically, each connector has a little tab and you can see that one right there. Push on the tab and then work the connector off and do that for each of them. Right here, where my finger is pointing, there is a 13mm bolt. You want to remove that bolt and then the plate comes off with that connector. Just a quick tip; we did spray the back of this bolt with penetrating oil. It actually appears to come out pretty easily. There it is out. Now to get this out of the bracket, we are going to take one screwdriver and put it in here - actually in right next to that slot, so that slot is now unlocked. That tab right there that is part of the plastic. Okay, the metal is not holding anymore. And then use another screwdriver and kind of pry it into there. Once you move it a little bit, you can take this screwdriver out and then with this screwdriver, just force it out of the bracket.
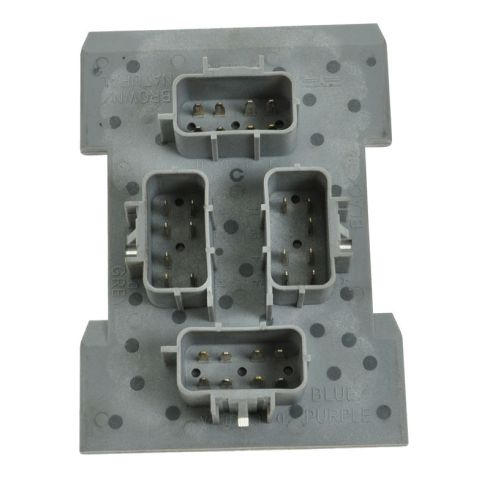
And the new one from 1A Auto, you can see that it is exactly the same. They are all - labeled: brown, grey, blue, and the black. Okay and also these tabs make it so you can't connect them incorrectly anyway. So you just place it back into this, okay. Clip it back in place and you are ready to reinstall. You are going to hook your, you have to hook these tabs in first, which means you have to put them in like that and then turn it. Then start your bolt. And I am going to cheat a little bit and bring in the air ratchet, the blue one is up here and it goes on the left, the black one, the gray one goes on top, okay brown or red on the right side and the black one on the bottom.
We hope this helps you out. Brought to you by www.1AAuto.com, your source for quality replacement parts and the best service on the internet. Please feel free to call us toll free 888-844-3393. We are the company that serves you on the internet and in person.
Tools used
Brought to you by 1AAuto.com, your source for quality replacement parts and the best service on the Internet.
Hi, I'm Mike from 1A Auto. I hope this how-to video helps you out, and next time you need parts for your vehicle, think of 1AAuto.com. Thanks.
In this video, we're going to show you how to replace the taillight junction block on this 2002 Chevy Suburban. It's the same part and similar process on the Suburbans from 2002 to 2006. You'll need a new taillight junction block from 1AAuto.com, a flat blade screwdriver, and a hammer.
Your taillight junction block is located right here. You want to start off by just pushing the tabs on each of these harnesses and disconnecting them. Most likely, your junction block won't just slide out now on its own, so what we do is we just use a flat blade screwdriver and a hammer to kind of loosen up these tabs. There are four of them in total. We'll just fast-forward as Don does that last tab, and then from the side of the junction block, you want to just use that flat blade screwdriver, hit it with the hammer, and it'll start to slide out. Once you get it most of the way you can pull it the rest of the way out.
On the left is the old junction block; on the right is the new one from 1A Auto. You can see they're identical, and they'll fit exactly the same. Take your new junction block and just slide it into the bracket. Then reconnect your four harnesses. You'll see on the junction block which color goes where. Now, since we've loosened this, it will slide out. Just to make sure it doesn't, we just want to hammer the edge there until it kind of bends down over the junction block. Now it's held in place, and you're all set.
We hope this video helps you out. Brought to you by www.1AAuto.com, your source for quality replacement parts and the best service on the Internet. Please feel free to call us toll-free, 888-844-3393. We're the company that's here for you on the Internet and in person.

923-012