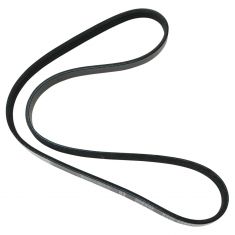
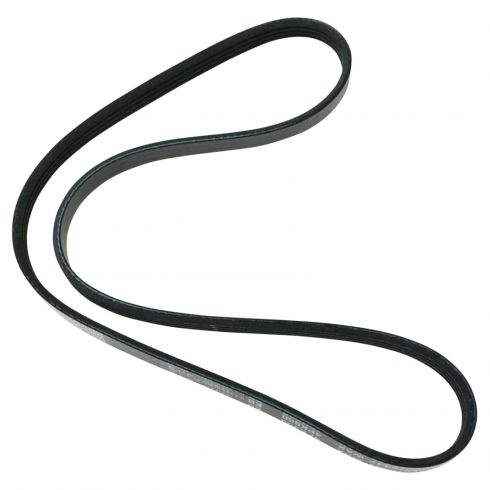
Replaces
This part doesn’t fit a . Select from parts that fit.
Frequently bought together
Genuine original equipment part (OEM) that was factory installed on your vehicle by the manufacturer.
Item Condition:
New
1 Year Warranty
This item is backed by our 1-year warranty. In the event this item should fail during intended use, we will replace the part free of charge. This warranty covers the cost of the part only.
Wear and Tear
This item is backed by a warranty against defects in materials and workmanship under its intended use. The warranty does not cover normal wear and tear. Please keep your invoice for proof of this warranty.
FREE Shipping is standard on Orders shipped to the lower 48 States (Contiguous United States). Standard shipping charges apply to Hawaii, Alaska and US Territories. Shipping is not available to Canada.
Expedited is available on checkout to the United States, excluding Alaska, Hawaii and US Territories as well as P.O. Boxes and APO/FPO/DPO addresses. Final shipping costs are available at checkout.


Created on:
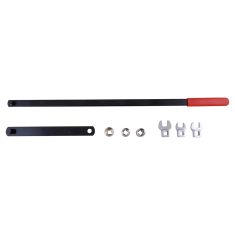
Tools used
Hi, I'm Mike from 1AAuto. We've been selling auto parts for over 30 years! We're dedicated to delivering quality auto parts, expert customer service, and fast and free shipping, all backed by our 100% satisfaction guarantee. So visit us at 1AAuto.com, your trusted source for quality auto parts.
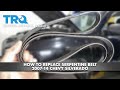
In this video we're going to be working with our 2002 Chevy Suburban 5.3-liter V8. We're going to show you how to remove and replace your vehicles serpentine belt, this is the forward one not the rearward one that works your AC.
If you like this video, please click subscribe. We have a ton more information on this and many other vehicles and if you ever need parts for your vehicle you can follow the link down in the description over to 1AAuto.com.
Here's the items you'll need for this repair: flat blade screwdriver, 15mm wrench, 15mm socket, ratchet, socket extension
Loosen the hose clamp just after the mass air flow sensor. This is going to be the second one back from your air box. We'll do this using a flat blade screwdriver. Wiggle and twist the boot to release it from the mass air flow sensor. You may need to use your screwdriver to help peel it back here. These tend to get stuck on pretty good. We'll also remove the one at the throttle body. We'll need to disconnect the hoses from their clamps here. You can either try prying it out there, or there's also a little clamp at the bottom here that you should be able to compress, pop loose with a flat blade, and remove the intake runner from the vehicle.
We've removed some things like the radiator fan and the fan shroud to make it easier to show you what's going on, but you shouldn't need to do this if you're doing this job at home. Before removing your serpentine belt, make sure your vehicle has a belt path diagram under the hood somewhere. If this is missing or faded, you can just draw another one onto the plastic with something like a paint marker. Using a 15mm wrench on the tensioner, rotate the nut clockwise to slack the belt. Pop the belt off of whatever pulley is easiest for you to reach. Let the tension off the pulley and remove your serpentine belt.
Install the belt over the front grooves of the harmonic balancer or crank pulley. Bringing the right side over top of the pulley. We'll then go over top of the water pump and loop under the power steering pump, over the alternator, under the idler pulley. I'll keep this piece in my hand. Make sure that everything is seated because this one's kind of tight and you're going to want the room. Using my 15mm wrench, we'll take the tension off of the tensioner pulley, slide the belt over, double-check that our path is right, all of the belt is properly seated, and then let the tension back on.
Reinstall the intake tubing. It's easiest to set it onto the throttle body. Reengage the hoses into their clips and then get the boot over the air box. Then tighten down both clamps with a flat blade screwdriver.
Thanks for watching. Visit us at 1AAuto.com for quality auto parts, fast and free shipping, and the best customer service in the industry.
Tools used
If you were to look right down here, you're gonna see a clamp. If you were to look at the other end where it connects onto the throttle body, you're gonna see another clamp. You go ahead and loosen those up. Also, if you come right up here, you're gonna see an 8-millimeter bolt. If you loosen that up, you can take this right out. Once you have that out of the way, and the clamps are loosened, you can wiggle this around. I'm gonna draw it off of the throttle body right here, and I'm gonna come right there, take it off of right here, remove it from the vehicle.
So now that we have the intake and the little shell out of the way here, it gives us a nice, clear view. You don't necessarily need to take off the shell but I just like to have it out of the way. Go ahead and relieve your tension like that. And then I'm just gonna take the belt off of the idler pulley here and then I can let go of that. We'll get our serpentine belt tore right out of the way. Let's go ahead and remove the belt. Go ahead and take one side, go down and around the passenger side of the water pump, which is this right here, and then put it over the crank, which is the main pulley over there. Just gonna circle it, put it up and then slide it around. I'm gonna take one and I'm gonna come up and over the tensioner right here, and then the other side. I'm gonna bring it down and around the water pump and then underneath the power steering pump. It's gonna fit right inside the ribs perfectly. And then I'm gonna come up. Make sure it's sitting in those ribs. There it is. Come up and over the alternator right here. This looks good. Make sure everything is situated approximately where it needs to be. That looks great. I'm gonna grab my tensioner tool, put it on there, relieve tension. Now I'll take this, bring it right underneath the idler pulley. This is your idler pulley. Get our tool off, give it a nice tug, and then of course double-check all of your pulleys, every one of them that has the rib side that goes up against the belt, you need to make sure it's sitting perfectly inside the ribs.
Wondering what your belt routing should look like? You can find it right on the front. Gonna take back on here. It's gonna go right underneath this hose here, line it up there, grab this, slide it in, push it all the way in so it's up against the whole throttle body. Make sure your clamps are nice and tight. Your hose over here should have a little clippy-do. Ours is actually broken. But it's gonna push in right there and that will hold it secure. This cover back on here, just slide it all the way back so it's sitting inside the pitons, put this down and tighten up your bolt.
Tools used
Tools used
So, to get started on doing your serpentine belt, you want to make sure your engine is off, obviously. Once you've done that, you want to make sure that you pay attention to the belt routing, so you know exactly the way that the new belt is going to go on. If you were to follow the belt coming over in this direction towards the passenger side, this upper pulley right here is the tensioner. You're going to get on that with either a 15-millimeter wrench or, of course, your serpentine belt tool. I'm going to turn that clockwise. It's going to relieve tension, and I'll take the belt right off. I'll bring this up here, so it hangs out. Now, I'm going to remove the belt. There it is, friends.
When I'm doing these serpentine belts, the first place I like to start is way down at the bottom at the crank. So, I'm going to take one of my ends, put it down along the bottom of that crank, and try to get the belt, so the grooves sit on the grooves of the actual crank pulley. I'm going to bring this around. And now, I'm going to line it up with the direction that the belt originally ran, coming around to the water pump here. Back down around the power-steering. Up over the alternator. Down under the idler pulley.
Okay. So, this looks good. Have it around the tensioner. I'm going to double-check to feel as though it goes around all the pulleys. Oh, look right down here, I can see it's coming right off that power steering pulley. Loosen up the belt a little bit. Slide it in. This looks good. The next thing I want to do is relieve tension from the tensioner, and slide the belt underneath the smooth pulley of the idler. Slide this right over the idler. Carefully release. Now, what I want to do is I want to check to make sure that the belt is sitting on all the pulleys flush.
If you have it hanging over, there's pretty good odds that you're going to damage your belt, and you're going to have to re-replace it again. That feels good. Ok this one. Yeah. Perfect. We'll get our tool out of here, and then we'll start it up and check it.
That looks good. Let's go ahead and start up the vehicle. We're going to run it for approximately 15 seconds, turn it back off, and then double-check.
Tools used
Tools used
If you were to look right down here, you're gonna see a clamp. If you were to look at the other end where it connects on to the throttle body, you're gonna see another clamp. You can go ahead and loosen those up. Also, if you come right up here you're gonna see an 8-millimeter bolt, if you loosen that up you can take this right out. Once you have that out of the way and the clamps are loosened, you can wiggle this around. I'm gonna draw it off of the throttle body right here, and I'm gonna take them right there. Take it off of right here, remove it from the vehicle. So now that we have the intake and the little shell out of the way here, it gives us a nice, clear view. You don't necessarily need to take off the shell but I just like to have it out of the way.
Go ahead and relieve your tension like that. And then, I'm just gonna take the belt off of the idler pulley here and then I can let go of that. We'll get our serpentine belt right out of the way. Let's go ahead and remove the belt. Let's remove the five bolts that hold up your skid plate. Now that that's out of the way, we have a clear view of the AC belt tensioner right there. Go ahead and use a 3/8 ratchet with a short extension. Put it right in the slot. When you pull this down, it's gonna relieve tension, and then, we'll just get the belt right off of there. There we are. Take that off of there. I'm gonna take it, I'm gonna go over that AC compressor. And then, I'm gonna start over the top of the crank. Now that we have that up and over the crank, and then, it's heading its way over to the AC pulley, I'm gonna go ahead and pull this down, give myself a little bit of slack. Put the belt up over the tensioner, and then, just start working it over the AC clutch itself. When you do this, you want to try to be as straight as possible because if you come in at an angle, it's not gonna fit very well. Okay, I relieve tension. Now, you just want to check that belt, feel all the way around, make sure it's on the crank perfectly. Now, we're gonna go and put our shield back up on here.
Go ahead and take one side, go down and around the passenger side of the water pump which is this right here, and then, put it over the crank which is the main pulley over there. I'm just gonna circle it. Put it up and then slide it around. I'm gonna take one, and I'm gonna come up and over the tensioner right here. And then, the other side I'm gonna bring it down and around the water pump, and then, underneath the power steering pump. It's gonna fit right inside the ribs perfectly. And then I'm gonna come up, make sure it's sitting in those ribs. There it is. Come up over the alternator right here. This looks good. Make sure everything is situated approximately where it needs to be. That looks great. I'm gonna grab my tensioner tool. Put it on there. Relieve tension. Now, I'll take this, bring it right underneath the idler pulley. This is your idler pulley. Get our tool off. Give it a nice tug. And then, of course, double check all of your pulleys. Every one of them that has the rib side that goes up against the belt, you need to make sure it is sitting perfectly inside the ribs. If you're wondering what your belt routing should look like, you can find it right on the front. We'll get our intake back on here. It's gonna go right underneath this hose here, line it up there. Grab this, slide it in. Push it all the way in, so it's up against the whole throttle body. Make sure your clamps are nice and tight. Your hose over here should have a little clippy-do. Ours is actually broken, but it's going to push in right there and that will hold it secure. Put this cover back on here, just slide it all the way back so it's sitting inside the pitons. Put this down and tighten up your bolt.
Tools used
You remove this cover, there's a bolt right here. Use an 8-millimeter socket, take that out, and slide the cover up, slide it forward. There's a bracket right here that holds the coolant hoses on, just use a trim tool and just separate that from that. This one's broken in this vehicle. Now we wanna remove the snorkel and use an 8-millimeter socket, loosen up the worm clamp, or you can use a straight blade screwdriver. So right here. Slide this off and slide it off the throttle body and pull it out of your way. And use a 15-millimeter wrench or you can use a belt tensioner tool and just put it on the belt tensioner, loosen this up. Slide the belt off of the idler pulley. Loosen up on the tensioner and slide the belt off the alternator, off the power steering pump pulley, off the water pump, and off the crank pulley.
All right, take the serpentine belt and slide it over the crank pulley first and go over the water pump. The backside of the belt needs to go over the water pump. And go down to the power steering pump and up over the alternator. And then over the tensioner right here and you hold off on putting it over the idler pulley till last. And now take your belt tensioner tool or a wrench and just take the tension off the tensioner. All right, now I'm gonna slide the belt close to the idler pulley and take the tension off the tensioner with your wrench or your belt tension tool. Just be careful. And take the wrench off and just double-check all the pulleys and it looks good. Now take the intake snorkel and line this up over the throttle body and that's good there. And then line it up on the mass airflow sensor, just like that. And tighten this up, tighten up that worm clamp and then same with this one. And take this bracket and then reposition that into that bracket. This one is broken. And slide this cover back on. Get this bolt started and tighten that up.
Tools used
If you were to look right down here, you're gonna see a clamp. If you were to look at the other end where it connects onto the throttle body, you're gonna see another clamp. You go ahead and loosen those up. Also, if you come right up here, you're gonna see an 8-millimeter bolt. If you loosen that up, you can take this right out. Once you have that out of the way, and the clamps are loosened, you can wiggle this around. I'm gonna draw it off of the throttle body right here, and I'm gonna come right there, take it off of right here, remove it from the vehicle.
So now that we have the intake and the little shell out of the way here, it gives us a nice, clear view. You don't necessarily need to take off the shell but I just like to have it out of the way. Go ahead and relieve your tension like that. And then I'm just gonna take the belt off of the idler pulley here and then I can let go of that. We'll get our serpentine belt tore right out of the way. Let's go ahead and remove the belt. Go ahead and take one side, go down and around the passenger side of the water pump, which is this right here, and then put it over the crank, which is the main pulley over there. Just gonna circle it, put it up and then slide it around. I'm gonna take one and I'm gonna come up and over the tensioner right here, and then the other side. I'm gonna bring it down and around the water pump and then underneath the power steering pump. It's gonna fit right inside the ribs perfectly. And then I'm gonna come up. Make sure it's sitting in those ribs. There it is. Come up and over the alternator right here. This looks good. Make sure everything is situated approximately where it needs to be. That looks great. I'm gonna grab my tensioner tool, put it on there, relieve tension. Now I'll take this, bring it right underneath the idler pulley. This is your idler pulley. Get our tool off, give it a nice tug, and then of course double-check all of your pulleys, every one of them that has the rib side that goes up against the belt, you need to make sure it's sitting perfectly inside the ribs.
Wondering what your belt routing should look like? You can find it right on the front. Gonna take back on here. It's gonna go right underneath this hose here, line it up there, grab this, slide it in, push it all the way in so it's up against the whole throttle body. Make sure your clamps are nice and tight. Your hose over here should have a little clippy-do. Ours is actually broken. But it's gonna push in right there and that will hold it secure. This cover back on here, just slide it all the way back so it's sitting inside the pitons, put this down and tighten up your bolt.
Tools used
Brought to you by 1AAuto.com, your source for quality replacement parts and the best service on the Internet.
Hi, I'm Don from 1A Auto. I hope this how-to video helps you out, and next time you need parts for your vehicle, think of 1AAuto.com. Thanks.
In this video, we're going to show you have to replace the serpentine belt on this 2002 Chevy Suburban with the 5.3 liter V8 engine and the 130 amp alternator. The items you'll need for this are a new serpentine belt from 1AAuto.com, a 10 and 15mm socket and ratchet and a flat blade screwdriver.
Start off by loosening these two hose clamps, using a flat blade screwdriver. We'll just fast forward as Don does this. Now, just pry this clip out and then pull the hose back. You may need a flat blade screwdriver to help you pry it free. Then, pull forward and lift it up and out.
Next, remove these two 10 millimeter bolts. We'll fast forward as Don does that. Then, pry the clip on this hose out of the fan shroud. Then, remove these four clips around your shroud. To remove these clips, you just pry up the center and then pull the clip out. We will fast forward as Don does this to the other three. Now, just pull that hose back and lift the shroud straight up and out.
Right here is your tensioner. Just put the 15 millimeter socket and ratchet on it and push down on the ratchet. This will release the tension on the belt and you can pull the belt from the pulleys. You want to just reach down and pull it off all the pulleys and the belt will be free and you can just pull it up and out.
Now, located on the front of your truck, you will see this serpentine belt diagram. You want to follow this when you're putting your belt back on. Really, it's hard to show us doing it. So, you're going to have to refer to that but it's pretty simple to follow. Everything is where it needs to be. You can see he starts with the lower pulleys. He just starts feeding the belt down around each of them, following that diagram. We'll fast forward as he does the majority of this. Once you've got it on all but one pulley, push back down on the tensioner and double check. Make sure your belt's on all the pulleys properly and not just half on some of them. Then just get it in to position and then carefully release the tension on the tensioner and pull the ratchet free.
Now to replace the shroud, just push it back down in to place and then replace those four clips. Just push them back down in to place and push the center down to lock them. Push the hose back in to place and then replace those two 10 millimeter bolts.
Take the air intake hose and push it back down in to place on to the air intake box and then on to the engine. Then just tighten up those two hose clamps and just re-clip that hose to the air intake hose and you're all set.
We hope this video helps you out. Brought to you by www.1AAuto.com, your source for quality replacement parts and the best service on the Internet. Please feel free to call us toll-free, 888-844-3393. We're the company that's here for you on the Internet and in person.
Tools used
Hi, I'm Mike from 1A Auto. We've been selling auto parts for over 30 years!
What's up, guys? I'm Andy from 1A Auto. Today I'm gonna show you how to remove and reinstall the serpentine belt on this 2008 Chevy Silverado with a 4.3L V-6 engine. If you need parts for your vehicle, click the link in the description and head over to 1aauto.com.
One thing you want to keep in mind, when you're doing a serpentine belt is which routing the belt is. Before you take it off, it's a good idea to take a picture with your phone. If you don't have any reference of the belt, sometimes there's a key on the vehicle itself. This vehicle does not have it.
We will take this serpentine belt tool, we actually sell this at 1aauto.com. Slide the tool into the tensioner, right here. And then there's a hose over here that's kind of in your way a little, so pull up on the tensioner. Just going to hold this. Make sure you don't have anything in the path of this. You don't want to slip and let go of this and have it hit you in the face or anything.
So, we'll pull up on this. We're going to pull the belt off of this idler, right here. We will pull it off the alternator. Pull it off the tensioner. Pull it off the crank, the water pump, the power steering pulley, and then off the AC compressor. Then I'll slide this belt over the tool and pull it out. There's the belt.
A good thing to practice when you're doing this is to take the new belt and line it up with the old belt, and make sure they're the same length. We don't have a new belt, so we're just going to reuse the old one.
All right, we're going to remove this tool before we put the belt on. It'll just make it easier to maneuver the belt around to position. So, first we're gonna install the belt on the crank pulley. Slide it over the water pump, and over on the power steering pulley, up around the AC compressor, and over the water pump. We're going to skip the idler, for now, 'cause we'll put that on last. Over to the tensioner.
So now that those are all lined up, I can take the belt tool, slide this in position, and put some tension on the belt. Slide this up, and slide it under the idler pulley. Remove the tool. Then check all the pulleys, and make sure the belt is in position and hasn't jumped off any of the teeth. And that looks pretty good.
Then we can just start it real quick and then shut it off, and just make sure everything is still in position.
Thanks for watching. Visit us at 1aauto.com for quality auto parts, fast and free shipping, and the best customer service in the industry.
Tools used
Brought to you by 1AAuto.com, your source for quality replacement parts and the best service on the Internet.
Hi, I'm Don from 1A Auto. I hope this how-to video helps you out, and next time you need parts for your vehicle, think of 1AAuto.com. Thanks.
In this video, we're going to show you have to replace the serpentine belt on this 2002 Chevy Suburban with the 5.3 liter V8 engine and the 130 amp alternator. The items you'll need for this are a new serpentine belt from 1AAuto.com, a 10 and 15mm socket and ratchet and a flat blade screwdriver.
Start off by loosening these two hose clamps, using a flat blade screwdriver. We'll just fast forward as Don does this. Now, just pry this clip out and then pull the hose back. You may need a flat blade screwdriver to help you pry it free. Then, pull forward and lift it up and out.
Next, remove these two 10 millimeter bolts. We'll fast forward as Don does that. Then, pry the clip on this hose out of the fan shroud. Then, remove these four clips around your shroud. To remove these clips, you just pry up the center and then pull the clip out. We will fast forward as Don does this to the other three. Now, just pull that hose back and lift the shroud straight up and out.
Right here is your tensioner. Just put the 15 millimeter socket and ratchet on it and push down on the ratchet. This will release the tension on the belt and you can pull the belt from the pulleys. You want to just reach down and pull it off all the pulleys and the belt will be free and you can just pull it up and out.
Now, located on the front of your truck, you will see this serpentine belt diagram. You want to follow this when you're putting your belt back on. Really, it's hard to show us doing it. So, you're going to have to refer to that but it's pretty simple to follow. Everything is where it needs to be. You can see he starts with the lower pulleys. He just starts feeding the belt down around each of them, following that diagram. We'll fast forward as he does the majority of this. Once you've got it on all but one pulley, push back down on the tensioner and double check. Make sure your belt's on all the pulleys properly and not just half on some of them. Then just get it in to position and then carefully release the tension on the tensioner and pull the ratchet free.
Now to replace the shroud, just push it back down in to place and then replace those four clips. Just push them back down in to place and push the center down to lock them. Push the hose back in to place and then replace those two 10 millimeter bolts.
Take the air intake hose and push it back down in to place on to the air intake box and then on to the engine. Then just tighten up those two hose clamps and just re-clip that hose to the air intake hose and you're all set.
We hope this video helps you out. Brought to you by www.1AAuto.com, your source for quality replacement parts and the best service on the Internet. Please feel free to call us toll-free, 888-844-3393. We're the company that's here for you on the Internet and in person.
Tools used