Replaces


Recommended for your 2011 Cadillac Escalade
Frequently bought together
Part Details
Specifications
About TRQ:
TRQ is a trusted brand dedicated to making every repair a success story by combining premium parts with easy installation. Each TRQ part is engineered by a team of automotive experts to meet or exceed OEM standards, delivering enhanced performance and maximum longevity. With rigorous in-house testing, the brand ensures superior fit and function across every product line. TRQ also provides customers with best-in-class, step-by-step installation videos—so you can complete repairs with confidence, whether you're a first-time DIYer or an industry professional.
Returns: Parts with electrical components cannot be returned once installed.
Attention California Customers:
 WARNING: This product can expose you to chemicals including Di(2-ethylhexyl)phthalate (DEHP), which is known to the State of California to cause cancer, and birth defects or other reproductive harm. For more information, go to www.P65Warnings.ca.gov.
Lifetime Warranty
This item is backed by our limited lifetime warranty. In the event that this item should fail due to manufacturing defects during intended use, we will replace the part free of charge. This warranty covers the cost of the part only.
Returns: Parts with electrical components cannot be returned once installed.
FREE Shipping is standard on orders shipped to the lower 48 States (Contiguous United States). Standard shipping charges apply to Hawaii and Alaska.
Shipping is not available to a P.O. Box, APO/FPO/DPO addresses, US Territories, or Canada for this item.
Expedited is available on checkout to the United States, excluding Alaska, Hawaii.
Final shipping costs are available at checkout.
Created on:
Tools used
Brought to you by 1AAuto.com, your source for quality replacement parts and the best service on the Internet.
Hi, I'm Mike from 1A Auto. I hope this how-to video helps you out, and next time you need parts for your vehicle, think of 1AAuto.com. Thanks.
In this video, we're going to show you how to replace the radiator cooling fan on this 2011 Chevy Silverado 1500. It's the same process on a large variety of GM trucks and SUVs from 2007 to 2012. You'll need a new radiator fan from 1A Auto.
Now the first thing that you want to do is in behind the radiator cooling fan there's this clip right here you want to remove. There's a harness connected to the back of each fan. Disconnect both of those. You want to pull this clip up. Then there's another one over here that you want to pull up. We'll fast-forward as he does those steps. He uses a small flat blade screwdriver to help him with those clips.
Now you'll see there are two 13mm bolts at the top of the radiator fan. You just want to go ahead and remove those. We'll fast-forward as he does this. Then down here you'll see there are two 10mm bolts. There's one here and the other one, it's difficult to show with the camera, but it's right down right over here. Again we'll fast-forward as he removes those bolts. Now, over here, you'll see this liner here. You just want to pull out.
There's a rubber grommet right here. Pull that back. Then there's a little clip right there. Just pull that off. Then you just want to pull on the line until it comes free. Now you can pull that radiator cooling fan up and out.
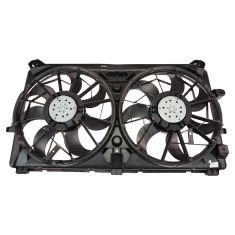
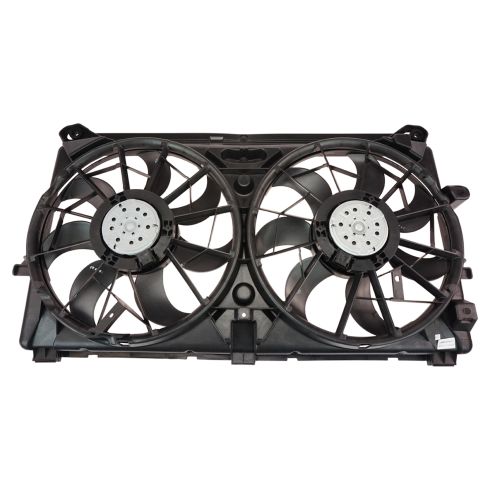
You may need to move around some of the hoses. Now on the front is the new part from 1A Auto; in the back the old part. You can see they're identical, and they'll fit exactly the same, with the same mounting points.
Now there are a couple of things you want to remove from the old one and put into the new one like this clip right here. Take that off and put that into place on the new one. Then you want to pry off this clip right up here. You may want to use a pair of pliers to help pry this out. You just want to put that on to the new fan. Then the last thing are these two little metal clips here, just pry those off. You can use the pliers or a flat blade screwdriver, whatever you want. Just pry those off and slide them into place on your new radiator fan.
To reinstall, you just got to put the fan down in, move the hoses and things out of the way, and you can see we're putting the old fan back in because there's nothing wrong with it in this truck. You want to feed the passenger side down in first to a certain point, then the passenger side, and then just keep going down in with it. You want to make sure that the radiator fan is resting on this tab right here. There's one on both sides.
Now you can reconnect this line here. You just push it right back into place, push that clip back in, and then slide that grommet back up into place. Now you can push these two lines back into that clip. Put the top part back on over the top of them and push that into place. You want to reconnect the harnesses back to the back of the radiator fans. Push that hose in up top. You want to push in the clip on the other side too.
Now you want to replace those two 10mm bolts. You want to first do it by hand just so you can get it lined up, and then you can tighten them the rest of the way with a socket and ratchet. We're just going to fast-forward as he does this. I'll continue to fast-forward as he replaces those two 13mm bolts that secure the radiator fans in place. Once those are tightened up you're all set.
We hope this video helps you out. Brought to you by www.1AAuto.com, your source for quality replacement parts and the best service on the Internet. Please feel free to call us toll-free, 888-844-3393. We're the company that's here for you on the Internet and in person.
Tools used
Tools used
Hi, I’m Mike from 1A Auto. We’ve been selling auto parts for over 30 years!
In this video we'll be replacing the cooling fans in a 2009 Chevy Suburban. If you need these parts or other parts for your vehicle, click the link in the description and head over to 1AAuto.com.
We're going to remove this cover. Just grab underneath, pull up, and then you're going to pull out. You're going to have to wiggle it a little bit and it'll come right out. That's where it's secured down. Just clips that hold on in.
Next, we're going to remove this snorkel. We have a worm clamp right here. We're going to use an eight millimeter socket and extension. Loosen that up, and then over here, there's a hose clamp right here, do the same. Then we're going to take a trim tool and over here where the hose is secured. We’re going to separate that. We're going to remove this hose that goes to the upper valve cover. Pull that out. We're going to lift up right here and pull towards the front of the vehicle. And then pull this off the air box. Pull that out of your way. I'm going to pull the air box out. I'm going to disconnect the connector right here for the mass airflow sensor. Move that aside. Grab on the air box and you're just going to gently pull up, like that and the air box will pull right up.
Next we're going to pull these transmission cooler lines off. We're going to pull this little cover back. It covers up the lock for the transmission cooler lines, and I'm going to take a right angle pick and you're going to go in here and grab the little locker that holds the line on. We'll slide that out. I'll show you what it looks like.
What you're doing is when it's in there, trying to grab in here and just pull this out like that, and then you can grab it and pull it out. I'm going to grab the other cover for the other one, pull that out, and then pull the other clip off this one as well. Grab it and pull it out. They do actually make a special tool that you can slide over here and push it down. We do not have access to that tool, but some of you may have access to it and it'll be a little bit easier.
I'm going to take these 10 millimeter bolts out with a 10 millimeter socket. They hold the line on. These hold the transmission bracket on, so we'll take these out. Sometimes these are caged bolts so they stay with the bracket. I'm going to pull these lines out. Make sure you have a drain bucket underneath cause some fluid's going to go into the bucket, pull the upper line out, straight back. Next we're going to pull this line up onto the bracket right there. Set that aside. Then I'm going to use a trim tool and pry this clip up. It holds the upper radiator hose, move it out of the way.
So next on these, fans I'm going to grab this connector and there's a little button to push. As you can see the lock, we'll pull that up. We'll grab the other one, do the same. Pull the hose off. We'll use a trim tool to disconnect the wires from the fan shroud. Just one more. All right, that's all disconnected. So we're going to take these upper fan bolts out. So 13 millimeter, we'll use a 13 millimeter socket and a ratchet. Get those cracked free and then we'll do it by hand. Pull the bolt out. Do the same over here. At this point you should be able to grab our fan shroud. The only thing holding it down here is these clips, so pull that up and then pull it up on this side. Just maneuver it. Oh, it's stuck right there. And there it is.
These are our old fans. These are our new fans from 1AAuto.com. As you can see, the fan configuration are the same, connectors are exactly the same. The fan Motors and the fan blades are both equal to the original. Flip it over. Take a look at this side. This side's the same. As you can see, the fans are the same from this side. The mounting spots are the same. The clips that clip into the radiator are the same. Get yours 1AAuto.com and you'll be ready to rock and roll.
Next we're going to install our coolant fans. Pull this hose out of the way. Over here, there's a little slot right here. That's where you want to line the fan up with the housing. Same with the other side. It's going to line up right here. We can install our bolts. Installed that bolt and that bolt over here. Now we can tighten these up with our 13 millimeter socket and ratchet. Now we can install the wiring harness into the holes down below here. The little push retainers, put those in. We can connect our fan connector. Re-connect this one. Next, we can slide this retainer through the top of the fan shroud.
Next we can install this tranny cooler line. The lower one. We're going to just put it in the fitting and push until we hear it click. Just like that. We can push down this little black cover over it. Once that's on, make sure it's seated all the way around. Looks good. Next, I can install the 10 millimeter bolt right here. We'll tighten this bolt up with a 10 millimeter socket and ratchet.
Next we're going to install our upper tranny cooler line and get it lined up in the fitting, and then push until it clicks and then push this cover over. This cover keeps the clip from popping out. Then we're going to install our 10 millimeter bolt right here. We'll tighten it down with a 10 millimeter socket and ratchet. Now we're going to install our air box, slightly in this way. We'll push it down. Go into those rubber grommets. We can connect this electrical connector to the mass airflow sensor like that.
Next we'll install the intake snorkel, slide it down. We're going to slide it over the throttle body right here, and watch this rubber grommet over here. We're going to pull up on it, slide it back. And it's in, and it's in right here. Next we're going to come over here, pull this onto the air box like that. Over here, a little retainer for the hose, slide that in there like that. And then on the backside, this hose that connects to the upper valve cover, pop that in.
Now I'll take my eight millimeter socket extension and a ratchet. Tighten up this worm clamp right here. Not too tight, just a little bit snug. And then same on this one. Snug it up. That's good. We're going to slide it underneath the hoses over here, the heater hoses, and then slide it back. Then once it's back all the way, these little rubber grommets in here that line up with that ball and socket and push down.
Next we'll pull off our coolant cap on our overflow tank or coolant reservoir. Now we're going to add our coolant. You want to make sure you use a 50/50 mix of coolant to water. Check the bottle of the coolant to make sure it's not premixed. This is we're using a Dex-Cool coolant in this or a GM vehicles approved coolant.
As you can see, that's where the fill line is. When we start the vehicle, that is going to suck more coolant into the vehicle. We're going to start it with the cap off and as the vehicle runs, the coolant's going to go down and we're going to have to top off accordingly. Now we're going to start it.
As you can see, it sucked down all the coolant out of our bottle. So we're going to add more coolant. You want to keep in mind checking the temperature while we're letting the coolant burp. You don't want to just start it and walk away. We're going to wait until the temperature gets up to about 210 degrees. Another thing that's a good idea is to turn the heat on. We'll turn the heat on high, all the way up. and keep checking and make sure you get heat coming out. If there's no heat, then there's not enough coolant in the system and you need to add more coolant.
We're going to check our coolant level. Make sure it's still above that line, which is good. And then, carefully, you're going to grab this radiator hose. And this hose still feels cold. That means the thermostat still has not opened yet, so we're going to keep letting it run until it opens.
As you can see, our vehicles up to just about 210 degrees, which is good. Our heat is working well and the thermostat has opened. At this point, we're just going to shut the vehicle off and let it cool down. All right, so now our engine has cooled down, and we're going to check our coolant level. It's a little bit high. What I'm going to do is I'm going to drop it down just above where the full line is. And then I'm going to put the radiator cap on, and then we're going to go for a test drive. And after we get back from about a 10 minute test drive, we will adjust accordingly. Let it cool down again before you take this off and then you'll be good to go.
Thanks for watching. Visit us at 1AAuto.com for quality auto parts, fast and free shipping, and the best customer service in the industry.

RFA83472