Replaces


Frequently bought together
Returns: Parts with electrical components cannot be returned once installed.
Attention California Customers:
 WARNING: Cancer and Reproductive Harm - www.P65Warnings.ca.gov.
Lifetime Warranty
This item is backed by our limited lifetime warranty. In the event this item should fail due to manufacturing defects during intended use, we will replace the part free of charge. This warranty covers the cost of the part only.
Returns: Parts with electrical components cannot be returned once installed.
FREE Shipping is standard on Orders shipped to the lower 48 States (Contiguous United States). Standard shipping charges apply to Hawaii, Alaska and US Territories. Shipping is not available to Canada.
Expedited is available on checkout to the United States, excluding Alaska, Hawaii and US Territories as well as P.O. Boxes and APO/FPO/DPO addresses. Final shipping costs are available at checkout.

Created on:
Tools used
Brought to you by 1AAuto.com, your source for quality replacement parts and the best service on the internet.
Hi, I'm Mike from 1A Auto. I hope this How To video helps you out and next time you need parts of your vehicle, think of 1AAuto.com. Thanks.
In this video, we're going to show you how to change your cap and rotor and this is just all part of doing a basic tune up on one of these, this is a '96 Tahoe. It has the 5.7 liter Vortec engine, same engine that's in any 1995 to 1999 Chevy or GMC pickup as well as 1995 to 2000 SUVs of this body style. The only tools you'll need are a 12-mm socket with a ratchet and extension to remove your air intake system and then you'll need a T15 and T20 Torx drivers.
We're going start off, take off your air cleaner cover here then we're going to unplug this. I'm reaching down underneath and you can grab the little clip that holds it on, pull the clip back and just like that. Disconnect this up here as this comes up and we'll also going to disconnect this hose right here. Then you're going to want to remove this nut, this silver one right down in here. Just fast forward here as we remove that. That is a 12mm nut. As I remove that, basically take this whole apparatus right out and gives me a lot clearer view. You go to replace your cap and rotor. Here's your new cap. You can see there's going to be two screws that hold it in and then on the cap, it actually has you're firing order. C for coil, six, four, two and eight, then over here five, three, seven and one.
These numbers correspond to the number of cylinder and on most V8s, all GM V8s and most V8s, the driver side or left bank is the odd, passenger side or right hand bank is the even. The first one towards the front of the car is your number one cylinder, three cylinder, five cylinder, seven cylinder is closest to the passenger compartment and on the passenger side your two cylinder is first towards the front, four, six and eight is closest to the passenger compartment. Basically with that, what you can do is, come right in here. Remove your coil wire first and then you can just kind of unplug and take your other wires out of the way and the wires, you kind of twist, kind of give them a quarter of a twist as you're unplugging them.
Now with the wires off, I can kind of look down in and see there's one of my screws and the other one is kind of opposite of that. The cap's here. You just have to use a T20 Torx driver and get it into the screw. I'm just going to fast forward as I remove that other screw from the backside and so you know I am standing on a stool so I can get into the engine compartment this far. Here's what the underside of the cap looks like. You can see that these are kind of gray and scored. Now, go down to a smaller T15 Torx driver and there are two screws that hold the rotor on. I'm going to speed it up here again as I remove those screws. You want to note which way the contact is pointing on your rotor and just makes it easier when you go to put the new one on. Just make sure it's pointing generally the same way.
I've got my new rotor. So here is my new rotor, I've got the two screws in there. You can see, it really can't go on incorrectly. Put it down on. At this point it's just about as simple as it looks. You put it back down in place the way it was, make sure you get those screws lined up and then tighten them up with your T15 Torx driver. You want to make them nice and tight. You don't have to over tighten them but they should be nice and firm. I'm going to put the cap on and make sure that the side that has the five connections,that one being the coil, is over towards the passenger side of the truck.
I'm going to put this down on. Again, just speed up here. Put the rotor on. I'm sorry, just put the cap on and then take your T20 Torx screws, put them into your driver, put them right down and you can see I'm using a magnetic driver. Put them down in and tighten them up. Now you just want to basically follow each wire up. Let's see. This is the number one wire, make sure you put it into the number one. This goes back to what I said before on the left side or driver side, the spark plug all the way towards the front is the number one spark plug. The next one is the three, five and then seven is the rearmost, so you just make sure that you follow the one plug all the way up or the on, the wire that's connected to the number one spark plug followed up. Make sure you connect it to the number one receptacle on the distributor cap and keep going that way.
I just switch over to the passenger side. Same thing on the passenger side. I do the coil first and then the furthest forward spark plug is the number two spark plug, just follow it up and make sure you connect the wire that's connected to the number two spark plug to the number two terminal on the distributor cap. That goes the same for the four, six and eight, two being the furthest forward and eight being the furthest rearward. After that, put your air intake back together. You can put it on into place. Make sure reconnect both of the connections, the airflow sensors and put it back into the air box, tighten up that 12-mm knot and reconnect to the PVC, put your air filter in and your air box back together. Even though I didn't loosen any of the clamps on the air intake hose, I did check them and I found that one was loose, so just make sure you tighten up all those connections and check them.
We hope this helps you out. Brought to you by www.1AAuto.com, your source for quality replacement parts and the best service on the internet. Please feel free to call us toll free 888-844-3393. We're the company that here for you on the internet and in person.
Tools used
Brought to you by 1AAuto.com, your source for quality replacement parts and the best service on the internet.
Hi, I'm Mike Green. I'm one of the owners of 1AAuto. I want to help you save time and money repairing and maintaining your vehicle. I'm going to use my 20 plus years experience restoring and repairing cars and trucks like this to show you the correct way to install parts from 1aauto.com. The right parts installed correctly. That's going to save you time and money. Thank you, and enjoy the video.
In this video we're going to show you how to replace the distributor cap and rotor on this 2000 Chevy Blazer with a 4.3L, same as a lot of the different vehicles. A lot of different GM vehicles with the 4.3L V6. The only tools you'll need on this vehicle are a T15 and T20 torque drivers. Those are screws with the little star-shaped heads, and you'll see what I mean in the video.
We're looking at the battery here and then the engine. Your distributor cap is right in behind the center. You can see I've done a little work here already. I've wiped down the ends of the plug wires, and I've labeled them with numbers that correspond to the numbers on the cap: five, one, three, five, one, and three, and then two, four, and six, and then the coil for C. Once you have these marked, what you want to do is twist them, and then pull. They are never that easy to get off. So you pull all of them off. Just make sure you mark them first so you know where to put them back on.
Due to the congestion over here, what I'm going to do is actually I'm going to unbolt the cap first. You can see one of the bolts is right there. It's a T20 torques bit. Then just opposite this indent right here, that's where the other screw is and I can't really get the camera down in there. You want to remove those two T20 Torx screws. Here's my T20 Torx driver.
I am going to fast forward through just removing those screws. One thing, just make sure you do not drop them. Be very careful as you're taking them out that you don't drop them down and behind and lose them. Now that I have the cap up, I can pull it clear of these hoses a little bit. Get a better grip on these wires to pull them. There's my cap. You can see how these contacts are burnt somewhat. That's an indication that this has got some wear on it. Now with that cap out of the way, you can see here is our rotor. It's got two T15 screws holding it on. Again, we'll fast forward through here. Again, just make sure you don't lose those screws.
Those screws fall out, and here's the cap, and it too has got some definite wear on the contact there. So here's my new rotor, and it actually has two pins next to the screws. There's another locating pin right here that correspond. So you can really only put it on one way. Just make sure it goes on and down nicely. So there's our new rotor installed, new cap, coil wire. The one with the four goes onto the passenger side. I'm just going to make sure that I don't have any wires in the way. Set the cap down on. And it has a flat spot on here so that it can also only go on one way. Now take our T20 screws. Be very careful not to drop them.
Make sure the cap is on there nice and firm. The new cap has a little bit smaller numbers, but still you can see there's three, one, and five. Obviously make sure you push them all the way on. Over here you got six ... four ... that's two. Then our coil wire. Let's see. Where did he go?
So now it should be ready to fire up. We hope this helps you out. Brought to you by www.1AAuto.com, your source for quality replacement parts and the best service on the internet.
Tools used
Hi, I'm Mike from 1AAuto. We've been selling auto parts for over 30 years! We're dedicated to delivering quality auto parts, expert customer service, and fast and free shipping, all backed by our 100% satisfaction guarantee. So visit us at 1AAuto.com, your trusted source for quality auto parts.
In this video, we're going to be working with our 1996 GMC Sierra K1500. We're going to show you how to replace your distributor cap and rotor. This is an important part of the tune-up process. If your plugs and wires are bad, it's worth going in there and taking a look at this because ours was loaded with corrosion and probably a good part of the reason that a vehicle doesn't run right.
This video is on a 5.7L V8, but will be very similar to a variety of other GM engines. If you like this video, please click Subscribe. We have a ton more information on this and many other vehicles. If you want these parts for your truck, you can follow the link down in the description over to 1AAuto.com.
Here are the items you'll need for this repair: flat blade screwdriver, T15 Torx driver, T20 Torx driver
Remove the thumb screw on the top of the intake track at the throttle body. This can be done by hand, or if yours is stuck you can lightly grab it with a pair of pliers and rotate it that way. Disconnect the rubber elbow on your PVC breather and loosen this hose clamp with a flat-blade screwdriver. Now, you could disconnect the electrical connectors, undo the air box and remove this all as one piece if you want, depending on what you're trying to get room for. However, this is all that's necessary for what we're trying to do.
Undo the boot, lift up and forward, and remove the upper intake.
The distributor cap is located at the back of the engine behind the upper intake manifold. It's secured with two T20 Torx bolts, which you can remove with a screwdriver, like we're going to, or a Torx socket and ratchet. Now, it's very important that your plug wires go on in the same way they came off. They are numbered, so you could look it up, but that's a little more difficult.
What we're going to do is if you look, the wire looms have these locked in the right position, so we're just going to unplug them and let them hang knowing that we can plug then back in in the same order and not have an issue. These do tend to get stuck on there, especially if they've been on there a while, so you may have to work them a bit to get them off. Just make sure you pull from the boot and not the wire because tearing or breaking it could cause misfire. On the passenger side, you'll notice this lone wire over here that's not in a wire loom, marked C. This is for your ignition coil. It'll be the only wire not out of a loom. If you follow it, it comes out of your ignition coil, which is located right over here, so that's an easy one to keep track of. Once all your plug wires are off, you can remove your two T20 Torx screws. You can now remove your distributor cap.
Now, normally when doing a distributor you'll do your rotor as well. It's very important to know which way the contact on the rotor is facing. Ours is at about the 7 o'clock position. It's facing the number two cylinder, which is going to be the front passenger cylinder, so we know where that's going to go. We'll now remove these two T15 Torx screws. We’re going to use a Torx screwdriver for this. You can use a Torx socket and ratchet if you prefer. Now, these are very tiny screws, and I don't want to lose them. Once they're loosened up, I'm just going to leave them sitting in their holes in the rotor, so I can lift it all out as one piece and take the screws out then. It looks like they're loosen out to me. Now, we'll lift up and remove our rotor from the distributor.
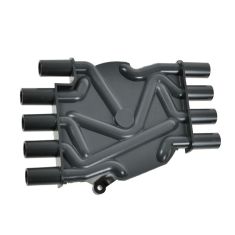
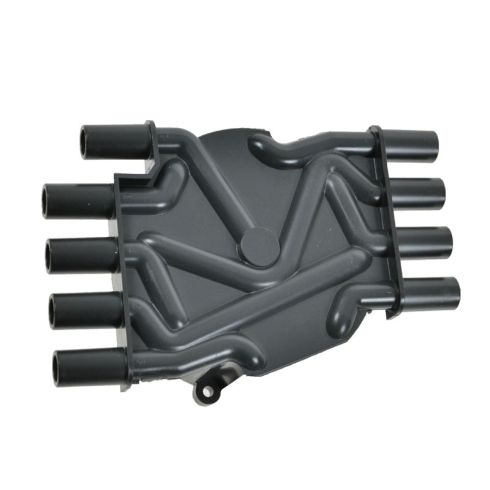
Here we have our old distributor cap and rotor that we removed from our vehicle and our new parts from 1AAuto.com. Now, you can see these parts are exactly the same. Our new parts even come numbered with which plug wire is going to go where, which is going to make this a lot easier to install.
We also have a new rotor with the same two-bolt mounting location which has the same alignment tabs on the bottom. Now, you can see our olds one's got some pretty nasty corrosion building up here. It's got that greenish tarnish color on the contact here. There's also a bunch of debris on the inside and some rust at the end here. That's kind of bent down where you can see this is pointing up and nice and springy on the new one, nice clean metal. Same two-bolt mount location on your distributor cap. If you flip it over, the difference is clear. Nice clean contacts here. No debris. No buildup.
On this one, you knock the corrosion off with your fingers. It's just really contaminated and dirty. It's not going to give us a good spark, and it's not going to let our engine run to its full efficiency. This means we're going to get less power. We're not going to get as good of a burn, which makes our vehicle less efficient as well, and it could also cause misfires and more serious issues with our engine. If your vehicle's misfiring and plugs and wires weren't quite enough to get it back up and running the way you would expect, these new parts from 1A Auto are going in direct fit just like your original equipment, get you a good strong spark and fix you up right.
Reinstall the rotor onto your distributor in the same way you removed it. There are little alignment tab's there as well but you could put it 180 out. We already know that ours was facing the 7 o'clock position the way we're looking at it now. We'll reinstall our screws with a T15 Torx driver, whether you're using a socket and ratchet or a screwdriver, either way. Reinstall your distributor cap, lock into place once it goes on. It only fits one way. Then, we'll reinstall our two T20 Torx screws. Remember, your single wire goes on the coil, and the rest you'll just want to check the alignment, the loom it comes through. Make sure they're all in the right order.
Reinstall the intake boot onto the MAP sensor. Tighten down the hose clamp with your flat-blade screwdriver. Line up your fitting onto the throttle body. Remember, this has to slide on at the front first and then be pushed down. Reinstall your PVC breather. Reinstall your thumb screw. Just get that down as tight as you can by hand, and you're good to go.
Thanks for watching. Visit us at 1AAuto.com for quality auto parts, fast and free shipping, and the best customer service in the industry.

DR474T