Replaces


Frequently bought together
Part Details
Product Features
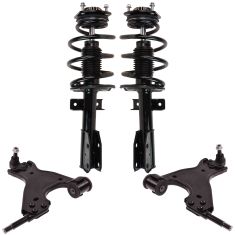
TRQ suspension kits are manufactured using premium raw materials and coatings for extended service life. Each TRQ suspension component is designed to be a direct, maintenance-free replacement to the stock unit. To extend the life of your steering and suspension components, TRQ recommends replacing components in pairs, sets, or kits. All products are fit and road-tested in our Massachusetts R&D facility to ensure we deliver on our promise of Trusted Reliable Quality.
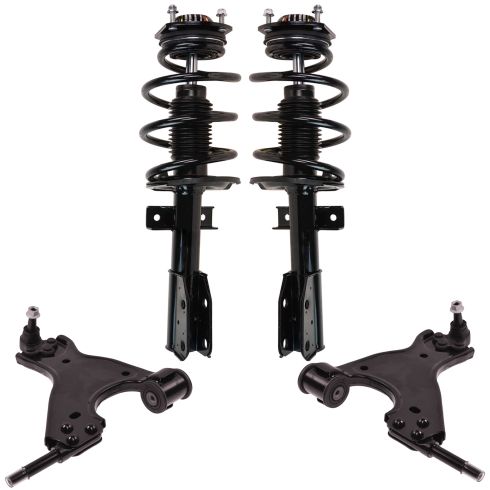
Replacing struts used to require specialized tools to compress, remove, and transfer the old spring and mount. Our Pre-assembled, complete strut & spring assemblies come with all new parts and make the job much quicker and easier for the do-it-yourself mechanic.
Strut & spring assembly contains:
Our steering and suspension components are pre-greased and sealed for long life and do not require the extra maintenance typically required by greaseable versions.
Attention California Customers:
 WARNING: This product can expose you to chemicals including Chromium (Hexavalent Compounds), which is known to the State of California to cause cancer, and birth defects or other reproductive harm. For more information, go to www.P65Warnings.ca.gov
Lifetime Warranty
This item is backed by our limited lifetime warranty. In the event that this item should fail due to manufacturing defects during intended use, we will replace the part free of charge. This warranty covers the cost of the part only.
FREE Shipping is standard on orders shipped to the lower 48 States (Contiguous United States). Standard shipping charges apply to Hawaii and Alaska.
Shipping is not available to a P.O. Box, APO/FPO/DPO addresses, US Territories, or Canada for this item.
Expedited is available on checkout to the United States, excluding Alaska, Hawaii.
Final shipping costs are available at checkout.
Created on:
Tools used
Brought to you by 1AAuto.com, your source for quality replacement parts and the best service on the Internet.
Hi, I'm Mike from 1A Auto. I hope this how-to video helps you out, and next time you need parts for your vehicle, think of 1AAuto.com. Thanks!
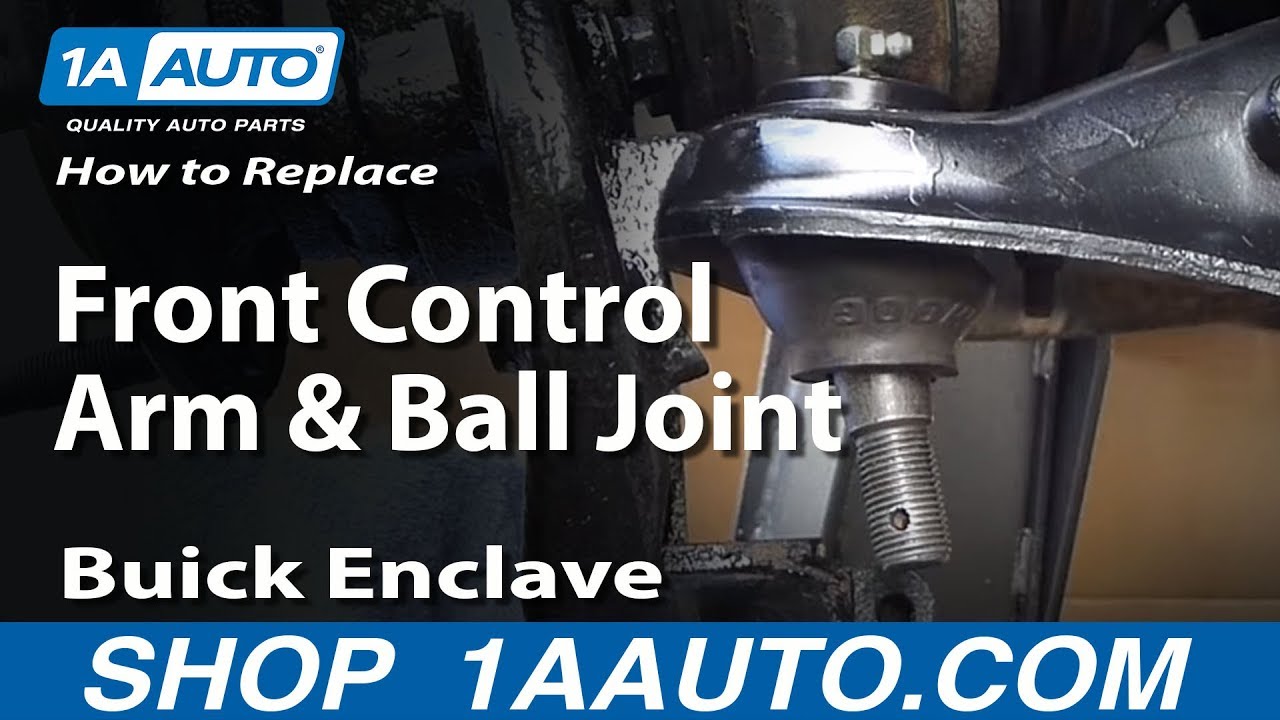
In this video, we're going to show you how to replace the front control arm in this 2010 Buick Enclave, but this is basically the same process for this generation of GM SUVs the Enclave, Acadia, Outlook, and Traverse. We're going to show you on the passenger side, but the driver's side is the same procedure. We do recommend you replace these in pairs, because usually whatever is wrong with one side, whether it's a ball joint or rust, is eventually going to happen to the other side. You're going to need new control arms from 1AAuto.com, jack and jack stands, 8-24 millimeter sockets and/or wrenches, 8 and 21 millimeter wrenches you will need, ratchets and extensions, large hammer, penetrating oil, torque wrench, and after this repair you will need a front end alignment done on your vehicle.
You're going to start by removing the front wheel. You're going to remove the cap if you have one. Then the lug nuts are 22 millimeter. If you don't have the benefit of air tools, loosen up your lug nuts first, then raise and secure the vehicle, and then remove the lug nuts, wheel, and tire.
Use penetrating oil on the stabilizer link where it hooks to the strut, and then an 18 millimeter wrench. You'll first loosen it up, use another wrench, hook it on there, or use a larger socket and ratchet. Loosen up the nut first, and then you'll want to put either an 8 millimeter wrench or an 8 millimeter ratchet, and if you turn the ratchet clockwise, it actually drives the stud out of the nut. The other thing you can do is you can use a set of locking pliers and hook them on the backside once you get it loosened up enough, and then remove the nut with your wrench. That's just another way to do it. Then put that stabilizer link to the side.
The control arm attaches at three different points: a nut on the front, 24 millimeter, a nut on top of the ball joint that's 21 millimeter, and then a bolt and nut, they're 21 millimeter, that hold the rear of the control arm into the frame. Use a socket and breaker-bar, or double wrench method, which is a 24 millimeter wrench, and then you hook another wrench onto it for extra leverage and loosen up that front nut, and once it gets loose you can use your regular ratchet, or just the wrench, and you can remove that nut all the way. On the back fastener you'll need a 21 millimeter wrench and either another 21 millimeter wrench or a 21 millimeter socket with a ratchet. It can help to have a deep socket in this case.
I was able to get by with a regular socket and just put the ratchet into it a little bit. Remove that nut, but leave the bolt in place. Then you're going to want to put some pressure up from underneath on the suspension. This will help hold the ball joint shaft into the steering knuckle. Mine actually broke loose fairly easily. Spray a little bit of penetrating oil on the top of that ball joint stud. 21 millimeter wrench, kind of hook it in under there. You will need a wrench to get under the CV joint, and once you get it loose it actually came loose pretty easily remove the nut most of the way, and then you'll want to break the control arm loose. Mine actually just comes loose as I lower down the control arm. You may have to give the steering knuckle a couple of hits with a hammer. I'll show you just how to hit it.
You can see that my control arm actually just comes loose, which I was actually kind of surprised about. If you should need to hit it with a hammer - see, it came loose right there with just a little tap of my hand. Hit the knuckle right there with the hammer while the control arm is hanging down, and you leave the nut on, just to keep things together. Now, I'm going to remove... there are two bolts that go through and they have nuts on top, I'm just loosening them up first. These are 18 millimeter, they hold the mount in place. I'm going to remove one of the bolts, and I'm going to loosen up the other bolt so that mount will swivel and allow me to get the control arm out. I remove one bolt and loosen up the other one.
In order to get that rear bolt out, you have to take your jack and jack up the stabilizer bar. Jack it up a little bit, make a little tap that bolt out some, raise it up a little bit more, and use a pry bar just to tap on that part. Raise it up a little bit more and take the nut off of the ball joint. I kind of take that nut off the ball joint, drop the control arm down, and then you can move the control arm around and take that bolt right out of there. Then you'll need to let your jack down out of the stabilizer bar to get the control arm out the rest of the way. Here you can see on the right the new control arm from 1AAuto. On the left is the rusted one that has a bad ball joint, and the control arm from 1A Auto's going to go in exactly the same.
When you go to reinstall, just take the shipping protectors off of the front shaft and off of the ball joint. Keep that nut in your hand and throw the protector away. Put the front shaft in first. Put the rear mount just kind of into place, and then get the ball joint up into place. You might have to push the ball joint just to angle it better. Push the ball joint up in the steering knuckle and then just thread the nut on there to hold it in place. Put your jack back under the stabilizer bar and raise it up and out of the way so you can get that bolt in. Then you use two screwdrivers, or you can use something a little bigger. There are slots in the mount, and you just move those. It would help to have another pair of hands. While one person puts the control arm into place, the other one can put the bolt in.
I was able to hold it well enough and get the bolt started it, and then you just kind of manipulate the control arm and tap it in with the hammer. Now, work that front mount bolt you put into place, and push it in there. I'd just kind of use a combination of pushing it up in there and threading it in, and then it goes in, and I put the bolt on the other side, or the nut on the other side. At this point, you can tighten those up, and you want to torque those to 70 foot pounds.
Now, you can put that 24 millimeter nut back in place. You let your stabilizer bar back down, put the 21 millimeter nut back on there, and, at this point, I'm just going to preliminarily tighten both of those. I'm going to torque them up a little bit later. Just get them on there so they're snug. Same thing with the 24 millimeter nut. Now, we're going to put pressure back up underneath the control arm. That holds that stud into place. I tap on the steering knuckle just to allow it to kind of get some pressure and seat itself, and then you want to tighten it to about 100 foot-pounds. I just kind of try and roughly do it with the 21 millimeter wrench and the other wrench for some extra torque.
The stabilizer link is back in place. Just make sure you get the ABS wire on the correct side of it. I put it back in place. I still have the locking pliers on there, so I just left them on there. Put the nut on, then tighten it up until the walking pliers start to get pitched, and you could have skipped this step and just done what I do next, which is just have your wrench, your 18 millimeter wrench on there using 8 millimeter socket and ratchet, and you actually drive the socket and ratchet counterclockwise, which pulls the stud through, and then tighten it up with the wrench. Make sure your harness is clipped back in place.
Next, we're going to torque those other two fasteners, so the vehicle is now on the ground. You can see the lift, and there's nothing holding up the front. What is holding up the front is I have my jack underneath the control arm, and the car's basically in a level position. Now I'm going to torque that front 24 millimeter nut to 120 to 130 foot pounds, and that rear one, 95 to 105 foot pounds, and notice I have the torque wrench on the nut end, and I was holding the other end with the wrench.
Now we can raise the vehicle back up, put the tire on, and then just thread the lug nuts on preliminarily. With the vehicle still in the air, you can just tighten the lug nuts up preliminarily. You're not tightening them up all the way here. Just so they're snug. Lower the vehicle back down. Torque the lug nuts to 110 foot pounds, and I use a crossing pattern. Torque one, go to the opposite one, and then go to the opposite one minus one, and the opposite one, and then I just go right around and check them. Then last, but not least, put the cap back on, and you will want to have a front end wheel alignment done after you've done this repair.
Thanks for tuning in. We hope this video helped you out. Next time you need parts for your car, please visit 1AAuto.com. Also check out our other helpful how-to and diagnosis videos.
Tools used
Brought to you by 1AAuto.com, your source for quality replacement parts and the best service on the Internet.
Hi, I'm Mike from 1A Auto. I hope this how-to video helps you out, and next time you need parts for your vehicle, think of 1AAuto.com. Thanks!
In this video, we're going to show you how to replace a front strut with an unloaded strut from 1AAuto.com on this 2010 Buick Enclave. We show you on the passenger side, but the driver's side is the same procedure. The items you'll need is that new unloaded strut from 1AAuto.com, flat blade screwdriver, 8mm, 15mm, 18mm, 21mm, 22mm, and 24mm socket and ratchet, 18mm wrench, torque wrench, spring compressors, a 13/16 spark plug socket, and jack and jack stands.
Start off by prying off your hub cap and then remove these 22mm lug nuts. You want to just loosen them while the vehicle is on the ground and then raise the vehicle up and remove them the rest of the way. Now the wheel will pull free.
Pry up the cap at the end of your wiper arm and then remove this 15mm nut. Then either using a wiper arm puller or just pushing it in and out and using penetrating oil and pulling it off, you want to remove the wiper arm, but a wiper puller helps. You just twist it. It pops it off the stud and you can pull it free. Then you just want to repeat the process on the other wiper arm.
Now you need to remove these four clips, and you can either use a pick and you just pry up the center of the clip and then pull the clip up and out, or you can use a flat blade screw driver, pry up the center, and then pry out the bottom. Remove this ground and pull it free. Then pry out this clip right here, and there's another one on the other side. You just need to pry them out of the body of the car, peel off this adhesive pad from the cowl panel, and do the same thing on the other side. Then pry up this clip right here on the driver's side of the cowl panel, and then pull up sharply on the cowl panel and it will release the clips. Then do the same thing for the other side. Then you want to just pull this up. Make sure all the clips have released and then pull the panel free.
Now you want to remove two of these three 15mm nuts, and then the last nut you just want to loosen most of the way. Use a flat blade screwdriver and pry out the clip that holds your brake line in place. Then an 18mm socket and ratchet you just want to get the bolt on the end of the stabilizer link to move. You have it moving. Then use an 18mm wrench and then an 8mm socket and ratchet. The 8mm socket and ratchet hold the stud into place while you remove them with the wrench.
You might have to a couple of times, spray some penetrating oil on, re-tighten the nut, and then loosen it back up. You can see, it just pulls right out. Now remove these two 24mm nuts, and you can loosen them up with a breaker bar, or you can use power tools. Once you get those nuts to a certain point, just put them back on just a little bit, and then pull this harness out of here. Just make sure you put the nuts on so they're flush with the bolts. Once you get them moving, then take the nuts off. All right, we've got the jack supporting the suspension just a little bit, so this comes up nice and loose. You want to make sure that your steering knuckle doesn't pull too far out. Remove the nut. Now we just wire tighten this right here so there's not too much stress on the axle or too much stress on the hose here.
Now with the strut out, you have to compress the spring. I've got my spring compressors. I'm just going to tighten those up. This is a large spark plug socket and it's got an insert in here to hold the spark plug up. I'm just going to take a 90-degree pick and pull that insert out so it's wide open. Put a 7/8 wrench on here and then there's a 9mm socket and I have an adapter on it to get it to 3/8. This socket is on here really tight, so I want to knock it off first.
Now you can just remove that nut and pull the top off with the spring and this pad. Take your new strut. Just loosen up the nut on the top and it will just pull out. Take this boot, transfer it over and transfer over this pad. Once you have that lined up, take the spring and lower it into place. Then the same way you got the previous nut off, you want to do that again to tighten this one back on. We'll fast-forward as Mike does that.
Before I tighten it up, I've just got my spring there, which it's in my cushion correctly. Make sure it's right there on the platform of the strut as well where it's supposed to be. Then, just to preliminarily aim, this should be facing towards the outside of the car, and then this stud here, the big one, should be towards the outboard part of the car. Once you line it up, tighten up the nut that holds the spring out of the strut, and then make sure it stays lined up as you loosen up your spring compressors.
Now feed the strut back up into place. You just want to push those studs through, replace one of the nuts preliminarily to just hold it there, and then line up the wheel knuckle into the strut. Then replace one of those bolts just to help hold it into place. Then replace the other bolt, and you can just hammer them in the rest of the way. Now just replace those two nuts. You can adjust your alignment, so you will need to have your vehicle aligned after you install these.
It looks like mine is pretty close to the middle. The top one is fixed, but the bottom one you can flex by pushing in or out on the knuckle. I'm actually just looking in behind. I can see a nice line where my old one was sitting. I'm just going to line it up there and then tighten it up preliminarily. I'm going to torque these to 120 foot-pounds.
Jack the strut up into place. I'm just going to put these 15mm nuts back on. I'll preliminarily tighten them, but we're going to torque them once the vehicle is back on the ground with the wheel on. Take the harness clip from your old strut and it just pulls out. Then you just push it into place in the new strut. Then re-clip the harness into that clip. Push this clip back into the lower part of the strut. Push the sway bar link back into place, and then just replace that nut and tighten it up.
Now you can replace the wheel, and then just replace the lug nuts and tighten them preliminarily in a crossing pattern. Then you want to lower the vehicle and tighten these the rest of the way and torque each of them to 100 foot-pounds, again in a crossing pattern.
Then you can just line up and hit your hub cap back into place. Now torque these three nuts up here to 45 foot-pounds. Pull out any clips that stayed behind in the vehicle and push them back into place in your cowl panel. Then feed the cowl panel back into place. Make sure it tucks back under, under the hood. Once you get everything lined up, just start pushing the clips back into place. Make sure that this adhesive cushion over here goes back up and over, and repeat the process on the other side.
Now replace those four clips. Just push in the lower part and then the center to lock them in. Replace the ground and tighten it back up. Make sure your weather strip is back in place, and then, for now, you can close the hood. Make sure these clips on either side of the cowl panel are back into the body of the vehicle. Push the wiper arm onto the stud. Make sure it's lined up where you want it and then replace that 15mm nut and tighten it up. Put the cover back on the end. Now just repeat the process with the other wiper arm.
We hope this video helps you out. Brought to you by www.1AAuto.com, your source for quality replacement parts and the best service on the Internet. Please feel free to call us toll-free, 888-844-3393. We're the company that's here for you on the Internet and in person.
Tools used
Hi, I’m Mike from 1A Auto. We’ve been selling auto parts for over 30 years!
With the vehicle on the ground, you use a breaker bar and a 22mm socket to loosen the lug nuts. Raise and support your vehicle with a jack and jack stands. We're using our two post lift. Use the socket and finish removing the lug nuts. There it's seized to the hub. Take a couple of lug nuts—just thread them on lightly. Use a dead blow or rubber mallet, hit on the tire, and that will knock it free. Lug nuts will keep the wheel from falling off. Now it's loose. Finish taking the lug nuts off. Just going to support it so it doesn't fall.
I'll put some tape on the edge of the wiper blade, just mark where it is. When I remove the arms and reinstall, them I'll know where to align them. I'll just do this for both wiper arms and blades. You could use tape or even a permanent marker on the glass would be fine because it will clean off. Use a small flat bladed screwdriver, pop these caps up and off the end of the wiper arms. Do the same thing for both sides and remove that nut. Use a 15mm socket extension and ratchet extension to remove this. Get it free. Take it off.
We need to close the hood. Actually lift it up and rock it back and forth, pull it off, to lay back down, and open the hood. Get the wiper arm out. Just going to put the nut back on here so we don't lose it for now. Do the same for the other wiper arm. Cap up, to the side, and loosen the nut. Close the hood and rock it back and forth. Pull it right out.
This weatherstrip is just clipped into this outer plastic piece, just kind of pop it up and out. It can remain clipped to this to the cowl. There's push clips along the edge of the cowl. Take a flat blade screwdriver and pry them up. Pull them right out and put the center parts right back in. Just going to go along the entire edge and do the same.
The weatherstrip from right here too. Going to unscrew this ground lug for jump starting using a 15mm wrench, closed in, just unscrews. Take it right off and slide this trim up and around. It'll sit like that. Do the same for the other side. Lift up on the cowl, pull it out, and unclip the hood cable. Push it right up. That's loose there. Go to the other side and loosen it.
I'm going to move this fuse panel out of the way and push the locks in. Lift the cowl panel up and out. I'm going to put this cover back on so nothing in there gets damaged. Top of the sway bar link bolts through the strut. I'm going to use a wire brush and just clean the threads off so that when I remove the nut that's holding it, it'll spin easier. Just knock off some of the dust, knock off some of the dirt, rust and then I can spray some rust penetrant on here too. This nut is 18mm.
I'm going to use an 8mm socket on this breaker bar to counterhold the end of the sway bar link so it doesn't spin while I'm trying to remove it. Make sure it gets on here. It's a little rusty. Push it on, brace that against the knuckle, and remove this nut. Go this way with it. Spray some more rust penetrant on here, help get rid of some of the rusty chunky bits that are coming off. The nut is self-locking.
It's not perfectly round on the end—that's what locks it. It's going to be hard to turn, but it should turn and just keep doing this until you thread it all the way off. If you're replacing the strut, make sure you have a new sway bar link on hand because sometimes they break and they'll need to be replaced. As it gets towards the end and the locking part is coming off the threads, it should get looser and easier to turn. Let's see, take this off now. Just going to spin it off with my fingers.
It's stopping on that socket—I got stuck. Just give it a couple of turns. Socket’s loose and now just come off with my fingers. Need to push the ABS wire clip out of the strut, so we'll use some needle-nose pliers, and I'm just going to push down from the top and push it right out. Pops right out. This one down here—use some needle-nose pliers, just grab onto the connector, and work it out of the strut. Once you get some clearance there, the needle-nose underneath, just kind of pry it out.
Use a trim clip tool to get this lower one. Just want something to slide under there, and then you can pry it out, just like that. You put aside two bolts, holding the strut to the knuckle. I'm going to spray some rust penetrant on the threads and try to spray some between where the strut goes around the knuckle. Use a 21mm wrench to counterhold the head of the bolt. I'm going to use a long ratchet and a 24mm deep socket to remove the nut. You may need to use a breaker bar, but we'll try this. Repeat this for both bolts. This procedure will be the same on both sides.
If it's loose enough, you can just take it off by hand. We're going to leave that bolt in there for now. We'll loosen the bottom one. I have that loose, going to throw a little extension on here and give me some clearance against the brake caliper. The bolts have actual splines that sit inside here so they don't spin, but you do want to counterhold them as you're trying to get them off so you don't tear up those splines.
I'm going to reinstall the nuts just loosely on both of them. Use a ball-peen hammer and just tap them out. You see the splines here. Just keep tapping it. It's nice and loose—bolts come right out. I have to wiggle this around to get the bolt to come free. Lift up on it a little bit—there it is. Okay. That'll just sit like that.
Going to remove the three 15mm nuts that are holding in the strut to the strut tower. There's three studs that go through from the strut, and they have 15mm nuts on them. Use this 15mm deep socket extension and ratchet, and I will begin to loosen them. Kind of loosen them out evenly. Don't just take them all out because the strut will fall out, so you're going to loosen them all. And then when you get the last one loose, you'll reach underneath, support the strut and remove it, and then pull the whole strut out from inside the wheel well.
Get this one loose, right to the top of the threads and leave it. I'll remove the other two the same way. Go after the last one here. As you loosen this, the strut will actually start to lower down. Just going to push the strut off the knuckle. It's real loose in there. Push that up, and now it's only hanging by one of them. I'm going to reach up under here and support it, lift it up, and I can thread off the last nut by hand.
Now I need to guide this out of the wheel well. Just be careful that there isn't anything to support this brake line, so it is just kind of sitting here like that. It's okay, we're not over-stressing it but we're going to leave it like that.
This is our original strut for our vehicle. This one was leaking. It's got a little bit of fluid coming out of the top seal here, so dampness and dirt stuck to it. Here's our brand new complete strut assembly from 1AAuto.com. This is just a warning sticker telling you that the spring may settle after it's installed. You can just remove that. But it is a complete strut assembly—no need to swap over this spring to a new strut. Got a new top mount bearing, everything all ready to go. Makes this a real easy job. It will fit great and work great for you.
Before you install it you can remove this warning sticker too. This just tells you there's no need to loosen this nut that's in here that's holding the whole thing together. It's already all tightened and adjusted—you don't have to touch it. There's a bearing in here. I really can't spin it. I don't have enough leverage. But it will spin once it's bolted to the body of the car and connected to the knuckle. That way if it doesn't line up, attach these points and then turn it down here and line it up with the knuckle.
To reinstall the strut, going to take the nuts off. The new ones off the top of the studs that have them ready. Put them right up top here on the cowl panel. Bring the strut into the wheel well and slide it up into place. There are four openings, but three studs, so I'm going to put the stud back in the same place that one was originally, and you can see where the nut made a mark in the paint.
I'm just going to loosen it, and I'm going to lightly tighten the nut on there. Then I'll lift up the strut with the nuts on the O-ring and on the last one. I'm maneuvering the strut around with one hand underneath and installing the nuts with the other hand. They're going to stop when they get to the locking part of them. Take the 15mm socket and ratchet and tighten them up evenly. This will draw the strut up into the body. Just a couple turns so the other side you've got some turns and just repeat this till the strut's all the way up, and then I'll torque them afterwards.
So this will turn on the bearing now, so if you need to turn it and just line it up with the knuckle. It's at the knuckle. Lift it right into place because the sway bar link is not attached. Just lift right up. If you need to you can use a jack. Have one of the bolts handy. They do go in from this direction. Lift it up into place. Get the other one caught.
The little splines, they're lined up with the nuts on. I'm going to tighten the nuts and draw the bolts through. Just use a longer ratchet because they're getting a little harder to pull in because they're setting into the splines. I torqued these lower strut nuts to 144 foot-pounds. Put the wrench on here and counterhold the bolts. There you go. Torque the nuts for the upper strut mount to 33 foot-pounds.
Reinstall the sway bar link. We install the new one with our new strut. If you didn't damage your old one, you can reuse it. You can see how the opening is not perfectly round because it is a locking nut, sort of oblong or oval shape. As you tighten it down, it'll lock against the threads so you can thread it on as far as it'll go. Then we'll need to use a socket and ratchet to tighten it the rest of the way.
The back side of this is a six point. It looks like it would be a nut, it fits 18mm. Put it on there to counterhold it, and we use an 18mm socket to drive this in. If you're reinstalling the original one you took out that installation will be the reverse of the removal. Just tighten this down. This'll be the same for both of these, both the top and the bottom. Just get it tight and I'll come back and torque it. I want to do the same for the other side. Torque for the top one, it's 55 foot pounds. Hold it.
Reinstall the ABS wire where you clip it to the strut body. Push that in and then push this one in up here. Install lug nuts by hand. Going to use the socket to thread these down. We'll re-torque them with the vehicle on the ground. Torque the lug nuts in a cross pattern to 140 foot-pounds.
Reinstall the cowl panel cover. This is the inside of it. There are some hooks that will hook underneath the windshield, and it'll lay down over this lip here. Feed it around the hood strut and lift up on this plastic. Lift up on this clip here on the outside of the fender corner. It's going to slide underneath that. Slide it over and get the other side set. Lift up this plastic around the ground screw. Lift more like this and then it's going to go up, clip underneath. Put this rubber back, that down, and push the clip back in. Push this back in—the same for both sides.
Push the washer nozzle hose back in here. Put this down underneath. Clip it in place. Clip this down. Go ahead and reinstall all the push clips. Push these clips back in. Got this clip. I'll put it back in. Put the ground lug back on—it just threads back on. Give it a couple of turns to tighten it. That feels good there, I don't want to break it off.
Reinstall the wiper arms. The one with the shorter end here is the driver side. Move the nut that I put back on there so I wouldn't lose it. Just going to lay them in the same place with over the wipe transmission and wiggle it down and it'll go into the splines. That's where it was before. Get the nut started. The same for this one. Going to tighten these up. If I feel it getting tight I'll stop. I don't want to break off the wiper transmission. Same for this one. Replace these little caps. They just snap right back into place. They kind of pivot. Clip it right down. Do the same for both of them. Peel your tape off. Job is complete.
Thanks for watching. Visit us at 1AAuto.com for quality auto parts, fast and free shipping, and the best customer service in the industry.

PSA63679