Replaces

This part doesn’t fit a . Select from parts that fit.
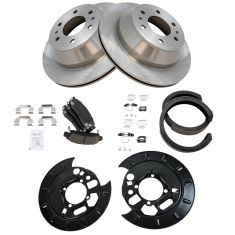
Frequently bought together
Part Details
Complete Repair in One Purchase - Stop searching for parts individually and complete your repair with a customized kit or set from DIY Solutions.
High-Quality Parts from Trusted Brands - DIY Solutions' kits and sets are selected from the best automotive brands and include hard-to-find and even obsolete parts you may need for your vehicle.
Guaranteed Fit - DIY Solutions ensures its selected parts are quality-tested to guarantee fit and function.
Item Condition:
New
Attention California Customers:
 WARNING: Cancer and Reproductive Harm - www.P65Warnings.ca.gov.
Lifetime Warranty
This item is backed by our limited lifetime warranty. In the event that this item should fail due to manufacturing defects during intended use, we will replace the part free of charge. This warranty covers the cost of the part only.
FREE Shipping is standard on orders shipped to the lower 48 States (Contiguous United States). Standard shipping charges apply to Hawaii and Alaska.
Shipping is not available to a P.O. Box, APO/FPO/DPO addresses, US Territories, or Canada for this item.
Expedited is available on checkout to the United States, excluding Alaska, Hawaii.
Final shipping costs are available at checkout.


Created on:
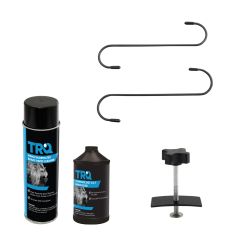
Tools used
Tools used
Tools used
Okay, friends. One of the first things we need to do is safely raise and support the vehicle so your wheel's off the ground. Once you've done that, we're gonna come right here to your center cover, use a nice little pry bar and go ahead and pop this off. Now that we've done that, we're gonna remove all 6 of our 19-millimeter lug nuts and take the wheel off. Now that the wheels off of here, we're gonna go ahead and take this caliper off of the bracket. To do that, use your 17-millimeter and hold on to this area right here. That's the caliper slider. On the other side, you're gonna find a 14-millimeter bolt. All right. There we are. That one loose, do the same to the other one. Take the caliper off and quickly inspect it. What I mean by that is looking right along this rubber boot right here, and make sure you don't see any fluid. If you see fluid coming out of here, you have a caliper issue, and it needs to be either serviced or replaced. This one looks fine, so let's set it aside and move along. Now it's gonna be time to get the pads out of here. You might notice that they're frozen inside the bracket. Obviously, that's gonna be an issue. Take a nice punch chisel, whatever you might have, even a pry bar and just get the pads out, and then, of course, we'll recycle them.
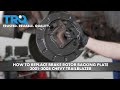
Moving along, we're gonna remove the 18-millimeter head bolts that hold the caliper bracket to the differential. There it is, friends. Next, it's gonna be time to get the rotor off of there. Sometimes what you might notice is the rotors might have these little clips that are supposed to be holding the rotor on there. A lot of times you can either just pull them off. You might have to pry them off or even grab them with some cutters. Go ahead and grab onto that rotor. Give it a wiggle and remove it. Now that we have that off of there, it's a good idea to take a quick look around. You wanna double-check your e-brake shoes. That's these right here. You also want to take a peek behind there and make sure that you don't have any leaks of any sort. Assuming everything's good, we're gonna go ahead and clean up the mating surface where the rotor is gonna ride. Now that we have the majority of this cleaned up, it's important to make sure you get along the areas in between the studs and the hub area. Now we're gonna be using a little bit of chemicals, so you wanna make sure you have a collection bucket and some parts cleaner. Let's clean this down. Before we go ahead and install our rotor onto the vehicle, it's important to make sure that you clean all the braking surfaces.
The reason for that is because it's gonna have a chemical that's put on there during shipping to prevent rust or damage of any sort. Okay. So now, before we go ahead and start spraying this down with any copper Never-Seez, we wanna take our brand-new rotor, right here, slide it on, and we wanna gauge to see how far we need to adjust the emergency brake. It's always a good idea to try to adjust your emergency brake. To do that, if you were to come from the back side with your screwdriver, come in between where the lever is, right behind here, and then I'm just gonna try to pry like as if I'm pulling on that emergency brake. Then I'm gonna try to spin that rotor. What we wanna do is make it so it doesn't spin when you pull on this, but when you let go, it needs to be able to spin without any drag. This area right here with the knurls is the area where you'd adjust. If I was to go right here and lift up, that's gonna de-adjust, and if I was to go right here and bring it around clockwise, that's gonna adjust it out a little bit and make it tighter. Now going with the assumption you have your emergency brake adjusted up the way it needs to be, let's go ahead and put on a little bit of copper Never-Seez on the mating surface where the rotor's gonna ride. Put the rotor on there and start on one of your lug nuts.
Now we've made our way over to the bench with our caliper bracket. The reason for that is because we need to strip it down and clean it up. Let's take a small pocket screwdriver, get right in between here, and take these tins off. We'll set these tins aside for recycling. Next we're gonna remove the slider. You might need to use a small pocket screwdriver just to peel it up and away from the area that it's stuck on to. Pull that right out of there. Set it aside. Do the same to the other one. Okay. Now we're gonna remove the slider boot. Should come right off. Just give it a quick check-over. Make sure it's not worn or torn in any way. Do the same to the other one. I like to clean them up, of course. Set those aside. Now we're gonna put a little bit of cleaner inside here. Just be careful because when you spray stuff in, stuff always comes out. You could use a boar brush of some sort or some kind of wire brush and try to clean it out inside, or, of course, you can just use a rag. It doesn't have to be anything special. Give it a nice twist. Stick it inside there, and twist as you keep going in. Okay. Go and pull it out. It looks pretty nasty. Look inside. Make sure it looks nice and clean. If it looks like it's pitted or it's in any way gonna cause an issue with the slider, you're gonna need to continue on.
I'm gonna do the same to the other side here. One last thing before we move along, you wanna look down along this area right here where that boot's gonna ride. Make sure that there's no crowd or anything like that that's gonna cause an issue for sealing of the boot. If there's an area that moisture can get in, obviously, it's gonna cause an issue internally. Let's move along to cleaning up the sliders. Get off any of the gunk that might be on there. As you clean them up, you wanna inspect the slider. Make sure it's not rusted or pitted or anything. If there's some sort of issue that might cause a binding issue, you're gonna wanna take care of it now. Also, when you're cleaning, look at this ridge right here. That's also another area that that slider boot's gonna ride. It needs to be clean as well. Let's just open up that boot, take our rag, and then just clean up the inside as well. Close it back up. We'll do the same to the other one. Now it's gonna be time to clean up the area on the bracket where those tins are gonna be. You wanna clean up this area right along here and, of course, either of these sides. To do that, you could use your small pocket screwdriver.
You could use a scraper of some sort, a nice wire brush, or if you have one of these nice sanding tools right here, you could try to clean it up. One thing to mention if you're using something like this, be careful not to take off too much of the metal of the actual caliper bracket itself because then you'll get pad slap noises. Next thing we wanna do is use a little bit of Moly grease. This is just plain old caliper grease, and it's nothing special. The reason for using a little bit of grease on here is for vibration dampening, noise reduction, and it also keeps moisture out so rust doesn't build up again. Now that we have those nice and lubed up, let's go ahead and put on these tins. Should just slide right in there. Clip in so they're nice and secure. Make sure it doesn't fall off. Do the same to the other side. Perfect. Next it's gonna be time to get our caliper slider boots back on here. Before we go ahead and slap them on there, we wanna make sure that there's a nice little bit of lubricant going along that little edge that I told you to clean out. That's gonna help keep moisture out of there which is super important. Take your caliper slider boot here, pop it on there and give it a couple good twists. That's gonna make sure that everything's nice and lubricated. Next we're gonna take our caliper slider pin.
We're gonna lubricate the long part of it here, and then you also wanna make sure you get up into this groove. There we are. That's a decent amount. We'll slide it in there. Give it a nice twist. Make sure everything's nice and situated. Do the same to the other one. Slide it right on in there. A couple twists. Let's get back over to the vehicle. It's important to make sure that we clean up any of this old threadlocker that's on our bolts because we need to put on some new. Now with those bolts nice and cleaned up, we've put a little bit of threadlocker on there, we've got our caliper bracket, let's get it back on the vehicle. Once you bottom them out, go ahead and torque them to 148 foot-pounds. Now it's gonna be time to get our brake pads in the vehicle. You're gonna notice that two of the pads out of the set are gonna have this wear indicator right here. The pad with the wear indicator needs to be on the inside, and it also needs to be facing upward. Okay. I've got that one in there. You definitely wanna make sure that it's not to the point where you have to hammer it in. It needs to be able to slide around a little bit, okay? Do the same to the outer pad. There we are. Slides around. Slides around. It's gonna be time to push in our caliper piston.
Some people like to open up their bleeder screw, but what you might find is if you open up the bleeder screw, it might break off. So, if you don't wanna deal with that, you could just try to push it in but just push it in slowly. There we are. That looks great. Now we just need to add a little bit of that caliper lubricant here. When you're applying the caliper lubricant, I like to go right around the metal part of the piston and then on each of the ears of the caliper. You don't need to go anywhere else. Slide it right over the pads and the sliders and then go ahead and grab on to your bolts. Got our caliper bolts. I used a little bit of threadlocker on it because that's how I roll. We're gonna bottom these out. Torque these to 23 foot-pounds. All right. Let's get the wheel up on here. Start on all your lug nuts, bottom them out, and then we'll torque them to 103 foot-pounds. Let's torque these in a crisscross manner. Now it's gonna be time to put on your center cover. If you were to look at the back side, you're gonna see something that looks a lot like a valve stem. Line that up with your valve stem then just give it a nice loving bonk. Make sure it's completely secured.
All right. Now I know you think you're done, but you still need to pump up the brake pedal, and then we're gonna go out there and double-check that brake fluid level. Right underneath the hood, you're gonna see your master cylinder. It'll tell you what type of fluid to use. You can give it a little shake and just double-check to make sure you can see it's up at that maximum line.
Tools used
Tools used
Tools used
Tools used
You can take the center cap off. Use a straight blade screwdriver. Take that off. Use a 22-millimeter socket to take off the lug nuts. Take the wheel off. Take these two caliper bolts out. I'm gonna use a 12-millimeter socket and then a 16-millimeter wrench, just to hold the slide from spinning, loosen these up. Now we'll just use a screwdriver, pry the caliper off. Pull that out, then you can use a caliper hanger and just support it from the upper control arm right there. Just make sure there's no tension on the hose. Slide it over here. Take the brake pads off. Use the same straight blade screwdriver.
And take an 18-millimeter socket, take these 2 caliper bracket bolts out. Take these bolts out and slide the bracket right off. Now take the rotor off. If it's stuck on there, just take a hammer. Get a tap in these areas. Just try to not hit the studs. It should be loose. Try not to breathe any of that in, and slide it off.
We're gonna take the parking brake shoe off. There's a clip right here that's held in with an 8-millimeter bolt. Use an 8-millimeter socket to take that off. Slide that bolt out. Then we can slide this out. And if you just push the whole shoe assembly down, and get it to pop off, that lever right there, and this takes a little bit of effort. You don't have to take the axle out to get these off. Slide one side, get the other side out. Just like that. I'm just gonna take this adjuster out. Take that out. Clean that up a little bit. You can use a wire brush, and same with the other side. There should be a pin on that side. I'm just gonna put some grease on here before I put it back. Put the adjuster side on this side, and when you do the other side, it's going to be the opposite. And this pin's all cleaned up. Just put some grease inside there and get that pin in. Put a lot more grease on that. And the grease will hold it in there, and just slide this on this side.
Take the new shoes, and just angle this. This might take a couple tries to get it right. Here you go. Like I said, you really don't have to bend it, just angle it at the right angle. It might take a little practice. What you can do is get this to slide on like that and then we can move these afterwards. Just get it in the right position. You can try using a screwdriver or even some pliers. Try twisting this a little bit. Get that to line up with the screwdriver. Do the same on the other side. Find the correct hole down that matches the one you took off. Slide that in position with the new bolt and snug that bolt up, not too tight. That's good.
I'm just gonna clean up this surface right here. You can use a wire brush or some type of grinding wheel. Just be careful. You don't want to take too much material off, just get some of the rough stuff. Take a little anti-seize, put it on the hub area right here. When you go to put the rotor on, you may have to adjust the parking brake. You can spin that wheel either forward or backward and it will either tighten it or loosen it. Slide the rotor on, just make sure it spins good, and then double check with your parking brake, and adjust accordingly.
Slide the brake caliper bracket in place. Put the bolts in. You can use a little thread locking compound on the bolts. Now I'm going to torque these bolts to 122 foot pounds. I'm gonna install the brake pads. Make sure you have the brake pad warning indicator facing up on the outside and also on the inside. Now we'll take the brake caliper off. Take the hanger off. I have to compress the caliper so I use a brake caliper compressant tool. Just compress it really slow. This is gonna push the fluid through the hoses, back through the lines, back up to the master cylinder and into the reservoir. Just go nice and slow.
That's compressed. Pull the compressing tool out. Slide the caliper over the brake pads and the bracket. Take the two bolts. Install the bolts. You can put some thread locking compound on those bolts. I can use my 16-millimeter wrench, 12-millimeter socket, torque these bolts to 31 foot pounds.
And reinstall the wheel. Put the lug nuts on. Now I'm gonna torque these lug nuts to 140 foot pounds in a star pattern to tighten the wheel down evenly. And just go around again, double check.
And reinstall the center cap. Now we're gonna pump the brake pedal nice and slow. There's gonna be an air gap between the caliper piston and the brake pad, so we want to eliminate that air gap. Once the pedal feels good, then you're all set. Check the brake fluid level in the master cylinder reservoir. There's the minimum line right there, the max line right there. Adjust accordingly.
Tools used
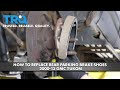
Okay, friends. One of the first things we have to do is safely raise and support the vehicle. Once you have your wheels off the ground in the rear, we're gonna go ahead and remove all six of these lug nuts. Remove your wheel. One of the next things that we need to do is take a nice small pry bar like this, we're gonna come in between the caliper and the pad and we're just gonna apply a little bit of leverage. What we wanna do is just push in that caliper piston just a teeny bit to take the pressure off of the brakes. The next thing we need to do is remove our two 18-millimeter mounting bolts for our caliper. Just take a wrench, can use a socket with a ratchet if you'd like. There's one bolt. I'm just gonna start that in just a couple threads to hold the caliper for me while I remove the second. There it is. Let's get that other one out of there. Next, we're gonna take the caliper and we'll just set it up here where it's gonna be nice and safe. Just make sure you put it somewhere that it's not gonna potentially fall down and hopefully not hurt you in any way.
Now it's gonna be time to remove your rotor. You might need to give it a couple light bonks. The next thing we're gonna do is use our 8-millimeter and we're gonna remove this small bolt right here. Just be careful because very often it's frozen in there and it might break off. Nice long ratchet did the trick. That little bolt out of there. Grab this out of here. Set those aside. Just gonna grab onto this. You'll notice it can move around now. If you were to look under here, you're gonna see the adjuster. If you just take that shoe, move it kinda closer to the axle and then give it a loving bonk down, it should come free from the adjuster. Go ahead and grab that shoe. At this point you can try to weasel it off the axle. There we are.
The next thing we're gonna have to do is take out this area right here. This is gonna be the adjuster and it should separate. We'll just spray it down with some penetrant. That looks good. Grab my little pry bar here. We need to separate the cogged area from the base area. Okay, starting to come up. Get this side out of there too. Right inside this area is where the adjustment's supposed to be for the emergency brake shoe. If you take it apart and you happen to notice that this part right here is frozen, the part that has a little cog, this part right here should spin in there. If it does not, you need to completely separate these, clean them up, re-lubricate them and then, of course, put them back together. This piece right here has like a little bobble. Believe it or not that's not one piece. It actually does come apart so you wanna be careful not to lose this. It's a great idea to clean all this up as well. That's just about good right there. This flows smoothly. It's looking great. You wanna make sure that this area right here is nice and clean, free of debris or anything that might obstruct it from being able to spin because that's gonna go inside this hole right here. How can I tell that this goes inside of this hole and not in the bottom hole? Because of this little clip right here. That clip is gonna line up with the notches on this and it's gonna prevent it from spinning on its own. We're not gonna put that in yet though. What we're gonna do, grab some more of that caliper grease and we're gonna put it right inside the hole on the other piece. All right, this is gonna be the other end. Just try to fill it right in there if you want. Get some more. More the merrier. Put it right in. Now I'm gonna grab my nice, clean pin. I inspected it. It's in good condition. I'll just put it right in there. Now we need to put a nice coating of that grease all along the areas where it's gonna rub up along the unit right there.
Now that those are nice and coated, let's continue on with the grease a little bit more and we're gonna go directly to where the adjuster is gonna be. You can go ahead and put in as much grease as you want. If you put in too much, it's not really that big of a deal but what you will notice is it will kinda come out and if that was to happen, you would just kinda clean it up so you don't get any mess on your emergency brake shoe. Now we're gonna take our pieces. Should slide right in there. Make sure it spins like it should. Do the same to the other side. You're gonna need a little bit more of that caliper grease or whatever type of grease you're using and you're gonna put it on the contact points of this bracket where the emergency brake shoe is gonna ride. The reason for that is of course for vibration dampening and noise reduction. So, we'll come right down here because we know it's gonna ride right along the outside there. Right here. This is a spot right there. If you were to come up here, you're gonna have this whole area. It hits up against there. And then if you come along the other side, you can clearly see exactly where the emergency brake shoe was riding before.
There we go. Now it's time to get the emergency brake shoe back up on here. To do this, you're gonna have to do a little bit of contortioning and just a little bit of wiggling and I'm sure over a period of time you should be able to figure out how to get it right over there. There we are. Nice light bonk. No big deal. We'll go ahead and line these tabs up with where it's supposed to sit on the adjuster there. Should slide over. If it doesn't, you can just kinda go past. Line up the adjuster ends so they're straight up and down so they'll line up with the way that the shoe needs to go on. Once you've gone past, like I said right here, you should be able to just kinda stretch it and draw it straight up on there. That looks great.
Now it's gonna be time to get the mounting bracket on there. It's a kind of funny looking thing, but if you were to look at it, you would see that it has an indented area right here. That's gonna ride right on this bracket right there. You want it to be kinda facing in this general direction so that the black part is gonna be riding up against the inner portion or the inner ridge of this shoe. Put it up on there. Line up your screw hole and then put in your screw. All right, so that's pretty much bottomed out right there. At that point, you definitely don't wanna go too much further because it is just a very small bolt, but something that I would like to mention is you also don't wanna go tight enough. With that said, once it's bottomed out, just give it a teeny bit more. Make sure it doesn't feel as though it's super loose to you. Give this a nice little wiggle. Make sure you don't see any movement between this and the bracket itself. I think that that looks great.
The next thing that we need to do is clean up the mating surface where the rotor is gonna match up against the axle. If it's all bumped up like this or rough in any way, just go ahead and sand it down with something. Now that the majority of the area is nice and clean and sanded down, we need to continue on by getting in between the lug studs and the rest of the hub area here, right in there. If you notice there's a large build up, you can use something like this, maybe a scraper or even a flathead screwdriver, just kinda get the majority of it up. Then you can take a nice brush, just work at the rest. Now we're gonna spray down the mating areas with some copper never seize.
Go ahead and put your rotor back on there. Look at the backside. This is the area that's gonna meet up against the axle. You need to make sure that's nice and clean as well. Now that we've cleaned up the backside of the rotor, we're just gonna place it over the axle like this. Push it all the way in and it should go over the emergency brake shoes. If it doesn't go over the emergency brake shoes, de-adjust your adjuster. If it does go over but you feel as though there's no drag at all, you're probably gonna wanna adjust it up a little bit. What you're actually gonna wanna do right now is get it so it's a semi-close so you can hear the shoes just barely dragging in there. Okay, that's the sound of the shoes hitting up against the inside drum portion of this rotor. If it's too tight and you try to turn it and it just doesn't wanna turn, then you know that it's over-adjusted. If your brakes are over-adjusted, they're gonna overheat and you're gonna have major braking issues.
Now it's gonna be time to get the caliper back on the vehicle. Before you go ahead and do that, you need to make sure that you clean all the existing thread locker off of these bolts, and I always like to replace it with some new thread locker of my own. Caliper around here. Make sure that your pads are situated inside the brackets as they need to be. They might keep wanting to fall out if they're like mine. Go ahead and grab those caliper mounting bolts. Start them both in. Now we'll snug them up and we'll torque them to 148 foot-pounds. We got our torque wrench. The next thing I always like to do at this point is to make sure I pump up the brake. Now it's gonna be time to get the wheel up on here. Let's start on those lug nuts and then we'll bottom them out and we'll torque them to 140 foot-pounds.
Let's the torque them. Double-check them if you want and if you have a center cover, put that on as well. Let's make sure we double-check that brake fluid. Give it a wiggle. It looks as though this is low. There's the maximum line. Open this up. We're gonna add some DOT 3 brake fluid. Bring it right up to that maximum line. Make sure you close it back up. Down the road you go.
Tools used
Brought to you by 1AAuto.com, your source for quality replacement parts and the best service on the Internet.
Hi, I'm Mike from 1A Auto. I hope this how-to video helps you out, and next time you need parts for your vehicle, think of 1AAuto.com. Thanks.
This is part two of a two part series replacing the rear disc brake backing plates on a 2004 Trailblazer, same as any '02 to '09 Trailblazer, Envoy, Bravada, Rainer, Isuzu Ascender and a Saab 9-X. Here's a quick review of all the tools you're going to need and we are going to start out with reconnecting the emergency brake cable.
You want to put your emergency brake back together. Put this on here, first, and then you can push it down, and push it into the cylinder here. There's a little rod that goes in and that goes in right there. Take your brake shoes. They're going to go into a little clip down here and then on there. Now I'm grabbing hold of my spring again. Slip the cable down. Push it into place. It actually goes together a lot easier than it came apart.
I'm going to put the axle back in. You want to lift up on it so it doesn't drag against your seal. Just kind of move it around a little bit and push it in. It just has to find its way on the inside. Here, what you're really hoping is nothing has moved. So, we're going to take our C clamp and the side that has the groove near the center is the one you want to put towards the center. So you just put that on to the axle that's pushing out through right there. Then, you can actually push the axle back by hand. Make sure you have this shaft nice and clean. Put it up in with the hole located at the bottom. This is where you're hoping that these gears didn't move around at all; it would appear that they did just a little bit. I'm going to line it up with my finger. It goes in. Push this in. Start it into place and your axle's locked back in place. As that's going in I'm just going to hit it with a little dab of Loctite. Being greasy and stuff, it's not going to stick that well but that's okay. You want to tighten this up probably about 8 to 10 foot pounds which is tight with this little wrench. That's good.
Now we're going to get back in to cleaning everything up and putting it back together. So, I just wiped down the inside as much as I can. Get as much dirt and everything out of there as possible. Now clean up and wipe down your rear end cover and there's a little triangle, I mean a rectangle there. That's the magnet. Make sure you get that wiped off really well. Right there, I'm displaying it. You can see I cleaned it up better. On this one, you do reuse your gasket and I put just a little bit of sealant on the cover just to help with some of the crustiness from the rust. Now, we'll put our cover up there, start it with a couple of bolts, then start all the bolts by hand and then tighten them preliminarily with a wrench, after that. Now, we skip forward, you want to torque these bolts to about 12-foot pounds. It's not very much but it's enough to seal it. You don't want to over-torque it, because you'll get leaks because you warp your differential cover. About 12-foot pounds, I tighten them kind of using an opposite pattern and then I just go around one by one and just make sure they're all tight.
Now we're going to refill the rear end. There's a plug right on the passenger side. Use a 3/8ths ratchet with an extension, remove that plug and then fill it with 80W90 gear oil. I use a little tube; helps get the bottle in a position so that you can fill it easier. Once you've filled it and the fluid starts dripping down, put your plug back in, and tighten it up. You don't have to tighten it incredibly tight but get it nice and snug and then wipe down all the grease off the rear end so you can check for leaks later.
Now I'm going to put the brakes back together, if you want to see this in regular speed just check out our other videos for the Trailblazer rear brake installation and you can see I've got both a new backing plate and new brakes on there and if you want to see those, just check out our other videos on the whole process for that. So, we'll get through that.
Very important: you've had your brakes apart, you obviously want to torque your lug nuts on there properly and you want to pump your brakes afterwards, make sure that you get your brakes reset and make sure that they're working properly before you test drive the vehicle. Torque the lug nuts to between 100 and 120 foot pounds, kind of use a crossing star type pattern and then you can put your cap back on.
Always make sure after you've had your brakes apart that you pump the pedal a bunch of times working the pressure back up and make sure you work the brake caliber pistons back into place.
We hope this video helps you out. Brought to you by www.1AAuto.com, your source for quality replacement parts and the best service on the Internet. Please feel free to call us toll-free, 888-844-3393. We're the company that's here for you on the Internet and in person.
Tools used
Brought to you by 1AAuto.com, your source for quality replacement parts and the best service on the Internet.
Hi, I'm Mike Green. I'm one of the owners of 1A Auto. I want to help you save time and money repairing or maintaining your vehicle. I'm going to use my 20-plus years experience restoring and repairing cars and trucks like this to show you the correct way to install parts from 1AAuto.com. The right parts installed correctly: that's going to save you time and money. Thank you and enjoy the video.
In this video we're going to show you how to fix a common problem on these GM mid-size SUVs, the rear disc backing plates tend to rust just because of their design. This is the same for any of these mid-size GM SUVs: the Trailblazer, Envoy, Bravada, Rainier, Saab 97x, and Isuzu Ascender.
There's a wide range of tools needed. Various size metric and standard sockets and wrenches from 5/16 inch to 19 millimeter, ratchets and extensions, breaker bar or pipe for leverage for some of those harder to move bolts. A catch pan, jack and jack stands, flat blade screw driver, 2 M10 by 7 centimeter bolts, 3/8 driver ratchet with extension hammer and torque wrench. This is an involved repair. I wouldn't call extremely difficult. You do have to take a part and put together a few things. The hardest part of it, probably, is some of the bolts are going to be quite tight and you need to make sure that you have something that you can get some leverage to get those bolts apart.
For your tire, lug nuts are 19 millimeters. If you don't have air tools, you want to start with the vehicle on the ground, loosen the lug nuts, raise it, support with jack stands and then remove the lug nuts. Okay, we'll use some fast forward as we remove the rest of the lug nuts and the wheel. We want to use a screw driver. What I'm doing is point out on the caliper that just helps to get it off the brake pads. You remove 2 bolts and then remove the caliper. And on this vehicle those are 14 millimeter bolts. Pull off the caliper, put it up and out of your way and then you can just pry out the brake pads. You actually can skip this step, you can just pull the bracket off, then you want the pad bracket, two 18 millimeter bolts on this vehicle. I'm going to use a piece of pipe along with my ratchet and the pipe actually just gives you some extra leverage and then on the lower bolt on this vehicle, it has a clearance issue, so I'm going to put on my 18 millimeter wrench and then I'm going to hook another 17 millimeter wrench onto it and pull down. Okay, then finish off taking those bolts out. Now the bracket comes off and then hopefully your disc will just pull off, on this vehicle it doesn't but the vehicle has 2 threaded holes, you insert some M10 metric bolts and use your wrench to tighten those bolts up which forces the disc off of the hub.
You could see a pretty common issue on these vehicles. The backing plate here is actually just kind of rusted and falling apart. Remove your emergency brake shoes by pushing them down and off of a clip first and then push them right up and off. Now we're going to remove the axle for each side and you start by removing the ten 13 millimeter bolts on the back of the rear differential and as I start removing them, get to the last 2, the fluid starts leaking out, allow some time for the fluid to drain out and then remove them the rest of the way.
Now you want to turn your drive shaft with your vehicle in neutral until you have a good angle at that bolt right there. I'm using a 5/16 inch wrench and I'm going to remove this bolt. As you remove this bolt, you want to hold this pin up here, pull that bolt out and let that slowly slide down. That will allow you to actually push your axle in. It then allows you to pull out a C-clamp. This will fall down here. Magnet. That C-clamp comes out, which now allows you to pull out slowly your axle.
With this backing plate missing and all is a really good angle here. You want to force your emergency break cable back up through this bracket by prying on a couple of tabs. Okay and pull your cable out, you need to pull on this. There are basically two opposing forces going here. Unfortunately I don't film it very well because my shoulder gets in the way, but you pull with your right hand, pull on the cable and then with your left hand you pull that spring, you just need to uncover about 1/4 inch of the cable and it goes right up through a little slot in the bracket.
That allows your cable to come up and out of there. Okay, with your axle out, now you can use whatever tools you need to, to get these off. I do have Loctite on them, so I'll use a large breaker bar, or a piece of pipe for leverage. Make sure the caliper stays up there, pull that out.
Now, we need to take and pry these, there's 2 tabs, one here and one here. Pry those tabs up. Give this whole thing a couple taps with a hammer and then to get that out, just kind of pull it up and out like that. Clean all out pieces of the old backing plate off. I want to save this, it's a rubber grommet on here. I'm just kind of peeling all the metal off so I can save that. What I'm going to do is just use this little screw driver, just hit the rusty metal and it'll hopefully go off. I got my new backing plate, put this in, twist it down. After it's in I'm going to put this rubber grommet right there. Make sure that's all together. I'm just going to stop here due to some technical difficulties I didn't get to film. There is another small rubber, kind of triangular piece that goes in under the arm. Just make sure you put that back in where it belongs. It's actually pretty self explanatory the way it's shaped. This'll all go on like so. Okay, before I start my other bolt, I'm just going to put a little bit of Loctite on them. Pull this out. Now here, I'm just tightening the bolts preliminarily with my impact wrench. Now I'm going to torque these to 90 foot pounds. Okay, we're going to end part 1 here. If you'd like to see the rest of it and putting it all back together, just see the video with the same title but says part 2.
We hope this helps you out. Brought to you by www.1AAuto.com, your source for quality replacement parts and the best service on the Internet. Please feel free to call us toll-free, 888-844-3393. We're the company that's here for you on the Internet and in person.