Replaces


Recommended for your 2008 Toyota Camry
Frequently bought together
About TRQ:
TRQ is a trusted brand dedicated to making every repair a success story by combining premium parts with easy installation. Each TRQ part is engineered by a team of automotive experts to meet or exceed OEM standards, delivering enhanced performance and maximum longevity. With rigorous in-house testing, the brand ensures superior fit and function across every product line. TRQ also provides customers with best-in-class, step-by-step installation videos—so you can complete repairs with confidence, whether you're a first-time DIYer or an industry professional.
Attention California Customers:
 WARNING: This product can expose you to chemicals including Lead and Lead Compounds, which are known to the State of California to cause cancer, and birth defects or other reproductive harm. For more information, go to www.P65Warnings.ca.gov.
Lifetime Warranty
This item is backed by our limited lifetime warranty. In the event that this item should fail due to manufacturing defects during intended use, we will replace the part free of charge. This warranty covers the cost of the part only.
FREE Shipping is standard on Orders shipped to the lower 48 States (Contiguous United States). Standard shipping charges apply to Hawaii, Alaska and US Territories. Shipping is not available to Canada.
Expedited is available on checkout to the United States, excluding Alaska, Hawaii and US Territories as well as P.O. Boxes and APO/FPO/DPO addresses. Final shipping costs are available at checkout.

Created on:
Tools used
Hi, I’m Mike from 1A Auto. We’ve been selling auto parts for over 30 years!
I'm going to remove the air box, just slightly out of the way, so that I can get to this connector better and undo it. Use a 10mm socket and ratchet. Loosen this up. There's a second one on the back side. Unplug this electrical connector here. Unplug this one here. This harness is actually connected to the air box, so can't pop it off, I'm just going to leave it here and move it to the side. Then loosen this clamp on the intake tube. Lift up the air box. Make sure those are fully released. Take our air filter out of here so it doesn't get damaged.
So, this harness here has a little push connector. I'm going to take these needle nose pliers and just push them together, and just pop it out. Put that aside. Put this aside, so it doesn't get damaged.
Remove the air intake tube from the radiator support. Let off the air box. Remove the three bolts inside holding the air box lower part. Your ten millimeter. If it's loose, you can just lift it up and off the bracket and place it aside.
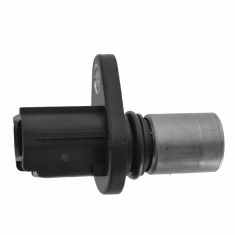
Camshaft position sensor is located here inside of the head. Push in the lock. Remove the electrical connector. Remove the ten millimeter bolt that is holding it in place. Have a rag handy in case any oil drips out. It should pull out. It's got some oil on it. Just going to wipe it off. No oil is dripping out so that's good.
These are our original cam position sensor from our vehicle and our brand new one from 1AAuto.com. Same exact style and design. Same style connector. Same single mounting hold. The new O ring. This should fit in there and work great.
Take our new sensor. Slide it right into place. Work it back and forth. Get lined up with the mounting hold. Reinstall the bolt to hold it in place. It's just a small bolt that's going into aluminum. I'm just going to tighten it just so it stops. Right there. I don't want to break it. Reinstall the electrical connector. Push it on so it clicks. Installation is complete.
Reinstall the lower air box. We've cleaned out all the debris that was in there. That's going to sit right back on the bracket. Get the bolts, and get them started. Tighten them down, socket and ratchet. Install the intake tube back into the box, just slides right over. Line it up on the radiator support. Just going to tighten those down, feel like I'm tight then I'll stop. Don't need to kill these, they're just holding plastic into the thin sheet metal.
Reinstall the air filter. Install the air box cover. It's got two tabs over here that need to go into these two hooks. Slide it over, and line up the little slot in the rubber with the plastic alignment tab. Make sure that the clamp is in the grooves. Tighten the screws holding in the air box. Then reconnect our electrical harness, clip it back into the spot on the air box were. Connect the mass air meter. And this little valve here, reconnect it.
Thanks for watching. Visit us at 1AAuto.com for quality auto parts, fast and free shipping, and the best customer service in the industry.

ESA53524