Replaces
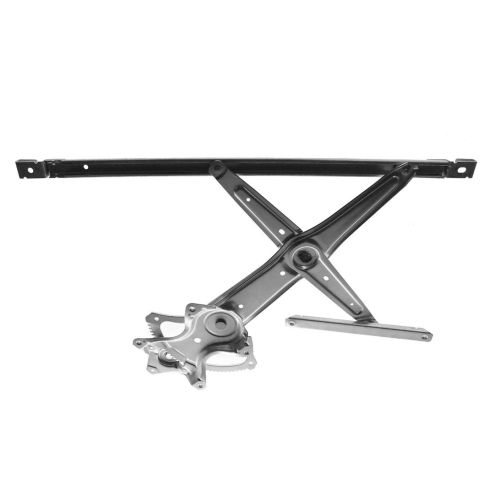
2007-11 Toyota Camry US Built Models Front Driver Side Window Regulator TRQ WRA52077

WRA52077
This part doesn’t fit a . Select from parts that fit.
Specify your vehicle's year, make and model to guarantee fit.
This part does not fit a .
Buy in the next and
Orders must be placed by 2pm ET
Frequently bought together
Specify your vehicle's year, make and model to guarantee fit.
This part does not fit a .
Part Details
- No
- No
- Galvanized Steel
- Electric
- No
About TRQ:
TRQ is a trusted brand dedicated to making every repair a success story by combining premium parts with easy installation. Each TRQ part is engineered by a team of automotive experts to meet or exceed OEM standards, delivering enhanced performance and maximum longevity. With rigorous in-house testing, the brand ensures superior fit and function across every product line. TRQ also provides customers with best-in-class, step-by-step installation videos—so you can complete repairs with confidence, whether you're a first-time DIYer or an industry professional.
Product Features
Attention California Customers:
![]() WARNING: This product can expose you to chemicals including Lead and Lead Compounds, which are known to the State of California to cause cancer, and birth defects or other reproductive harm. For more information, go to www.P65Warnings.ca.gov.
WARNING: This product can expose you to chemicals including Lead and Lead Compounds, which are known to the State of California to cause cancer, and birth defects or other reproductive harm. For more information, go to www.P65Warnings.ca.gov.
Lifetime Warranty
This item is backed by our limited lifetime warranty. In the event that this item should fail due to manufacturing defects during intended use, we will replace the part free of charge. This warranty covers the cost of the part only.
FREE Shipping is standard on orders shipped to the lower 48 States (Contiguous United States). Standard shipping charges apply to Hawaii and Alaska.
Shipping is not available to a P.O. Box, APO/FPO/DPO addresses, US Territories, or Canada for this item.
Expedited is available on checkout to the United States, excluding Alaska, Hawaii.
Final shipping costs are available at checkout.


Created on:
Tools used
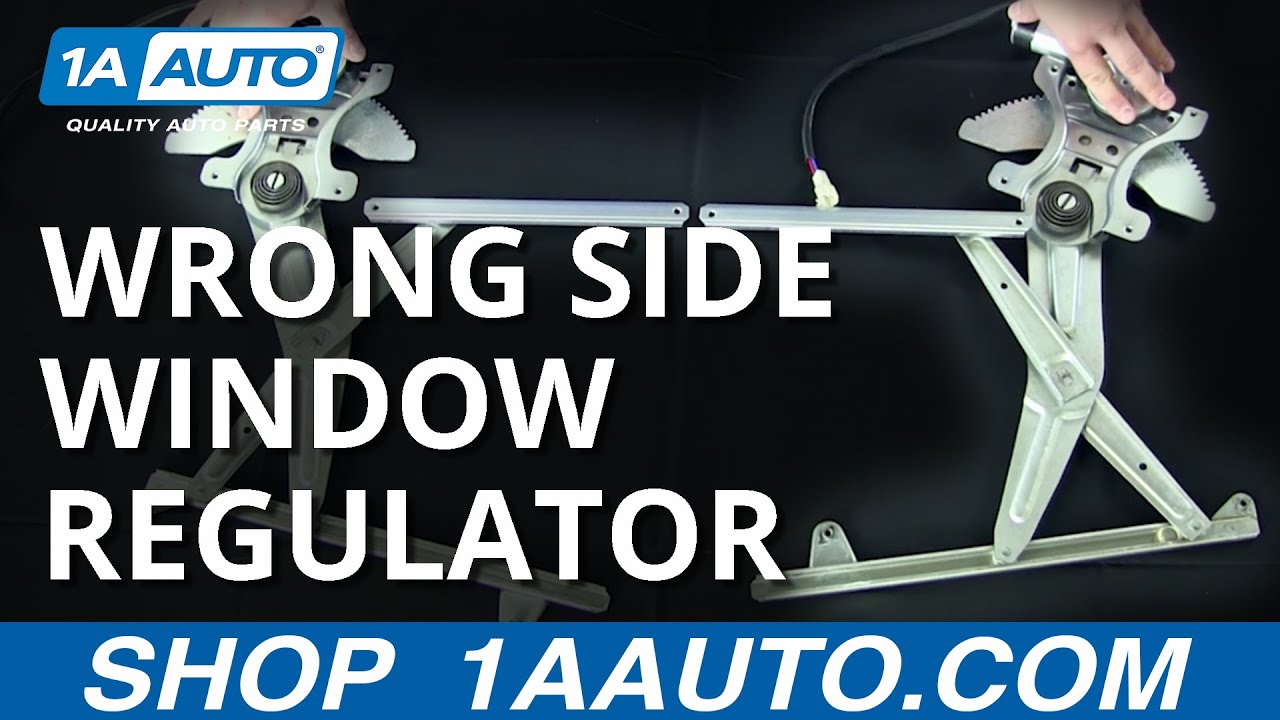
- Lay the old regulator and the new one side by side Pick the new regulator up by the motor side Flip the new regulator arms around to match your old regulator
Brought to you by 1AAuto.com, your source for quality replacement parts and the best service on the Internet.
Hey, I'm Brian, I'm here to give you guys a little tutorial on some window regulators. The specific design is the scissor design. We actually get a lot of calls on these products here and the common question is: The part I received seems different than the part in my vehicle.
The scissor design actually has a flip design and we're actually going to show you how to fix this here. The most common thing that you want to do, or the first step you want to do is lay the parts out side by side. Try not to match them up in the car because this can get confusing. Take it out, lay them side by side, and what you actually see here is a same exact part for the same model vehicle in the same door. As the appearance shows here, they seem to be mirrored.
If you look down at the bottom here, we have the power window motor. This is the piece that is actually powered to lift and lower your glass. The next section down here is . you actually have your gear drive. Here's your mounting plates on both. As you can see, it's identical. You have your tension spring here. If you notice on the upper section here, it's kind of reversed. You're going to think normally, I get the wrong side door. You're going to give us a call and you want to express that to one of our customer service reps. I'm going to show you how to fix this.
Basically, pick this up by the base and you want to scissor or flip. This is how you're going to fix the issue. It's going to actually match the component as shown there. You can now see that both of these components here are the same part and you're ready for installation.
You should be good to go. Click on Subscribe or check us out at 1AAuto.com. We'd be more than happy to have you join on board and join the 1AAuto team.
Thanks for tuning in. We hope this video helps you out. Brought to you by www.1AAuto.com, your source for quality replacement parts and the best service on the Internet. Please feel free to call us toll-free, 888-844-3393. We're the company that's here for you on the Internet and in person.
Tools used
- Pry the courtesy light out of the door panel with a trim tool Disconnect the courtesy light electrical connector Pry the trim piece off the mirror base with a trim tool Pry the grab handle panel off the door handle with a trim tool Pry the trim piece out of the door handle with a trim tool Pry the clip out of the front of the door panel with a trim tool Remove the Phillips screw inside the door handle Remove the two Phillips screws from the grab handle Pry out the door panel clips by hand Lift the door panel off the door Unclip the door lock cable from the door handle Pop the door handle out of the door Disconnect the wiring harness from the door panel Unclip the wiring harness from the door panel Disconnect the door latch cable from the door handle
- Pull off the water shield Remove the wire from the clips Disconnect the wiring harnesses Slide the wiring through the water shield
- Remove the four Phillips screws from the speaker Slide the speaker out of the door
- Disconnect the window motor lead Loosen the two 10mm bolts that hold the window to the regulator Raise the window by hand Hold the window in place with painter's tape Remove the five 10mm bolts from the regulator Pull the window regulator out through the door
- Insert one of the bolts into the window regulator Push the regulator into the door Hang the regulator by its bolt Insert the four 10mm bolts into the regulator Remove the painter's tape from the window Lower the window onto the regulator Insert the two 10mm bolts that hold the window to the regulator
- Slide the speaker into the door with the electrical connector at the top Insert the four Phillips screws into the speaker Connect the speaker electrical connector
- Slide the wiring and cables through Press the shield to the door Press the wire into its clips Plug in the wiring harnesses
- Clip the white door cable into the top of the door handle Clip the green door cable into the bottom of the door handle Feed the courtesy light electrical connector through the door panel Connect the electrical connector to the door panel Clip the door handle into the door panel Lift the door panel onto the door Line up the door panel, using the locating pins Push in the door panel clips Insert the Phillips screw inside the door handle Clip the trim into the door handle Insert the two Phillips screws into the grab handle Clip the trim onto the grab handle Clip the trim piece onto the mirror base Push the plastic clip into the front of the door panel Connect the courtesy light electrical connector Push the courtesy light into the door panel
Hi, I’m Mike from 1A Auto. We’ve been selling auto parts for over 30 years!
To remove this, take a plastic prying tool. You can get this from 1AAuto.com. Just kind of push in on this side. It'll pop it out. There's a clip there that you're trying to pop it out of. Push in the tab.
We're going to pop off the piece behind the mirror. You're going to get your fingers in there or use a plastic trim tool. It just pops to the two clips. To pop off this grab handle here, use a plastic trim tool. Pry it up. Pop it out. Put that aside. Pull the door handle open. Use the plastic prying tool to get in here. Pop that out. Use the plastic prying too to get this clip out. If you can get the middle up, that helps unlock it, but sometimes when they're flush like that, it's difficult. This one snapped, but it'll still work.
I'm going to use a Phillips head screwdriver to remove the one that’s behind the door handle. There's one in here and one deep in here. With these screws removed, the door panel is clipped around this edge and then it's going to lift off of the door frame. So I'm going to reach under here and pull it out. Do the same on this side. It’s free. Just be careful. The screws are in there so one just fell out. Put that aside.
You disconnect the door handles. That's the door lock. Pop this out. Pull it straight up. Same thing with this one. Pop it out. This whole piece actually came with it. That's fine. I guess that can stay in there. Disconnect the main harness from the door panel. It's clipped up here. There's a lock that's on the other side. Push it in. Pull it down. Door panel will come off. Pop this out. Pull it right off. Put that side.
To get to this door lock actuator, we have to remove the vapor barrier that's in the door. It's stuck on with this Butyl tape. It's really sticky. You probably want to put gloves on because it just gets everywhere but you can peel it away and take a razor blade and just sort of cut it. This stuff is so sticky that if you're careful you should be able to stick this back up and reuse the vapor barrier. Try not to pull too hard or stretch it.
If you just need to access the door lock actuator or the inside of the outer door lock handle, you could just peel it down halfway. Since we're going to also access other stuff inside this door I'm going to take the vapor barrier totally off. This wire harness for the door goes through the vapor barrier. It's taped to this mount so you could either cut it and retape it so it's actually easier just to untape it and pull it off. Need to unplug this from here. Use the plastic trim tool to reach in there, push the lock in and just kind of pull it out.
Disconnect the speaker plug and push the lock in, up. You can either cut this and rezip-tie it or try to push it out with a trim tool. I'll try to push it out. Pop that out. Unplug the mirror connector. Now I can keep taking this off, slide the harness up and through. Keep removing the vapor barrier. You can reuse this, just be careful with it. Go lay it down sticky side up. To remove the window regulator, I need to lower the window to about here so I can access the bolts. I'm going to plug it back in. This is the main door harness here. So I plugged our harness back in, and the window wouldn't go down because I had this disconnected here. Go about. There’s one of the bolts there, but I want to go down a little bit further so I can access it. I'm going to access it through where the speaker is. It's going to sit just about there. Now I can unplug this. Turn the car off. Put my door panel aside.
Just going to unplug this cable here. Take our speaker out of the way just using a Phillips head screwdriver. I'll loosen this 10 millimeter bolt and loosen this one. I'm going to slide our window up and out of the way. Take our masking tape, place it over the window. Do that a couple times, and that should hold it in place. There are five bolts holding in the window regulator: one, two, three, four, five. This sixth one is just to hang it as you install it, so I'm going to start by loosening that one, but I'm not going to remove it because that will slide out of this hole.
Now I can remove all of these ones, and break them all free. I'm using a 10 millimeter socket. I'm going to reach in, I'm going to slide this up and off of where it's hanging and feed the window regulator out of the door.
I'll take our window regulator, and feed it into the door opening. So this goes up here, there's a couple locating tabs, they're going to meet up in there. There's also this bolt here that it can hang on so just kind of maneuver it in here, you might have to reach in. Try not to pinch your fingers because it's kind of like a bunch of like scissor joints. Get these lined up and set in the tabs like that with the bolt started. Then finally tighten the one that we used to hang it on. I'm going to hold the glass and remove the tape. Lower it down easily. Kind of reach in and guide it. See those red tabs? I'm going to guide those into the regulator. You can move it back and forth, line it up.
Reinstall the bolts. Just tighten them up. The regulator is back in the door and the window is secure. I'll run this hook up behind the sheet metal of the door, line the speaker up in the door opening, self-tapping screws lined up. These are 10 millimeter, you can use a 10 millimeter socket or Phillips head screwdriver. They're just self-tappers going into plastic, so you don't have to kill them. Plug our window motor back in, plug our harness back in to the door, turn the ignition back on, and put the window up.
Before we put the vapor barrier back on, you can plug in the harness for the door lock actuator. Now you can reinstall the vapor barrier. This black stuff that looks like silicone is actually Butyl tape, it stays sticky for like a long time, so we can reuse this. If you need to, you can get more. It's called Butyl tape but this stuff should be fine. It's very, very sticky.
I'm going to feed these wires through here and sort of let that hang a little bit. There's another opening here that our harness needs to come through and to feel all of the connectors through here to actually make sure our window is unplugged because that needs to come through. Feed all these through. Just going to get this lined up in relatively the same spot and just push it down with your fingers. You'll feel it, it's really like gummy and sticky. Definitely want to be wearing gloves or else you'll have this all over your hands for a couple days.
This harness was taped here so you can either re-tape it or zip-tie it. I'm just going to plug it in first, plug our speaker in. This was clipped in up here for our mirror, I'm going to run that back into the clip, plug our mirror back in.
For our courtesy light, there's an opening in the bottom of the door panel for it. Just feed that through. A little trick to install this: get that started.
Take your door harness. Don't forget to plug that in or else nothing's going to work. It'll snap into place, so get this lined up. It's got a couple pins on the top and the bottom and those are going to push into these tabs.
Now we take the door panel and kind of push it up towards the window. Push it up towards the window and then down over. Sometimes you’ve got to push in on it. Just push down just like that. I can see the screw holes are lining up. I've got that where I want it. I'm just going to push in. That’s just going to capture all the clips.
I can reinstall the screws and install this small screw here behind the door handle. Our little trim piece has got all the clips. Pull this door handle out and get this front one captured first. Push that in place. There's two large self-tapping screws. One's going to go in the top. One's going to go in the bottom here in this door pull handle. Start with the top on. With two screws installed, we can clip this back into place.
Install our little triangle piece that goes near the mirror. These two clips are here. Push right into place. There's this little clip here. This one kind of broke, but we push it in there. If you don't have it, it's not a big deal. It doesn't do too much. The rest of the door panel is secure.
To reinstall the courtesy light and plug it back in. Push that up into place. The door panel's reinstalled.
Thanks for watching. Visit us at 1AAuto.com for quality auto parts, fast and free shipping, and the best customer service in the industry.
WRA52077
877-844-3393
Monday - Friday 8:00am - 9:30pm ET
Saturday - Sunday 8:00am - 4:30pm ET
Specify your vehicle's year, make and model to guarantee fit.
This part does not fit a .


