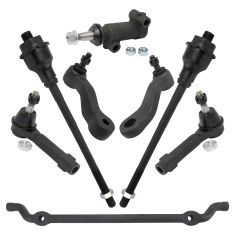
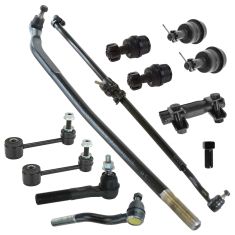
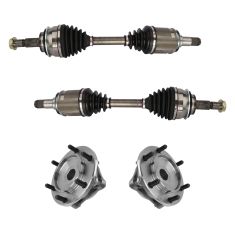
Steering & Suspension Kits
-
-
- Air Deflectors & Valance Panels
- Battery Trays & Related
- Body Panels
- Bumpers & Related - Front & Rear
- Convertible Tops, Soft Tops, & Parts
- Decal & Stripe Kits
- Emblems & Nameplates
- Engine Compartment Trim
- Frame Parts & Bushings
- Fuel Door Parts
- Fuel Tank Filler Neck
- Grille
- Header Panel
- Hood & Hatch Lift Supports
- Hood Latch & Catch Brackets
- Hood Release Cable
- Jack Pads
- Radiator Supports
- Rust Repair Panels
- Splash Shields & Fender Liners
- Tailgate Cables
- Tailgate Hinges & Related
- Weatherstripping
-
- Exterior Lighting
- Exterior Parts & Accessories
- Fender Flares
- License Plate Brackets & Frames
- Mud Flaps & Splash Guards
- Nerf Bars, Side Steps, Running Boards
- Radio Antenna
- Rain Deflectors
- Roll Bars, Light Bars, & Related
- Skid Plates
- Spare Tire Carriers & Related
- Tonneau Covers
- Tow Hooks & D-Shackles
- Trailer Hitch & Components
-
- Accelerator Pedals & Sensors
- Cruise Control Switch & Lever
- Electrical Parts
- Hazard Switch
- Ignition Key Lock Cylinder
- Ignition Switch
- Keyless Entry Remote & Related
- Neutral Safety Switch
- Parking Assist Cameras & Monitors
- Power Mirror Switch
- Power Seat Switches
- Power Window Switch
- Radio, Navigation, Entertainment
- Reverse Light Switch
- Trunk Release & Lock Solenoids
- Turn Signal Switches and Levers
- Windshield Wiper Switch
-
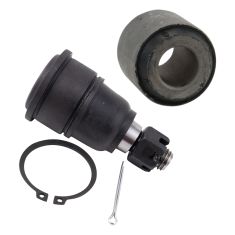
- Idler Arm
- Pitman Arm
- Power Steering Hoses
- Power Steering Pressure Sensor
- Power Steering Pump
- Power Steering Pump Pulley
- Power Steering Pump Reservoir
- Steering Dampers
- Steering Knuckles and Spindles
- Steering Rack and Gear Boxes
- Steering Shafts & Couplers
- Steering Wheels & Column Parts
- Tie Rods & Adjusting Sleeves
-
-
-
-
12296
1230
10
10
-
Notify When Available
VIDEO
 $229.95Save 31%List $334.95 Save $105.00
VIDEO
Brand: TRQ - PSA69898$229.95Save 31%List $334.95 Save $105.00 -
Notify When Available
VIDEO
 $389.95Save 29%List $550.95 Save $161.00
VIDEO
Brand: TRQ - PSA44108$389.95Save 29%List $550.95 Save $161.00 -
Notify When Available
VIDEO
$189.95Save 27%List $259.95 Save $70.00VIDEO
Brand: TRQ - PSA73445$189.95Save 27%List $259.95 Save $70.00 -
Notify When Available
VIDEO
$209.95Save 19%List $259.95 Save $50.00VIDEO
Brand: TRQ - PSA65058$209.95Save 19%List $259.95 Save $50.00 -
Notify When Available
VIDEO
$149.95Save 30%List $214.95 Save $65.00VIDEO
Brand: TRQ - PSA34609$149.95Save 30%List $214.95 Save $65.00 -
Notify When Available
VIDEO
$44.95Save 27%List $61.95 Save $17.00VIDEO
Brand: TRQ - PSA27595$44.95Save 27%List $61.95 Save $17.00 -
Notify When Available
VIDEO
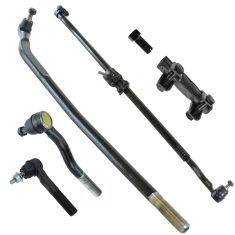
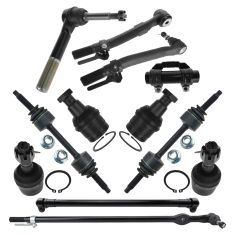
Replaces Jeep Wrangler Wrangler JK Front 12 Piece Steering & Suspension Kit TRQ PSA69904
Brand: TRQ- PSA69904$304.95Save 25%List $408.95 Save $104.00VIDEO
Brand: TRQ - PSA69904$304.95Save 25%List $408.95 Save $104.00 -
Notify When Available
VIDEO
$374.95Save 17%List $453.95 Save $79.00VIDEO
Brand: TRQ - CSA64083$374.95Save 17%List $453.95 Save $79.00 -
Notify When Available
VIDEO
$159.95Save 27%List $218.95 Save $59.00VIDEO
Brand: TRQ - PSA27840$159.95Save 27%List $218.95 Save $59.00 -
Notify When Available
VIDEO
$344.95Save 15%List $403.95 Save $59.00VIDEO
Brand: TRQ - PSA36705$344.95Save 15%List $403.95 Save $59.00

loading...
Choose the Make of Your Vehicle
