Replaces


Frequently bought together
About TRQ:
TRQ is a trusted brand dedicated to making every repair a success story by combining premium parts with easy installation. Each TRQ part is engineered by a team of automotive experts to meet or exceed OEM standards, delivering enhanced performance and maximum longevity. With rigorous in-house testing, the brand ensures superior fit and function across every product line. TRQ also provides customers with best-in-class, step-by-step installation videos—so you can complete repairs with confidence, whether you're a first-time DIYer or an industry professional.
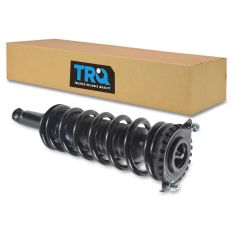
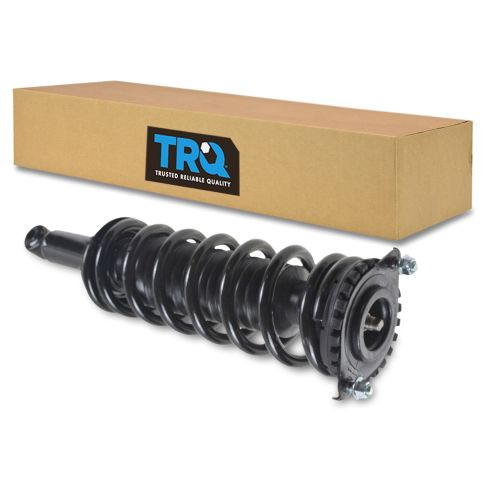
Replacing struts used to require specialized tools to compress, remove, and transfer the old spring and mount. Our Pre-assembled, complete strut & spring assemblies come with all new parts and make the job much quicker and easier for the do-it-yourself mechanic.
Strut & spring assembly contains:
Install Tip: To keep your vehicle operating safely and as designed:
Attention California Customers:
 WARNING: This product can expose you to chemicals including Lead and Lead Compounds, which are known to the State of California to cause cancer, and birth defects or other reproductive harm. For more information, go to www.P65Warnings.ca.gov.
Lifetime Warranty
This item is backed by our limited lifetime warranty. In the event that this item should fail due to manufacturing defects during intended use, we will replace the part free of charge. This warranty covers the cost of the part only.
FREE Shipping is standard on orders shipped to the lower 48 States (Contiguous United States). Standard shipping charges apply to Hawaii and Alaska.
Shipping is not available to a P.O. Box, APO/FPO/DPO addresses, US Territories, or Canada for this item.
Expedited is available on checkout to the United States, excluding Alaska, Hawaii.
Final shipping costs are available at checkout.
Created on:
Tools used
Hi, I’m Mike from 1A Auto. We’ve been selling auto parts for over 30 years!
Before we jack up the car, we're parked on level ground. We're going to set the parking brake, because we're jacking up the front of the car. We're going to leave the rear wheels on the ground. Loosen the lug nuts on the vehicle on the ground. We're going to use a breaker bar and a 19 millimeter socket. You've got a socket like this. It potentially might not fit inside of the lug openings. This particular car has very small lug openings. So, I'm just going to use a basic chrome 19 millimeter socket. That fits great. And I'll use the breaker bar to break these free. Go around and get them all loose.
Roll our jack underneath. Find the jacking point just behind the oil pan. Make sure you don't jack directly under the oil pan. Get the jack set up here. Make sure you're doing this on level, flat ground. It's lined up. Bring the car up. Get the wheels off the ground. All right. We'll set our jack stands up right here, right between these two notches and the pinch weld. Put our lock pin back in. Set the jack up the same way on the other side. Put our lock in and slowly lower the floor jack. Just going to leave the floor jack in place. Just take some of the weight off of it, but the majority of the vehicles weight is on the jack stands. Going to use the socket to finish taking off the wheel. I've already loosened the lug nuts. They should come off by hand. Take our wheel off, and put it aside.
I like to put the wheel underneath the car here. That way, if a jack stand gets knocked out, the car will land on the wheel. Pull the hood release. It's just under here, under the dash. Lift up on the hood. Find the safety release. Push it to the passenger side. Lift the hood up. Prop rods here. Put it in place.
Before you change the strut, just be aware, you'll want to have the car aligned afterwards, because the upper strut bolt does have a cam too it. And the camber adjustment can be adjusted at an alignment shop. So, in the meantime, I'm going to use this blue paint marker. You can use a paint marker, and color that you have. I'm just going to give a rough mark where the strut was on the knuckle. That way, when I install the new one, I can get it close and remove the bolt, holding on the ABS wire to the strut. I'm going to use some rust penetrant on the back side of the bolt. I'm going to use a 12 millimeter socket to ratchet and short extension, break it free. ... Once it's loose enough, I'll pull it out with my fingers. We'll put that aside and I'll put the bolt in here, just for now, so I don't lose it.
Going to remove the bolt, holding on the brake hose. And spray some rust penetrant. Get the back side of the bolts. Use the 12 millimeter socket, a ratchet, short extension, and break it free. Thread it out with my fingers. Pull the hose out, just like that. Put it aside. And I can move it just out of here. And thread this bolt back in here, so I don't lose it. I'm going to loosen the strut bolts.
I'm going to spray some rust penetrant on the nut side, with the exposed threads. Try to use this ratchet and a 19 millimeter deep socket. This ratchet might not be long enough. So, it is turning the bolts. It's not turning off the nuts. So, I'm going to use a 19 millimeter wrench to counterhold the bolt, while I loosen the nut. If you don't have enough leverage with a short ratchet like this, you can switch to your longer breaker bar to get it free. Just be careful you don't hit the fender.
With this one, I'm able to use the smaller wrench. Loosen that one up. Do the same for the lower one. So, the lower one, stuck on there, pretty good. I'm going to use the breaker. Get this broken free. Now, I can switch to the smaller ratchet. If you bend the metal, it's not a big deal, you can just bend it back—they're thin sheet metal. I'm going to take this bolt all the way out. That one's going to be the lower one. That's just a normal strut bolt. See if I can take this one off. It's not quite loose enough to come off with my fingers yet.
There's a washer on this upper one. Make sure you get that. Push this bolt out. You might have to push in on the knuckle a little bit. You can turn it with the ratchet. Pull it out. I'm going to put the washer and the nut on here, so I don't lose them. And you can see the top bolt has a cam to it. And that adjusts the camber as you turn it. It's also called an eccentric bolt. So, don't mix these up. This one will go on the top. The regular one goes on the bottom.
Loosen the nuts on the top of the strut. There's three of them. Spray some rust penetrant on here. Use a 12 millimeter deep socket, just have an extension, so I'm not hitting the fender of the car. I'll get these all loose. Be aware as you loosen them up. The struts going to start to drop out of the strut tower. It's not attached to the knuckle anymore. Strut is now in the car with only this nut. So, what I'm going to do, is reach underneath with one arm, and I'll hold up onto these struts, so it doesn't fall. And I'll loosen this nut. Put this down. Take this nut off. Lower the strut down off the knuckle. And guide the strut out.
Here's the original strut and spring assembly you pulled from the vehicle. This is the brand new one from 1AAuto.com. Spring is already assembled on it. It has a brand new top hat. No need to use a spring compressor to take this spring off. This is all set and ready to go in the car. They are marked. This one is for the front right, so front passenger side. The driver side would be marked FL.
There's a little warning label here. You can take this off. Basically it tells you, you do not need to loosen the nut that's under here. It's already set. Leave it alone. But, you can take that warning sticker off. Then this little sticker is just telling you that with the new springs the vehicle may appear to sit a little bit higher, and eventually will settle, with the vehicles weight. Will take that off.
The only thing I'm going to switch over. I'll take out these old bolts, so I can re-use them. That one's for the brake hose. And there was one in here for the ABS wire. I'll take it out. Comes with new mounting nuts on the top. I'll take them off. This is ready to go up inside the car. There's no direction to this. It can be mounted any way, as long as the bolts line up. As long as, the studs line up. All right. Put our strut up into the car. Be careful of our ABS wire and our brake hose.
I'm going to go up into the strut tower. Get them lined up. Get one of these new nuts caught. And I'll get another one caught. They're locking, so I'm just going to thread them on till they stop. I'm going to let that hang. Get our knuckle back into position. Line up with the strut. Going to start with the lower one. That's the one that doesn't have the eccentric part. Put it in from the back. Might have to move the knuckle and strut around. Maybe move it up or down, wiggle it around, push it in place.
Now, I'll just capture the nut, so it doesn't fall out. I'll do the same for the top one. Put the washer on. Put the nut on. The replacement nuts are 13 millimeter, so, I'm going to use a 13 millimeter deep socket and just tighten these up evenly. Bring this one up a little bit. Tighten the next one. Once I feel these get tight, I'll just stop. They do have a locking part of them, make sure all three of them are tight. Let's snug this top nut up, using the closed end of the wrench. I don't want to go super tight, because I can turn the whole bolts and make a camber adjustment. I'm going to bring the outer edge up to meet that blue line. Turn it this way. But, when you turn this, you can see it pushes the hub out. And as you turn it around, it pulls it in. So, I'm just going to pull it in, so it's close as it was.
I may not have been perfectly exact with that paint line, but we'll make it as parallel as possible. And, of course you can have your alignment checked afterwards. So, right about there is good. And we'll tighten this down. Tighten this one down. Not going to over-tighten them, because I want to torque them. I'm going to counterhold the bolts, closed part of my wrench, then torque the nut to 112 foot-pounds. Once it clicks, you're all set. Do the same for both. I'm going to reinstall the ABS line. Take out that bolt. Line up the line here. I'll just thread it in as far as it will go by hand. Use that 12 millimeter socket and ratchet. Thread it in. Feel it get tight. I'll stop.
Reinstall the brake hose. Just take it out of the way for a second. Get the bolt out of there. Put the brake hose back up in place. Line it up. Re-install those bolts. Get it started by hand. And then tighten it up with the 12 millimeter socket. Just tighten it up. And once I feel it get tight, go a little bit more, then I'll stop. This side complete. The opposite side will be the same exact procedure.
Reinstall the wheel. Start the lug nuts by hand. This one went down pretty far. Then get an opposite one caught. Use the socket and thread them in. We'll jack up the car, take it off the jack stands. Push the locks out. Do the same for the other side, as well. Lower the vehicle to the ground. Un-torque the lug nuts to 89 foot-pounds in a cross pattern. That's a click.
Thanks for watching. Visit us at 1AAuto.com for quality auto parts, fast and free shipping, and the best customer service in the industry.
Tools used
Hi, I’m Mike from 1A Auto. We’ve been selling auto parts for over 30 years!
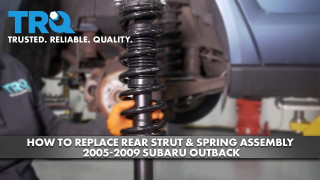
In this video, we are replacing rear struts in a 2008 Subaru Outback. If you need these parts or other parts for your car, click the link in the description and head over 1AAuto.com.
Open the back. Pull this up and out. Pull this up. See the clips underneath here. Fold down the back seats, push that down, and push that one down. This folded up here like that. And then take these two upper strut mount nuts off, and then put a 14 millimeter wrench on. And we'll break these free with a 14 millimeter wrench. Going to take off the lug nuts. It's a 19 millimeter socket and a breaker bar. I'm just going to crack them loose before we lift the vehicle off the ground. Take the lug nuts off.
From the side grab the wheel, pull it off. All right, then we're going to take the shock bolt out here, with a 19 millimeter socket and a 19 millimeter wrench. Pull the nut off. It's a good idea to support the lower suspension with… we're using a screw jack, but you could use a floor jack or a piece of wood or something underneath. The suspension may fall or go up once we pull that bolt out. To pull that out, I'm going to use a punch. Punch it through. As this goes through the shock is going to fall, so I'm going to try to support it. Be able to pull it down. Pull it straight down. We could have left a, one of the nuts on top so that it wouldn't fall all the way—you can also do that.
This is our old spring and strut assembly. This is our new spring and strut assembly from 1AAuto.com. As you can see, they are almost identical. It doesn't matter left to right—they're both the same part number.
On here you're going to see this warning. It tells you not to touch this nut underneath here, because it could be dangerous. It's safer to install the strut spring assemblies as a whole, versus removing the strut and taking a compressor and putting a new strut on. You don't have to mess around with it—it's good to pop right in. Order your part from 1AAuto.com and you'll be ready to rock and roll.
As you can see, when we took our strut spring assembly out, the suspension actually raised up. Most of the time when you're doing that, the suspension will kick down. For this vehicle it went up. All right, I'm going to install the new strut, this way and then I'm going to line up the holes on top. As that's in there, while I'm holding up I'm going to take one of the nuts and go around, get that nut started so it holds it up in place first.
So we're going to support the lower part of the shock strut assembly, but we also want to pry down on the suspension. I'm going to use a pry bar. Feed it through there and hold it against the frame. And while we're pulling down, try to get the bolt in. There we go. Once you get it started, you can take this down. Get this out of your way. And just tap it with a hammer. Put the nut back on.
Another way to get that bolt in for the lower strut: You could also put in a jack right here, if you had like a scissor jack. Could have stuck it in there and then be able to push the control arms down and then fish that bolt in and you'd be good. Now we're going to tighten the bolt up, the nut. 19 millimeter wrench and a 19 millimeter socket and ratchet. Now we're going to torque this bolt to 46 foot-pounds. That's good.
Install our tire. Put the lug nuts on. With a torque wrench, we're going to torque the lug nuts down to 90 foot-pounds going in a star pattern. You want to go in a star pattern so that you torque the wheel to the hub evenly. The struts come with new nuts, they're 15 millimeter instead of 14 millimeter. So I'm going to put these on. It's kind of hard to get underneath here. And the torque on these nuts is 22 foot-pounds. It's hard to get a torque wrench in there, so I'm just going to use a wrench.
And reinstall this. This piece comes up and over like that. There's a little push pin that goes right there, like that. Push the back seats up. Install the back panels. These two little clips go in there. Line them up and push them down. This one actually popped out over here. Put that clip in there first. Put this on here. Push it down. Just going to line those two tabs up in the back, and push that down. Close the deck lid.
Thanks for watching. Visit us at 1AAuto.com for quality auto parts, fast and free shipping, and the best customer service in the industry.

SCA57986