Replaces


Frequently bought together
Part Details
About TRQ:
TRQ is a trusted brand dedicated to making every repair a success story by combining premium parts with easy installation. Each TRQ part is engineered by a team of automotive experts to meet or exceed OEM standards, delivering enhanced performance and maximum longevity. With rigorous in-house testing, the brand ensures superior fit and function across every product line. TRQ also provides customers with best-in-class, step-by-step installation videos—so you can complete repairs with confidence, whether you're a first-time DIYer or an industry professional.
Direct Fit Replacement
Premium Aluminum Core
100% Leak Tested
Attention California Customers:
 WARNING: This product can expose you to chemicals including Lead and Lead Compounds, which are known to the State of California to cause cancer, and birth defects or other reproductive harm. For more information, go to www.P65Warnings.ca.gov.
Lifetime Warranty
This item is backed by our limited lifetime warranty. In the event that this item should fail due to manufacturing defects during intended use, we will replace the part free of charge. This warranty covers the cost of the part only.
Packaging:
Radiators may incur bent cooling fins or small imperfections during shipping or manufacturing. A few bent fins or small dents and scratches do not affect the fit or the function of the part. Neither our 60 Day satisfaction guarantee, nor the manufacturer's warranty, cover these types of insignificant damages.
FREE Shipping is standard on orders shipped to the lower 48 States (Contiguous United States). Standard shipping charges apply to Hawaii and Alaska.
Shipping is not available to a P.O. Box, APO/FPO/DPO addresses, US Territories, or Canada for this item.
Expedited is available on checkout to the United States, excluding Alaska, Hawaii.
Final shipping costs are available at checkout.

Created on:
Tools used
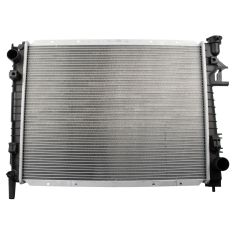
Hi, I'm Mike from 1A Auto, here to talk to you a little about radiators. This is the original radiator that we took out of this 2008 Dodge Ram that's behind me, and here’s a new replacement from 1A Auto.
Your engine has coolant running through it, and you either have a little gauge or a light on your dash that tells you how hot your engine is. The radiator coolant flows through it and it flows through the aluminum or brass. Air flows through that, takes heat from the coolant so that it can be recirculated into the engine and cool the engine down. Most modern radiators have plastic tanks with aluminum thins or the aluminum core, and a lot of times what happens is in climates, the aluminum corrodes. You start to get leaks in here and also you can have cracks in your plastic.
At 1A Auto, we sell very nice replacement radiators. They're always direct fit with the same fittings, same clips, same mounting points, and if you have a bad radiator, new replacement from 1A Auto will fix you up right.
Tools used
Brought to you by 1AAuto.com, your source for quality replacement parts and the best service on the Internet.
Hi, I'm Mike from 1A Auto. I hope this how-to video helps you out, and next time you need parts for your vehicle, think of 1AAuto.com. Thanks!
In this video, we're going to show you a radiator replacement. This is a 2008 Dodge Ram with a Hemi V8. This radiator and this process is the same of a lot of those generation Rams. You'll need a new radiator from 1AAuto.com, drain pan, large adjustable wrench, 3/8 drive ratchet, hammer, flat blade screwdriver, and 10 to 13 millimeter sockets.
This can easily be done from the ground. We raised and supported our vehicle and put a drain bucket under our radiator. Open the drain on the bottom of the radiator. Wait for your coolant to run out.
Open the drain on the bottom of the radiator. You only have to remove the upper radiator hose, so just drain a little bit of fluid out to make sure you don't lose too much, and then re-close valve.
Your radiator fan is located at the back of your radiator, attached to your water pump. There's a few different ways to take this off, but we're going to use a pipe wrench secured to the nut, a 3/8 ratchet to add a little bit of tension to our serpentine belt and keep the water pump from spinning, and a hammer. We're just going to knock the nut loose, and use an adjustable wrench to take the nut the rest of the way off. Then move your fan out from behind the shroud and set it off to the side.
Remove the feed tube on the bottom of your washer pump, make sure you have a drain bucket to catch what comes out. Lift the red safety to the connector, release the connector from your washer pump. Release the red safety from the level sensor, disconnect from your level sensor.
Remove your overflow hose from the fill neck on the radiator, remove the two 10mm bolts. Lift the reservoir out of the car, being careful not to damage your sensors and pump, set it off to the side.
Remove the 13 millimeter bolt under the fill neck under the radiator. Loosen the hose clamp on the upper radiator hose at the radiator. To remove a radiator hose without damaging it, we're going to twist and free it up before pulling it off and setting it to the side. Remove the other 13mm bolts on the fan shroud. Lift up on the fan shroud to release it from its tabs, put it off to the side.
Place a drain bucket underneath your lower radiator hose before removing. Use a flat head screwdriver to loosen the radiator hose clamp. Move it off to the side. Twist your radiator hose to break it free and remove from the radiator. Move it out of the way.
Remove the two 10 millimeter bolts at the bottom of the radiator that hold the power steering cooler in place. The power steering cooler bolts go through the bracket, so you'll have to hold one side with a wrench. Let the power steering cooler hang so it's free of the radiator.
Remove the 10 millimeter bolt behind the radiator and below the filler neck, and above the upper radiator hose on the opposite side. Lift the radiator up and move it to the side so we can access the training cooler bracket bolt, 10 millimeter. Release the transmission cooler lines from the side of the radiator, rest the training cooler somewhere safe. Lift the radiator out of the truck.
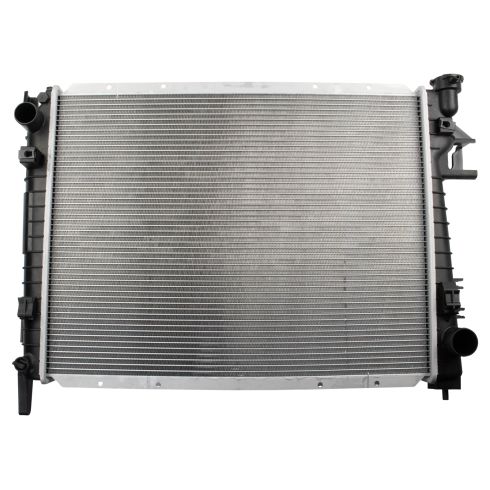
Here's the radiator out of our vehicle, and a new one from 1A Auto. You can see they're exactly the same. Same fill hole, same points for the radiator hoses, all the same mounting points. In this case, the radiator that we took out of the vehicle is in good shape, so we're just going to put that back in. We're just doing this video to show you. If you did need a new radiator, if you have a corroded core or cracked tanks, a new radiator from 1A Auto will help you out.
Make sure you close the drain on the bottom of your radiator before beginning the install. Put the radiator back into the engine bay. Put the tabs to the transmission cooler into the proper slots. With the tabs lined up make sure the cooling lines snap into the retainer. Make sure the ridges are located to the rear of the retainers.
Reinstall the 10 millimeter bolt. Place the power steering cooler down below the bar. Set your radiator hooked onto the lower brace and into the hole on the bottom passenger side. Line the transmission cooler brackets up with the corresponding holes in the bottom of the radiator. Feed the bolts through from the front and install the nut on the back. Hold the bolt on the front of the power steering cooler and tighten the nut from the back. Repeat these steps for the other side.
Reinstall your two 10 millimeter bolts to the upper radiator mounts. Your fan shroud has 2 tabs that'll slide into this hook and the matching one on the opposite side. These tabs will slide into the hooks. Install your two 13 millimeter bolts at the top of the shroud.
Reinstall your cooling fan into the shroud. You should be able to start the nut by hand. Spin it down pretty close using the fan. Finish tightening, adjust your pipe wrench or pliers to the nut. Some water pumps are reverse thread; this one is not. We'll give it a few taps clockwise to finish putting it on.
Reinstall the two tabs on the bottom of the expansion tank and washer reservoir into the corresponding slots at the bottom of the fan shroud. Install the two 10 millimeter bolts at the top of the tank.
Reinstall your overflow tube to the back of the filler neck on the radiator. Reconnect your washer fluid line and your electrical connectors. Make sure to snap the red safety tabs back into place. Reconnect your upper radiator hose and tighten the clamp.
Reinstall the lower radiator hose under the radiator. Slide your clamp on, tighten it down with a flat head screwdriver. Refill your washer fluid. Fill your radiator with Mopar-approved 50/50 coolant. Any time you drain the coolant from your vehicle you're going to want to properly bleed the system.
To do this, fill your radiator and your expansion tank. Turn the heat on in your vehicle and let it run. With the cap off wait until you see all the air bubbles come out, constantly checking the fluid level until the fluid level remains stable without any bubbling or draining. Then you're safe to reinstall the cap, ensure that your heat's blowing hot air, you're ready to go.
Thanks for tuning in. We hope this video helped you out. Next time you need parts for your car, please visit 1AAuto.com. Also check out our other helpful how-to and diagnosis videos.
Tools used
Hi, I'm Mike from 1A Auto, here to talk to you a little about radiators. This is the original radiator that we took out of this 2008 Dodge Ram that's behind me, and here’s a new replacement from 1A Auto.
Your engine has coolant running through it, and you either have a little gauge or a light on your dash that tells you how hot your engine is. The radiator coolant flows through it and it flows through the aluminum or brass. Air flows through that, takes heat from the coolant so that it can be recirculated into the engine and cool the engine down. Most modern radiators have plastic tanks with aluminum thins or the aluminum core, and a lot of times what happens is in climates, the aluminum corrodes. You start to get leaks in here and also you can have cracks in your plastic.
At 1A Auto, we sell very nice replacement radiators. They're always direct fit with the same fittings, same clips, same mounting points, and if you have a bad radiator, new replacement from 1A Auto will fix you up right.

RDA82616