Replaces


Frequently bought together
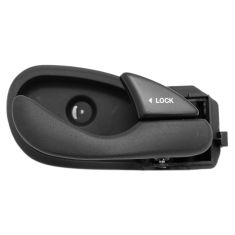
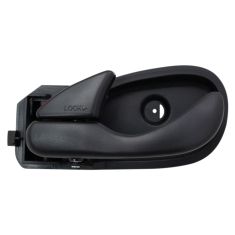
Part Details
About TRQ:
TRQ is a trusted brand dedicated to making every repair a success story by combining premium parts with easy installation. Each TRQ part is engineered by a team of automotive experts to meet or exceed OEM standards, delivering enhanced performance and maximum longevity. With rigorous in-house testing, the brand ensures superior fit and function across every product line. TRQ also provides customers with best-in-class, step-by-step installation videos—so you can complete repairs with confidence, whether you're a first-time DIYer or an industry professional.
Attention California Customers:
 WARNING: This product can expose you to chemicals including Lead and Lead Compounds, which are known to the State of California to cause cancer, and birth defects or other reproductive harm. For more information, go to www.P65Warnings.ca.gov.
Lifetime Warranty
This item is backed by our limited lifetime warranty. In the event that this item should fail due to manufacturing defects during intended use, we will replace the part free of charge. This warranty covers the cost of the part only.
FREE Shipping is standard on Orders shipped to the lower 48 States (Contiguous United States). Standard shipping charges apply to Hawaii, Alaska and US Territories. Shipping is not available to Canada.
Expedited is available on checkout to the United States, excluding Alaska, Hawaii and US Territories as well as P.O. Boxes and APO/FPO/DPO addresses. Final shipping costs are available at checkout.

Created on:
Tools used
Brought to you by 1AAuto.com, your source for quality replacement parts and the best service on the Internet.
Hi, I'm Mike from 1A Auto. I hope this how-to video helps you out, and next time you need parts for your vehicle, think of 1AAuto.com. Thanks.
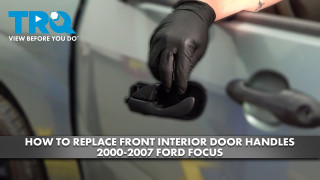
In this video, we show you how to remove and replace an inside door handle on this 2003 Ford Focus. We're going to show you the driver's front door. Pretty much the same procedure for the passenger's front door. Tools you'll need are a small and regular size flat blade screwdrivers, T20 Torx driver, and 7mm socket with a ratchet and extension.
Okay, on this door, first look at the top corner. You want to pull your trim out. It should pull, this has already come off, pull out, and then it pulls back and off. And then you can disconnect this. This, get your small screwdriver, and you actually pry right in here on this side of the connection. Pull it out. I'm just going to speed it up here. Those screws use a T20 Torx bit, so use your T20 Torx bit and remove all of them.
Okay, you want to pry this off. It's easiest to get it right here in the back. Pry that out it comes right off. Okay, go in with a 7mm socket, the extension, and ratchet. A quarter-inch socket actually works as well. Remove these two bolts. Now reach right in here and pull firmly. And up here, same thing, pull firmly. Pull this panel out. And then this disconnects. There's a little tab that's back behind the wires, push that tab down and pull that out. Tab's actually right on the back and pushes down. Same thing over here. A couple harnesses, they just have tabs that you press with your thumb.
Pull out and disconnect. Now you can just take your panel, pull it out, and pull up and it comes off. Okay, now this handle, pull it firmly and it comes out. To pry off the cable, pull up on it firmly, the cable comes up. You actually push that back and you see the ball of the cable comes up, comes off.
Here's a new handle from 1A Auto. Push that back, push the cable down in, and then lock it right into place. Put this back one in first, rotate it in, and lock it into place. Okay, I'm going to fast-forward through putting the door panel back together. If you want to see this in regular motion, you can just check out our other videos. Put hang the panel back up on the ledge, reconnect the mirror switch, reconnect the window switches, and put those trim panels back in place. And then put the bolts back in for the door pull. And now I'm going to fast-forward as I take those two 7mm bolts. Reinsert them into that door pull and tighten them up.
Then put the trim panel and snap it back into place. You want to put the top in first and then snap the bottom into place. Continue that speed as I just take the seven T20 screws. One goes in the door handle, the rest go around the perimeter of the door panel. Put those in and tighten them up. Last, but not least, put the little trim panel over the screw in the door handle.
We hope this video helps you out. Brought to you by www.1AAuto.com, your source for quality replacement parts and the best service on the Internet. Please feel free to call us toll-free, 888-844-3393. We're the company that's here for you on the Internet and in person.
Tools used
Brought to you by 1AAuto.com, your source for quality replacement parts and the best service on the Internet.
Hi, I'm Mike from 1A Auto. I hope this how-to video helps you out, and next time you need parts for your vehicle, think of 1AAuto.com. Thanks.
In this video, we're going to show you how to replace a rear inside door handle on this 2003 Ford Focus. The only tools you'll need are a small flat blade screwdriver and a T20 Torx driver. We do it on the driver's side, but the passenger side rear is the same as well.
We're going to first take a small screwdriver. Right back in behind the door handle there's a little round trim piece. Pull that out. Then here, go in behind here, pry that out, and bring that out and down. There are T20 Torx screws: two on the back, two down low, two on the front, as well as one in behind here. Then the 6mm bolts in there. You can use a 6mm socket or an inch socket. Let's speed it up here as I use a T20 Torx bit and remove the six screws around the edge of the door panel. Then one in behind your door handle. Get this off, and then right back here is a little tab.
We need to use your little screwdriver, press the tab down, and disconnect it. This panel comes out. Put your screwdriver under there and pry it out. Work your fingers underneath and unclip it. I'm going to fast-forward as I remove those two inch or 6mm bolts. Now lift your panel, pull the bottom out, lift it up and off the window ledge.
To remove the inside door handle just pull firmly and it comes off. Then, for the cable you have to grip your finger on there and pull it up. Make sure it's in the locked position and it will pull up and right out.
Reinstallation is just a reverse of the procedure. Put it into the locked position, push your cable down, and snap it on. Put this tab in first and snap it on.
To reinstall, push it up and onto the window sill. I'm going to fast-forward. All I'm doing right now is putting all the screws that go along the perimeter and in the door handle. Those are the T20 screws. Putting those in and tightening them up. And last, but not least, make sure you put that triangle trim back in place. Get it in place and push it firmly and it snaps in.
We hope this video helps you out. Brought to you by www.1AAuto.com, your source for quality replacement parts and the best service on the Internet. Please feel free to call us toll-free, 888-844-3393. We're the company that's here for you on the Internet and in person.
Tools used
Brought to you by 1AAuto.com, your source for quality replacement parts and the best service on the Internet.
In this video, we're going to show you how to replace the inside door handle on this 2002 Ford Focus. The procedure is the same for a lot of the vehicles of this era. The only tools you'll need are a T20 Torx driver and a flat blade screwdriver.
To replace the inside door handle there's a screw in behind the little panel right here, and that's a T20 Torx screw. You want to remove that. Then on this panel, just lightly pry here. Then it's also locked in back here, so pull a little bit. You can pull the harness free. The power window switch is on here. There's a little tab that you can see right from this angle. Press on that tab and pull the harness connection for your power windows switch. Pull this off. We'll probably just let this hang down like that. You can probably just reach in with your hand best. Pull it out and pull it from the door, and then this can just be really easily pried up carefully with a screwdriver.
To reinstall the door handle, take our cable and put it down in first. Put those into the lock button. Take this, press it down in. Make sure it locks. There's a little slot right here that the end of the handle goes in to. Make sure we get this out of the way. Make sure the handle goes in. It snaps in there. Now we can reinstall this panel, connect the power window switch and connect the lock switch. Make sure this back part snaps in. Snap the top part in. Replace the screw.
We hope this video helps you out. Brought to you by www.1AAuto.com, your source for quality replacement parts and the best service on the Internet. Please feel free to call us toll-free, 888-844-3393. We're the company that's here for you on the Internet and in person.
Tools used
Brought to you by 1AAuto.com, your source for quality replacement parts and the best service on the Internet.
Hi, I'm Don from 1A Auto. I hope this how-to video helps you out, and the next time you need a part for your vehicle, think of 1AAuto.com. Thanks.
In this video, we're going to show you how to replace the rear door handle on this 2005 Ford Focus. We show you on the passenger side, but the driver side is the same procedure. The items you'll need for this include a 6mm socket and ratchet, a T15 Torx bit, a pick, and a flat blade screwdriver.
This vehicle has manual windows. We'll need to remove the manual window crank first. You see, we're using a pick in there. There is a clip that holds the crank on. There's also a special tool designed for this, but you can use the pick like this. You could also actually just use a paper clip and bend it deep down in there and get that off. Then use your pick or small flat blade screwdriver and remove that panel. There are two 6mm bolts right in behind. We'll fast-forward as we remove those.
Pry out the small handle by the door handle. Behind here, there's a T15 Torx bolt. Go ahead and remove that. Lining your door panel, there's six T15 Torx bolts. We'll fast-forward as Don removes those. Pry off the triangular panel at the top of your door panel. Pull the door panel out, lift it up and over the window sill, then over the handle and it's free.
Hold the interior door handle forward, and pry up on this plastic cover. Underneath it, you can see the door handle cable. You want to just pull this straight out and your door handle is free.
To connect your new one, push the lock in. Push that back down into the door handle. Use something to make sure that you pushed all the way in. Then push that cover back down. Line up the tabs on the door handle, and push it back into the door.
Now, to replace the door panel, slide it onto your interior door handle and push it down into the window sill. Once you have that lined up, replace those two quarter-inch bolts in the pull handle. Replace your pull handle panel. Now replace the T15 behind the door handle. Put that little screw cover back in place. Next, put the clip back into your window crank and push it onto that stud. We'll fast-forward as Don replaces those six T15s that line the door panel. Push your triangular panel back in place, and you're all set.
We hope this video helps you out. Brought to you by www.1AAuto.com, your source for quality replacement parts and the best service on the Internet. Please feel free to call us toll-free, 888-844-3393. We're the company that's here for you on the Internet and in person.
Tools used
Hi, I'm Mike from 1A Auto. We've been selling auto parts for over 30 years!
All right, on this driver's door panel we're going to start by pulling this piece off. Just grab a trim tool, get underneath here, pry it out a little bit, and then it comes off towards the back.
A couple little clips that got stuck in there. Those little clips, we're going to transfer them back over to here when we go to reinstall it.
All right, we want to disconnect this mirror switch. The easiest way to do it is to pop this through, and just push it through that way. Pull it through, and then there's the little tab right there on the connector.
We'll just use a little screwdriver. Push on that tab so we can get underneath the tab right there. Just disconnect it that way, then we can pull this trim off.
Now, there's a little cover right here--just take a small screwdriver, get underneath there, pop that cover off. There's going to be a T20 screw in there, so we use a T20 Torx bit, and an extension, and a ratchet. Take this screw out. Pull that screw out.
Next we're going to use a trim tool and take off this cover right here over the handle. Get underneath there and pry it up.
Then there's two, this happens to have a couple mismatch screws. It's probably going to be a Torx screw or a Phillips head screw. So, we're going to use a Phillips head screwdriver on this one. Take that screw out. All right, so this screw has a quarter inch head, so we're going to use a quarter inch socket, an extension, and a ratchet. Once it's loose, I can just do it with the extension. Loosen it up. Pull that screw out.
Next we have these Torx screws that go along the outside of the door panel and the bottom. There's six of them. So I'll start by taking these off. I'm going to use a T20 Torx bit, an extension, and a ratchet. Take all these out. Take all these bolts out, I mean, screws out.
And there's two more of those torque screws over here on the side. So, eight in total. Take that one out, and then we'll take this one out down here. All right, so we're going to pull this trim piece off. Just use a trim tool, slide in underneath here, pop this off, pop this side off, and just pull that out.
Then we're going to disconnect these electrical connectors. Looks like this one is messed up a little bit, so I'll just use a little pick, push down, and pull that connector off. And then over here, this connector right here--push that one down and pull that connector off.
Now we'll grab the panel. Pull it out, slide it up, pull up on this backside, past the handle, and pull the door panel out.
To get this inner door handle off, we're just going to pull this from the front. All right, just take a trim tool, stick it behind, and just pop it out. You'll slide it that way. These little tabs hold it in, and then it slides.
To get this cable off you want to put it in the lock position. Be careful, because you're going to have your door in the lock position--you don't want to close the door by accident.
So, I'll just grab this and pull up, and then that slides out of there. See that? When that's in the lock position, then you're able to slide that cable out.
We're going to install this handle. Just have this in the lock position, slide that down there, and line this part up in the back. Then we push it straight down, like that. Then I'll check to make sure that operates properly. That seems to be working, so I'll slide it in over here, and then press it on just like that.
Now we'll take the door panel. I'm going to slide it on. Start in this corner, work your way forward--going to angle it out a little bit. Make sure you pull these wiring harnesses through. This one goes here. This one goes over here, just like that. Push it in all the way around.
I'll reinstall this bolt. This one, the quarter inch, with the extension and ratchet. This one had a Phillips head screw, but yours may have that quarter inch bolt. Tighten this up snug.
Now we're going to install these T20 Torx bit screws. There's eight of them. There's two in here. I'll just get them started. Then there's two on the back here. All right, I'll tighten this one down.
I'm going to install this handle. Goes this way, slides up there, and lock it in place.
All right, so we're going to slide the wiring harness through here first, and then you'll line this clip up with the door. One clip I left in the plastic trim piece, and one clip I left in the door. Slide it on there, and then push it that way.
We can take this and connect this connector. You'll line the tab up and lock that in. Want this to go in like this, and lock that in.
All right, so this wiring harness comes up like this. I'm going to connect that to the lock. It's supposed to slide in over here, like this, and then we'll connect the window switch back here, just like that. Snap that in place.
Then, over here, get this lined up. Whoops. Clip that in. Then we'll take our torque screw and get that started, and then we'll snug it up.
All right, take this little cap, and then push it on. Snap it in place.
Thanks for watching. Visit us at 1AAuto.com for quality auto parts, fast and free shipping, and the best customer service in the industry.
Tools used
Brought to you by 1AAuto.com, your source for quality replacement parts and the best service on the Internet.
Hi, I'm Mike from 1A Auto. I hope this how-to video helps you out, and next time you need parts for your vehicle, think of 1AAuto.com. Thanks.
In this video, we're going to show you how to replace an interior door handle on this 2005 Ford Focus. We show you on the driver side, but the passenger side is a similar procedure. The only tools you'll need for this is a flat blade screwdriver and a T20 Torx driver.
Pry out this screw cover and then remove the T20 screw inside of there. Then pry out on this panel and slide it forward and off the door handle. Now pull straight out on the door handle and then slide it forward. Lift this cable out of the door handle and unclip it.
Take your new door handle, re-clip the cable, and then push that top part back into place. Now you want to put this tab back into that slot, so slide it back into place and then push the front back in. Then take this panel, slide it back over the door handle, and push it back into place. Then replace and tighten up that T20 screw and push that cover back in. You're all set.
We hope this video helps you out. Brought to you by www.1AAuto.com, your source for quality replacement parts and the best service on the Internet. Please feel free to call us toll-free, 888-844-3393. We're the company that's here for you on the Internet and in person.

DHA49529