Replaces


Frequently bought together
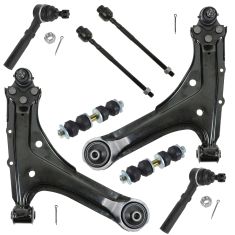
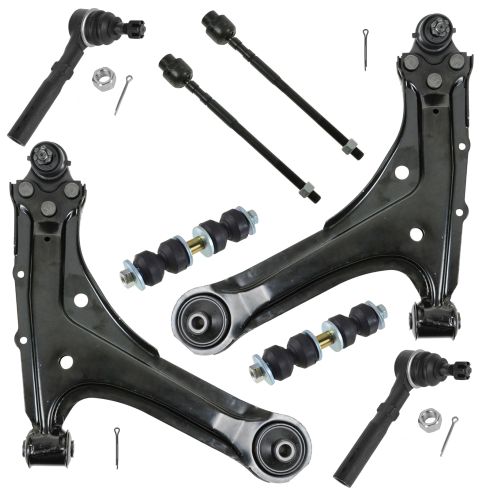
Part Details
Specifications
About TRQ:
TRQ is a trusted brand dedicated to making every repair a success story by combining premium parts with easy installation. Each TRQ part is engineered by a team of automotive experts to meet or exceed OEM standards, delivering enhanced performance and maximum longevity. With rigorous in-house testing, the brand ensures superior fit and function across every product line. TRQ also provides customers with best-in-class, step-by-step installation videos—so you can complete repairs with confidence, whether you're a first-time DIYer or an industry professional.
Product Features
TRQ suspension kits are manufactured using premium raw materials and coatings for extended service life. Each TRQ suspension component is designed to be a direct, maintenance-free replacement to the stock unit. To extend the life of your steering and suspension components, TRQ recommends replacing components in pairs, sets, or kits. All products are fit and road-tested in our Massachusetts R&D facility to ensure we deliver on our promise of Trusted Reliable Quality.
Install Tip: When replacing steering components, have a professional alignment performed afterwards. This ensures proper tracking and even tire wear.
Our steering and suspension components are pre-greased and sealed for long life and do not require the extra maintenance typically required by greaseable versions.
Attention California Customers:
 WARNING: This product can expose you to chemicals including Lead and Lead Compounds, which are known to the State of California to cause cancer, and birth defects or other reproductive harm. For more information, go to www.P65Warnings.ca.gov.
Lifetime Warranty
This item is backed by our limited lifetime warranty. In the event that this item should fail due to manufacturing defects during intended use, we will replace the part free of charge. This warranty covers the cost of the part only.
FREE Shipping is standard on orders shipped to the lower 48 States (Contiguous United States). Standard shipping charges apply to Hawaii and Alaska.
Shipping is not available to a P.O. Box, APO/FPO/DPO addresses, US Territories, or Canada for this item.
Expedited is available on checkout to the United States, excluding Alaska, Hawaii.
Final shipping costs are available at checkout.
Created on:
Tools used
Brought to you by 1A Auto.com. Your source for quality replacement parts and the best service on the internet. Hi, I'm Mike Green. I'm one of the owners of 1A Auto. I want to help you save time and money repairing and maintaining your vehicle. I'm going to use my 20 plus years experience restoring and repairing cars and trucks like this to show you the correct way to install parts from 1AAuto.com. The right parts, installed correctly. That's going to save you time and money. Thank you, and enjoy the video.
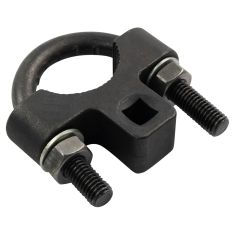
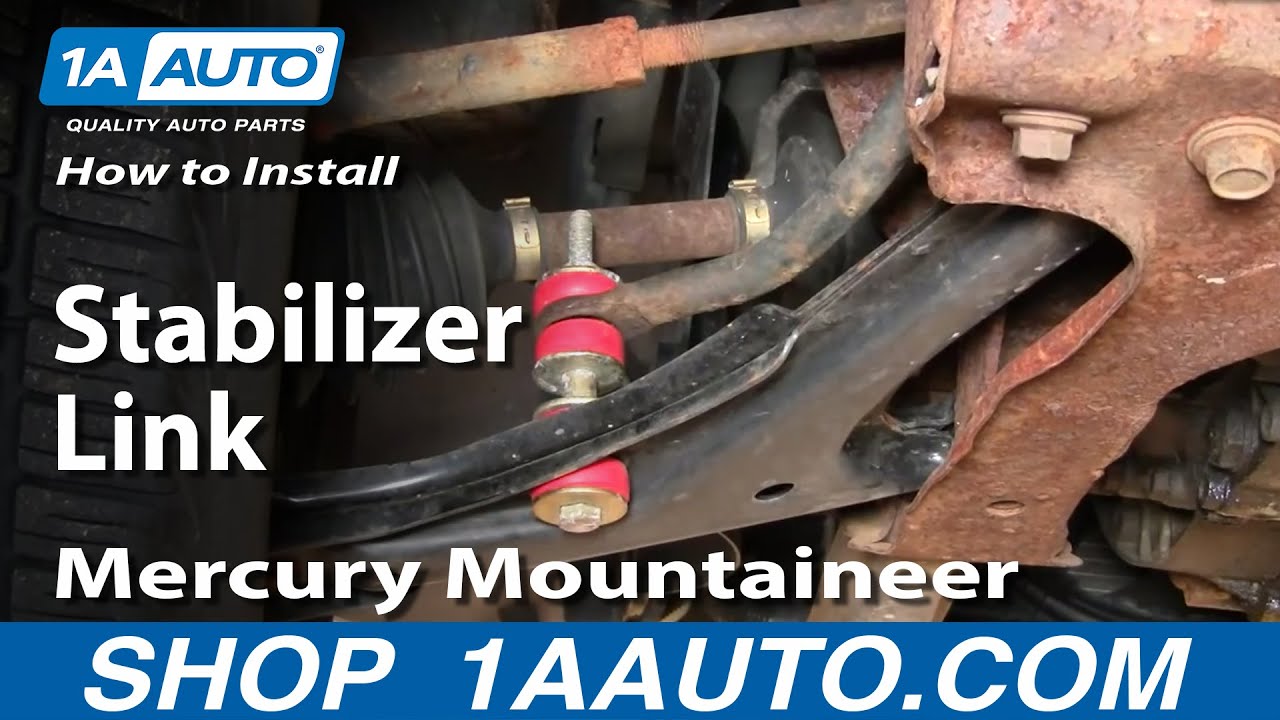
In this video we'll be showing you how to replace a stabilizer link on this 1997 Pontiac Sunfire. Basically the same as any '95 to '05 Cavalier and very similar to a lot of GM front stabilizer links. All you'll need is a couple wrenches and wrench size will vary. Okay sway bar links on the Sunfire Cavalier. Obviously you want to raise and support your vehicle, and you want to raise the front wheels off the ground evenly. You don't want to just put the left wheel up in the air or the right wheel up in the air, because the stabilizer bar is designed to act against that. So you'll actually just make it more difficult for yourself to take it apart. So when you raise the vehicle, on these vehicles you probably want to place the jack right here on this pinch weld behind the front wheel. You can raise it here and then support it here, and then raise the other side and do the same thing. Okay so here we are under the vehicle. We're looking towards the front of the car. Here's your stabilizer link, you can see these have been replaced recently.
So I'm just going to show you how to take them out and put them in. What can happen on these is these rubber bushings can wear out and then you have a metal on metal, or metal on metal down here. Also, what can happen is these studs can rust and just break. Some symptoms of your sway bar links being broken is your car will lean more in turns, and also another symptom if one of these bushings wears out, you'll hear a clanging when you go over bumps when your car is straight, but then if you're turning and you hit a bump you may not hear the clang because the sway bar will be counteracting the turn and just pulling itself tight against the metal. So these replacement sway bar, these replacement links are 9/16ths. Probably the originals are 13 millimeters. But it's pretty easy. You just want to get under here. Most likely if you have your originals on here, once you start doing this they're probably going to break. You just remove this bolt, you need to hold this nut with a wrench. So there's your link out. So when you put the link back in, you want to put a washer on, and then a bushing, and then you put the stud up through the control arm.
You put the bushing on with these stepped sides go into the holes. So it goes into that hole there. You can see here that stepped side goes into the hole in all cases. Whenever the bushing's against metal, you want them in the hole like that. So we have a bushing, put that up through. Now we need a washer. Then after the washer, there's a spacer. Then another washer. Then a bushing, and again the stepped side goes up into the stabilizer bar. Then a bushing on the other end, with the stepped side going down into the stabilizer bar. And then a washer. Generally these washers are just a little bit dished to hold the, actually they look pretty flat. They're a little dished to hold the bushing kind of within itself. They squeeze together. This is a lock nut so it's only going to thread on a little ways at first, and then you're going to get some resistance. Take your wrench, and hold. Torque specs on this is 13 foot pounds, so it doesn't have to be too tight. But what I like to do is kind of go slow at first. Make sure everything gets seated correctly. Make sure all these bushings are going where they need to go. Go a little further. Basically this goes all the way, the bolt goes all the way until it bottoms out. And that's basically it.
We hope this helps you out. Brought to you by www.1AAuto.com. Your source for quality replacement parts and the best service on the internet. Please feel free to call us toll free 888-844-3393. We're the company that's here for you on the internet and in person.
Tools used
We're going to be replacing the front control arms on a 97 Sunfire, same as a 95 to 05 Cavalier and Sunfire. You might think, whoa, control arms suspension, that's tough. Yeah, it is. It's involved, but it is something the do-it-yourselfer or backyard mechanic can do.
Here our control arm needs replacing. There's a lot of play in it. I'm actually not prying that very hard with that bar, and there's a lot of movement. Start any suspension project by lubricating all the bolts with penetrating oil very well. You can see I'm doing the front bolt, the rear mount bolt, and now the ball joint. While the penetrating oil does its work, remove the front tire.
Now that you have the tire clear, you can compare the new control arm with the existing control arm. Make sure the clip spots are in the right spot. The ball joint looks good. The next step is to remove the front brace to expose the front bolt. A helpful tool is this magnetic tray. It holds your bolts right in place. You can put it up anywhere underneath the car, and it holds everything right in place.
Our next step is to remove the three wire clips that hold the ABS wire in place. Remove the stabilizer link. You can see it's about a half inch bolt down there. That's the end I'm going to put the wrench on. Then I'm going to hold the top end with a wrench. You can see I'm using a towel. That's because it's a small wrench because of clearance, and that's just to pad my hand. Many times these links will break when you remove them, so you may want to order an extra set or order our kit that comes with the links.
The next step is to remove the Cotter pin that holds the bolt for the ball joint. The best way to do it is just break it off on the end that sticks through. Once you've broken it off, you can pound it through a little bit with a screwdriver or a lineup tool, and then pull it with a screwdriver or a pair of needle nose pliers on the other end. Then use an 18 mm wrench and get it started on the ball joint with the hammer, kind of a mock impact tool if you will. Once it's going once you get that loosened up, use a pickle fork and a hammer to separate the control arm and ball joint from the steering knuckle. You drive that in with quite a bit of force. Hammers and tools good times. Now remove the front control arm bolt, and then the rear control arm bolt.
Now at this point, here's where we end using the nice tools, and you start using crowbars and hammers. They'll be your best friends. You need to have the strut supported, and then you just yank on it with the crowbar to get the front out. Then you'll see I actually lift up the control arm more. Bang on the rear with the hammer, actually bang it in, and then kind of pull it up and out. Don't be nice here.
Now you have your new control arm, and you kind of reverse the process. Put the back in further than it goes, and then get the front on its way. Then you use a bar and a hammer. And again, you're not being nice. These are durable parts. You want to put the bar right onto the flange where the bolt goes through, and you're going to knock it in. Tap, tap, tap, or bang, bang, bang like in this case. You're using quite a bit of force. Then you can see that the collar is starting to get aligned. You're going to give it a few more hits. Get that aligned pretty well. Then we're going to put a screwdriver in there to just hold its place. Use a screwdriver or a lineup tool or whatever. It just allows it to move around a little bit to help us, but it makes sure it doesn't fall out of place.
Then in the back- actually, before we go to the back, we're going to line up the hole in the ball joint so it's front to back in the car. This will make it really easy to get the Cotter pin into the ball joint once you're at that step. It saves you some time. Now we're putting the ball joint up into the steering knuckle, and we're going to thread the bolt on there just to keep it together. Then after that, take a bar. And again, we're not being too nice here. We're going to pry out the rear mount. You can see I'm actually raising up the strut more to get the control arm in its natural location which is more horizontal. Then I'm giving a good pry with the pry bar, and it'll kind of slip out into place. Then you can see up into the hole just like the front. It starts to line up. I got a lineup tool, and I kind of got it in there. Now I'm just taking the bolt, pressing right up in there. I'm using an impact wrench at this step, but a regular wrench would do, and forcing it right up in there.
At this point, we're not tightening bolts. We're just getting them into place. You only want to tighten it up after you get the suspension all into the right place. Ideally, you want to put the car down on the ground on its wheels and tires, and then tighten up the bolts. So here I'm driving the front bolt in, and I'll get it into place some. Again, I'm not tightening it up here. I'm just getting it into place.
So now actually I'm using this jack to raise the suspension up. I'm pushing the ball joint in. I'm threading the bolt on more. Now I'm using a wrench to tighten up the ball joint. Basically I just got a regular wrench and I'm pulling as hard as I can. Then I'm looking back in the back to see if the holes are lined up on the bolt because what you'll need to do is put a Cotter pin through the bolt. You see I'm basically just pulling as hard as I can with that wrench. So it's not a big huge bar getting it incredibly tight, but it is tight with the smaller size wrench. Now you can see we lined up that hole before, and the Cotter pin goes right in. Grab it with needle nose pliers, bend it over. Up above the Cotter pin is the ABS sensor ring. Make sure when you bend the Cotter pin over it doesn't interfere with that sensor ring at all.
You can see now I've taken all the weight off of the lift. It's actually all on that bottle jack there. So now I can tighten up the suspension because everything's in place. Again, here I'm probably tightening to about 75 to 80 foot-pounds. That's usually what the specifications. We would recommend that you check your manual for the correct specifications. But again, suspension bolts in general anywhere from 70 to 100 foot-pounds. You can see I'm pulling with that bar, but not breaking tight.
Now I'm installing that front brace with the half inch bolts, tightening it up. Then the next step will be to put your stabilizer link back on. You can see I'm using a new stabilizer link because the old one was pretty rusty and a little thin. Just make sure you put all the bushings on correctly. Now I'm going to do a quick final check. Just go through it in my mind kind of. We tightened the front bolt. We tightened the rear bolt. We tightened the ball joint and got the Cotter pin in and tightened up the strut, and our clips are on the wire loom.
The last step in any suspension project is properly torqueing your wheel lug nuts. Never do this with the impact wrench. Always do it by hand. The impact wrench can tighten them too far, causing stress on your studs and causing your wheel to actually have a catastrophic failure and fall off.
We thank you. We hope this helps you out. Control arms is a project that can be done in your driveway and done by a do-it-yourselfer

PSA59423