Replaces

This part doesn’t fit a . Select from parts that fit.
Frequently bought together
Complete Repair in One Purchase - Stop searching for parts individually and complete your repair with a customized kit or set from DIY Solutions.
High-Quality Parts from Trusted Brands - DIY Solutions' kits and sets are selected from the best automotive brands and include hard-to-find and even obsolete parts you may need for your vehicle.
Guaranteed Fit - DIY Solutions ensures its selected parts are quality-tested to guarantee fit and function.
Item Condition:
New
Attention California Customers:
 WARNING: Cancer and Reproductive Harm - www.P65Warnings.ca.gov.
Lifetime Warranty
This item is backed by our limited lifetime warranty. In the event that this item should fail due to manufacturing defects during intended use, we will replace the part free of charge. This warranty covers the cost of the part only.
Returns: Parts with electrical components cannot be returned once installed.
FREE Shipping is standard on Orders shipped to the lower 48 States (Contiguous United States). Standard shipping charges apply to Hawaii, Alaska and US Territories. Shipping is not available to Canada.
Expedited is available on checkout to the United States, excluding Alaska, Hawaii and US Territories as well as P.O. Boxes and APO/FPO/DPO addresses. Final shipping costs are available at checkout.

Created on:
Tools used
Brought to you by 1AAuto.com, your source for quality replacement parts and the best service on the Internet.
Hi, I'm Mike Green. I'm one of the owners of 1A Auto. I want to help you save time and money repairing or maintaining your vehicle. I'm going to use my 20-plus years experience restoring and repairing cars and trucks like this to show you the correct way to install parts from 1AAuto.com. The right parts installed correctly: that's going to save you time and money. Thank you and enjoy the video.
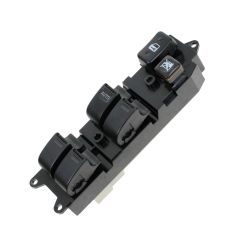
In this video, we're going to show you how to replace the master power window switch on this '94 Camry. It's basically the same as any '92 to '96 Camry. The only tools you'll need are a flat blade screwdriver and a Phillips screwdriver. Keep in mind, on up-level cars with a nice stereo, you'll have an extra speaker to disconnect.
Okay, we're going to start out by removing this trim panel up here. Put your fingers in behind. If you want, you can use a little screwdriver, and it just pops out. You can see it has little pins that go in the grommets there. Now you need to remove this bezel around your door handle. You do that by inserting a screwdriver at the top, prying up some and pulling it out. Do the same thing at the bottom. I'm prying up with the screwdriver, pulling out with my fingers. That comes out. Here's a close-up of where you place your screwdriver in order to pry that bezel. Now you need to remove four covers that show screws. Basically, just pry these right off. I just keep my hand over them because sometimes they'll go flying a little bit. There's another one right under here. Just pry it out and pull it out by hand. Then there's another one right down in here. Do the same thing.
Now, remove five screws: one, two, three, four and there's one in there, five. On the end of the door, there are two pins. Actually, push the center of the pin in. Then you can pull it out. Here's a close-up. Push in the pin. Then, use a screwdriver or fingernail to pry those two pins out of the end of the door. Now, there are four pins along the bottom of the door. I just recommend getting your hand underneath, and giving it a good quick tug. My screw came out of the armrest there. Now just lift your panel up and off. The last step is to disconnect this harness. There is a little button right here underneath, press and work the connection out. If you have the up-level stereo with the tweeter in the door pull, you'll need to disconnect those.
With the door panel off you're going to remove your switch. Just remove this upper screw here. Then this plate comes off. Then push your switch through and slide it up and out. There it is out. You'll want to remove this screw here. There are a few little tabs that lock it onto the switch here. Peel away at the foam so you can pry these tabs up then force the bezel up and off, and, also on the other side. The bezel comes up and off. There's nothing wrong with this switch, I'm just kind of using it to show you how to do this. Obviously, put the new switch in, bezel down on, and lock it down on.
Reinstall the retaining screw and tighten it up nice and firm. Put your switch into the door panel, slide it back, push it in, put your bracket on, and find that screw. Get your Phillips screwdriver and tighten that up. Put things back together. We're just going to fast forward through putting the door panel back on. If you took it off, you'll probably be able to get it back on without too much trouble. If you do want to see this in real time for some help to get the door panel back on, just check out our other videos for the Camry door panel installation and you can see that in regular motion.
We hope this helps you out. Brought to you by www.1AAuto.com, your source for quality replacement parts and the best service on the Internet. Please feel free to call us toll-free, 888-844-3393. We're the company that's here for you on the Internet and in person.
Tools used
Brought to you by 1AAuto.com, your source for quality replacement parts and the best service on the Internet.
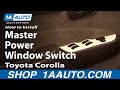
In this video, we are going to show you how to replace the master window switch. Sometimes if your windows stop working, it can be the lock-out button on the master's window switch goes bad. The only tools you'll need . it's pretty easy . you'll need a flat blade screw driver and a Phillips screwdriver.
Take a screwdriver, simply go up and underneath, pry it out gently, and pull this forward. Pull this out. There's a button right underneath here. Press the button on the plug. Now, there should be three Phillips screws here, but it would appear that I'm missing a couple there. Then, carefully, there are tabs on each side; pull back the tab. Pull out on the switch at the same time.
Do the same thing on the other side. Obviously, somebody's probably done this before. The switch comes out; reinstall. The switch goes down in. Click it into place. Start my one screw up here and I just went and found a couple of screws for the back here. Reconnect back in first. Press the button down here.
We hope this video helps you out. Brought to you by www.1AAuto.com, your source for quality replacement parts and the best service on the Internet. Please feel free to call us toll-free, 888-844-3393. We're the company that's here for you on the Internet and in person.