Hi, I’m Mike from 1A Auto. We’ve been selling auto parts for over 30 years!
All right, so we have an oil pressure issue with our 2009 Chevy Suburban. We actually have a code for the oil pressure sensor range performance. We noticed when we start the vehicle, if you look over at the oil pressure gauge, when we start it, it is stuck at zero. Now, we know we have oil pressure because we can hear that the lifters are not clanking, or we know that the top of the engine is getting oil, but the gauge is down to zero, and like we've said, we have the code for it. At one point, this gauge was reading 80. As you can see, it's up to 80 right now, and the gauge is jumping all around while the engine is running. This is the switch sending a faulty signal to the gauge. I'm going to shut the car off right now. I'm just going to turn the key on.
Let's see what the needle does. Okay, so right now, it's stuck on 80 with the engine off. Now, we know, obviously, there's not that much oil pressure at the sender while the engine's off, so what we can do now—oh, it just dropped down to zero, but what we could have done when it's stuck at 80, we could disconnect the sensor, and if it drops to zero, then you know it's definitely the sensor. All right, so we have our hood removed just for the sake of the video, but you don't have to remove the hood to do this.
At this point, we're going to remove this cover, just lift up, and then just wiggle it forward. It comes off. Okay, the oil pressure sensor is on the back here. It's really hard to get to. You can struggle to try to get that connector off. What you'd have to do is pull the lock tab up a little bit, and then squeeze the lock on the connector, and then pull the connector off.
If your oil pressure was stuck at 80, and when you did that it dropped to zero, then that's a 100% chance that would be the oil pressure sensor or oil sender that needs to be replaced because it's shorted internally.
We are going to remove the intake so that we can show it a lot better. It's not impossible to do with the intake on, but it is a struggle. Because we're going to be disconnecting the wire to the alternator, we're going to disconnect the battery so we don't arc anything out.
I'm going to take a 10-millimeter wrench and loosen up the negative terminal on the battery. We'll just set that aside. All right, we're going to take this snorkel off. It goes between the airbox and the throttle body. What we need to do under here is a little retainer that's holding this coolant, upper radiator hose on, so just push that down you can use a trim tool if you need to, and then over here, there's a little hose that connects this to the upper valve cover, so we'll just pop that off right there. We have these worm clamps. This one right here, and this one right here over on the throttle body side as well.
We're going to take an eight-millimeter socket, an extension, and a ratchet. You could also use a straight screwdriver, and loosen these up, and then same with over here. Loosen that one up. Once those are loose, you can take this right here. Push it in like that, and then there's a little grommet right here. You're going to have to lift up to release that, and then pull straight forward, and twist a little bit. This whole snorkel will come off. Okay, we're going to disconnect the connector for the throttle body. Sometimes, there's a lock on here, a little gray tab that you'd have to pull out. This one doesn't have it, so we can just push down on the release, and pull the connector off.
Next, we're going to come over here to the alternator and disconnect this connector right here. I'm just going to push down on this lock on the connector, push down like that, and then pull it out, and then, next, we will disconnect this wire right here that goes to the alternator. It should be a 10-millimeter nut, so we'll take that off. Make sure you have the battery disconnected at this time. I'll use a 10-millimeter wrench. This happens to be a ratchet wrench, but you can just use a regular wrench, or a socket and a ratchet. It should loosen it up. You should be able to do it by hand. Pull that nut off, and then we can pull the wire out. I'm going to put the nut back on here so I remember that it goes to the alternator there, and then we can move that harness aside so it's out of our way.
Next, I'm going to disconnect this connector. This goes to the map sensor. Just push down on this retainer and pull it out. I'm going to use a 10-millimeter wrench to take this nut off right here. You can use a socket or a regular wrench. We want to take these three bolts out here on this cover. This holds the wiring harness down, so I'll use a 10-millimeter ratchet wrench. I'm going to loosen them all up first, and then do it by hand. I can spin them out by hand. Then take this cover off. It might be a little easier if you pull it to the side like that.
At this point, I'm going to disconnect these fuel injectors on this side. I'm going to use a pick tool to release the lock first. Come in behind here. Pull the lock up. Once the lock is pulled up, then I can take my fingers and just squeeze the tab and pull it up. See, that releases, and we're going to do that for the rest of these, and then we'll do it on the other side. This back one is a little bit tricky. Sometimes, you can go to the front of the lock. You push it up just like that.
Sometimes that's a little easier. Then you pull that up. Just push those out of the way. On this side, we're going to move some of the wires out of our way, lift up on this, and push it to the side. Over on the backside, there's a cover. You can get it past the cover. It'll make it easier when we're removing the intake.
All right, so this purge valve, we can disconnect the connector right here. Just slide this out, and then pull it out just like that, and then the vacuum line that goes back to the gas tank. Then push down on the lock, and pull the hose straight back, and that'll release that. We can leave this purge valve and this hose connected because it will come out with the intake, and we can disconnect these fuel injector connectors. Take my pick. I can pull up on the front of the lock like that. It's a little bit easier. Then pinch it.
Under normal circumstances, we would pull the fuel pump relay or the fuel pump fuse to release the pressure, which is number 20 in this. In this vehicle, as you can see, there is no relay there where the fuel pump relay should be, and then the fuse should be right there. That is actually part of this fuse block. It's internal to it, so there's nothing I can do for that. I mean we're not going to release the pressure by disconnecting the relay and starting the vehicle and letting it drain down, but under normal circumstances, that's what we would do.
To release the fuel pressure, there normally is a cap right here. There's no cap on this vehicle. It's missing. For us to disconnect the fuel line, I mean, instead of getting sprayed while we're disconnecting it, we're just going to release the pressure here. I'm just going to take a rag, stick it over here, and then a screwdriver. I'm going to release the pressure just like that. It didn't take much, not that much came out, so we're good to go now. Make sure you wear safety glasses when you do this. You don't want to get sprayed in the eyes with gas.
There's a bunch of different types of fuel disconnect tools. This one will work. This one will work. We actually sell a kit similar to this at 1aauto.com, but you're going to need a fuel disconnect tool. Otherwise, you will never be able to separate those lines. The fuel line is right here. There's a little lock right here. You're going to lift up on the backside of the lock like that, and then pull it forward, so just like that, just set that aside. I'll show you how to use both of these disconnect tools.
This is the three-eights size. I'm going to slide this plastic on like this. I'm going to pull the line forward first, and then you're going to push the plastic in, and that releases little fingers in there, and there we go. You just pull the line off like that. As you can see, there's little fingers in there that release it, and some fuel is going to spill out. You could put a rag in the back to catch it. I'll just show you how the other tool works.
This tool is a little bit easier. You're going to take the bigger end of the tool. You can slide this on here, and then just push. While you're pushing it with your hand, grab the line and pull back. We are going to remove these eight-millimeter bolts that hold the intake on and use an eight-millimeter socket, an extension, and a ratchet. There's 5 on each side, so 10 total. Start removing these. Now, they're going to stay with the intake manifold, so you don't have to pull them out completely. I mean, you can if you want to, but they will stay with it. Just make sure they're completely loose.
In the back here, I switched to a shorter extension so that I can get to the bolts without hitting the firewall here. Now, I'll remove the bolts on this side. Just move the wiring harness out of your way. Now, there's these bolts right here for the fuel rail. We're going to leave those attached because the fuel rail is going to come up with the intake manifold. Now, we're taking the last one out. This vent hose right here is in my way, so I'm just going to move this. This is for the PCV system. There's a little lock on this over here. You just push that lock, and then pull on the hose up. All right, so now, my intake bolts are loose, disconnected, so I'm just going to move this wiring harness out of the way a little bit.
There's a little shield on the back here, that behind there. Now, pull up on the intake. Because the bolts are in the back, you're going to lift them so that they're past the holes. This one seems like it's sticking a little bit, and if that gives you a lot of trouble, you can pull the bolts out. Just pull the bolts out like that. This vacuum hose is connected to the intake right here, for the brake booster, so what I'm going to do is just grab and just wiggle it back and forth gently, and pull that off. Now, feed that hose this way. You're going to angle the intake up like this. Then pull that hose out. Then we can pull the intake off.
All right, since we got the intake off, we don't want any debris or anything to go in these holes, so we can take some rags and just stuff them in the holes. You do want to make sure you remember to remove these when we put it back together. Just put those like that. That'll prevent anything from falling into the engine.
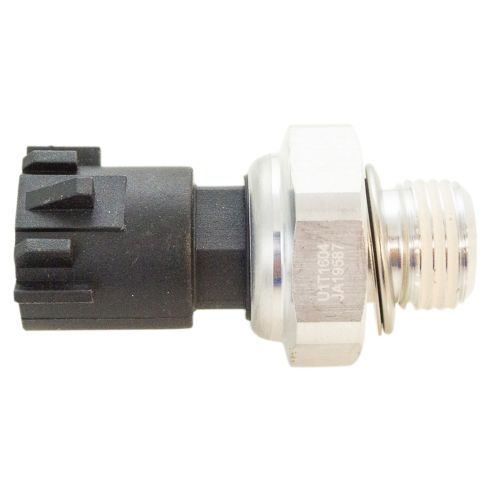
The oil sender is back here or the oil sensor. You can, like we said before, you can replace this while the intake is on. It's just easier to show. It is recommended to do it this way so you can see more but. We're going to lift this clip right here. That's the lock that locks this connector down, and we can push down on the terminal lock. Now, I'll release the connector. They make a special socket to replace this sensor. If you don't have one, you can actually use a one and one-sixteenth socket, a deep socket, or a 27-millimeter socket will work as well, and then we'll use our ratchet.
Once you break it loose, generally, it's pretty easy to take the sensor out by hand, and there's the sensor. Some vehicles have an oil screen down here. What you can do is take in a pick. You just slide it down in here and pull up. Sometimes, it's hard to get the screen. Pull up, and there's the screen. Generally, these will clog up with debris. Sometimes it'll give you a false reading.
Basically, you'll have no oil pressure at the sensor. You put a new sensor in it, and it's still not reading pressure because this screen is dirty, so you can either clean it out with some brake parts cleaner or replace the screen like we're going to. This one actually ripped when we pulled it out, so we have a new screen for it.
As you can see, this is our old pressure sensor and screen. This is our new pressure sensor and screen from 1aauto.com. The screen, if you look at the screens, they're the same design. Everything looks the same on that, and then the sensors themselves, the threads are the same thing. The gasket is the same. The connector is the same. Get yours from 1aauto.com, and you'll be ready to rock and roll.
Now, before we install the sensor, we're going to install screen. I'm just going to line it up in the hole. Make sure you do it with that screen going down. The top part is open. Like that. You push it down. Push it down with your finger, and then we'll take the sensor, start putting it in. I'm going to start tightening it with the ratchet, and then I'll torque it once I get it snug. I'm going to use a one and one-sixteenth socket and this torque wrench. I'm going to torque it to 26 foot-pounds. We sell these torque wrenches at 1aauto.com. It's good and tight.
At this point, I can reconnect the electrical connector. I'm going to line this up like that, lock it down, and then I can push down on the lock for the connector. There's a lot of debris in here from mice coming in here and putting nests and stuff, so what I'm going to do is I'm going to use a vacuum and vacuum out this area. One thing to keep in mind, if you're using an electric vacuum, you don't want to suck up any gasoline.
Okay, and before I put the intake back on, what I want to do is I want to clean the area around where the intake ports are. I'm going to use a rag and some brake parts cleaner. You just wipe just a little bit around this area, and I'm going to do that to all eight of the intake ports. All right, so I cleaned those, all those ports up pretty good.
I'm just going to take a little bit of compressed air while those rags are still in there and just clean up this area, and before I put the intake on, I'm going to pull all these out and make sure nothing went in there. You can take the compressed air. You just blow out those holes as well.
Okay, if you were replacing this intake manifold, the next step, what you would want to do is remove this hose for the EVAP purge solenoid. This little lock right here, you push down on that, lift that up, and then you could slide this out or take these eight-millimeter bolts out of the fuel rail, and then you can pull the fuel rail up, wiggle it back and forth, and pull the throttle body off.
There's 10-millimeter nuts and 10-millimeter bolts. Pull the MAP sensor out. There's a little lock on here. Test the slide, and then pull this PCV tube out. How you get this out is you would have to pull this stud off, and then you could twist this tube sideways, and then this will pull out. On the back side, you would have to pull this hose off. Use some pliers and squeeze that clamp, pull the hose off, and then this cover, there is a 10-millimeter nut right there, and that'll come off.
Then if we flip it over, these eight-millimeter bolts, we'll just pull these out for now, because otherwise, they're just going to fall out. Flip this over. Then we can replace the gaskets. We're going to replace the gaskets when we reinstall this one. To replace the gasket, there's a little lock right here. I'm going to pull that off right there, a little lock right here, and then one on the end. That just holds the gasket. Pull that off, and before I put the new one on, I'm going to take a rag and just wipe down this area. There's a little bit of dirt and debris in there.
These little insulation things go right here. These try to keep rodents out, but for the most part, mice still get in there and stuff, so we'll wipe these down here. Now, we'll take our new gasket and slide it on that side, and then slide it to that lock, and that lock just like that, and we'll do the same for the other side.
Now we're going to reinstall the intake. We want to make sure you got all the rags out of your ports and everything is nice and clean in that area. We did take all the bolts out of the intake. You can leave them in, but it's a little bit easier to angle the intake in with the bolts out. Now, going to set this here. I'm going to take this hose and feed it through here. It'll go under this wiring harness.
Yeah, I'm going to angle it in the back, and this wiring harness will come over on this side. It kind of helps to keep the fuel rails on because then you can use the fuel rails as handles. You can move it around a little bit, so watch out for the injector connectors, the fuel injector connectors because you don't want to squish them. That's all lined up like that. Then just give it a little shake, and make sure it's down all the way. Then we can install the bolts.
The way the bolts work on this, you kind of got to angle it a little bit. If you put them in straight, they won't go in. Just angle it so that collar will go down. Then give it a little turn. I'm going to do this—there's five on this side. I'll do it with the remaining five on the other side as well. Now, I'm going to start snugging these down a little bit with the eight-millimeter socket and an extension just by hand, just go around the whole intake and just snug them up before we torque them. All right, at this point, we're going to torque these intake bolts in sequence. We start with the middle on the passenger side. We're going to torque these to 44 inch-pounds first. Do them all in sequence, and then we're going to go back and torque them to 89 inch-pounds. We'll start with the passenger side.
Make sure that's good, and then go to the driver's side center, and pretty much do it evenly, alternating, and then you would move to the driver's side, the next one back, and then passenger-side. Next one forward from the center and alternating back and forth. Now, I'm going to do the second stage of torquing 289 inch-pounds. Make sure you're on inch-pounds, not foot-pounds. We'll torque these in sequence, the same sequence we did before.
Okay, we'll reinstall this vacuum hose that goes to the brake booster. What we're going to do is just slide this into the grommet. Over here, I'm going to rehook up the fuel injectors, the connectors. I'm just going to slide it right back on the fuel injector, and then push down on the lock, and then do this for all the rest of them. Then we'll do the same for the passenger side, just push it down and lock it in.
Next we're going to hook up this fuel line. Just slide this on right there and attach it to the fuel rail. We have this retainer that holds the fuel rail on. I'm just going to slide this on this way, and then lock it down. That'll keep the fuel rail from popping off. Next, we're going to install this EVAP line. It goes to the purge valve right here. Just slide it on, lock it in, and then we have our electrical connector. Connect that to the purge valve just like that.
Next, we're going to install this wiring harness over here, over here, and then this will slide on right there. This connector will connect to the MAP sensor—just line that up. Lock it in. This cover I'm just going to go back here like this, and that's going to go over these wiring harnesses right here. Then we'll take these 10-millimeter bolts and put these in, these three. I'll just take them up by hand first. I'm going to use a wrench. I'll use a ratchet wrench. If you don't have a ratchet wrench, you can just use a regular wrench or a socket and a ratchet. We'll just snug these up.
Remember, it's plastic so don't overtighten it. It just got to be snug. You take that 10-millimeter nut and stick it back on this bracket, and then snug this up. Now, we're going to reconnect this PCV hose. This goes to the upper valve cover and just slide that on. We can connect the throttle body connector right there, just lock that in. Then we're going to take the 12-volt feed to the battery that goes to the alternator. We're going to pull this nut off the alternator that we put on before so we didn't lose it. Put this wire on here, and then reinstall the nut. Then we'll take a 10-millimeter wrench and snug this up, not too tight, just snug, and then we'll put the boot, the protective boot that goes over that. We can connect this connector to the alternator, just line that up, and click it down.
Install the snorkel and slide this back here, so we're going to slide this over the throttle body first. You're going to hold up on this part of the snorkel because it's going to go over this little stud over here, and then you can push it down on the stud where that rubber grommet is, and we can reconnect this hose. You're just going to click it in just like that. Now, we can hook this side to the airbox, just slide this on underneath here, the upper radiator hose that just locks into there. I'm going to tighten up this one clamp with an eight-millimeter socket, an extension, and a ratchet. You can use a straight blade screwdriver as well, not too tight, just snug. I'll do the same on the throttle body side.
At this point, I'm going to reconnect the battery. Install the negative terminal, and I'll use a 10-millimeter ratchet wrench. You could use a regular wrench or a socket. Then we'll snug this up.
Now, we can reinstall this cover. I'm going to slide it underneath the heater hoses over here, slide it back, and then there's two rubber grommets under here. We'll just line up with those studs and push it down.
All right, at this point we already replaced the oil sensor, so we're going to check it now. We'll just turn the key on, and as you can see, the oil pressure gauge is sitting there at zero, which is good. Now, we'll start the vehicle, and as you can see, that the oil pressure gauge is actually reading what the actual oil pressure is accurately so we repaired the vehicle.
Thanks for watching. Visit us at 1AAuto.com for quality auto parts, fast and free shipping, and the best customer service in the industry.