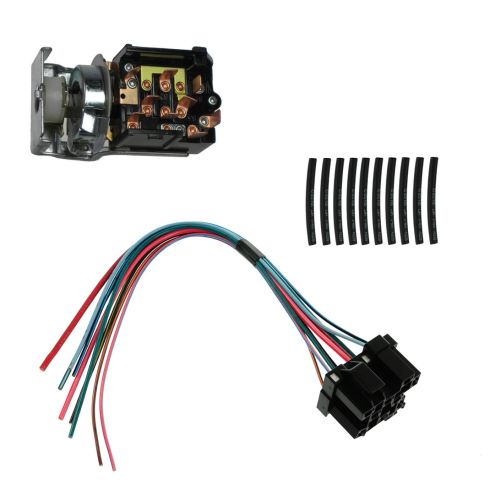
1AZHS00231-Jeep Dodge Headlight Switch DIY Solutions BSS00682

Replaces
Jeep Dodge Headlight Switch DIY Solutions BSS00682

Frequently bought together
Product Reviews
Loading reviews
4.58/ 5.0
24
24 reviews
Head light switch
October 6, 2017
Well Parts ease to work whit it ease to instaled 100% satisfies thanks 1Aa
Headlight switch
October 26, 2017
Thanks for including.plug and wiring with switch, was not aware of plug melting and wires burning, until I removed switch. I will install a relay system to lower the current through the new switch.
November 11, 2017
This is my second switch after the factory recall which was poorly done. This switch has heavier duty wires in the connector and the switch operates vevy smoothly. It seems to be better quality than the other switch i used. Time will tell if its 5 stars for now i give it 4
98 Dokota head light switch.
March 12, 2018
The video showing me how to replace the Head light switch was great. The switch went right into place and works great. This is my go to place for parts. Great service and great videos to learn how to do it yourself.
Thank you for a great product and service.
Bill Hale Longview TX
outstanding service
October 9, 2018
I ordered a light switch and wiring connector, hooked all up switch had no power coming out , called up 1a auto gave them my name and they sent me out another switch , under warrenty no questions asked . cant get service like that at your auto parts stores.
Head light on and off problem.
October 18, 2018
I had a repair shop work on my truck four times to solve the head light going off and on during night traveling . Gave up on them and took it to the Dodge dealer twice but they both charge me and did not fix my problem. I found you on line and you supplied me with the proper parts now I must fix this problem myself. Thank you for your assistance.
Excellent product and installation video
October 24, 2018
1AAuto is great, excellent product, great prices and the removal and install video is spot on! This is the third part I've gotten from 1AAuto and each time I was very pleased! Thank you 1AAuto. Bob
Great service
November 7, 2018
I ordered a light stitch from 1A auto. I received it in a very timely manner and it was the correct part. After I installed it and finished up it didn't work as it should have worked. I called after determining it was defective from manufacturer. Your team took excellent care and was truly understanding, courteous and very polite . They took great care and the replacement part is on the way. Great job!
Headlight switch and ignition switch order
January 10, 2019
I have ordered many different parts from 1-A auto. I have never been dissatisfied. Every part ordered was exactly what I needed. They fit and worked perfectly. All the people I have had the pleasure of dealing with was knowledgeable, friendly, and professional. I will continue to purchase my parts there, and pass it on to my people here in western N.C. of the great service I was provided....
Sheila Brown
Just what I asked for.
April 17, 2019
Came just as described and was a good match. Happy with purchase.
Worked Perfect
September 13, 2019
I didnt even know if this would work I was having so many problems but I ordered the switch and it was very easy to install came with wires and everything but I only needed the switch itself and it works perfectly!!
Good service, quick delivery
February 1, 2020
Parts are exactly as described and what I needed, delivery was better than advertised
Right on the Money
February 8, 2020
Fixed the problem and the price was RIGHT. Where else can you get the PART,PRICE and shipping , all in the same BUNDLE for such at great Price? Nowhere but A1 AUTO. Thanks A1 AUTO!!!
5 out of 5 STARS !!
September 29, 2020
Best price, quality product. Install was as easy as 1.2.3
Great
November 9, 2020
thank you, arrived and was right part!!
Will order from again!!
Exact fit
December 23, 2020
Easy to replace exact fit light switch for 1996 Dodge Ram 1500 .
June 15, 2021
Big mistake buying, should have left the old one in. New switch fried everything and did the opposite of what it should, now none of the dash lights and exterior lights work. Thanks 1a auto for making this such an easy ,convenient experience!!!
Needs a plug on both ends.
October 1, 2021
Outside of the wiring needing done, this was ?? great.
January 31, 2022
Great it work like it should
Defective swithes
August 26, 2022
The switch is defective. It won't energize the running lights when turned on. I've tried 2 separate switches from 1A and both have the same defect. I'm requesting a refund but not successful yet.
Dodge 2gen
April 7, 2023
Excellent product! No issues. Fixed the problem.
January 22, 2024
Is working like it's supposed thanks
Great Price and Fast Shipping!!
September 25, 2024
Great price, fast shipping and perfect fit!!
Headlight switch assembly
October 8, 2024
Works just like the original. Actually better as the original switch broke. Great videos, prices are good, and the employees are the best.
Customer Q&A
Does the wires come with it?
February 20, 2017
10
Yes, the wires on the new harness come with it, just like the picture.
February 20, 2017
Tim K
10
Yes it does. The pigtail has to be spliced into the original harness, which replaces the original connector.
February 20, 2017
Nick G
10
Yes
February 20, 2017
Eric H
Will this fit a 1998 ram 1500?
December 8, 2023
10
Currently, we do not carry this part for your vehicle. We're always updating our inventory so please check back soon!
December 8, 2023
Emma F


