Replaces
This part doesn’t fit a . Select from parts that fit.
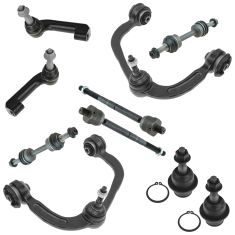
Frequently bought together
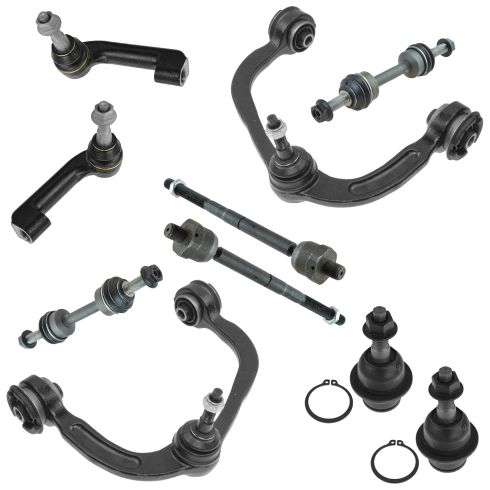
Part Details
TRQ suspension kits are manufactured using premium raw materials and coatings for extended service life. Each TRQ suspension component is designed to be a direct, maintenance-free replacement to the stock unit. To extend the life of your steering and suspension components, TRQ recommends replacing components in pairs, sets, or kits. All products are fit and road-tested in our Massachusetts R&D facility to ensure we deliver on our promise of Trusted Reliable Quality.
Product Features
Install Tip: When replacing steering components, have a professional alignment performed afterwards. This ensures proper tracking and even tire wear.
Our steering and suspension components are pre-greased and sealed for long life and do not require the extra maintenance typically required by greaseable versions.
Item Condition:
New
Attention California Customers:
 WARNING: This product can expose you to chemicals including Chromium (Hexavalent Compounds), which is known to the State of California to cause cancer, and birth defects or other reproductive harm. For more information, go to www.P65Warnings.ca.gov
Lifetime Warranty
This item is backed by our limited lifetime warranty. In the event that this item should fail due to manufacturing defects during intended use, we will replace the part free of charge. This warranty covers the cost of the part only.
FREE Shipping is standard on orders shipped to the lower 48 States (Contiguous United States). Standard shipping charges apply to Hawaii and Alaska.
Shipping is not available to a P.O. Box, APO/FPO/DPO addresses, US Territories, or Canada for this item.
Expedited is available on checkout to the United States, excluding Alaska, Hawaii.
Final shipping costs are available at checkout.


Created on:
Tools used
Brought to you by 1AAuto.com, your source for quality replacement parts and the best service on the Internet.
Hi, I'm Mike from 1A Auto. I hope this how-to video helps you out, and next time you need parts for your vehicle, think of 1AAuto.com. Thanks.
In this video, we're going to show you how to replace the front struts. This is a 2005 Ford F-150. It's exactly the same for any 2004, the new body style, through the 2008, and probably the same for 2009 and up. We show you on the driver's side, but the passenger's side is the same procedure and we do recommend you replace them in pairs. You'll need new front struts from www.1aauto.com, sockets from 8mm up to 30mm, a pipe or a breaker bar for leverage, a 12mm 12-point socket, 18mm and 21mm wrenches, pliers, pry bar, flat blade screwdriver, torque wrench, hammer and jack and jack stands.
Start off by prying off the hubcap. Then loosen up these lug nuts using a 21mm socket and ratchet and a piece of pipe for some extra leverage. Then raise the vehicle, and remove them the rest of the way and take the tire off. You want to life the whole front of the car up and put it on jack stands with both wheels off the ground. Now pull the wheel off. Now turn the wheel, and remove this 21mm nut at the top of your outer tire rod. Then once you remove it, you want to just put it back on just a couple threads.
Now hammer the knuckle until the outer tire rod drops down. Now you can remove that nut, and just set your outer tire rod off to the side. Underneath your control arm, on the bottom of the sway bar link you want to just remove that nut. You can try doing it with an 18mm ratchet, but most likely it's going to start spinning, and the solution for that is an 18mm wrench and an 8mm socket and ratchet. Then you can just remove that nut. You want to spray the bolt that holds the bottom of your strut, and then a 30mm socket. I'm using a breaker bar and a piece of pipe and break that free. Then once you get it going, the bolt will most likely spin. Hold the bolt end with the 27mm socket and take that nut off.
Then spray these 15mm nuts at the top of the strut with some penetrating fluid, and remove two of them all the way. The other one, you just want to leave on a few threads. Using a pair of pliers, remove this cap. Then loosen up and remove that 13mm nut. Then you want to just put it back on just a few threads. Tap it with a hammer and make sure it goes through. Then remove the nut the rest of the way. On the other end of the axle, there's a series of 12mm bolts. You just need to use a 12mm 12-point socket, and then a pry bar to hold the wheel. Just loosen those up.
You can also just have a helper get in the vehicle, and hold the brakes to hold the axle in place. When you remove that last one, just push the axle down to the side. Now spray this 21mm nut up here on the bottom of your upper control arm. Then remove that nut, and put it back on just a few threads. Now with the nut back on a few threads, just hammer the wheel knuckle until the upper control arm loosens up. Now just lift up on the wheel knuckle, and then remove that nut. Now you can just set the wheel knuckle off to the side carefully.
You don't want it to strain those brake hoses. Then just tap the axle and pull it out of the wheel knuckle. You want to feed the axle towards the left side towards the front of the vehicle. Then just angle it down, and pull it down and out. Now, we're just going to check up underneath the control arm a little bit. The vehicle is still supported on the jack stands under the frame. Remove the bolt from the bottom of the strut, and you can see the struts in there are still loose. Make sure the nuts on the top of the strut are removed. Pry the strut out.
Up top is the old strut. Below it is the new one from 1A Auto. You can see they're identical and they'll fit exactly the same. Feed your strut up into place. Push those studs through. Then just replace those nuts at the top to just hold it. You don't need to tighten them up right now. You're just putting them there to hold it in place. Then pry the bottom of the strut back into the lower control arm. Then push that bolt back through. You just make sure it's all the way in. Then replace the nut and tighten it up preliminarily. We'll just fast-forward as Mike goes back over those 15mm nuts making sure they're tightened. Then you can remove the jack.
Feed your axle back into place. You want to feed it back in the same way that you pulled it out. Then just angle it back down into the hub and push it in. Now you can take your upper control arm and push it back into the wheel knuckle. Once you push it through, just put that 21mm nut on there to hold it in place. Line up the axle and replace those 12mm bolts. We'll fast-forward as Mike does this. Now tighten each of those to 60 foot-pounds in a crossing pattern. You can see we torqued that one. Then you want to turn the wheel until you get the one on the opposite side. Then torque that one. You want to just repeat this process with each of them. Now replace this 13mm nut and torque it to 20 foot-pounds. Then replace that cap and just tap it into place.
If any of the lines on the back came undone, make sure you push them back in and re-clip them. Then push your outer tire rod up to the wheel knuckle and replace the nut. Then torque that to 111 foot-pounds. Now just tighten up this bolt on your upper control arm. If the stud spins, use a 10mm socket and ratchet. Then you want to torque this to 111 foot-pounds. Then tighten up the nut on the bottom of your sway bar link. Jack up underneath the lower control arm to simulate a wheel being in place. Torque the lower strut bolt to 150 foot-pounds.
Now we'll fast-forward as Mike replaces the wheel and replaces the lug nuts and tightens them preliminarily. Then he lowers the vehicle and tightens them the rest of the way. Then torque each of them in a crossing pattern to 120 foot-pounds. Then just replace your hubcap and you're all set.
We hope this video helps you out. Brought to you by www.1AAuto.com, your source for quality replacement parts and the best service on the Internet. Please feel free to call us toll-free, 888-844-3393. We're the company that's here for you on the Internet and in person.
Tools used
Go ahead and remove your center cover here. That's gonna expose your lug nuts. Remove all 6 of your 21-millimeter lug nuts. Remove your wheel. Now, the next thing we're gonna do is break free our jam nut right here. There we are. Remove your outer tie rod end nut. Now, let's go ahead and use our hammer, and we're gonna give our knuckle a couple of loving bonks to break this free. Now, let's use some locking pliers, come right up on this inner tie rod end stud here, and then we'll remove our outer tie rod ends. You wanna make sure you count this on the way out. What I mean by that is, here we go around one, two, three, and then so on. All right. So I've got 23, results may vary.
Okay, friends. Now, it's time to install our brand new outer tie rod end. You wanna make sure you put this in, the same amount of turns that you removed the old one. Let's go ahead and put this back into the knuckle. Start our nut on there. Let's snug up the jam nut. Let's go ahead and snug the tie rod now. And now we'll torque it to 44-foot pounds. Now we need to pay attention to our castle nut and make sure it lines up with the hole and the stud. If it doesn't, you need to continue tightening until the next hole does. That looks good. Let's go ahead and put our little cotter pin in here. And then of course, peen it over so there's no way this nut can loosen up.
Let's go ahead and get our wheel back up on here. Start on the lug nuts and then we'll torque them to manufacturer specifications. All right. Now, with the wheel just barely touching the ground, we're gonna torque these lug nuts to 140-foot pounds. Your little center cover on there, torqued.
Tools used
Tools used
Tools used
Tools used
Tools used
Tools used
Okay, friends, one of the first things we need to do to get started on this job is to safely raise and support the truck. After you've done that, remove your center cover here and then remove all 6 of your 21-millimeter lug nuts and get the wheel off. Now that the wheel's off, let's go ahead and get this ABS wire disconnected. I'm just gonna come right along here and then remove this 8-millimeter bolt. Now let's go ahead and remove our anchor bolt for our flex hose for the brakes. The next thing we need to do is remove our two caliper bracket bolts. Like this. I'm just gonna start that in a couple threads. Now we're gonna remove our caliper and we're gonna hang it so it puts no pressure on the flex hose. Let's remove the rotor. Let's go ahead and remove our vacuum lines here. Let's go ahead and remove this little center cover. Now let's remove our axle nut. Now we're just gonna push on this axle stub here. If it doesn't move, just go ahead and put the nut back on a few good threads and then give it a couple loving bonks with a hammer. Now let's go ahead and get this off of here. Let's go ahead and follow that ABS wire and just continue disconnecting it up along the way here. Comes up to this area coming in from the back. You're gonna see you have a little push button. Go ahead and push on that and then separate the two.
Now let's go ahead and get our cotter pin out for our tie rod. Set that aside for recycling. Let's remove the nut. Now we're gonna use a hammer and we're gonna hit right on the knuckle right here to try to break this free. Now let's remove our upper ball joint nut. Now we're just gonna separate these two. So now we're just gonna go ahead and put that nut on just a couple small threads here. That's gonna help prevent this knuckle from falling down when we relieve the lower ball joint. The next thing I wanna do is pull down on the upper control arm and we're gonna put it just like this so it leaves a nice gap between the knuckle and the nut itself so we can move down to the lower ball joint. Let's just leave this on a couple threads. Now the next thing that we need to do is carefully bonk on the knuckle and try to separate the ball joint from it. Let's remove that nut. Hold up on your knuckle. Remove the lower ball joint nut. Bring it down and slide it out and away from the vehicle. Next, let's go ahead and put our axle up on top of our sway bar link so it's out of the way and then we'll continue on to spraying the lower ball joint upper area. Now looking at it from the top, you'll be able to see that there's a snap ring on this. We're gonna go ahead and spread this clip, and then what we're gonna try to do is just peel it right off of that ball joint. Watch your eyes.
Now it's gonna be time to get our lower ball joint out of the lower control arm. To do that, you wanna use a ball joint press to get it out. You could of course also use a hammer in case you don't have access to this. Just give it a couple loving bonks along the top and be careful for when it shoots out the bottom. There it is, friends. Okay, friends. Now it's gonna be time to get ready to start installing our brand new lower ball joint. One of the first things I wanna mention is we're gonna take off this nut right here, and then also, we're gonna remove the boot. You wanna be careful not to tear it in any way. I'm gonna use a nice screwdriver, get in between here, and carefully pry down. We'll remove this and we'll set this stuff aside. Let's go ahead and clean up this area. So we're gonna go ahead and install our ball joint using that ball joint kit with the cup that just barely fits onto the lip right here. We wanna be very careful not to damage any of the center aspect. You're gonna have a short cup that looks like this. That's gonna go just like that. Grab the ball joint press and get it set up. So what we're gonna do here is try to press the ball joint straight up and into the control arm. We only wanna go until it bottoms out. You don't need to go too much further than that but you do wanna make sure that it's going up as straight as possible.
After you have it so it's completely bottomed out, what you're gonna wanna do is give this a couple loving bonks with your hammer. Just be careful. The reason why we did that is to help make sure that it's completely settled in. Remove your ball joint press. Now let's go ahead and put on our snap ring. There we are. Just give those ears a couple bonks. We just wanna kinda spin it in the groove to make sure it's completely situated. Now it's gonna be time to get our boot back on there. You wanna pay special attention to it and just make sure it's not damaged in any way. We're gonna find a cup that fits right over and along the lip right here. We don't need to squish on this area. This fits perfectly. Put it up on here. Double-check to make sure it's completely seated the whole way around. All right. Let's go ahead and clean down this area. All right. Let's go ahead and get this axle back inside the bearing there. We're gonna slide the knuckle up so we can get the ball joint started on the lower aspect here. There we are. Go ahead and give that axle a nice wiggle and it should wanna set right in and then it's gonna be coming out the other side here. Let's snug this up. Now we're gonna torque this to 85 foot-pounds and then we'll continue on to putting on the cotter pin.
Now the next thing you wanna do is line up the slots on the nut to the hole in the stud for the ball joint. If for some reason after you torque it it doesn't line up, continue tightening until the very next slot does. The next thing we need to do is get our axle inside the knuckle as we push the knuckle up. You wanna be very careful not to damage your internal seal. Now I'm just gonna take a pry bar, come in and under here, and then I'm gonna try to put the ball joint through the knuckle. Go ahead and start that nut. Snug it up. Torque it to 85 foot-pounds. What you wanna do next is make sure that you have your slot lined up with the hole on your ball joint stud. If for some reason it isn't, you need to continue tightening until it is. Next, take your cotter pin, go ahead and put it through the slot and the hole, and then, of course, lock it down. Now before we can continue on to putting the brakes together, we wanna make sure that the hub mating surface and the back of the rotor mating surface is nice and clean. After you've done that, apply a little bit of copper Never-Seez. Let's go ahead and get our rotor back on here. I'm gonna start a lug nut on so it holds the rotor for me. Let's get our caliper reattached. We're gonna use some thread locker, of course, on the bolts. Start them both in and then we're gonna torque them to 185 foot-pounds. Let's get our vacuum lines reattached.
Now we're gonna reconnect in our bracket, the ABS wire. Let's snug them up. Let's start re-securing our ABS wire. Make sure you go up and in between the brake line here just like that. This looks good for now. Make my way down here. Get a little push clip. It's gonna go into your hole right there. The rest of it should just line up if we continue on. Making our way up here, let's make sure we reconnect in our ABS wire. Listen for a click, and then, of course, give it a nice tug. After that, you wanna make sure that you secure it back in up here. Make sure everything's nice and secured and it's definitely not rubbing up against anything and there's no way it can get caught. Let's get the outer tie rod end on here. Snug this up. Torque it to 85 foot-pounds. The next thing we wanna do is make sure that our slots line up with the hole and the stud for the tie rod. If for some reason it doesn't, you need to continue tightening until the next one does. Install your locking cotter pin and then lock it down. Let's get the wheel back up on here. Start all of your lug nuts, snug them up, and torque them to 150 foot-pounds. Torqued. Okay, friends, so that's pretty much it aside from making sure you pump up that brake pedal and then get yourself safely down to an alignment shop.
Tools used
Tools used