Replaces

This part doesn’t fit a . Select from parts that fit.
Frequently bought together
Part Details
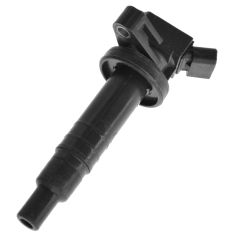
TRQ ignition coils will have your engine running like new. TRQ ignition coils are manufactured to precise specifications using premium raw materials to optimize each vehicle's ignition system. To ensure peak performance, TRQ recommends replacing ignition coils in sets to prevent electrical output imbalances. All products are fit and road-tested in our Massachusetts R&D facility to ensure we deliver on our promise of Trusted Reliable Quality.
Product Features
Item Condition:
New
Attention California Customers:
 WARNING: This product can expose you to chemicals including Lead and Lead Compounds, which are known to the State of California to cause cancer, and birth defects or other reproductive harm. For more information, go to www.P65Warnings.ca.gov.
Lifetime Warranty
This item is backed by our limited lifetime warranty. In the event that this item should fail due to manufacturing defects during intended use, we will replace the part free of charge. This warranty covers the cost of the part only.
Returns: Parts with electrical components cannot be returned once installed.
FREE Shipping is standard on Orders shipped to the lower 48 States (Contiguous United States). Standard shipping charges apply to Hawaii, Alaska and US Territories. Shipping is not available to Canada.
Expedited is available on checkout to the United States, excluding Alaska, Hawaii and US Territories as well as P.O. Boxes and APO/FPO/DPO addresses. Final shipping costs are available at checkout.


Created on:
Tools used
Brought to you by 1AAuto.com, your source for quality replacement parts and the best service on the Internet.
Hi, I'm Mike from 1A Auto. I hope this how-to video helps you out, and next time you need parts for your vehicle, think of 1AAuto.com. Thanks.
In this video, we show you how to replace the ignition coil on this 2000 Toyota Celica. It's the same process on the Celicas from 2000 to 2005. There are two types of ignition coils for this vehicle, so make sure you check your engine number and compare it to the engine number given with the part on 1AAuto.com. The only tools that you're going to need for this are a 10mm socket and a ratchet.
Right here are your four ignition coils. You're going to start off. You just pry up the tab and pull the harness right off. Then you just remove the 10mm bolt right here and then the ignition coil just pulls right up and out.
Reinstallation is straightforward, put the coil back in, line up the hole, reinsert the 10mm bolt and tighten it up nice and firm, reconnect the harness, and then repeat that for the other three coils.
We hope this video helps you out. Brought to you by www.1AAuto.com, your source for quality replacement parts and the best service on the Internet. Please feel free to call us toll-free, 888-844-3393. We're the company that's here for you on the Internet and in person.
Tools used
Okay, friends. One of the first things we need to do is get under the hood. Once you're under the hood, just make sure it's not super hot because we don't want to deal with a hot engine. Go ahead and remove this cover right here by removing your two 10-millimeter headed nuts. Okay, there should be one right here. Ours is missing. Go ahead and carefully lift that up and set it aside.
Awesome. Now that the cover's off, we have a clear view of our ignition coil harness right here. We need to go ahead and squeeze on this tab right here and try to draw it off. If you can't squeeze hard enough, go ahead and use a pocket screwdriver, come right underneath this ear, carefully lift it, and then draw this away. Every time I remove an electrical connector, I always look to see if there's any funny colors. If there is, it's probably corrosion, and that's gonna cause restriction. This looks good. Let's set it aside. The next thing we're gonna do is remove our 10-millimeter headed bolt right here. Set that aside as well. Go ahead and grab onto the coil, twist, and lift.
All right friends. Now, it's going to be time to install our brand new coil. Install the coil, I always like to put a little bit of dielectric grease right down inside this area here. It's going to keep the moisture away, and of course, along this area right there also to keep the moisture away. Right in there. Along here. You don't need very much. Go ahead and set that down on there and press it down onto the spark plug. Let's put our bolt in there. Always want to start these in by hand, of course. Now, we'll snug it up. Just bottom it out, give it a teeny bit more. That's good. If you want to use a little bit of dielectric grease inside of your connector, we'll call it your prerogative. Aside from that, go ahead and press it on, listen for a click. Give it a nice tug. Make sure it's secure. We would just do the same down the line.
Now, when you get down to this portion of this, you're probably gonna see that this black piece is in the way. There's a 10-millimeter bolt here and a 10-millimeter headed nut right there. We're going to remove the pair of those, and then you can lift this up and out of the way.
All right. Now that we have everything nice and securely connected, we have this back on there as it should be, let's go ahead and put this cover back on. Line up the holes with the studs coming off your engine. Put on your nut, and then of course, snug it up. Do the same to the other one if you have one.
Okay, friends, the next thing that we need to do is carefully start up the vehicle. We're going to come right back out here and we're going to watch the engine. Make sure it's not shaking around. If it's shaking around, you have a misfire. There's a possibility that maybe you didn't plug something in. Aside from that, shut the hood, hop back in the vehicle. Make sure there's no check engine light, and take it for a road test.
Tools used
Okay, friends. One of the first things we need to do is get under the hood. Once you're under the hood, just make sure it's not super hot because we don't want to deal with a hot engine. Go ahead and remove this cover right here by removing your two 10-millimeter headed nuts. Okay. There should be one right here, ours is missing. Go ahead and carefully lift that up and set it aside.
Awesome. Now that the cover is off, we have a clear view of our ignition coil harness right here. We need to go ahead and squeeze on this tab right here and try to draw it off. If you can't squeeze hard enough, go ahead and use a pocket screwdriver, come right underneath this ear, carefully lift it, and then draw this away. Every time I remove an electrical connector I always look to see if there's any funny colors, if there is, it's probably corrosion and that's going to cause restriction. This looks good, let's set it aside.
The next thing we're gonna do is remove our 10-millimeter headed bolt right here. Set that aside as well. Go ahead and grab onto the coil, twist, and lift. All right friends, now it's gonna be time to install our brand new coil. To install the coil, I always like to put a little bit of dielectric grease right down inside this area here, it's gonna keep the moisture away and of course along this area right there also to keep the moisture away. Right in there, up along here, you don't need very much. Go ahead and set that down on there and press it down onto the spark plug. Let's put our bolts in there. You always want to start these in by hand of course. Now we'll snug it up. Just bottom it out, give it a teeny bit more and that's good.
If you want to use a little bit of dielectric grease inside of your connector, we'll call it your prerogative. Aside from that, go ahead and press it on, listen for a click. Give it a nice tug, make sure it's secure. We would just do the same down the line. Now when you get down to this portion of this, you're probably gonna see that this black piece is in the way. There's a 10-millimeter bolt here and a 10-millimeter headed nut right there. We're gonna remove the pair of those and then you can lift this up and out of the way.
All right. Now that we have everything nice and securely connected, we have this back on there as it should be, let's go ahead and put this cover back on. Line up the holes with the studs coming off your engine, put on your nut, and then of course snug it up. Do the same to the other one if you have one. Okay friends, the next thing that we need to do is carefully start up the vehicle, we're gonna come right back out here and we're gonna watch the engine. Make sure it's not shaking around, if it's shaking around, you have a misfire, there's a possibility that maybe you didn't plug something in. Aside from that, shut the hood, hop back in the vehicle, make sure there's no check engine light, and take it for a road test.
Tools used