Replaces
This part doesn’t fit a . Select from parts that fit.
Frequently bought together
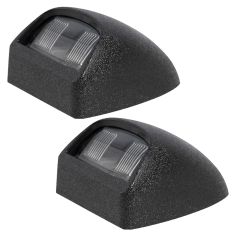
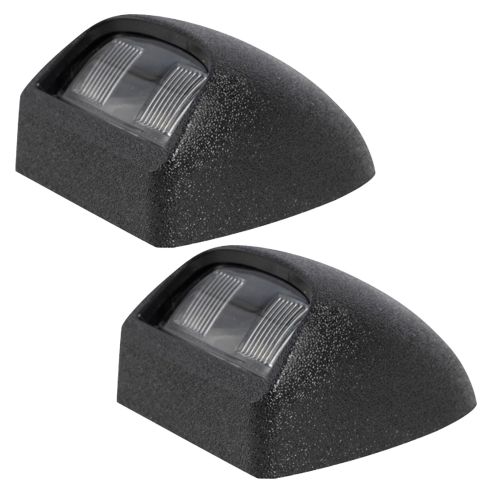
Part Details
Assemblies may include halogen or incandescent test bulbs that should be replaced before installation.
Item Condition:
New
Attention California Customers:
 WARNING: This product can expose you to chemicals including Chromium (Hexavalent Compounds), which is known to the State of California to cause cancer, and birth defects or other reproductive harm. For more information, go to www.P65Warnings.ca.gov
Lifetime Warranty
This item is backed by our limited lifetime warranty. In the event this item should fail due to manufacturing defects during intended use, we will replace the part free of charge. This warranty covers the cost of the part only.

Created on:
Tools used
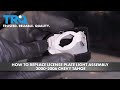
All right, to take out the plate light assembly, there is a clip on this side and a little latch on this side. So if you could push this forward, try to get it to slide out, and use a trim tool. Oh, that broke off. This slides out. It's kinda hard if you have a trailer hitch to actually remove it so if you try pushing that in, then you should be able to get that to release. This part will break.
This is how it looks on the new one. So it slides in the back, and it latches on that side. Take the old one, twist out the bulb, the socket assembly. You can take the bulb out. Replace the bulb while you're doing this. This is a 194 bulb. Slide it back in position, take the socket, and twist it. And then we're gonna slide it on like this. It's gonna slide in the back first and then push it on this way just like that.
Tools used
Okay, friends, so, it's gonna be time to get started on this plate light assembly right here. If you were to look at it, you would see that it has this little tab. What we wanna do, is from the back side of this bumper, we would press on the tab, and that'll release this from the bumper itself. This one's obviously not in the best condition, so, we're gonna replace it. When I do these, usually I like to do them as a pair, so, they'll match. If you're not necessarily worried about it, you could, of course, paint it to match whatever color you need it to be.
With that said, I'm just gonna take my pocket screwdriver, I'm gonna come underneath the bumper, just like this. And then I'm gonna try to find that tab. I'll just push on that tab. Go ahead and grab onto the pigtail, give it a twist, counterclockwise, and remove it.I always like to remove the bulb. This should be a 194 bulb. Take a look inside. Make sure you can see that the filament is still in good condition, and the bulb is not discolored. I'll just reinsert it back on there. Double check the seal. Make sure your seal's in good condition. If it looks like it's torn or even missing, obviously, you're gonna want a seal.
Let's go ahead and take this, and, get it on there. Twist it clockwise to lock it in. Give it a nice tug. Make sure it doesn't come loose. At this point, you're gonna see you have a hookey-doo on this side. And, this is the side that we pushed in on to remove it. So, when we insert, we're gonna go at an angle, and we're gonna put this side inside, and up against there first, and then roll the other side in. Okay. Slide it in. It should click. Make sure it's nice and secure. That looks great. Let's just test it.