Replaces
This part doesn’t fit a . Select from parts that fit.
Frequently bought together
Part Details
TRQ suspension kits are manufactured using premium raw materials and coatings for extended service life. Each TRQ suspension component is designed to be a direct, maintenance-free replacement to the stock unit. To extend the life of your steering and suspension components, TRQ recommends replacing components in pairs, sets, or kits. All products are fit and road-tested in our Massachusetts R&D facility to ensure we deliver on our promise of Trusted Reliable Quality.
Product Features
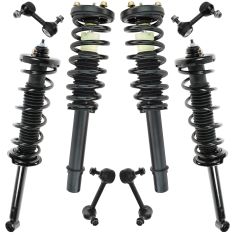
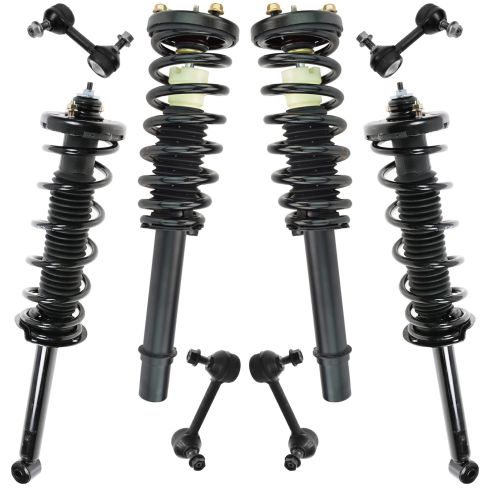
Replacing struts used to require specialized tools to compress, remove, and transfer the old spring and mount. Our Pre-assembled, complete strut & spring assemblies come with all new parts and make the job much quicker and easier for the do-it-yourself mechanic.
Strut & spring assembly contains:
Our steering and suspension components are pre-greased and sealed for long life and do not require the extra maintenance typically required by greaseable versions.
Item Condition:
New
Attention California Customers:
 WARNING: This product can expose you to chemicals including Chromium (Hexavalent Compounds), which is known to the State of California to cause cancer, and birth defects or other reproductive harm. For more information, go to www.P65Warnings.ca.gov
Lifetime Warranty
This item is backed by our limited lifetime warranty. In the event that this item should fail due to manufacturing defects during intended use, we will replace the part free of charge. This warranty covers the cost of the part only.
FREE Shipping is standard on orders shipped to the lower 48 States (Contiguous United States). Standard shipping charges apply to Hawaii and Alaska.
Shipping is not available to a P.O. Box, APO/FPO/DPO addresses, US Territories, or Canada for this item.
Expedited is available on checkout to the United States, excluding Alaska, Hawaii.
Final shipping costs are available at checkout.


Created on:
Tools used
Hi, I'm Mike from 1A Auto. We've been selling auto parts for over 30 years!
Hey, everyone. Sue here from 1A Auto, and today we have a 07 Accord in the shop, and we're going to do rear strut assemblies. If you need this part or any other part for your car, click on the link below and head on over to 1aauto.com.
There's two pull taps located for the bottom seat. There's one here and one there right in that area. So you reach your fingers and you can see feel like a little "T" handle. Pull out on the handle and pull out. And then do the same on that side. I'm going to grab mine from the center here and keep a firm hand and pull down. Once this is up, you'll see a little head of a bolt right here 10mm socket. I'm going to take this one off and the same on that side.
Take my 10mm socket. And then I'm going to do the same thing on the other side. Now you take your ignition key and you put it in the lock back here and you hit unlock. Pull the seat down. And now we have the side pillar that's unbolted from the bottom. I'm going to lift up on it and push that aside. Do the same to the other side. Now with the trim tool, I'm just going up in here and just pull up on the plastic tabs.
Here we go. With a 14mm socket, I'm going to disconnect the tops of the strut tower mounts. I'm not going to touch that center that is the spring load. I had to get a quarter-inch set to get to that back one because of the plastic in the way. 19mm socket to loosen up the lug nuts. I'm to use a two-post lift to raise my vehicle. You can use a jack and jack stands at home. Now I can take my 19mm socket. Now that I've raised it up, I can remove the lug nuts to take the tire off.
To remove the bottom mount of the strut the 17mm socket. I'm just going to put a socket on there with an extension, get my long ratchet and break that free.
There we go. The next thing I do is I'm going to remove this bolt that holds the bracket to the upper sway bar link, and that way I get more bottom throw out on the bottom of the strut housing. It's a 14mm socket that takes that bolt right out of there. I can just set that aside and move that way so I got more throw here for my lower shock. And there you have it. Just had to get a better angle. There it is.
Here we have the new rear start to our '07 Honda Accord from 1A Auto, and here we have the original equipment we just pulled out. They're both the same link as you can see. Coils are the same diameter, comes with new bumper and dust boot. Comes with two new locking nuts on the strut mount for the top and a new rubber seal that will get nice and compressed in there to stop any road noise. If you need this part or any other part for your car, click on the link below and head on over to 1aauto.com.
I'm going to dismount the two locking nuts for the strut cap for the inside of the cab with the compartment. Set these aside. I'm going to fish this back in. It's going to go between the link. Get my pry bar. So pull down on the suspension, and then you're going to fish the new strut into the link and the bracket.
Pry this down, and get this in the fender well. Now with the strut in the fender well, I can lift it up and line it up in the top. Let's see if I can hook that through. See if I can now pry this down far enough. It looks like I got enough on there. Now I'm going to lower the vehicle and put the two top nuts on the mount so I can work down below and not have this fall down. So now I'm gently going to put the nuts on by hand only because I don't want the whole strut assembly to fall back down through.
Sweet. Now I'm going to get my socket and tighten that down. So the new nuts to the strut mount are at 15mm socket. I'm just alternating it back and forth and tightening it down snugging it. The torque specs for this are 37 foot-pounds. Okay, we're ready to go down below again.
So now with my long pry bar I'm going to pull down on the suspension and see if I can get the bottom part of the strut at least started before I remount the sway bar link bracket on the other side. There we go. So now that part is lined up. I can put the bracket on and thread that bolt through. So now I'm going to line up the sway bar link bracket to the knuckle and start this bolt. I'm not going to tighten that up until I've threaded this bolt completely through and started it.
I'm leaving that bracket loose. It was easier for me to start the threads. Just in case if you tighten that bracket up and it's just a 1mm off of the threaded hole, you can end up stripping that nut and ruining the bolt. It's easier to make sure the main bolt is threaded through and then tighten up that bracket.
Now I'm going to tighten up that bracket with a 14mm socket. Now we can torque the main bolt on the bottom of the strut. So now I'm going to torque it and the factory specs is 43 foot-pounds. It's a 17mm socket.
Reinstall the top piece trim. Move the seatbelt out of the way. Actually it doesn't have to go away. Line this keyway up with the latch that releases the seats, and the lip goes on the top of that plastic piece. You can guide them right in, and you'll see where the plastic clips go and just push down. All set.
So you have to make sure you get this bottom eyelet in the middle bracket and this top one in that bracket. With the seatbelt out of the way, now the bottom on is in. There we go. Now it's lined up. You can see the trim better on the door casing. Now we're going to have to repeat that process on that side. Okay, seatbelts are all lined up. Except for this side.
Push it back and snap it down in. That side's down. Now repeat the process on the other side. 19mm socket. Now we're going to torque the wheels up. The wheel torque on this particular model is 80 foot-pounds. Make sure you do it in a star pattern--crisscross. And then double-check.
Thanks for watching. Visit us at 1aauto.com for quality auto parts, fast and free shipping, and the best customer service in the industry.
Tools used
Hi, I'm Mike from 1A Auto. We've been selling auto parts for over 30 years.
Hey everyone. Sue here from 1A Auto and today we have an '07 Honda Accord in the shop and we're going to be doing front strut assemblies. If you need those parts or any other parts for your car, click on the link below and head on over to 1aauto.com.
19 millimeter socket to loosen up the lug nuts. Now I'm going to raise and support my vehicle with my two-post lift and you can use jack stands with a jack.
And now we're clear to remove the tire.
14 millimeter socket. I'm going to take the lower strut bolt out. Make sure you pre-spray to help yourself for a smoother job. The threads on this go through the wishbone. There is not a nut on the other side. The pinch bolt has to come all the way out because of the actual strut itself has a indent in it for where the bolt lines up through the wishbone. So don't think you're going to cheat it and just loosen it up and see if you can slide this out. You won't be able to.
17 millimeter wrench and 17 millimeter socket and we're going to take the wishbone bolt out.
Just take a hammer and tap it out. So now I'm going to remove the wishbone from the bottom part of the strut.
Perfect. Now we can lower our vehicle and undo the top of the strut bolts and slide her out. Now we've lowered our car so we can access the top of the strut. There are three 14 millimeter socket style nuts and two 12 millimeter socket nuts. These do have to come out. Our new strut from 1A Auto comes with the actual all five nuts so we don't have to reuse the old ones.
We'll leave that one on because now the strut's going to feel ... want to drop down.
That's the great thing about this being at this height now. I can reach in with one hand and hold the strut and take this top one off. Take the last nut out.
Now, you can see that there's no, not much room to get this strut out, so at this point I'm going to strongly suggest we undo the top nut to the control arm. Just make your life a little easier. You're moving the upper control on ball joint castle nut. I got to discard the old cotter pin, see if she can come out without breaking.
Beautiful. We discard that because we got a new one. 17 millimeter socket and we're going to take off the upper control arm castle nut.
Now I'm going to hit this right here with a hammer and that ball joint will pop right out of the knuckle.
10 millimeter socket. We'll take this mounting bolt off the control arm. This little nut that holds the AVS wire on. I normally would have done that before. I just forgot. Now you can move the knuckle forward and guide the strut out.
Here we have our new front strut for an '07 Honda Accord from 1A Auto and here we have the actual factory strut. Now you can see that they're same style. The one from 1A Auto has the same keyway and the notch for the bolt. Comes with new bumpers and cover, strut assembly, strut's springs are the same size, same amount of coils. Strut cap, comes with a new strut cap and it comes with five new locking nuts. If you need this part or any other part for your car, click on the link below and head on over to 1AAuto.com.
So I'm going to line the strut cap with the two bolts that go for that cross member bar and then the cap studs themselves. So I can try to get this to go up in there. The front here.
Now I lowered it so that I can hopefully hold the strut and and thread onto the bolts.
The new size of the socket for the new stretch nuts is a 15 milliliter. We're going to snug these down, then we'll torque them to spec. And the two nuts that go on the little cross-member bar is a 13 millimeter socket now. So the three strut mount nuts, three identical ones, are 37 foot-pounds, and the two cross-member nuts is 16 foot-pounds.
Now we're going to reattach the wishbone on the lower strut. Make sure we line that up best we can. Got to find that notch. The only problem with, you might need a mirror so you see the keyway. The torque specs for this lower strut bolt into the wishbone is 32 foot-pounds.
Now we had to take a pry bar and we'll just prying it into the wishbone like this so that we can turn that lower part. so it lines up with the control arm.
Now we can line that up for the bolt to go through. Might need to take a hammer and tap it. Just give it a little fine tuning. I'm going to actually take my punch that I used. See if I can do this. Let's see how far up in the side away off. So we'll take the pry bar and twist it the same time. There we go.
17 millimeter socket. We're just going to snug that right down. Then we'll torque it to the manufacturer specs. 'K that's snug. I'm going to get my torque wrench. Low wishbone bolt that goes through the lower control arm is 47 foot-pounds. Now we're going to attach our upper control arm to the knuckle. Take them ... Here we go. Here we go.
Do the upper castle nut for the control arm ball joint is 35 foot-pounds. Now let's see. Well the keyway is right there for the actual cotter pin. This will also help me know if the stud is turning while I tighten this. Nope. A little bit more.
So you can see I went past the torque, but that's because the cotter pin didn't line up with the hole and you have to go tighten, never loosen to get the cotter pin in. I used a new cotter pin that came with the upper control arm. Slide that right in to the side hole. No.
So what's happening is the control arm is in the way of the length of the new cotter pin. So I'm just going to manipulate it down and that way I don't have to ... there's only one hole on this ball joint. I would have to take the whole thing out to turn the stud. Here we go.
Last is the ABS bracket. It lines right up. There's a little mounting hole for the bracket. Let that guide sit right in there. That's a 10 millimeter socket. Tighten that down.
Now we're ready to put our wheel back on.
I'm just going to snug them up by hand and then I'll lower it down on the ground. Let the weight of the vehicle on it, and I'll torque the wheel to 80 foot-pounds. 19 millimeter socket. We're going to torque the wheel to 80 foot-pounds in a star pattern.
Double check.
Now we're going to repeat the process on the other side.
Thanks for watching. Visit us at 1AAuto.com for quality auto parts, fast and free shipping, and the best customer service in the industry.
Tools used
Hi. I'm Mike from 1A Auto. We've been selling auto parts for over 30 years.
Hey, everyone. Sue, here, from 1A Auto. Today, we have an 07 Honda Accord in our shop, and we're going to be showing how to remove and install the front sway bar links. If you need this part or any other part for your car, click on the link below and head on over to 1AAuto.com.
19 millimeter socket to loosen up the lug nuts. Now I'm going to raise and support my vehicle with my two post lift. You can use jack stands with a jack. Now we're clear to remove the tire.
14 millimeter wrench, I'm going to break that nut free and then of course it's going to spin. So I'm going to have to hold the inner part of it. There is an Allen head right here, but there's no way I can get there from that wishbone. I can do it on the top one, but not on the lower. So I'm going to have to hold the inner piece of metal with a pair of locking pliers.
Make sure you can get your wrench out. There we go. I'm going to remove the upper swivel link to the sway bar. 14 millimeter sock wrench again. See how much we can get before it starts to spin. It's spinning. Okay, so we'll put some locking pliers on the back just like I did on the bottom. See if I can hold that firm.
Wonderful. Now we can remove the sway bar link from the actual linking control arm. I'm going to just take a pry bar and see if I can pry that free.
To install the front sway bar link, it's just basically two reverse procedure. I like to put the sway bar link into the top of the sway bar first. The new nuts are a 15 millimeter, not a 14. It still has the Allen head in the center, which is a five millimeter Allen head.
Now I'm going to put the lower one in. Start the nut. With the wishbone in the way, I have found that it's kind of difficult to put an Allen head in there and hold that. So you're going to have to use a pair of the needle nose vise grips like I did to remove it just being careful, not pinching the new boot, using a gear wrench, ratchet wrench. I'm going to snug that pretty much as tight as I can get it because I'm going to end up torquing it.
Now I'm going to start the bottom. Put a pair of locking pliers on there, needle nose locking pliers. See if I can catch it without pinching that boot as careful as I can be. I'm going to put a longer wrench on here to tighten this because obviously I can't get a torque wrench in there. The specs for this is 22 foot pounds.
Now I can put a torque wrench on the top. So we're going to torque this to 22 foot pounds. Okay. Now we're ready to put our wheel back on. I'm just going to snug them up by hand then I'll lower it down on the ground with the weight of the vehicle on it and I'll torque the wheel to 80 foot pounds.
19 millimeter socket, and we're going to torque the wheel to 80 foot pounds in a star pattern. Double check. Now we're going to repeat the process on the other side.
Thanks for watching. Visit us at 1aauto.com for quality auto parts, fast and free shipping and the best customer service in the industry.
Tools used
Tools used
Tools used
Tools used
Hi. I'm Mike from 1A Auto. We've been selling auto parts for over 30 years.
Hey, everyone. Sue here from 1A Auto. And today on our 07 Honda Accord we have in the shop, we're going to do rear sway bar links. If you need those parts or any other parts for your car, click on the link below and head on over to 1aauto.com.
19 millimeter socket to loosen up the lug nuts. I'm going to use a two post lift to raise my vehicle. You can use a jack and jack stands at home. Now I can take my 19 millimeter socket, now that I've raised it up, I can remove the lug nuts to take the tire off.
Rear sway bar links, 14 millimeter wrench. I'm going to place that on the top link on the nut. My nut, and it's a five millimeter Allen head socket that goes right in the center of it. I'm just going to give it a little tap right in there. I pre-sprayed but I'm going to spray again cause of the weathering element. See if I can make sure there's no rust sticking there. Okay now I'm going to put my ratchet on there.
Let's see if we made enough room that we can actually put a pair of locking pliers in the back there. And then we'll use a socket. Now I have a pair of needle nose locking pliers and there's a metal lip, washer flat side on the other side. Once I loosen it up enough, I can grab it with these and lock this down. Now I can put a socket on there. And that's just the top. Got the bottom to go.
Okay the lower sway bar link, we're going to do the same thing. Just have a little bit more room to work with. I'm going to put the locking pliers on there. 14 millimeter socket. Marvelous, look at that.
Here we have our brand new sway bar link from 1A Auto, and here I have the manufacturer's one I just took off our 07 Honda Accord. It's still the original equipment by the looks of it and you can see their design. They put the Allen head and a little flat washer there. With a 1A one, puts a space for our open end wrench and the new nuts. They're both sealed units, non-greasable. If you need this part or any other part for your car, click on the link below and head on over to 1aauto.com.
Now we're going to reinstall our new rear wheel sway bar links and we're going to install the one of the bar first. Start the nut. Now we have the freedom of moving it back and forth, nut down. The inside bolt hex is a 14 millimeter open end wrench, and the outside is a 15 mm. So 14 mm on the inside, that open-end wrench. And 15 mm socket. I'm just going to snug them because the torque specs is 29 foot pounds. So I'll snug that one and now I'll get to this one.
So I'm going to torque them now to 29 foot-pounds. Now we're just going to repeat the process on the other side. 19 millimeter socket. We're going to torque the wheels up. The wheel torque on this particular model is 80 foot pounds. Make sure you do it in the star pattern, criss-cross and then double check.
Thanks for watching. Visit us at 1aauto.com for quality auto parts, fast and free shipping and the best customer service in the industry.
Tools used