Replaces
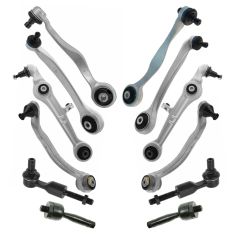
Replaces VW Passat Audi A6 Quattro S4 Front 10 Piece Suspension Kit TRQ PSA59761
$289.95
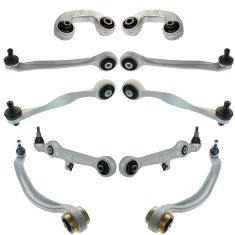
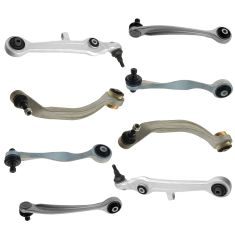
Replaces Audi A4 A4 Quattro Front 10 Piece Suspension Kit TRQ PSA65137
$289.95
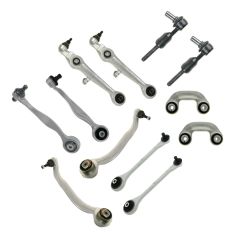
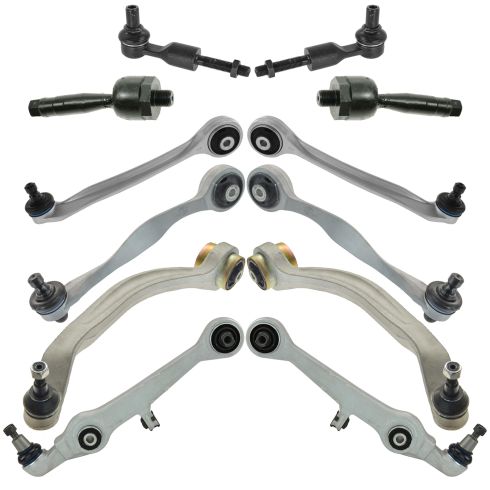
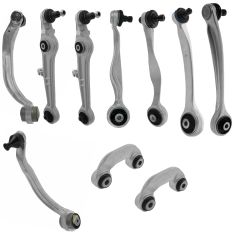
Replaces Audi A8 Quattro S8 Front 12 Piece Steering & Suspension Kit TRQ PSA56144
$280.95
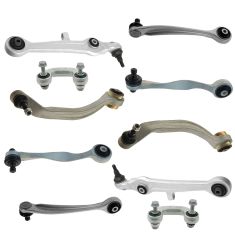
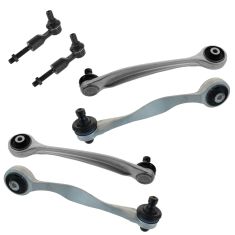
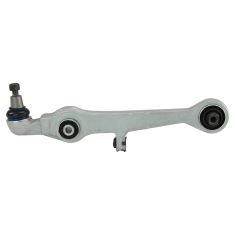
Replaces VW Passat Audi A6 Quattro S4 Front Driver & Passenger Side 8 Piece Control Arm with Ball Joint Set TRQ PSA62592
$269.95
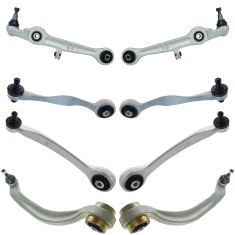
Replaces Audi A4 A4 Quattro Front Driver & Passenger Side 8 Piece Control Arm with Ball Joint Set TRQ PSA65875
$269.95
Replaces 2001-02 Audi Allroad Quattro Front 12 Piece Steering & Suspension Kit TRQ PSA59208
$268.95
Replaces Audi Allroad Quattro Front 10 Piece Suspension Kit TRQ PSA56186
$262.95
Replaces VW Audi Front 6 Piece Steering & Suspension Kit TRQ PSA56493
$119.95
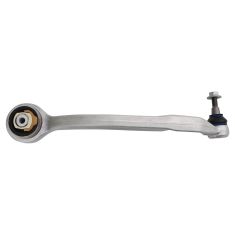
Replaces VW Audi Front Driver Side Control Arm with Ball Joint TRQ PSA83973
$84.95
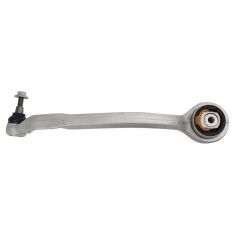
Replaces VW Audi Front Passenger Side Control Arm with Ball Joint TRQ PSA83974
$84.95
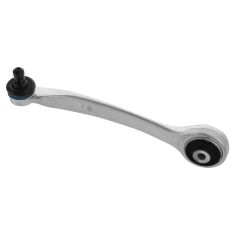
Replaces VW Audi Front Control Arm with Ball Joint TRQ PSA83972
$51.95
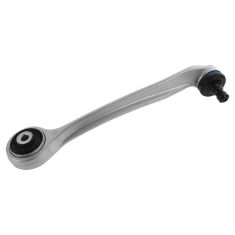
Replaces VW Audi Front Driver Side Control Arm with Ball Joint TRQ PSA83662
$44.95
Replaces VW Audi Front Passenger Side Control Arm with Ball Joint TRQ PSA83663
$44.95
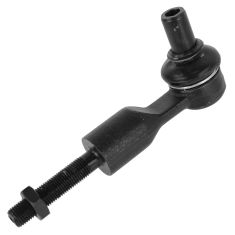
Replaces VW Audi Front Tie Rod TRQ PSA68561
$36.95
Replaces VW Audi Front Tie Rod TRQ PSA68684
$29.95
Part Details
Specifications
About TRQ:
TRQ is a trusted brand dedicated to making every repair a success story by combining premium parts with easy installation. Each TRQ part is engineered by a team of automotive experts to meet or exceed OEM standards, delivering enhanced performance and maximum longevity. With rigorous in-house testing, the brand ensures superior fit and function across every product line. TRQ also provides customers with best-in-class, step-by-step installation videos—so you can complete repairs with confidence, whether you're a first-time DIYer or an industry professional.
Product Features
TRQ suspension kits are manufactured using premium raw materials and coatings for extended service life. Each TRQ suspension component is designed to be a direct, maintenance-free replacement to the stock unit. To extend the life of your steering and suspension components, TRQ recommends replacing components in pairs, sets, or kits. All products are fit and road-tested in our Massachusetts R&D facility to ensure we deliver on our promise of Trusted Reliable Quality.
Install Tip: When replacing steering components, have a professional alignment performed afterwards. This ensures proper tracking and even tire wear.
Our steering and suspension components are pre-greased and sealed for long life and do not require the extra maintenance typically required by greaseable versions.
Attention California Customers:
 WARNING: This product can expose you to chemicals including Chromium (Hexavalent Compounds), which is known to the State of California to cause cancer, and birth defects or other reproductive harm. For more information, go to www.P65Warnings.ca.gov
Lifetime Warranty
This item is backed by our limited lifetime warranty. In the event that this item should fail due to manufacturing defects during intended use, we will replace the part free of charge. This warranty covers the cost of the part only.
FREE Shipping is standard on orders shipped to the lower 48 States (Contiguous United States). Standard shipping charges apply to Hawaii and Alaska.
Shipping is not available to a P.O. Box, APO/FPO/DPO addresses, US Territories, or Canada for this item.
Expedited is available on checkout to the United States, excluding Alaska, Hawaii.
Final shipping costs are available at checkout.


Created on:
Tools used
Brought to you by 1AAuto.com, your source for quality replacement parts and the best service on the Internet.
Hi, I'm Mike from 1A Auto. I hope this how-to video helps you out, and next time you need parts for your vehicle, think of 1AAuto.com. Thanks!
In this video, we're going to show you how to remove and replace a tie rod on this 2007 Audi A4. That's the same for '02 to '09 A4 as well as S4, some other Audi models, and VW Passat as well. Items you'll need are a new tie rod from 1AAuto.com, 17mm socket, ratchet with a breaker bar or your tire iron, 22mm and 18mm open end wrenches, 13mm and 16mm sockets and ratchet, jack and jack stands, hammer, and some penetrating oil.
Remove the wheel. Use the special center cap removal tool, available at 1AAuto.com, or you could use a 90 degree pick. Put it into the center of the cap and pull. Loosen your lug nuts. They're 17mm. Loosen them with the vehicle on the ground. Raise and support the vehicle. We'll remove the lug nuts the rest of the way.
Obviously, if you had the benefit of air tools, you didn't need to loosen them up on the ground, but you can loosen them now with either wrench. I'm going to use an impact gun. Now, remove the wheel.
We want to loosen this 22mm nut, and we're going to hold the 18mm nut in behind it. I'm just going to use a little bit of penetrating oil and spray it down first. I've got my 18mm wrench on that back nut and then 22mm on the locking nut. Just pull it and it loosens up actually fairly easily. I'm going to just loosen it up a little bit, about a quarter of a turn. Now, we're going to remove this 13mm bolt on top and this 16mm nut here. You need to drive this bolt out. I'm going to put the nut back on here just so I don't end up ruining the bolt itself.
Hammer, get it going. I've driven it out some. I'm just going to use my upper bolt to drive it out the rest of the way. Then, to get the tie rod to drop down, a couple good hits usually loosens it up a little bit. Just shaking and pulling it down. Put your 18mm back on the end of your steering here and then just turn your tie rod end right out.
The old part that we removed from the vehicle, new part from 1A Auto, you can see they're dimensionally the same length and the important part, which is where it goes in to the steering knuckle is the same as well as where it goes into the end of the rack is the same. This is going to be a functional replacement. It's going to fix your problem if your tie rod end is loose. It may look a little different.
For reinstallation, we're going to take the lock nut, set it to basically the same position as the original. This will give you a good preliminary alignment. You will want to take your vehicle to an alignment shop and have an alignment done after you do this repair just to make sure it's all good. This should be able to make it so it's drivable.
Just set that where it is on the original. Just like before, thread it in to the rack. While you're turning this in, make sure you hold the 18mm nut so it doesn't spin at all. Use a wire brush and just try and clean it out a little bit.
Need to move or twist this shaft so it will go up and this indent will line up so the bolt goes through. Just use a pair of pliers, grab it tightly where the indent is, and twist. The other thing is you'll have to line it up somewhat to go up in there. Once you feel like you have that pretty well lined up, put the tie rod up in to place. You should be able to get it started pretty well with some light hammer taps. It should drive it up in the inside.
This bolt goes in. The flat side should be facing the flat on the other side. Tighten the 13mm bolt first. Then tighten the 16mm nut. Now, hold the 18mm nut on the end of the tie rod and rack and tighten the locking nut.
Reinstall the wheel back up in place. Kind of a pain because no lug studs. Twist it and line up the holes. Tighten the lug nut bolts preliminarily. Lower the vehicle.
Now torque your lug bolts to 90 foot-pounds using a star pattern. Put your center cap back on, just note the largest space here. Find your largest space between the tabs on your cap then peek in behind.
Thanks for tuning in. We hope this video helped you out. Next time you need parts for your car, please visit 1AAuto.com. Also check out our other helpful how-to and diagnosis videos.
Tools used
Brought to you by 1AAuto.com, your source for quality replacement parts and the best service on the Internet.
Hi, I'm Mike from 1A Auto. I hope this how-to video helps you out, and next time you need parts for your vehicle, think of 1AAuto.com. Thanks.
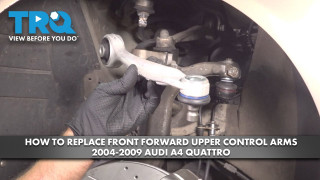
In this video, we're going to show you upper control arm replacement on this 2007 Audio A4. Pretty much the same for 2000 to 2008. You'll need a center cap removal tool or 90 degree pick, 16 to 18 millimeter sockets with ratchets and extensions, 16 to 18 millimeter wrenches, penetrating oil, chisel, hammer, ball joint or tire rod fork, Phillip's screwdriver, torque wrench, large pliers and jack and jack stand.
To remove the wheel, you'll have to remove this lug cover. You can use the tool supplied with your spare tire kit. Often these are missing and are available on 1AAuto.com or you can use a hooked pick.
Remove the five 17 millimeter wheel bolts. I'm going to use the screw jack to push up on the suspension and simulate the weight of the vehicle on the tires. You can do the same thing with a floor jack at home. Bring it up until the suspension stops compressing. Hook a measuring tape to the top of your strut mount. Mark where you put the front of the tape on the strut mount and where it lines up at the bottom.
Our measurement here is 3 1/2 inches. Since the arms can't be torqued inside of the vehicle we will use a recreation of this measurement to set the angle of the control arm with the weight on before you torque on the bench. This arm will be aligned with our tape at both marks to 3 1/2 inches. We'll make our other arm parallel before torqueing on the bench.
Lower your screw jack or floor jack to release the weight from the suspension. Remove the pinch bolt at the top of the spindle. Often these are frozen in and will require heat power tools and just generally a lot of working back and forth to remove, but we're going to try starting ours by hand. You'll need a 16 millimeter wrench and a 16 millimeter socket and ratchet. Often even once the nut's been removed these pinch bolts tend to get stuck in the spindle. The best thing you can do for this is spray penetrating oil just about anywhere you can get at the bolt.
If you have to get a little outward pressure while you try to turn the bolt out of the spindle, you can use part of a chisel behind the washer just to put some outward pressure on it while you try to turn it out. We're going to be using a very thin wrench to get behind the washer, pry out on the bolt while we turn. When all else fails, you may just have to use power tools.
As the gap behind the washer gets bigger, you can up-size wrenches or even double them up to fill the gap. The best way to remove the upper control arms from the spindle is with a ball joint or a tire rod fork. Simply slide it under the joint, send it in with a hammer until it separates from the spindle. Remove the Phillips head screw on the top of the coolant expansion tank. Slide the tank out of its retainers. Just lay it off to the side. Be careful not to spill.
Remove the 16 millimeter bolt below the expansion tank. Our vehicle is missing the rain tray. If yours isn't, you'll have to remove it to access this rubber plug just before the fuse box. Remove the 16 millimeter bolt underneath. Remove the last 16 millimeter bolt between the break booster just by the fuse panel.
Using an 18 millimeter socket and ratchet and an 18 millimeter wrench, remove the bolt from the bottom of the strut through the lower control arm. Remove the bottom of the strut from the lower control arm and pry out to release the clip. With the strut assembly removed remove the 16 millimeter bolts holding in the upper control arms.
Reinstall your upper control arms. Remember to transfer the mark you used to measure the angle of the control arms from your old part to your new part so we can set the angle and torque the control arms appropriately. Torque the upper control arm bolts to 37 foot-pounds and then add 90 degrees.
Reinstall the other control arm the same way. Remove the protective caps on the new boots and you're ready to reinstall the assembly into the vehicle. Reinstall your strut assembly into the wheel well. Reinstall your top strut bolts. Torque the strut cap bolts to 55 foot-pounds. The strut may have rotated. All you have to do is use a small pry bar to twist it the way you want it. Once you're lined up send your bolt back through, tighten it back up with an 18 millimeter socket and ratchet and wrench.
Reinstall your forward control arm into the spindle. You may need a large pair of pliers to press the control arms into the spindle. Once it's in, install the pinch bolt halfway to keep it from falling out.
Reinstall the nut on the back of your pinch bolt. Tighten it down with a 16 millimeter socket ratchet and wrench. Torque the pinch bolt to 30 foot-pounds. Using your floor jack or screw jack to simulate the weight of the suspension on the vehicle torque your lower strut bolt to 66 foot-pounds.
Reinstall the wheel onto the hub. It helps if you send a lug bolt through and hold it with a 17 millimeter socket on the other side. Start the first bolt by hand to help keep the wheel in place. Torque the lug bolts to 90 foot-pounds in a cross pattern. The slots on the back of the lug cap are staggered. Be sure to align them before installing.
Reinstall the rubber cap and the rain tray if your vehicle has one. Reinstall the coolant reservoir into the slots on the fire wall. Reinstall the Phillip's head screw to secure it.
Thanks for tuning in. We hope this video helped you out. Next time you need parts for your car, please visit 1AAuto.com. Also check out our other helpful how-to and diagnosis videos.