Replaces


Frequently bought together
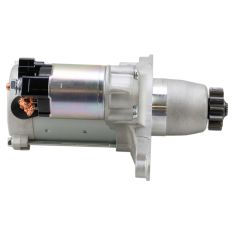
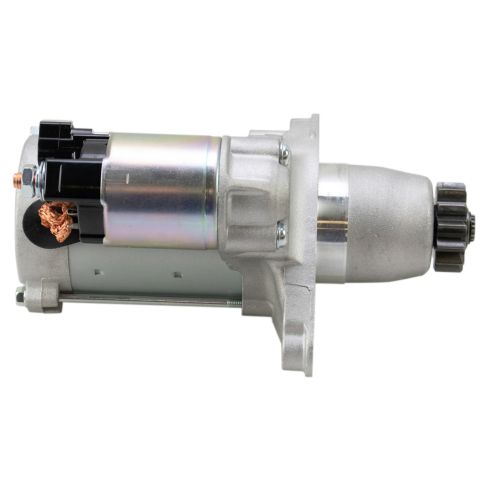
Part Details
About TRQ:
TRQ is a trusted brand dedicated to making every repair a success story by combining premium parts with easy installation. Each TRQ part is engineered by a team of automotive experts to meet or exceed OEM standards, delivering enhanced performance and maximum longevity. With rigorous in-house testing, the brand ensures superior fit and function across every product line. TRQ also provides customers with best-in-class, step-by-step installation videos—so you can complete repairs with confidence, whether you're a first-time DIYer or an industry professional.
Product Features
Returns: Parts with electrical components cannot be returned once installed.
Attention California Customers:
 WARNING: This product can expose you to chemicals including Lead and Lead Compounds, which are known to the State of California to cause cancer, and birth defects or other reproductive harm. For more information, go to www.P65Warnings.ca.gov.
Lifetime Warranty
This item is backed by our limited lifetime warranty. In the event that this item should fail due to manufacturing defects during intended use, we will replace the part free of charge. This warranty covers the cost of the part only.
Returns: Parts with electrical components cannot be returned once installed.
FREE Shipping is standard on orders shipped to the lower 48 States (Contiguous United States). Standard shipping charges apply to Hawaii and Alaska.
Shipping is not available to a P.O. Box, APO/FPO/DPO addresses, US Territories, or Canada for this item.
Expedited is available on checkout to the United States, excluding Alaska, Hawaii.
Final shipping costs are available at checkout.
Created on:
Tools used
Tools used
To remove this carpeted shield on the inside of the trunk lid, there are 13 push clips, all over here. I already removed these. I’m going to continue to remove these here, using the trim clip tool. Just kind of work them under there and pull them right out. I'm just going to put them in the trunk, so I don't lose them. Off with the last clip. This carpet is now loose. I'll slide it off. Slide the emergency handle through it. I'm going to just put it in the trunk, so it doesn't get damaged.
Disconnect the electrical connector at the trunk latch release. There is a control cable that goes to it, or control rod. When you pull this, actually, when you stick the key in the lock cylinder in the trunk, and turn it, that's what pops the trunk. So, we need to remove that. Then just pop the clip off here. Just pull it down, and pop it off. Actually, it fell right out. It sits in here in the grommet, just like that, and then locks. So, I popped it out, and it came right out.
I'm going to remove these. There's two 10 millimeter bolts up here. Get that one loose. Get this one loose. So, hold on to this piece while I remove it. Put the other bolt aside. Slide this out of the deck lid. Let's get this control rod, it has to come all the way out. The turn lock assembly is removed.
Here's the original trunk lock assembly from my vehicle. Here's a brand new one from 1AAuto.com. It is identical. It comes with this rod here, that goes to your lock assembly. It has the emergency handle on it. This is going to fit perfectly in the car. It'll work great for you.
To feed this rod back through the opening. It's going to go up and over here. Take our original bolts, slide them up. I can just see them go up through into the hole. Get this one threaded in. It goes to my ratchet, and get it tight. I'm going to stop. Reconnect the electrical connector.
Go back over here for the control rod. It's going to push into this yellow grommet, and flip it over, and lock it. Close it. I'm going to go pop it. It opened right up.
Reinstall the carpeted cover. Goes on the bottom of the ... the inside of the rear trunk lid. Push it up and over, like that. Just kind of hold it in place. It's pretty light. You can hold it with one hand. I'm going to get one of these push clips caught. Get another one caught, over here, and get one of the bottom ones caught. This middle one's good.
Thanks for watching. Visit us at 1AAuto.com for quality auto parts, fast and free shipping, and the best customer service in the industry.
Tools used
Hi. I'm Mike from 1AAuto. We've been selling auto parts for over 30 years!
Disconnect the negative battery terminal. This is a 10 millimeter nut.
Remove the intake air duct from the radiator support. These are 10 millimeter bolts. These removed, the duct should lift right out. Place that aside.
Before we can unbolt the starter from the transmission, we have to disconnect the electrical connector here, and the electrical, the main power cable here. I’m just going to put that back, push in on the lock. Sometimes you push it in first and then work it out. You might need to use two fingers. Put that plug aside.
Just take this nut off of the starter to remove the power cable. It's a 12 millimeter. Slide the cable right off. With the cables removed, I can sneak a 14 millimeter socket and extension in behind the starter. We'll reach this rear-most bolt. There's two bolts, this will be the rear one. Steady it with one hand and break it free with this one. I've got the rear one loose, so now I'm going to loosen this front one. It's loose enough that I'm just going to pull it out with my fingers. Take the socket and my extension, reach in here. I'll just turn it loose with my fingertips. Snake the bolt out here. With the bolts removed, the starter should pull from the transmission. Pull it right out of the engine bay.
Here's our old starter from our vehicle, and our brand new one from 1AAuto.com. It's no core on this. It is brand new. See they're identical in design. It has the electrical connector here and the same size stud and nut here for the main power cable. So this should fit and get your car started again.
Feed our new starter into the engine compartment back into the transmission. Go under the shift cable, push a little bit farther back. Get this front bolt caught. This one's pretty easy to thread in, so I'm just going to thread it by hand all the way down. The rear bolt's a little trickier to get to, so I'm going to put it in the end of the socket with the extension and then just sort of carefully feed it down in here. Get it over this without dropping it. Get it in place. Just use my fingers to thread it in.
Torque the starter bolts 28 foot-pounds. I’ve got the extension and socket already in there. Just sliding in the torque wrench.
To reinstall the main power cable, the nut is on here from the factory, so we have to take off this nut and washer. Place the cable back over so those little metal tabs kind of lock in place over the square part. Push this rubber cap out of the way. 12 millimeter socket, tighten this nut up. Don't over-tighten it, because you can break the stud off here. So just bring it down. Feel like it tight. Reinstall that rubber cap. That prevents that cable that gets direct battery power from grounding out. Reinstall the electrical connector.
Reinstall your intake tube, sliding it back on to the air box, lining up the holes on the radiator support. Reinstalling the bolts. these are just bolts holding plastic into the sheet metal of the radiator support, so once you feel them get tight, just stop.
Reconnect the negative terminal. Starter installation's complete.
Thanks for watching. Visit us at 1AAuto.com for quality auto parts, fast and free shipping, and the best customer service in the industry.
Tools used
Hi, I’m Mike from 1A Auto. We’ve been selling auto parts for over 30 years!
Open the hood. We have to pull the release inside the car. It's just inside right around your left knee on the driver's side. You need to release the secondary or safety release, just kind of feel around for it. This one is right here. Squeeze up. Use a 10-millimeter wrench to loosen this so you can remove the negative terminal. This one's a little loose just from being rusty. If you needed to, you could use an adjustable wrench because that would probably fit better and do the same thing, loosen it. Once it's loose, you should be able to wiggle it free and then you can just push it aside.
Disconnect the positive terminal. We're going to lift up on the protective cover. Use a 10-millimeter wrench to loosen it. You don't have to take that all the way off, just get it loose enough and then you should be able to wiggle it free. Put that over there. Just going to spray some rust penetrant on these because they're rusty. Same for this bolt over here—get it from underneath. Use our ratchet extension and 10-millimeter socket. Don't need to fully loosen this one. Work on this bolt here. This should unhook. Just kind of have to play with it a little bit to get it to unhook from where it hooks underneath, but you don't have to take the nut fully off. We'll put this aside.
Now you can lift the battery out of the engine compartment. This is probably pretty heavy so be prepared. And then just put this in a safe place.
With the battery out of the way, you can reach down and pick up the plastic tray. Just kind of sits in there.
The starter is located right here in the top of the transmission. Pull these positive cables out of the way. There's the electrical connection. That's the signal wire, and then the direct power is right here.
You can pull the rubber boot down. I'm going to unplug this. I'll put the rubber boot back up. Unplug this first and push down on the lock. Sometimes you need two fingers, and then with other fingers you can push down and pull it out. Just put that aside. Move the boot out of the way.
Just going to spray some rust penetrant on here. Looks a little rusty, corroded. There's a 12 millimeter bolt, needs a 12 millimeter box wrench to loosen it. Reach in, take it off with my fingers. Boot's kind of in the way, just push the boot out of the way. And we'll pull this off. Put that off to the side. There are two bolts holing the starter to the transmission. There's one here and one back here.
I'm going to spray some rust penetrant on them. The seal's pretty tight between them, but it might soak in there and help. Use 14 millimeter box wrench to break these bolts free. I've done the hard work of loosening them with the box wrench, so I'm just going to use a small ratchet with a 14 millimeter socket, spin them out quickly. Put that bolt aside. And there it is. Starter's loose. Pull it from the transmission. Kind of have to maneuver it out of here. Just going to push it backwards. And then, slide it up this way. Maneuver it right out of here. There is our starter.
Here’s our original starter from our vehicle. Here’s a brand new one from 1AAuto.com. Same style mounting. Turn them around here. Same style electrical connector. Same style positive terminal. This is a brand new starter. There's no need to send it back for a core. This'll fit great and work great in our vehicle.
Feed our starter in. Kind of the reverse of the way I took it out. Maneuver it down in here. Got to go beyond this. Get it into the transmission opening. It gets a little hung up on the harness that's right here. Just kind of wiggle it in. And I'm going to turn it and get it to line up. So right there should do the trick. Pull the harness out of the way.
Going to reinstall the bolts. Both bolts are the same. Might have to move this around, get it to line up. I'll thread it in by hand. The same with the back one. Find my way back here with it. Move this around, get it lined up and installed. Using our torque wrench, and a short extension, because it's difficult to get the torque wrench in there with the bolt. The torque on this is 27 foot-pounds. Going to reconnect the wires. Start with the positive one. So I'll take off the nut that came with the starter, and place it right over.
This replacement nut is 13 millimeter, as opposed to the original was 12. I'm going to get it threaded down there and started. The torque on this is seven foot-pounds. Very, very light. So I'm just going to do it by hand. Seven foot-pounds really just feels kind of like finger-tight. Don't want to break the stud off the starter, so as soon as you feel it get tight, just like that, and I'll go about a quarter turn more. Perfect. Put the rubber cap back on. Don't want it to ground out. Find the electrical plug, and it's stuffed under here. Plug that back in. It's locked into place. Starter is installed.
I'll reinstall the battery. I'm going to reinstall the tray. It's got these two little plastic bumps that are going to fit right here with the metal battery support. Kind of cleaned some of the dirt out of the tray. Should just kind of find those. There it is. It just sits in there.
Replace your battery back in the engine compartment. Not going to hook it up, going to install the bracket first. Back of our bracket has a hook and you want to go down here and hook it into the opening, just like that. Lay the bracket on top. It sits over here on the radiator support. Install this 10-millimeter bolt, nice and tight. That's still hooked in there. Now I can tighten this down. You don't have to over-tighten this but you want it tight. So once it gets tight, just stop. Just don't want the battery to bounce around or go anywhere.
Reconnect the positive terminal first. Tighten it up. Put the cap back on it. Reconnect the negative terminal. Tighten it down. That's tight, battery is replaced.
Thanks for watching. Visit us at 1AAuto.com for quality auto parts, fast and free shipping, and the best customer service in the industry.
Tools used
Hi. I'm Mike from 1A Auto. We've been selling auto parts for over 30 years.
Hey, everyone. Sue here from 1A Auto and today we have a 2013 Camry in the shop and I'm going to show you how to replace the starter. If you need this part or any other part for your car, click on the link below and head on over to 1aauto.com.
First thing we're going to do ,like always, is disconnect that negative battery cable. 10 millimeter wrench or socket, and we're just going to loosen that up and move that aside. Now, the location of the starter is right down here on top of the transmission where it meets the engine. It's kind of right underneath the air box area in the air dam. We're going to take this all apart and get right to that starter.
First thing we have to do is take all seven body clips in this plastic shroud cover all the way over, and how you do it on this Toyota is very simple. Push down. You hear that click and then the whole thing will pop right up.
To reinstall it, see how the pin goes out. I just like to grab 'em, push 'em up like that, and then you'll push it back in and push it flush. To take 'em out, push it down, lift it up, and push it down. Then you can lift it up. Go all the way over, all seven. Take that and get that out of the way.
I'm going to take the air box out and the air dam feeder. I'm going to leave the air box top attached to the bottom. Let's do it as easy as possible. First thing is take this hose right off and then 10 millimeter, take the clamp off at the throttle body. There's three, I think, bolts holding this whole housing down, and it's going to be a 10 millimeter socket: one here and one way down here.
All right, so we have to take the top off, so we did under the throttle body. Take that vacuum hose off. We're going to take the map sensor, disconnect that, push down that tab, it's kind of a stiff tab. I don't want to break it. With a little screwdriver, pop that right out of the way. Take the clips and the vacuum lines--we've got one over here on the engine side, two in the front, and one with a white line on it that goes to the left side. Now we can lift that cover up.
We're going to have to unplug the mass airflow sensor harness from the lid right there. I'm going to get a little pair of pliers and take that out of there. Okay, now we can lift that right up.
Now I'm going to lift the air filter out of the way. See what's holding this down. We're going to take this vacuum line off that, and I want to take the harness off of the air box. There you go. Now I think it's just going to be rubber bushings, so I'm going to grab this thing real firmly and pull up. And it worked. We have a solenoid up front here and the clip is down below, I can feel it. Slide that off.
Now, do I want to take this front air dam off? I am going to for visuals, so we can see better. With a 10 millimeter socket, I'm going to take these off. Take this up. That's perfect. You can just rest that aside. Now we can see the whole starter and the bolts that we need to get to.
I'm going to peel back the boot on the positive cable that goes to that starter, and if it's the factory starter, that's a 12 millimeter wrench or socket. Break that free. You make sure that that negative cable is undone because if this positive cable wire touches anything, if that battery is attached, you can short and blow a lot of modules. I always do that for safety. I put the boot back over it.
Now, on the solenoid wire, I'm going to push down on the tab and pull it out. Then there's two mounting screws that mount this starter to the actual engine block, there's one here and one there and it's a 14 millimeter socket. I like to break 'em both free before I back one of 'em all the way out. It's nice enough that you can just use your hands after you break 'em free. Get that top bolt and the bottom. Now I'm just going to grab that starter and wiggle it and there it is.
Here we have our brand new starter we just got from 1A Auto, and here we have the Toyota factory one we just took out of our 2013 Camry. Match 'em up. They're identical, same size, mounting holes, solenoids, same connector, that's nice. Ours comes with a new bolt and it is a 12 millimeter socket, same as the factory one. The actuator is the same size in diameter and has the same teeth, obviously. If you need this part or any other part for your car, click on the link below and head on over to 1aauto.com.
Here we have the old starter that we took out, and we're just going to give it a quick exam and make sure that everything inside the housing is working properly. When you take your old starter out, sometimes you're not going to be able to understand why it failed, because it's going to be inside the solenoid or inside the winding of the motor. You might not visually see it. A lot of times this ground wire gets corroded and breaks off, unfortunately that is part of the motor itself, so you need to replace the whole starter or the solenoid will go bad internally.
If you have a grinding noise, like something is metal to metal, you always want to check your gear teeth here and make sure there's none that are shiny, real shiny and scratched up. If they are, then you want to make sure that your flywheel is in good shape. Examine that flywheel before you put a new starter in, because no matter where you get that starter from, it's not going to last long. One because the flywheel is damaged and two, you're going to void any warranty. Just give it a quick visual, this was electronic died, that's why it's not working. It wasn't actually a sound or a metal grind.
Take our new starter, I'll just bring it down. Line it up with that starter hole in the tranny and just wiggle it until you can find it centered out. I'm going to hand start the two starter bolts first and make sure they're centered properly. I'm going to snug it down and then I'm going to get the torque specs torqued out to the manufactures' specs.
The specs for the starter: Two bolts for the mounting bolts is 27 foot pounds. It's kind of a hard place to get in the back here, you need a little extension. There we go.
Now we're going to install that solenoid wire. Always check conditions and make sure there's no burnt marks and that nothing's been melted. Looks great, so we're just going to click it in. Then we have the battery cable. Take this bolt off. It's nice because it has that floating washer in it, just like the factory, and it is a 12 millimeter. Factory size is perfect. You don't want to rank on it. That is copper stud, and it will pull right through that housing or stripper snap. Once it's firm, that's really all you need to do. Make sure your boot is back on and we're ready to reassemble the air box.
Now, these two kind of go together and that's kind of a tight fit in there. I'm going to just slide that in like that and bring that down. You've got this arm dam down here. You're going to make sure you center that. Put that in--you see it right there. My mounting bolts seem to line up, so does this.
Before I tighten anything, I want to get my vacuum lines back in place. Just going to start 'em by hand and then I'm going to get the air box bolts and going to start those by hand. I already snapped down that back bushing to stop this from moving around too much. I'm going to tighten this down, so I don't want it to move anymore. I'm going to hold it right into place, nice and snug there. Tighten that bolt and tighten this one. Tighten the top front. I'm going to go alongside here and put my hose in.
I have attachment back here for the mass airflow sensor harness. Put our air filter in. Grab the top of our air box. I like to line up the throttle body first before I do anything. Make sure my vacuum lines are out of the way. You got those two prongs on the back here, so you're going to tilt it at an angle and slide those in. Now it sits nice and flush. Lift up your clamps.
First thing I'm going to do so I don't forget is put my mass airflow sensor harness back on and connect that. The one with the ring on it goes to the left, and I have one more over here. Put my vent hose in and tighten that up. That's a 10 millimeter socket and you want to make sure a 100% that that's sitting down flush on that throttle body. You can also use a Phillips screwdriver. Toyota's nice enough to have that option. You want to make sure that's tight, no air leaks. You'll throw a code from the mass airflow sensor. Perfect. Nice and snug. All's we got to do is connect that negative battery, and we'll give it a shot. Be sure that's down tight. 10 millimeter wrench. Start her up.
Put our radiator front shroud cover back on. You get the three little fingers that are going to go right into that hole. Push it down flush. Don't push it down all the way.
Thanks for watching. Visit us at 1aauto.com for quality auto parts, fast and free shipping and the best customer service in the industry.

STA03075