Replaces


About TRQ:
TRQ is a trusted brand dedicated to making every repair a success story by combining premium parts with easy installation. Each TRQ part is engineered by a team of automotive experts to meet or exceed OEM standards, delivering enhanced performance and maximum longevity. With rigorous in-house testing, the brand ensures superior fit and function across every product line. TRQ also provides customers with best-in-class, step-by-step installation videos—so you can complete repairs with confidence, whether you're a first-time DIYer or an industry professional.
Attention California Customers:
 WARNING: This product can expose you to chemicals including Lead and Lead Compounds, which are known to the State of California to cause cancer, and birth defects or other reproductive harm. For more information, go to www.P65Warnings.ca.gov.
Lifetime Warranty
This item is backed by our limited lifetime warranty. In the event that this item should fail due to manufacturing defects during intended use, we will replace the part free of charge. This warranty covers the cost of the part only.
FREE Shipping is standard on Orders shipped to the lower 48 States (Contiguous United States). Standard shipping charges apply to Hawaii, Alaska and US Territories. Shipping is not available to Canada.
Expedited is available on checkout to the United States, excluding Alaska, Hawaii and US Territories as well as P.O. Boxes and APO/FPO/DPO addresses. Final shipping costs are available at checkout.

Created on:
Tools used
Hi, I’m Mike from 1A Auto. We’ve been selling auto parts for over 30 years!
Remove the plastic cover. Cam position sensor is located on the top of the valve cover, underneath the plastic cover. You can do it with the cowl panel installed. We just have it off for other things. It also makes it easier for you to see what you're doing. I'm going to spray the connector with some water displacement oil because it is pretty dirty. It'll help me get it off.
The lock is here on this side. Sometimes you have to push the connector in and then squeeze on the lock tab. Just got to work it back and forth. Try not to pull on the wires. There it is. Put that aside. Going to remove the 10 millimeter bolt holding it in. Use a 10 millimeter socket extension ratchet. Going to wipe up some oil I sprayed in there. Need to remove this. It does have an O ring sealing it, so I got to push it kind of back and forth this way. Break it free, and then kind of wiggle it out of the opening. There it is.
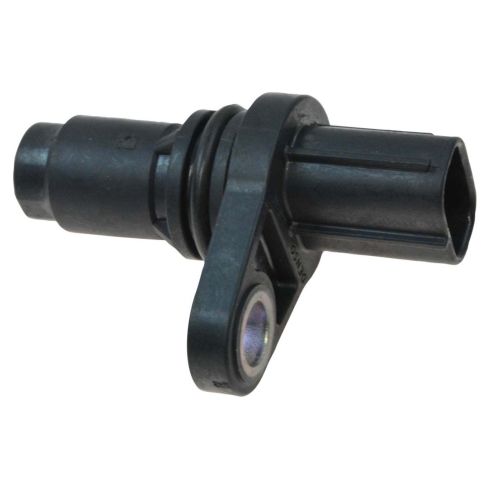
Here's our original camshaft position sensor we took out of our vehicle. And here's our brand new one from 1AAuto.com. Same exact style connector. Same design as the camshaft position sensor. This will fit great and work great for us.
Put the new one back in the same opening as the original one. O-ring might be a little tighter. Push it into place. Reinstall the bolt by hand. Use the steel bolt and aluminum valve cover. You don't want to cross thread it. It should fit in nice and easy. Just gently tighten it. Feel it get tight just stop. You don't want to crack the valve cover.
Reinstall the electrical connector. It's keyed only going on one way. It'll click when it locks in place. Put your plastic engine cover back on. These three rubber mounts just push on over these three ball studs. Apply up on the oil cap hole, and that's it.
Thanks for watching. Visit us at 1AAuto.com for quality auto parts, fast and free shipping, and the best customer service in the industry.
Tools used
Hey friends, it's Len here at 1AAuto. Today, I'm working on a 2007 Toyota FJ Cruiser, and I'm going to be replacing the cam position sensor. It's going to be a very easy job and I want to be the one that shows you how to do it. If you need this or any other part, you can always check us out at 1AAuto.com. Thanks.
Okay, so we've got the hood up. Now what we're going to do is we're going to remove this 10 millimeter nut and this 10 millimeter nut. Grab our cover, lift it straight up and pull away. There's our cover, we'll set this aside. We'll move ahead to the next step.
Okay, so now that we're under here, we're going to need to remove this air filter box. This whole unit right here is the air filter box. To get started, we're going to unclip these, pull the outer housing away. Now's a great time to check your air filter if you wanted to. You just pull it out, take a peek, it's brand new, slide it in.
We're going to release the mass airflow sensor right here. Just squeeze the tab, pull it out. There's a little clip right here, that should be in there, this one pops out nice and easy. This one right here, let's see. Not so much. I'm going to grab my tool real quick, just pop that right up. Now our mass air flow sensor wiring harness is out of the way, we'll just take a peek at it, make sure there's no funny colors. This looks great. We'll set it aside.
Okay, so we have two mounting bolts. You've got one here, one here. You also have a clamp, one right there, and then you have a hose that we're going to remove, right here. Okay? The majority of this is going to be done with a 10 millimeter, so if you have a ratchet or an electric gun, whatever you've got. It's a 10 millimeter.
We'll remove that bolt. Both bolts are the same. 10 millimeter again. We're just going to loosen that up. We'll set this stuff aside. Now grab this right here, you can usually squeeze them with your fingers, slide it down and out of the way. Grab your hose, slide it off of there and down and out of the way. Now we're just going to grab our air filter housing unit, give it a little wiggle. If this is loose enough, you should be able to slide it off, and we'll slide this right out of the way.
You don't want to try to pull too much because there is still another hose attached back there. If you pull it off, you need to make sure that you remember to put that hose back on. That's a vacuum hose. We'll just set it aside, we're not even going to touch that hose.
Okay, so we got our sensor right here. Okay? It's right up along the top near the valve cover. Got a 10 millimeter bolt there. The electric gun's not going to get in there, but I'm just going to use a ratchet. I'm going to break this free. Cool, so we know that's going to break free.
On the wiring itself, there should be a little push button. See if I can grab it. Okay, I cannot, that's fine. So what I'm going to do, I'm just going to fully take this out and then I'm going to get a better view of it, and probably an even better grip.
There's our bolt, we'll set this aside. Grab our sensor, give it a little wiggle. It should be wanting to come out. You might have to use a pocket screwdriver. Just try to pry a little bit. They have a little rubber O-ring on them, and a lot of times the O-ring likes to stay in there and that's kind of what holds it all together right here. So if it seems like it's being kind of hard to pry, well that's probably why. It's coming though.
You can do something like use a little bit of penetrant spray if you wanted to. Just wiggle it around, see if that helped us any. Oh yeah, so there we go. There's our cam sensor. Okay. There's a little push button that I was talking about. You squeeze that, it lifts up this tab end right here, and then you should be able to slide the sensor out.
If for some reason you can't squeeze it hard enough to do it, just stick your pocket screwdriver in there, lift that. Once it gets up, you should be able to pull this off. It's really sticking in there. It is what it is. Nothing's really easy, right? Try to get that to stay for a second. There we go. Cool, so there's our sensor. Let's move ahead to the next step.
Okay friends, a quick product comparison for you. Right here we have our original 2007 Toyota FJ Cruiser cam sensor, and right here we have our brand new quality 1A Auto part. These two parts are the exact same. They have the same shape, same mounting hole, and of course the same internals for plugging in your wiring harness. Okay? This has everything that you need. With that said, I don't see any reason why I wouldn't want to use this in this vehicle, so I'm going to do it.
If you need this or any other part, you can always check us out at 1AAuto.com. Thanks.
Okay, so now I'm just going to take a nice clean rag, or pretty clean rag, just going to try to clean up in and around that hole. There we are, nothing too crazy. I don't need to spend all day there.
I've got my new sensor. I used a little bit of silicone paste, that's just going to help it slide in nice and easy. Slide it right in, there it is. We'll take our bolt, the shorter of the three that we have. Going to line this up. There we are. I'm just going to snug it up. I don't want to break the plastic for the sensor, so all I'm going to do is tighten it until I feel it bottom out like that, and just give it a teeny bit more and that's it. Tight enough.
We've got our sensor, or sensor wiring of course. Sorry, the sensors are obviously in. Just take a peak, it looks like it's good to go. Just going to take it, connect it in there, give it a nice little tug. It's not going anywhere, it's locked in. We can move ahead to the next step.
Okay, so now we're just going to grab our box, being careful for that hose that's behind there. Like I said, if that comes disconnected, just reconnect it. Okay? If you don't, you're going to have a running issue.
I'm going to take this and I'm going to slide it right up on here. Just give it a nice little wiggle. Wiggle, wiggle. There we are. We've got our two bolts. One goes right up top obviously, just got to get it lined up. Be helpful if I could reach it. The other one, right here. All right, just go ahead and tighten up those two bolts. There it is. This one.
Okay, we're going to do our clamp. It's important to make sure that you don't have your clamp up like this, because if you do, the cover won't sit down on there. So I'll just bring it down, have it sitting so it's pretty much going to sit semi level. There we are.
You want to make sure that you can't move the clamp around. This doesn't move around at all. You don't want any air getting sucked in between here and here, because that would be unfiltered air and unmetered air, which would be very bad. You'll have a runnability issue.
Put this up on here. There it is. Grab our clamp, it's easy to squeeze. It goes right up on there. Looks good. Grab our mass airflow sensor wiring, connect this in. Listen for a click. Very nice. We've got this right here, there. This right here, there. Cool.
Grab this. This slides in from the rear first, and then the front. When you're sliding it in you just want to make sure you have these clips right here facing out. Getting it started is the hardest part, because if you don't have it sitting in there just right, then it's not going to sit in right. There we go. Give it a nice tug, just in case. I like to pull forward to back like this, in case these aren't clipped in like I think that they are, and I go like this, it'll probably go pop, and open up. Okay? That way there I know that's not closed. I know that it's definitely closed. We can move ahead to the next step.
We're going to take this, put it right up on here. Bring it down. We've got our two studs, just going to grab our two nuts. Snug these up. Tight, tight. All right, easy peasy.
Thanks for watching. Visit 1AAuto.com, your place for DIY auto repairs, for great parts, great service, and more content.
Tools used
Hey friends. It's Len here from 1A Auto. Today we're going to be working on our 2006 Toyota 4Runner and I want to show you how to remove and install a cam sensor. If you need this or any other part, check us out, 1AAuto.com. Thanks.
Okay friends, so now that we've got the hood up, going to take a look at this cover, this has to come off. You're going to notice a 10 millimeter right here and a 10 millimeter nut there. Can use a ratchet, you can use your electric device, whatever you've got, just remove the nut. Looks like that. Nothing too special. Do this one, same as the first. We'll set it aside. Grab your cover lift it straight up like this and then you're going to draw it towards you. You're going to notice you got a little hooky-do there and there and those just kind of sit right on this rubber and that rubber. We'll set this aside.
If you look right under here, you're going to be able to see right where your cam sensor is located. You've got your wiring harness that leads to it, and then of course you've got your mounting bolt right there. This is also a 10 millimeter. I'm going to use my ratchet and a 10 millimeter socket. We'll remove that mounting bolt and then we'll see if we can pull out the sensor and get it over to a working position where we can get the wiring harness off.
We're just going to take out this bolt that's got a, it's a nice and long bolt, obviously. Just takes a couple extra turns here to get it out apparently. Here we go. That's what our bolt looks like. We'll set this aside. Grab the sensor, try to wiggle it around, make sure it breaks free and then draw it up or away from the engine there. Pull that right out of there. Awesome. We have a clear view of what we're dealing with. On the backside you can see where the little clippy-do is. You're going to squeeze that. This is going to lift up and it should unlock for you. Give it a squeeze, if you notice the lock doesn't come up far enough, you could use something as simple as a pocket screwdriver. Just stick it in, try to give that a lift and then just separate it just like that.
Awesome. There's our sensor. Let's do a quick product comparison and we can move along. Okay, so we have our brand new cam sensor here. It's time for the install. Okay, so you'll notice right along your sensor you have this little rubber O-ring. It's a good idea to put something on there that's going to act as a lubricant. You can use some silicone paste or a tiny amount of grease, whatever you might happen to have. If you had to, you could use a little bit of oil, but you need some sort of lubricant because when it presses into the engine, this needs to slide. Let's bring it right over. See if we can't slide it in.
Awesome. I'm going to take my clip, take a peek, make sure you don't see any funny colors in there. If you see any blues, oranges, reds, pretty much anything besides metal, you know you got a problem. This one looks great. We're going to just connect it right in. Listen for a click. Perfect. We have our mounting bolt right under here. See if we can get it started. All right, so now we're just going to snug that right up. I just switched to a ratchet wrench just because it's a little bit finer tooth for me and I can get it in here a little easier than that ratchet. Still sticking with my 10 millimeter. It's just a wrench instead of a ratchet with a socket.
Okay. Sounds like it just bottomed out right there. I'm just going to give it a teeny little tweak and that's it. I'm just going to grab that wiring harness, give it a tug. It does not want to come off. I would say that's definitely locked in. We can move along. We've got our little hooky-dos on the cover here and then the rubber's right there as I showed you before. I just go just like this, so I can see. Slide them on there. We're going to bring this down nice and easy. We're going to line up the studs with the holes. Perfect. We've got our two nuts, they're both the same. We'll snug these up, give it a little tug. That feels good. Make sure you have all your tools and parts out from underneath the hood and down the road you go.
Thanks for watching. Visit 1AAuto.com for quality auto parts shipped to your door, the place for DIY auto repair. And if you enjoyed this video, please click the subscribe button.
Tools used
What's up guys? I'm Andy from 1A Auto. In this video, I'm going to show you how to replace the exhaust camshaft position sensor on this 2010 Toyota Rav4. If you need this part or other parts for your vehicle, click the link in the description and head over to 1AAuto.com.
I just want to pull this cover off. Just grab underneath the cover, slide up, and that up there. These retainers that hold it in, just push on little grommets right on those locations. The exhaust camshaft position sensor is located right here. We're just going to disconnect the connector. Push down right here on the lock. Disconnect the connector. Now if there's any dirt or anything you want to wipe it away or take a blowgun, blow off any dust. You don't want any of the dirt getting into the engine.
And going to take a 10 millimeter socket and electric ratchet or you can use a regular ratchet, take this bolt out and just grab the sensor. Just wiggle it back and forth a little bit. There is an O-Ring that seals it. Sometimes it'll stick a little bit, so the O-Ring's pretty stuck in there. What I'm going to do is just take a little water displacement oil or some kind of a lubricant, just spray that in there. Just let it sit for a second. Lubricate that and then I should be able to pull it out. All right, let's grab the sensor, wiggle it a little bit, twist it Just going to put a little bit of tension right here, just with a pic. There we go. And it came up. This is the O-Ring that was sticking. Here's the old sensor.
Just before we install the new sensor, just take a rag and wipe out some of that area. There's probably a little bit of corrosion on there. You take a little bit of emery cloth or some light sandpaper and just sand it it if you had to. I don't plan on doing that with this one. That's good, especially because you don't want any of that stuff to get down in there, so. Here's the old part. Here's the new cam sensor from 1AAuto.com. You can use this cam sensor both in the exhaust cam or the intake cam. The sensor itself is the same as the same O-Ring. The connector's the same, and the mounting position is the same. Get yours at 1AAuto.com and you'll be ready to rock and roll.
All right, take the new sensor. You can take a little bit of oil or transmission fluid or even some other kind of grease and put that on there. It'll help the O-Ring go in a little easier without rolling. And slide the sensor in position. Just wiggle it a little bit, back and forth. Make sure it's flush. That looks good. Take the bolt, get the bolt started. And I'll take my 10 millimeter socket and electric ratchet, snug this down. That's good. Take the connector, line it up, lock it in place. Take this cover and we want to align these little tabs up with these little pins right there. There's three of them. Just push it down and then you're good to go.
Thanks for watching. Visit 1AAuto.com for quality auto parts shipped to your door, the place for DIY auto repair. And if you enjoyed this video, please click the subscribe button.
Tools used
What's up guys? I'm Andy from 1A Auto. In this video I'm going to show you how to replace the intake camshaft position sensor on this 2010 Toyota RAV4. If you need this part or other parts for your vehicle, click the link in the description and head over to 1aauto.com.
Just want to pull this cover off. Just grab underneath the cover, slide up. And up there and there is these retainers that hold it in and just push on little grommets right on those locations. This is where the intake camshaft position sensor is located in the back here. Disconnect the connector, just push down on the tab, slide the connector off, push down on the tab that releases the lock. Then we want to take this bolt out. I'm just going to use a 10 millimeter socket. I'm going to use an electric ratchet. You can use a regular ratchet. If you don't have an electric one. Take that bolt out and if there's any dust in this area, you want to wipe it away or use a little compressed air. You don't want that getting into the engine and then generally these are pretty difficult to get out because of the O-ring. Sometimes they pull right down. Let's see if we can just get this out.
All right, I'm struggling a little bit. So what I'm going to do is just take a little water displacement oil with some kind of a lubricant. Let it sit for a second. Then it will be easier to pull the O-ring up. All right, now that that's set for a little bit. Just try to grab this, pull it out and then I'll just try to take a pick, try to get underneath here. Just be careful. Just rock it back and forth a little bit. You don't want to pry too hard because then you'll just crack it. It is plastic. But there we go. Cut it out. And what happens is you get a little dirt or corrosion on the top of that O-ring and that causes it to come out kind of a little bit difficult.
Here's the old part. Here's the new cam sensor from 1aauto.com. You can use this cam sensor both in the exhaust cam or the intake cam. The sensor itself is the same, has the same O-ring, the connector's the same, and the mounting position is the same. Get yours at 1aauto.com and you'll be ready to rock and roll.
Just take a rag, clean out this a little bit. Try not to get any debris falling down into the engine. Take the new sensor. I'm just going to take a little bit a ATF or you can take some engine oil or some other type of grease. It's just going to help the seal. Prevent the seal from rolling when you're installing this. Make sure that goes down and that's flush. Take the screw or the bolt, get the bolt started and take a 10 millimeter socket and ratchet and just snug this up. That's good. Take the connector, line it up, lock it in place. Take this cover and we want to line these little tabs up with these little pins right there. There's three of them. Just push it down and then you're good to go.
Thanks for watching. Visit 1aauto.com for quality auto parts shipped to your door, the place for DIY auto repair. And if you enjoyed this video, please click the subscribe button.

ESA94799
