Replaces


Frequently bought together
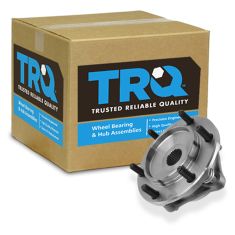
Part Details
Specifications
Attention California Customers:
 WARNING: This product can expose you to chemicals including Lead and Lead Compounds, which are known to the State of California to cause cancer, and birth defects or other reproductive harm. For more information, go to www.P65Warnings.ca.gov.
Lifetime Warranty
This item is backed by our limited lifetime warranty. In the event that this item should fail due to manufacturing defects during intended use, we will replace the part free of charge. This warranty covers the cost of the part only.
FREE Shipping is standard on orders shipped to the lower 48 States (Contiguous United States). Standard shipping charges apply to Hawaii and Alaska.
Shipping is not available to a P.O. Box, APO/FPO/DPO addresses, US Territories, or Canada for this item.
Expedited is available on checkout to the United States, excluding Alaska, Hawaii.
Final shipping costs are available at checkout.


Created on:
Tools used
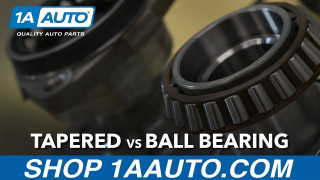
Hi everyone. Sue here at 1A Auto, and today we're gonna talk bearings. The difference between a roller bearing and a ball bearing type.
While both a roller bearing and tapered bearings work in the same manner. Tapered bearings use tapered rollers shaped like flat topped cones and two races angled from the outside to the inside of the bearing. The rollers have a large contact area which is what makes them better than roller bearings at handling forces exerted on the bearing during cornering in trucks and large cars.
For applications that require it, the TRQ brand offers tapered roller bearing style wheel bearings that match OEM specifications where other brands do not.
Roller ball bearings work well for small cars but replacing a tapered bearing with a roller ball bearing will result in increasing wear and faster failure.
So now that you know all parts aren't created equal, you can purchase your TRQ bearing at 1aauto.com.
Tools used
Hey, friends, it's Len here at 1A Auto. Today, I'm working on a 2007 Toyota FJ Cruiser. I'm going to show you how to replace the left front wheel bearing. It's going to be a very easy job and I want to be the guy that shows you how to do it. If you need this or any other part, you can always check us out at 1AAuto.com. Thanks.
Okay, so what we're going to do first is we're going to take off these six lug nuts, 21 millimeter. You can use a ratchet and a socket if you want or your air gun. There we are. Get the wheel broken free. Drop this down, wheel out of the way. Okay, so now we're just going to try to push back the caliper a little bit. I'm just going to go like this. Just try to push back these pistons best I can. This is just to release the pads from the rotor. Cool. Okay. The rotor can move around freely. If we need to, we can push them back a little further in a minute. Now we're going to remove the caliper. One of the first things we need to do is take off this clip right here.
Generally, cutters work pretty good for this to grab onto it. I'm going to grab some in a second here. There we are. Now this line can move around. It's very important so when you take your caliper off, it can move around a little bit. I'm going to use a 12 millimeter up here on this bolt, that's going to remove this bracket so it can move around. Get the socket off of there. There we are. Okay. The bracket can move around freely. I'm going to take these off right here. If it's easier and you wanted to, you could take off the outer tie rod end. I'm probably going to do that. That way there I can turn this and I can get to those bolts easier. Let's grab some cutters. There we are. Just wiggle this around.
If you have a new cotter pin, you don't have to worry about saving this one, but if you don't, you're going to have to try to save it. We do have new ones, so I'm not super worried about it. This one doesn't look like it's coming out, so I'm just going to cut that off of there. Tie rod and nut is a 19 millimeter. There we are. Took that off of there. 19 millimeter. I'm just going to give the knuckle a couple bonks. I want to be careful not to damage the threads on the tie rod or hit the boot. Super important, you don't break your boot open. If you do, you'll have to replace the outer tire rod end.
All right. Around this way. There we are. Now, when we go to install this, we're going to have to make sure that we get that cotter pin out of there. Okay. Because we want to put a new one in there. We'll set this aside. Now we can pivot this and we can do what we need to do. We're going to use a 17 millimeter to remove the two bolts for the caliper to the knuckle. Same thing to the other one. At this point, the caliper may come down. You want to make sure you hold onto it so it doesn't fall down and hang too far.
Bolt number two, it's the same as the first. We'll set it aside with the other one. Now, I want to hang the caliper, not by its flex hose, obviously, So, just grab whenever you've got, a coat hanger or something that everybody would have. There you really. We can remove our front rotor. Okay, so now we're going to take off this cover right here, it's just the tin cover, so you don't want to completely destroy it. Along the hub and the cap itself, there's a little lip. There's kind of a little a gap. Hopefully, you can try to get a pry bar or screwdriver or whatever you've got in there. You just kind of want to get in between, break it free. If this bends a little bit, that's okay because you can just bend it back if you have a pliers or anything like that. Like I said, you just don't want to damage it too bad because it needs to create a good seal. Okay. I'm going to see if I can get someone else in there. It looks like we're pretty close. Just get this here. There's our cover. It's not too damaged.
I can try to straighten that out a little bit. When I go to re-install this, I'm just going to use a little bit of RTV or gasket maker It's just going to help keep moisture out of here and protect this nut area. I'll set the cap aside.
We're going to remove this cotter pin. I'm going to use my cutters. Once again, if you have a new cotter pin, you can go ahead and cut it. If you don't, you need to try to save it because you do need to have the cotter pin in there. I have access to new cotter pins, so I'm going to cut this. Just watch your eyes. It's a little locking thing. Okay. It just slides over the nut there, and then you line up the slots with the hole and put your cotter pin through. It makes it so this nut can't loosen up when you're driving down the road. Not that it should, you're going to have a torque down anyway. It's just precautionary. We'll set this aside because we're going to reuse it.
Now we're going to take off this nut, so I'm going to grab the socket we need and we'll move along. We're going to take off this nut right here, 36 millimeter. It's easiest with an air gun. If you don't have access to an air gun, what you're going to want to do is you're going to grab a bar, you're going to bring the vehicle closer to the ground, and set this up against your lug studs just like this pretty much, so when you go to loosen up this nut, your hub won't be able to turn. Okay? And you can use your 36 with a long ratchet. Break it free. It'll come loose, With an air gun, you don't need to worry about that. Just hold this. Easy peasy. Okay.
Now you want to try to push your axle in. This one feels like it moves a little bit, so we know we're in good shape on that. I'm going to go with a little bit of penetrant here. Let it do its job. It's going to hang out in there. Oh, yeah. So, that's moving freely. Now when we go to remove the bearing, the bearing will come off and we don't have to worry about being stuck on the axle.
Now we're going to move ahead. We're going to take out these bolts right here, these holding the bearing. So I'm going to grab my wrench because obviously I can't do anything else. I'm grab a wrench. I'm going to wrench these out.
Okay, so to remove these bolts, you're going to use a 17 millimeter wrench. Just put it in behind the hub, just like this. Set this all the way at the end so it can't turn on you. Now you can do a couple of things here. You could do something like a rubber mallet, bonk, bonk, give it a couple bonks. That's the way I'm going to do it. Other people would say you can use a pipe if you can slide it over there. There's multiple ways you can do it. This would be the safest way. Wear your safety glasses, of course, just in case something goes flying. A lot of times the wrench likes to come flying off, and I'm just give a couple of loving bonks here. We're just going to go like this. See if we can get it to break free. Okay, that one's free. We're going to do the same to all four, and then we'll go ahead and start to continue to remove all of them. Just got to get that on over the rust.
So now we're just going to use the open end of our wrench. You definitely don't want to try to use a ratchet wrench here because once this comes out as it can, you're probably not going to be able to get your wrench out of there and you're going to be crying. Once it's loosened up, you can just grab it by hand. So that one's all the way out. It's not actually physically going to come out of the bearing. Your new bearings going to come with those, so you're just going to get it to that point. Leave it there, move along. Do all four of them the same way. Then you can move on to the next step.
So we've got all four bolts loose that hold the bearing to the knuckle as loose as they're going to get. You're going to take your hammer and you're going to give this a couple bonks, and you're going to try to break it free. You'll see right along the bearing in the backing plate, you'll start to see a little bit of a gap there. That means it's starting to separate and that's a good thing. Okay, so safety, glasses, hand protection.
I'm going to grab a bigger hammer real quick and easier. So here we go. I got my little hammer. We're starting to see it separate right along here. Now's a great time to throw a little penetrant in there. It's going to make its way right down in, do its thing. Cool. A few more bonks here. Okay. Lug stud. Anybody want one of these? We'll recycle that. Okay. It's still coming off. It's taking its time. If you want to, you can go ahead and put the tie rod in, back in here so it doesn't flop around on you. I mean, it's still going to move around a little bit, but it won't be nearly as bad as what it was. So we'll just keep on keeping on. There we go. Now it's really starting to come off. Try to help it along here. Okay.
What's happening is the bearing itself has a little edge and that's kind of pressed into the knuckle. When you tighten these up, it pulls it into the knuckle and it corrodes all in there, so it's just doing it's been in there for a while. Okay. It's just trying to be a pain. It's all right. We're pretty much at the end here. It almost turned itself in a little bit somehow. Here we are. It's our bearing.
Okay, friends, a quick product comparison for you. Over here, we have our original left front wheel bearing out of our 2007 Toyota FJ Cruiser. We just removed it. Over here, we have our brand-new quality 1A Auto part. As you can tell, they're shaped exactly the same. You've got the hat height, same exact height. Super important to make sure that you've got the same depth. If you don't and this one is sticking up a little further than the other one or vice versa, it's going to change the offset of your wheel, which will because alignment issues, steerability issues. We've got six lugs. Super important, make sure you're dealing with the same lug pattern. All right.
We've got the area where our axle comes through. When we removed the old bearing, we remember those bolts didn't want to come out. Well, the new bearing came with them. They even came with a little bit of thread locker on there for you. It comes with a new seal, of course, with all that said, I don't see any reason why this wouldn't be a quality part to install into this vehicle, so I'm going to go ahead and do it. If you need this or any other part, you can always check us out at 1AAuto.com. Thanks.
Okay. I'm going to use a little parts cleaner directly on rag. Make sure I'm wearing safety glasses here in case anything flies up, hits me in the face. I'm just going to clean out in here the best I can. A lot of times you'll get grease or gunk or who knows what. This little nub, right here, is your abs sensor. It comes through from here, goes through your knuckle. It's wired in. It goes up to your ABS unit, or I guess it actually goes up to your ECM and just tells the computer how fast you're going on this wheel. So, we get that clean. It looks pretty good. I'm going to grab a little sanding disc and I'm just going to clean up along here. Okay, so to clean this up, I like to use something like this. It's a little cleaner tool with a standing disc. You can buy this at 1AAuto.com. It's a really nice tool. All you're going to do is you're going to skim along this, try to make it look nice, fresh metal again so you don't have any big chunks of a rust flaking up.
I'm just feathering the trigger right now. It can go much faster. Just feel along, I don't feel anything flaking up anymore. I'm just going to grab my cleaning rag again. Let's wipe this out. I guess I could've probably cleaned it out after I did that, but it's not too hard to just do it again. No big deal. There we are. Easy peasy. I like to use a little bit of copper spray. I'm just going to put a little bit and I'm going to run it with my gloved finger along in here, and that's just going to help make it, so if someday I have to take this bearing out again for some reason, it's going to want to come out fairly easily.
There we are. We have our backing plate. If you were going to replace this now, it'd be the time to do it. For the purpose of this video, I'm not going to worry about it. I am just going to make sure that there isn't any large flakes along where the knuckle or the bearing are going to ride. If there is, I can just skim it a little bit. Maybe I will. I've got some pretty big flakes, so it wouldn't make sense to clean this up nice and pretty and then have this ruin it for me. Use my same tool.
You'll notice I cleaned it up good. We've still got our little nubs there on the backing plate. That's super important to make sure you don't grind those down. I mean, it's not really going to be integral to the safety of the vehicle or anything, but it just kind of tells you where to line it up with the knuckle. Okay. It makes it so you can't go ahead and do something like this, or like this, or like that because it really only goes one way. Okay. You got your nub, your nub, nub, nub hole, just like that. The reason why this is open like this is because, well that's where your caliper goes, right? It's easy enough to figure out. So, we've got this, I'm going to grab a little bit more copper spray, just going to go right along here, right on the splines of the axle.
Grab my bearing. The backside of the bearing has a magnet. So you want to make sure that you don't set that on anything that's magnetized because it'll mess up the reading for your ABS sensor. So now I'm just going to get this on here. I'll line it up with the backend plate. Everything should mesh together fairly easily. There we are. I'm going to try to start in my bolts here. I'm not going to tighten any of them up until I make sure all of them are started into the knuckle. I've got them all started in, we're going to get them all bottomed out now. I'm going to go crisscross here. I'm going to use the box end of the wrench. Once I get it so it feels like it's snugged up, just give it a couple of bonks, safety glasses again still. I want to make sure it's nice and tight. Okay. You can't skimp on it. This one on the backend plate is blocking me. Turn the wrench around. There we go. Okay. Tight, tight, tight, tight. All four are tight.
I'm just going to go ahead and put on the axle nut now. So I'm going to take my bar, I'm just going to go straight across the studs just like this. That's going to make it so the hub can't turn while I torque this down. I want to get my torque wrench and we're going to torque this down to 173 foot pounds with my 36 millimeter socket. So here we go, 173 foot pounds. There we are. I'm just going to one more time. Torqued.
So now it's time to put on our new lock. This just slides over the nut. You line up the slot with the hole, put your new cotter pin through. Then, you could choose which way you want to pin it. Some people like to make one of these ears go one way, one go the other. It really depends on what you want to do. It's your prerogative. I'll leave it up to you. Some people will bring it up around the front. Basically, as long as you bend them over and the cotter pin can't come out on its own, and then the axle nut can't unlock on its own, you're doing all right. Okay. That's never going to come off on its own. We're all set.
Now we'll grab our cap. Okay, so I'm just going to use a little bit of a gasket maker here. Just go right along the edge. There we are. We're going to put this right into the hub, just like that. I'm going to grab my rubber mallet, give it a couple of bonks. There we are. Let's make sure it's in. Okay. No moisture is going to get in there. Now, if you want to clean it up, go ahead and cleaned it up. Just go around it, do the best you can. It doesn't have to be anything too pretty. Well, it's your vehicle, maybe you do want it to look pretty. It's going to be hidden though. FYI. Get that out of there. Cool. I'd say that looks decent. It's getting worse the more you touch it, so I'm just going to stop.
We're just going to plug in our ABS wire. Listen for it. Clip. Give it a nice little tug. It feels good. It goes right in these little plastic brackets here. I'm going to push that down in one second here. I'll just get this on there. Okay. I'll just clip these in. ABS wire can't go anywhere. It's not going to get caught on the axle anywhere. It should be good to go. Now we'll put on a little bit of copper Never Seize. Perfect.
We'll grab our rotor and we can move along. All right, we've got our rotor. Slide it right on here. I'm just going to grab a lug nut. I'm trying to put this on as far as I can. This is going to help me make sure that the rotor can't move around on the hub. The more it moves around, the more chances you have of rust flakes falling in between the rotor and the hub, which will because a brake pulsation down the line. We'll just kind of give it a little spin like this. I don't hear any brake grinding. The backing plate isn't hitting up against there. It's very common for it to happen. Maybe you are moving something around, you tweak the backing plate a little bit. This one sounds good. Carefully put it back over.
Grab your mounting bolts. If you want to use a little thread locker on these, you can. It's your prerogative. For the purpose of this video, I'm not going to worry about it. We're just going to turn these all the way in and then we'll torque them down. So now we're going to torque down these two bolts to 91 foot pounds using a 17 millimeter. Okay, I'm going to check them again real quick. Can set our bracket back up. Got the hole for the bolt and then the hole for the ear on the bracket. I'm just going to go like this. You're turn it so there's less pressure. I'm just going to come up here. A bolt like this, you definitely don't need to use thread locker on. It might actually be better to use a little bit of Never Seize if you have access to some, but I'm not going to worry about it for the purpose of this video. I'm going to use my 12 millimeter, tighten this up. Okay.
I'm going to take our line, try to bring it down so we can see the groove. We're going to use this clip. This is going to go through with the a little flippy ear facing our thumb. I'll just try to bring it in. Sometimes, getting these in, it's pretty difficult. I'm just going to loosen this up again real quick a little bit. Maybe that'll let us get some more movement out of this. It wants to set up where we need it, as soon as I let go, it goes back. Okay, now I'm just going to bonk that in with just what I have in my hand. A small hammer would work for this. Okay. Snug this back up. Tight, tight, tight. All that's tight. Okay. We've got this right here, when we took it apart we had to break the cotter pin, so I'm just going to need to drill that out real quick, so I'll do that. Okay, so we got the hole through that. Easy peasy. Now, we'll just clean it off, and we can tighten it down, and put a brand-new cotter pin in there.
So now we're just going to take the tie rod nut. We're going to bottom it out, and then we'll go ahead and torque it down using my 19 millimeter We'll go with the assumption that it doesn't want to tighten down. It's just spinning inside the knuckle there. Something you can do, if you have access to a long pry bar, just apply upward pressure. Be careful, of course, for your axle, wherever you need to go that you're not pressing on your axle. I'm just going to keep moving around until I find a nice safe spot. That'll be all right, I guess. I'm just going to apply upward pressure. There we are.
Now we're going to go ahead and torque this down, and then we're going to have to bring it continually clockwise until we get to the closest slot that lines us up with our locking point. Okay. We're going to torque this down to 67 foot pounds. Okay. That's torqued. Now it's important to pay attention to, like I said before, where the holes are. There's a hole right here, but it kind of lines up with the castle nut, the castle part of the castle nut, so we need to bring it a little further until it lines up. I'm just going to use my ratchet. I'm going to go as far as I feel like I need to here, a little bit more. There we are. Slide that right through.
It's your prerogative how you want to set this. Some people go side to side, one ear to one side, one ear to the other side. Some people go over the top. As long as it's bent and it can't come out on its own, you're doing all right. So you do you booboo. Get that on there. That cotter pin can go nowhere. There's no way that this nut is going to be able to loosen up on its own and the tire rod won't be able to come off causing the wheel to go out of control. So, we're tight, tight, everything's tight coming around here. Perfect.
Clear to move onto the next step. Okay. We've got our caliper on there. Now all you're going to do is you're going to get up inside the vehicle, actually you'll want to make sure that your brake fluid is topped off, of course, I mean that's just generally speaking. And then get inside the vehicle and then just pump up the brake until the brake pedals nice and firm. And then you should be clear to go for a road test.
So when you have all this apart and you have your bearing out of there, a lot of times you're going to want to replace the seal that goes on the back side of the hub up against the bearing. It just kind of protects the inner area of the bearing from getting moisture and debris in there. Some people do, some people don't. It's a good habit to do it. If you have access to the part, you should go ahead and do it.
Okay, so now we're going to get the wheel up on here. I've got a couple lug nuts in my hand. I'm going to take the wheel, put it up against my leg, and I'm going to lift with my leg/ab muscles just like that. I'm going to try not to use my back. I don't want to hurt my back. Go like this, lift this up. There we are.
I'm holding the wheel. Get one lug nut started on there. Number two started on there. Now I can release the wheel and I can grab the rest of my lug nuts. We have all of our lug nuts on. All right. We still have to snug them up. To snug them up, what we want to do is going to snowflake pattern on this. Generally speaking, you can go crisscross, but this is more like snowflake, so you go boom, boom, boom, boom, boom, boom. Okay. Never go around in a circle. You go ahead and go around and start circle, you tighten it up along this way, it pulls it in, right? You get over to this side, you think you have it tight, you might even torque it down, and it's still cocked off to the side a little bit. You go guy and hit a bump. Boom.
Next thing you know your wheels ready to fall off, okay?. So just go ahead and go crisscross, star pattern, whatever you want to call it. I'm just going to bottom it out, and then we're going to torque them down after. We're going to go ahead and torque down the wheel now to 85 foot pounds with our 21 millimeter socket. We're going to continue in our snowflake pattern or crisscross, whenever you want to call it. Start here, go to the opposite side of the wheel. There we are. We know they're all torqued. If you want to hit him again, hit him again. A small price to pay for a little bit of safety. There we are. Easy peasy.
Thanks for watching. Visit 1AAuto.com for quality auto parts shipped to your door, the place for DIY auto repair. And if you enjoyed this video, please click the subscribe button.
Tools used
Hey friends. It's Len here from 1A Auto. Today, we're going to be working on our 2006 Toyota 4Runner, and I want to show you how to remove and install a front hub bearing assembly. If you need this or any other part, check us out, 1aauto.com. Thanks.
Okay, friends. It's time to remove our wheel. To do that, you're going to remove all of your lug nuts. Going to use a 21 millimeter socket. If you're going to be using a ratchet, it might be easier to do this while the wheel's still on the ground so it can't spin while you try to loosen up your lug nuts. I'm using an air gun, so I've got my eye protection, my hand protection. Here we go.
This one, I'm going to leave on a few threads. Now I have a spare hand. Try to wiggle this around. A lot of times on Toyotas, they don't want to break free right away. That's not really that big of a deal. You could use something as simple as a rubber mallet, or if you have a pry bar. Either way, what you want to do is make sure you have a lug nut on, at least a couple threads, but it's still nice and loose.
Come right under here. I'm going to bonk right on the edge of the rim. If you're using a real hammer, that's not a rubber mallet, definitely don't hit your rim. You'll mar it up, cause issues. You could try bonking on the tire. You just have to be careful, because when you bonk, it's going to want to come back. Rubber mallet right on the rim.
There we are. That lug nut did its job, made it so the wheel didn't come falling off and hurt anybody. That's super important. Safety's number one. We'll take our wheel off. We'll roll it out of the way.
All right. We're going to take out this clip right here. Just a little forky looking clip, does this. It goes right over the line. Can use a screwdriver, a small pry bar, some cutters if that's easier for you to grab with or even pliers. Once you get it, so it wants to break free, should be able to wiggle it right out of there. That's what it looks like. It's got a little ear here, that ear faces towards you, or away from the vehicle.
Okay. Now it's time to take out these caliper slider pins here. Sometimes there'll be frozen in there, if your caliper's old, and that's pretty common. Basically, what you need to do is grab like this, your small pocket screwdriver, you're going to take off this clip right here. Do the same thing to the other one, pull off that clip. It's the same as the first. You don't have to worry about mixing them up. Awesome.
Now, what you would need to do, just take your small hammer, give these a couple bonks. These ones come out nice and easy because it's a brand new caliper, but if it wasn't, and they didn't come out easy, you just use your hammer, bonk, bonk, bonk, until it's level. Take your punch, drive these all the way through as far as you can, and then come from this side and pull your pin all the way out. You'd want to inspect your pins, make sure that they're not rotted or rusted or anything like that. If they are, you'd want to replace them, so they look something like this, nice and smooth. Because your pad needs to be able to slide around on them nice and easily.
We'll set those aside. We've got a little clip up here. This comes out very easily. Just got a little ear right there, and it slides into the hole on the pad. Then same thing over here. At this point, if this wasn't a brand new caliper, your pistons are going to be holding your pads probably up against your rotor. We'll go with the assumption that they are. You would take your small pry bar, just come right between the rotor and the pad, and just try to push like this. That's going to slowly push in this piston. Same right here, over here and over there. Once you have it so your pistons are pushed back, and your pads are plenty distance away from your rotor, you can grab your pad, slide it right out of there.
We'll set that aside for recycling. This one. Now you're going to want to make sure you have maybe something like this, or even a small bungee cord, whatever you need, because we're going to be taking out the two mounting bolts that hold this caliper to the knuckle, and we're going to have to hang this somewhere. Just get it ready. Wherever you think you can probably put it. We're going to take out those two bolts, and we can continue.
Now, I'm going to use a 17 millimeter socket. This one's just a swivel, and it's on my impact wrench. That's just so when I come in, I can get the right angle. You can use a 17 millimeter socket and a long ratchet if that's easier for you. Of course, if you're using your air gun, you want to make sure you're wearing safety glasses at all times.
Got both of our bolts. Set these aside. Just grab this, bring it down here. Should be able to move around fairly decently. Just going to put that there. There's no pressure on this flex hose. You definitely don't want to put a tug on your flex hose. When you're trying to take the rotor off, you'd want to have a lug nut on there, at least a few good threads, and then when you're taking your hammer, and you're going bonk, bonk, bonk to try and get this to break free, if the rotor did decide to pop off, it can't come down and potentially hurt you anywhere. This rotor's already broken free. Here's our rotor.
Okay friends. We've got a little punch. We've got our hammer, you've got your cover. All we're going to do is just make a little divot in the cover, just like that, and now I'm going to try to drive the cover off. All right. As you can tell, I did not make a hole inside the cover there, the tin cover. If I did make a hole, I would just have to seal it up. All right. The reason why I had to make that, is just so I had something to grab onto, so I can knock the cover out.
Now, we have a clear view of where our axle comes through the wheel bearing, and then all the rest of the stuff we're going to have to take off to get that axle out. Now, I'm just going to use pair of cutters. You can grab these ears. You can either bend them up and cut them off. I wouldn't cut them unless you have a brand new cotter pin, because you can't put this back together without a cotter pin. If for some reason you don't have access to another cotter pin, just straighten out these ears the best you can, then you should be able to get the cotter pin out.
All right. We do have access to cotter pins, but I'm just doing it this way, just to show you what I'm talking about, about trying to straighten this stuff out. Of course, it'll straighten out more along the way as we do this. At this point, I would say that it's fairly reusable. It's not broken in any way. I didn't try to cut into it very much. I just gripped in. Like I said, I'm going to replace it because we have access to new ones, but you definitely need to have one of these to lock this in.
All right. We're going to use our 36 millimeter socket. I'm going to use my air gun, and I'm going to take this off. If you're not using an air gun, and you're just using a socket with a ratchet, when you go to turn it to the left to loosen, this is just going to spin. That causes an issue. What you can do, grab yourself a pry bar, put it like this, going across your lug studs, and then bring it down close to the ground, so that this is all right down on the ground. As you go to loosen, it's going to bring the pry bar around, rest this on the ground, and it's going to hold the bearing from spinning around on you, and you'll be able to remove the nut.
For me personally, I don't need this because I have this. I have my eye protection on, my hand protection of course. Here we go. Take that nut off of there. I'm going to put it with the rest of the stuff. Grab this, see if we can push it through. Okay. I cannot push this through. This is going to need to come out of the bearing when we take the bearing off.
What we're going to do now, right in the center here, you can see there's a little pilot hole. You can either use a punch with a hammer, bonk, bonk, bonk, try to drive this through, or you can use your little air chisel with a punch that goes in the center. What you need to make sure that you don't do, use your hammer, give it a couple bonks. If you peen over the threads on your axle, the axle is going to be unusable. You'll have to try to file it down. Hopefully you can get it going good. It's kind of a pain in the butt. Maybe you might even need to replace the whole axle, and that will be fairly expensive.
If you do do something like that, you need to replace the axle, check out the video. We'll do one on that as well. I'm going to grab a punch, and I'll show you what I'm talking about.
Okay. I'm just going to use my air chisel, with my little punch bit. I got my eye protection on. Here we go. I can see the axle driving its way in. This comes in handy. You can get yourself an air chisel if you want, right off 1aauto.com. Going to grab our 17 millimeter wrench. You'll notice you've got your mounting bolts, you've got one here, here, on the other side on the bottom, and the other side on the top. Pick which one you want to start with. With your 17 millimeter wrench, it's going to go right up here. Get this up on there.
I've got myself a rubber mallet. If you don't have access to a rubber mallet, you could try something like double wrenching. I'm not going to show you how to do that, but I'm sure there's plenty of videos on how to do it. Whatever you do, just be careful. Once it breaks free, I just like to go like this a couple times. Just helps get the rust and everything broken up in there. Awesome. I'm going to do the same thing to all four of these bolts. Turn the wrench around.
Obviously, these bolts can't come out all the way, because you've got the hub area of the bearing. Just get them out as far as you can using your 17 millimeter wrench.
All right friends. Now, we're going to put our axle nut on. Just a few threads here. Now, we're going to use our little hammer. All right, this little one. We're going to give this bearing hub a couple nice bonks. We're just going to try to break it free from where it's pressed up against the backing plate/knuckle. All right. The reason for this, is so when I'm bonking, and this thing finally wants to break free, it's not going to be able to go too far, and won't come flying down, potentially hurt me. Last thing I want to do is for me to get hurt or God forbid you to get hurt.
Okay. Safety first. I'm going to grab my safety glasses. We're going to give it a couple bonks. Here we go. Okay, this nut did its job, saved us from potentially getting hurt. Thank you.
Grab this, grab our backing plate. We'll slide it right out of the way. What I'm doing is I'm just trying to use my a brush, and just try to make sure that I clean out all the crud that might be inside here. That's super important, because you don't want to have anything inside there that's going to hurt the ABS sensor, or get stuck in between the seal and the bearing, or the axle, or anything. We're just going to do this, get it as clean as we can. Make sure you don't have any big chunks going across the top here. This is the knuckle area. You're going to have your backing plate, and then the wheel bearing around that.
As long as it's clean enough that it doesn't have any big flakes, you're doing all right. We'll get this like this. Going to take a little bit of parts cleaner. Awesome. That looks pretty great. We can move ahead.
I'm just going to use a rag. I'm going to cover up the area where the ABS sensor is, just because I don't need any of this on there, and I'm just going to use a little bit copper Never Seize. Going to get right on the axle splines there. Bring this up and around here. Just try to get all inside along here. That's just going to make it so someday, if I ever had to, and I had to remove this bearing again, it's going to come out nice and easy for either me, or the next person that's going to be doing it.
I'd say that that looks pretty great. We've got our backing plate. All right. Little flake, get that out of here. Looks pretty decent otherwise. Just going to set it right up on here. It's going to be just like this. You're going to have the cutout for where your caliper is, and you know where the caliper's going to be, because you've got this right here.
We've got our brand new quality 1A Auto bearing here. I'm just going to take it, slide it right onto the axle splines, line everything up the best we can here. I'm just going to see if I can get these bolts lined up with the holes in the backing plate, and the holes in the knuckle. Just try to turn them in. At least try to get a few good threads before we tighten any of them down.
We're just using our 17 millimeter wrench, and we're turning in these bolts. All right. We've pretty much got all these bottomed out. Just going to snug them up. Obviously, there isn't much room to get a torque wrench with a socket in here, to be able to torque these down. I can't really give you a specific torque specification for this, where I could say, oh, torque these down to 100 foot pounds or something like that.
What you're going to have to do, just make sure that they're tight. All right. Once you've got them so they're all tight, I just take a nice rubber mallet, carefully bonk on my wrench. Reason why I'm using a rubber mallet is so I don't damage my tools. Let's give them a little three bonk each here, seems like it's working good. Last one. Give this one one more. Let's see. Yeah, those are all nice and snug. That spins good.
Awesome. All right. We've got our axle nut. Start it on here. We're just going to bottom this out now, we're not going to put the hammer down or anything. Perfect. Let's grab the torque specification, and we can move along.
All right. Now, what I'm going to do, is I'm going to take a nice long pry bar. I'm just going to go right over my lug studs like this, and I'm going to try to keep my bar flat along the stud threads, and that's just so I'm not damaging the threads while I do this. The reason why I put my bar going like this, is so the hub can't turn when I go to torque this nut. We're going to use our 36 millimeter socket, and we're going to torque this nut to 203 foot pounds with our torque wrench. Try it one more time. We know that's definitely torqued. Grab our bar, move along.
Okay. We've got our lock, and you'll notice that it has a whole bunch of slots where the corners of your axle nut can go into, and you've got a whole bunch of little slots here for where your cotter pin's going to go through. The reason for that, is so when you go to put it on, in case when you go to put it in, the hole doesn't line up with a slot. You just keep turning it and turning it, until you find an area where it lines up perfectly. Once you do, I like to use a brand new cotter pin for this. Obviously, this is super important that it stays on there. Going to hold that in there. Grab some cutters, come down like this, grab this one, bring it up. Just give them a couple bonks.
Awesome. When we go to put on the cap, I like to use a little bit of Gasket Maker or RTV, and I just go right along the edge here, where this is going to mate with the bearing itself, and if for some reason, when you were taking this cap off originally, if you happen to have poked a hole through here, and you can see it coming through the other side, this doesn't have a hole, it's just pushed in. Anyway, if it did, you would want to make sure that you put some kind of Gasket Maker there as well, to make sure that no moisture can get inside this cap, and then get this all rusted up on you.
All right. Just going to use a little bit of Gasket Maker here, see if we can get it working. Sometimes, it likes to be a pain in the butt. Looks like it's trying to. I'm just going to go right along here. It doesn't have to be anything pretty. I'm not trying to win a coloring contest or anything like that. That looks pretty decent. Just as long as it's going all the way around. If you wanted to, and you had a gloved finger, you could just kind of schmutz it all around. Make sure that you have a nice layer. All right. Use my rubber mallet. Set this in just like this. Just give it a couple loving bonks all the way around.
It's best if you try to bonk along the edges and drive it in, instead of in the center. Obviously if you bunk in the center, you could collapse it in. Just along the edges, and if for some reason you're not using a rubber mallet, you're using a metal hammer, when you go this, if you bonk and you end up hitting one of these studs, that's going to become an issue. You're going to want to keep that in mind. If you damage the threads on this, you're just going to have to try to clean them up with something. Use a small file, tap and die set or something like that. You need to make sure your lug nuts can go on there. That's why I'm using a rubber mallet.
I'd say that that looks pretty great. Going to use my gloved finger, or you can use a rag. Definitely don't use your bare hand or bare finger. This is of course a chemical. I don't want anybody getting sick. I'd say that that looks wonderful. Give it a little spin. I love it. It looks perfect. Let's continue.
All right. We're just going to clean up our rotor here. A lot of times, brand new rotors come with a coating on them that just helps prevent rust and anything really from messing up the nice beautiful surface that they made. I just like to take a little bit of parts cleaner. Give it a little spray, wipe it down. That looks great. I'm going to grab some copper Never Seize. I'm just going to try to spray the base of this. That's right where the rotor is going to be mating up against. The reason for that is, it's going to help keep moisture out of there, and also make it so the rotor's going to come off easily when it's time to take it back off someday, to do another brake job.
Now's a great time, before we get the caliper on here, just to double-check and make sure that the backing plate hasn't been bent in, because if it's hitting up against the rotor now, it's obviously going to hit up against the rotor later. Give it a little spin. That sounds horrible. Let's check it out. Carefully, give it a little push. Obviously, there are some sharp edges. Your backing plate may or may not look like this, but if it has sharp edges, I want you to be super careful.
Just going to take a pry bar. Just try to help this backing plate along. It's seen its day. It's obviously not in the best condition, but just keep working your way around. Find all the places where it might be hitting, and just maneuver it away a little bit. It's like it's hitting just a teeny bit right down here still. Oh. Love it.
Now, we're going to take our caliper, bring it right over here. Torque it right down. I know what you're thinking. Who puts on the caliper without putting the pads together first? You can think that if you want, and that's fine. I'm not going to get mad at you, but I'm going to show you why. We're going to get this all together. We're going to get it torqued down, and then we'll install the pads.
I'm just going to grab my ratchet with my 17, snug it up. Going to bottom bolt these bolts out, and we'll torque them down. Torque specifications for this is 91 foot pounds. Torqued, torqued. Awesome.
Now, it's time to get the brake hose back into the bracket here. You might notice that when you were hanging it or whatever happened, maybe the line straightened itself out, or it changed its position. As we move this around, start noticing that it gets kind of close, which is good. Just going to try to spin this now. Okay. This forky is going right through. It's got this locked in perfectly. We don't have to worry about our flex hose moving around. I'd say that looks pretty great. Let's move along.
Okay. It's time to grab our pads. Slide it right in just like this. That's cool. Same thing with this one. It should slide right in. If for some reason your pads don't slide in like this one does, and it moves around very freely, odds are you need to clean up your caliper. Obviously this is a new caliper, so it's going to slide perfectly. If it wasn't and it was an old caliper, and we tried cleaning it up with our brush and our screwdriver or whatever you use to get off the large chunks, if the pads can't move, you got a little bit more work to do.
Going to go through like this. I'm going to leave that one just like that. This one, I'm just going to go all the way through. Grab one of my little clips here, put it through this one. That feels great. Can't fall out. Awesome. The reason why I left this one like this, is because we've got this little clippy-do here, and what this is going to do, is it's going to want to separate the pads. When you step on the brake, the pistons are going to squeeze the pads, and then you release the brake. The pistons are going to want to go back in, and this is going to make the pads go back out. Okay, very nice.
I'm going to go right over the pin just like this. Now, I'm going to take this here, put it in, everything's lined up great. Grab my other little clip, slide it through. Awesome. Next, what we're going to do, we're going to make it so this little piton goes inside the hole there, and this ear comes up over the top of the pad. Do the same thing for this one. Awesome.
Now, let's assume we're inside the vehicle. When we step on the brake, we release the brake, step on it, release. That's doing its job. Something to pay attention to, is when you mount this in, you want to make sure that this area of the clip isn't hitting up against your rotor. It's very possible that maybe it's bent a little bit and it wants to hit, like this one is. Super close. What I like to do at this point, just grab it, give it a little tug.
Now, I've got a pretty good distance between there and there. Just give it a little push, goes back down. Let's try again. Give a little push, goes back down, but it's still clearing the rotor. It's not hitting at all. At that point, it looks perfect.
Now, we're going to grab our wheel. These wheels can be heavy and I don't want you hurt yourself. Instead of grabbing your wheel like this and trying to lift with your back and potentially hurting yourself, show you a little secret. You take your leg. I'm assuming you're not worried about your pants getting a little dirty. I'm just going to grab it like this, roll it right up your leg, and now you can use your leg/ab muscles to lift it right up, use your leg to hold it, balance it. See, that works pretty good.
I'm going to take my lug nut, my socket, put it right on here. Now that we know we've got one locked in, we can release it. Grab the rest of our lug nuts. We're going to start all these on. We'll bottom them out, and then we'll torque them down.
All right. Let's bottom out these lug nuts. Perfect. We'll get this down on the ground and we'll torque them down to manufacturer specifications. Okay, friends, let's get our torque down. We've got our 21 millimeter socket. We've got our torque wrench set to 83 foot pounds. We're going to go in a crisscross manner. Okay. I'm just going to go around one more time. It's a small price to pay for safety. Awesome.
Thanks for watching. Visit 1aauto.com for quality auto parts shipped to your door. The place for DIY auto repair. If you enjoyed this video, please click the subscribe button.

BHA54130