Replaces


Recommended for your 2012 Toyota Avalon
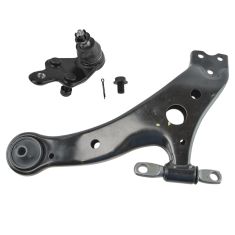
Part Details
Specifications
About TRQ:
TRQ is a trusted brand dedicated to making every repair a success story by combining premium parts with easy installation. Each TRQ part is engineered by a team of automotive experts to meet or exceed OEM standards, delivering enhanced performance and maximum longevity. With rigorous in-house testing, the brand ensures superior fit and function across every product line. TRQ also provides customers with best-in-class, step-by-step installation videos—so you can complete repairs with confidence, whether you're a first-time DIYer or an industry professional.
Our steering and suspension components are pre-greased and sealed for long life and do not require the extra maintenance typically required by greaseable versions.
Attention California Customers:
 WARNING: This product can expose you to chemicals including Lead and Lead Compounds, which are known to the State of California to cause cancer, and birth defects or other reproductive harm. For more information, go to www.P65Warnings.ca.gov.
Lifetime Warranty
This item is backed by our limited lifetime warranty. In the event that this item should fail due to manufacturing defects during intended use, we will replace the part free of charge. This warranty covers the cost of the part only.
FREE Shipping is standard on orders shipped to the lower 48 States (Contiguous United States). Standard shipping charges apply to Hawaii and Alaska.
Shipping is not available to a P.O. Box, APO/FPO/DPO addresses, US Territories, or Canada for this item.
Expedited is available on checkout to the United States, excluding Alaska, Hawaii.
Final shipping costs are available at checkout.
Created on:
Tools used
Hi. I'm Mike from 1AAuto. We've been selling auto parts for over 30 years!
Use a large pry bar or a flat-bladed screwdriver to remove the wheel cover. Just kind of slide it between the wheel and the plastic and pop it off. These lug nuts are a 21mm socket. I’m going to use that and a breaker bar to loosen them while the vehicle's on the ground. Raise and support the vehicle. We're using a two post lift, but you can use a jack and jack stands. The lug nuts are loose, so you can take the socket and finish removing them. I’m just going to hold onto the wheel. When I take the last lug nut off it's going to be loose. I don't want to drop it. If you drop the lug nut that's okay; you just don't want the wheel to fall.
The ball joint is bolted to the lower control arm and has two nuts and studs and one single bolt, and of course the ball joint goes through the knuckle. We're going to spray some rust penetrant on here before we try to remove these. While this is mostly together, I just want to loosen these three 17mm – well, there are two 17mm nuts and one 17mm bolt. I’m going to use a 17mm socket and a large breaker bar to get these free.
Now I want to remove this cotter pin that's up here. So we take some needle nose pliers, bend it up, get them straight, and wiggle it back and forth, push it back out of the castle nut. Then take some side cutters, and I think what I'm going to do is just cut these off because they're real, real rusty. I’ll fold them as flat as I can and push them together. Take a punch and a hammer. The punch typically fits through the ball joint hole once it's opened up. And just do my best to pop that back out the other way.
This is 19mm. I'm going to put the box wrench on here and try to just break whatever's left of the cotter pin by turning the nut off. It's pretty stiff so I'm going to hit it with a mallet. Put some more rust penetrant on there. Just keep turning it off. Normally you'd try to pull that cotter pin out, but it was so rusty we had to break it. Then you’ve got to be careful you don't get the box wrench part of there stuck in here. I'm going to turn this on just a few turns. Just work it down and then I can slide the box wrench out. Because now I've got it free, I'm going to switch to the open end, and luckily the ball joint is stuck in the taper of the knuckle so it's not spinning as I'm trying to remove it. If the ball joint started to turn inside of the knuckle into the taper, it was just turning with the nut, you can try to put a floor jack up in here and put pressure onto the ball joint to try to hold it tight, and that's really about all the options you have.
Use the open end. So if this happens, and the CV axle is in the way, you don't have to take the CV axle out. I'm going to thread this back down because I know it'll come free. Get back down until just enough room there. If you don't have a ball joint removal tool or a separator tool, you can use a metal sledge hammer, a small one. You want to hit right here on the knuckle. Be very careful because you can break the knuckle this way, but you can give it a couple good strong whacks. Yeah. See, I don't like doing that because you have to hit it really, really hard, and I'm always worried that we're going to break a knuckle that way. So, since I've got a ball joint separating tool, I'm going to use that instead.
I think it's going to be easier for me to get in here if I remove these fully. Just pull this control arm down. Pull that down out of the way. It gives me a lot more space to work. So I'm having trouble getting the ball joint tool in here because it's super tight, and doesn't want to fit. The nut can't quite come off because the axle is in the way. I've put a couple little dents in the knuckle from trying to hit it with the mallet, so I don't want to keep doing that. I've kind of decided that if I took a pry bar and just very carefully pry it against the CV axle and pry it down, I could actually get it to pop out of the knuckle. It's not the most ideal method, but it worked. The ball joint will just come right out of here. If the shield is in the way, that's fine. Just put our pry bar in here, just pry the dust shield back, and pull the ball joint out.
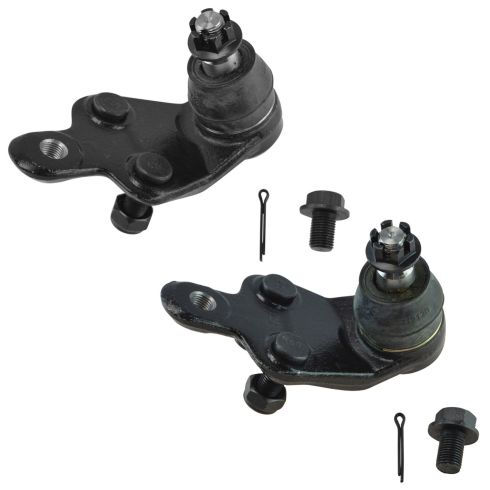
Here's the old ball joint from our vehicle. You can see where the cotter pin broke off. It's still inside the little cotter pin hole. Here's a brand new one from 1AAuto.com, the same exact style. It comes with two new locking nuts for the studs, and a new bolt to go underneath. It also comes with a new castle nut, and a brand new cotter pin. This should fit right in and work great in your vehicle.
I’ve just got to wipe down all the extra grease that squeezed out of the old ball joint while I was trying to remove it, and slide our new ball joint up into place. You just need to pry the dust shield back a little bit. It's going to be squished right up in there. Get the nut caught.
Put this down and under. Just catch these two lower lock nuts so it doesn't pop out. Pull this down so it's flush and install the bolt.
We'll take a 19mm wrench, tighten this down. I’m going to switch to the longer wrench. You just want to make this nice and tight as possible. That feels pretty tight. I also want to make sure -- a we'll go a quarter turn more just to line up the hole with the castle nut. Take some pliers, bend this one up and over. Cotter pin is locked in there, it's not going to come out.
Snug down the 17mm bolt. Nuts on the replacement ball joint are 19mm. Snug these down. They have a nylon locking portion to them. Torque these lower nuts and this bolt to 55 foot-pounds. These are the 19s. Switch sockets. The ball joint is replaced.
Reinstall our wheel. It's important to note, these lug nuts have a taper. The taper meets the wheel, matches the inside of the wheel. Don't install them with the flat side like this; that is incorrect. Install them with the taper to the wheel. It helps locate the wheel on the lug nut side. I'm just using the socket and ratchet to bring these down snug before I put the car on the ground. Torque the lug nuts to 76 foot-pounds, going in a cross pattern.
Reinstall the hub cap. You're going to line up the opening for the valve stem with the valve stem on the wheel. Just push it in place.
Before we start the car, just going to gently press the brake pedal down; not all the way to the floor, maybe about a quarter of the way, and just pump it. This will bring the brake caliper piston out to meet the pads because we compressed it, and you'll start to feel it get more solid as it pumps up
Thanks for watching. Visit us at 1AAuto.com for quality auto parts, fast and free shipping, and the best customer service in the industry.
Tools used
Hey, everyone. Sue here from 1A Auto and today we have a 2013 Toyota Camry in the shop and I'm going to show you how to replace a lower front ball joint. If you need any parts for your car, click on the link below and head on over to 1AAuto.com.
So take the tire off. You need a 19 millimeter socket. Take your tire off. Now, we're going to take the old cotter pin out of the lower ball joint 'cause we're going to have to discard that. The new ball joint will come with one and go from there. I just use a pair of cutters. See if I can get it to line up. We can make itself a little free in there. Sometimes there's a little ear you can grab from the other side. This one's going to be, it's probably been in their original equipment. Yeah, I got it to move. Good. Feel the other end with my hand. I can feel it moving. You'll see the other end now has a little bit more of a lip to it. I can just grab it with the cutters and then pull it out. Perfect. There you go.
The nuts on the spindle part of the balls are pretty good. So I can only fit a open end wrench on there. So I'm just going to give it a quick tap. See if I can get it to jilt itself a little free. Notice how I keep my hand on that. You take your hand off of it and try to hit that, the wrench could just bounce off and hit you. Let's go to the other side. There we go. So it's mostly the vibration of the hammer, not so much the effort of trying to spend the wrench around it. We'll get this off as far as we can go before it hits the axle and then I'll take the bolts off on the control arm side and we'll take a pickle fork because we're not going to reuse it so we can use a pickle fork and break that down.
I'm going to take these three bolts, two nuts and one bolt out. 17 millimeter socket and use my half inch breaker bar. You can use air tools if you have air tools at home. I'm going to show you if you don't have air tools how to do it and it can be relatively easy. Can see the pressure as the control arms going up. That's where the pressure point as the ball joint pushes it down. Then we get up pickle fork. I'll just pull down on this, get that out of the way. You can take a hammer actually before you get the pickle fork, if you hit right in here, you might be able to jilt that that free. All right, we'll hit that pickle fork go that way. This might not work. It might be the wrong size. There it go.
Now if you're reusing that ball joint, you want to try to not use the pickle fork 'cause you can rip the boot just like that. So if you reusing the ball joint and you need to take it out for some reason, I don't recommend doing it that way. In this case, we're replacing it, so we can just destroy it. Oh there we go.
So now on a Toyota, the axle nut or spindle nut is a special socket. It has to be a 12 point 30 millimeter. So you can, you have to order it or make sure you have one before you do a Toyota axle for the spindle nut. Let me take that off.
Set that aside and I'm going to spray a little bit penetrating spray in there, so that I can hopefully hammer that axle out of the knuckle. Hit the spindle part and get the CV axle shaft out.
So here we have our original factory ball joint for our Camry and the replacement from our TRQ line at 1A Auto. And it's nice. I like the pressed in studs, threaded rod, it's got the R on it just like the factory one to make sure you know that it's the right side lower ball joint. New boot of course spindle, new castle nut, and new mounting hardware. That's really nice. Has the same angle. If you need this part or any other part for your car, click on the link below and head on over to 1AAuto.com.
I'm going to put the new lower ball joints in. Now I think it's going to be easier for me to fish it up into the knuckle and then put it into the lower control arm. So I want this spindle piece turned in as far as I can that way. So I've got it at this angle so that way I can hopefully work this in. The vacuum plate, probably won't hurt to bend it a little bit. We'll just have to bend it back. There we go. Get that castle nut and put it back on.
Now I'm going to try to torque this down before I put the axle in, 'cause then I can use an actual socket. So the new nut on the ball joint is a 21 millimeter. The old one was a 19. now the torque specs for this is 91 foot pounds. So do I want to put, the leave the CV shaft in and tight and like I would if I was just doing the ball joint. You could, but at the same time you're not going to get 91 foot pounds out of that. So it's just as easy to take the axle mount out whether you're doing the knuckle bearing or not. Just take the axle nut out, slide it out. Helps you do the whole job probably a little easier. And you can actually use a socket take the old one out. So I'm going to be able to torque that now till 91 foot pounds.
So I'm going to tighten this lower ball joint castle nut. It's a 21 millimeter socket and I put my half inch breaker bar in there 'cause the torque is 91 foot pounds which was really high. And I'm going to use a pry bar and put it right through where the axle would go through. It's not going to do any damage to it and that way I can get some good leverage on this and torque this write down.
Let's see if the cotter pin lines up. So it's pretty close. I lucked out on that one. Now I'll just put that new cotter pin through. Grab my ... I'm going to pull the top one over. Cut off the excess. And then I'll spin this side around and I'll get this side over here.
Now we're clear to put the axle back through the center of the bearing, going up the spindles and at the same time I'm going to line up the lower ball joint to the control arm. There we go. Get a pry bar. With a pry bar I can pull down on the control arm.
We have the two do lock nuts. They've got the lock washers on them. It's got to reverse, little grooves in them that once it's torqued down, tightened it doesn't back off. And then our one bolt that goes through the platform. Make sure you start everything by hand so you don't cross thread it.
So we're going to tighten the lower bolt ball joint to control arm with the two nuts in the one bolt. The two nuts are an 18 millimeter socket. When torquing down the ball joint to the control arm, the manufacturer gives you two choices of replacement nuts and it's a wider nut or thinner nut. The thinner walled nut is 55 foot pounds. And the wider based nut is 68 foot pounds. We have the wider base here, so I'm going to go with 68. Put my 18 millimeter socket on there and torque this to a 68 foot pounds. And then this one bolt is a 15 millimeter socket.
So before we put our new axle nut on, apparently I hit it a little too hard. This is why you really should use a center punch, but sometimes you just use a hammer and I just knurled over the end thread just a hair. So I want to show you how to take care of that. I have a triangle file here, just a three sided file and I'm going to find that where it's flattened over. I'm going to put it right in that groove and I'm just going to file forward. And it just takes enough off of it so that the new thread will correct itself.
Now that we corrected out threads in the beginning here, we can put the new nut on. I'm going to use an air gun to get it down just before the hub because I have to torque this to the manufacturer's specs with a torque wrench. You don't want to over tighten it with an air gun cause that's a pressed in bearing and you'll actually compress the housing and the bearing will get wasted real fast. And you don't want to leave it too loose 'cause then the bearing has play and you'll end up defeating the whole point of it.
So in order to put enough torque on the spindle nut, I need you to stop the wheel from turning. So I'm taking my longest bar and I'm putting it through the lug nuts. I'm going to take my 12 point 30 millimeter socket.
Yeah. Now that tells me that when I used my air gun earlier, I didn't even come close to bottoming out, which makes me happy because I didn't want to. So bravo to me. I did a good job. Torque specs is 217 foot pounds.
So before you talk the axle nut, you want to make sure your car is still in neutral, not in park, because in park you're actually putting strain on the axle. Makes sense, and it goes into the gear section or the transmission. And 217 foot pounds can be too much and you can make actually do some gear damage, chipping gear. So make sure it's a neutral so that the pry bar takes the initial pull of the 217 foot pounds. Now take your lug nuts off so you can remount your tire.
Last step before you put your wheel on, you're going to take a punch and a hammer and push down on this. It's a little tin piece out here and it stops it from backing off. Just want it enough so it sits right in that groove and stops it from moving.
19 millimeter socket. I'm going to hand tighten all the lug nuts. Then I'll lower it down and torque it. I'm going to start at the bottom and I'm going to go in a star pattern and the wheel torque for this Camry is 76 foot pounds. Double check everything.
Thanks for watching. Visit 1AAuto.com for quality auto parts of shipped to your door, the place for DIY auto repair. And if you enjoyed this video, please click the subscribe button.

PSA63330