Replaces


Recommended for your 2011 Toyota Avalon
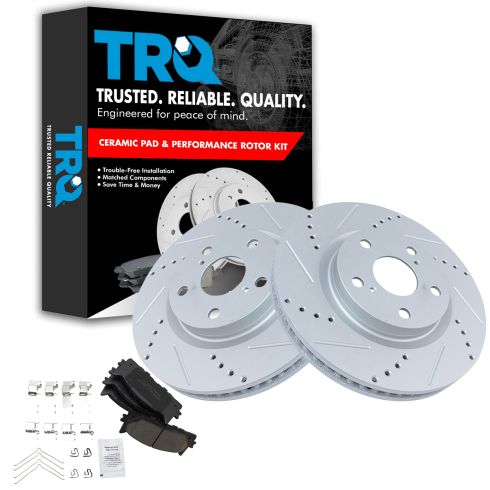
Part Details
Specifications
About TRQ:
TRQ is a trusted brand dedicated to making every repair a success story by combining premium parts with easy installation. Each TRQ part is engineered by a team of automotive experts to meet or exceed OEM standards, delivering enhanced performance and maximum longevity. With rigorous in-house testing, the brand ensures superior fit and function across every product line. TRQ also provides customers with best-in-class, step-by-step installation videos—so you can complete repairs with confidence, whether you're a first-time DIYer or an industry professional.
Product Features
Attention California Customers:
 WARNING: This product can expose you to chemicals including Lead and Lead Compounds, which are known to the State of California to cause cancer, and birth defects or other reproductive harm. For more information, go to www.P65Warnings.ca.gov.
Lifetime Warranty
This item is backed by our limited lifetime warranty. In the event that this item should fail due to manufacturing defects during intended use, we will replace the part free of charge. This warranty covers the cost of the part only.
FREE Shipping is standard on orders shipped to the lower 48 States (Contiguous United States). Standard shipping charges apply to Hawaii and Alaska.
Shipping is not available to a P.O. Box, APO/FPO/DPO addresses, US Territories, or Canada for this item.
Expedited is available on checkout to the United States, excluding Alaska, Hawaii.
Final shipping costs are available at checkout.
Created on:
Tools used
Hi, I’m Mike from 1A Auto. We’ve been selling auto parts for over 30 years!
Use a large pry bar for a flat-bladed screwdriver to remove the wheel cover. I'm just going to slide it between the wheel and the plastic. Pop it off. These lug nuts are a 21 millimeter socket. I'm going to use that and a breaker bar to loosen them while the vehicle's on the ground. Then, raise and support the vehicle. We're using a two post lift, but you can use a jack and jack stands. The lug nuts are loose. I'm going to take the socket and finish removing them. I'm just going to hold on to the wheel. I'll take the last lug nut off. It's going to be loose. I don't want to drop it. Drop the lug nut. That's okay. I just don't want the wheel to fall.
Before I remove the caliper, I'm just going to pull on it and try to compress the piston. That way, it will slide right off. Take a 14 millimeter wrench to loosen the caliper slide bolts. There's one on the top, one on the bottom. They're pretty tight. If they don't want to budge, you can take a mallet to break them free. Same thing on the bottom one. I've got a bungee cord handy, so when I remove these caliper slide bolts, I could hang the caliper from the strut. Let's loop it around. The caliper should slide right off. See, one of our hardware pieces of hardware is actually broken on here. It should go right in there. The pads will slide right out like this.
Two 17 millimeter bolts that are holding the caliper on. There's one on the top and one on the bottom. To break them free, you can use the box wrench and the mallet. We've got these loose. I'm just going to remove them by hand.
The rotor is very loose. We don't want it to accidentally fall. I'm just going to take one of the lug nuts. Just put it on there so it doesn't fall on my feet. Remove the caliper bracket. So we're pretty lucky. This brake rotor's really loose. I'm going to take the lug nut off that I was using to hold it on, just slide it right off the studs and the hub. If it was rusted on, you could thread a couple of small bolts into here and evenly turn them down or push against the hub and push the rotor off.
These are old pads and rotors for our vehicle. I've got brand new ones from 1AAuto.com. So the pad design is very similar. The rotor design is the same. Five lug holes, two pusher holes. It's a ventilated rotor. This will fit great and help the car stop.
Before you put the rotor back on the hub, make sure it's nice and clean, not too rusty. This one's in good shape. If yours is really rusty around the hub here, take a wire brush and knock some of the rust down, clean it off. We're going to take our new rotor, and we'll install it backwards first. Take our brake parts cleaner, and we're going to clean off the oil that they ship with so they don't rust. Grab it, flip it over, install it the correct way. I'm just going to throw a lug not on here so it's not moving all around on me. Take a brake parts cleaner. Clean the surface. I'm just going to wipe down any excess.
You need to compress the cylinder back into the brake caliper. I'm taking the old brake pad, and I've got a C-clamp, and gently compress it. This way, our new pads that are thicker will fit. We need to clean our hardware so we can reuse it. We'll take some brake parts cleaner and just spray it in there. Get a wire brush. Just repeat for the other side. We're going to reinstall our bracket. Get those started by hand. The top one's usually easier to get done first, and you can move this one in and out to line it up. I'm just going to snug them down. Take some brake parts cleaner to just make sure the pad surface is nice and clean before you install them, and put just a tiny amount of brake caliper grease on the ears of the pad. Don't need to go crazy with this stuff.
The inside and outside pads are identical, so I'm going to start with the inside one. Pop it into the bottom, push it in. Repeat for the other pad. Clean it off. Put a little bit of grease on the ears. Replace the spring hardware, put it in place. It's going to balance the caliper. Swing it down. Get the back part caught first. Push that over. Caliper slide bolts and reinstall those. Get a 14 millimeter ratcheting wrench. Tighten them up, and torque the two caliper bracket mounting bolts to 79 foot-pounds. Don't forget to remove the bungee cord you were using. Make sure the brake rotor is clean. Sometimes, you get dirty fingerprints on it. I'm just going to double check that these are tight.
I'm going to reinstall our wheel. It's important to note these lug nuts have a taper. The taper meets the wheel, matches the inside of the wheel. Don't install them with the flat side like this. That is incorrect. Install them with the taper to the wheel. It helps locate the wheel on the lug nut stud. I'm just using the socket and ratchet to bring these down snug before I put the car on the ground, and torque the lug nuts to 76 foot pounds. I'm going in a cross pattern. We'll reinstall the hubcap. I'm going to line up the opening with the valve stem, with the valve stem on the wheel. Just push it in place.
Before we start the car, I'm just going to gently press the brake pedal down. Not all the way to the floor. You need about a quarter of the way, and just pump it. And this will bring the brake caliper piston out to meet the pads, because we compressed it. And you'll start to feel it get more solid as it pumps out.
Thanks for watching. Visit us at 1AAuto.com for quality auto parts, fast and free shipping, and the best customer service in the industry.
Tools used
Hey, everyone. Sue here from 1A Auto, and today we have our 2013 Toyota Camry in the shop. I'm going to show you how to do front brakes. If you need any parts for your car, click on the link below and head on over to 1AAuto.com.
So take the tire off. You need a 19 millimeter socket. Take your tire off. First thing I'm going to do is take my bleeder screw cap off and break the bleeder screw free. Make sure it opens up, because I want to push that piston back and I don't want to have to struggle with that unmounted. Just make sure it loosens up. That's good. Just give it a little tightness. Now I can dismount the caliper, 14 millimeter socket and we'll disconnect the caliper from the bracket. As you can see, that inner slider pin's spinning on me. So it's a 17 millimeter wrench and a 14 socket, 14 millimeter. Break those free. Then you get the top bolt too. Take that bolt out. Now we can slide the caliper off the bracket. There we go.
At this time, you want to look and see if you see any wetness, like a brake fluid leak on that boot. Looks pretty clean. It is a fairly new caliper from looking at it. But that doesn't mean that that won't fail because it still can fail. Here's a quick example of something you see. These are not our brake pads, and this is why I don't like non-riveted shims. So you get what you pay for sometimes if you buy a cheap pair of brake pads. These are brand new. Someone just put these on. But look at the shim. Look what that's done. They're just little divot points. That's how they come. I like them riveted on. When they do this, this is what happens. It slides right up and eventually. I've seen these slide up and start to cut into the caliper right in here. You can already see a line forming right there. I've seen them slide down and get jammed in between the bracket and come back around and start cutting into the hat of the rotor. So don't skimp out on brake pads.
Now we can get that bracket off the caliper knuckle. That should be two 17 millimeter sockets. There's two bolts, one on the bottom and one on the top. Going to use a brake caliper hook to get that caliper up out of the way. Someone put a lot of red thread locker. Get the top bolt. Take the bracket right out. Let's see if I can get this bolt out of this knuckle. They just kept using a lot of the thread locker. It's really caked in there. Now the rotor is stuck on the hub. It's pretty normal for that. So you just take a hammer. I'm not going to reuse my rotor. So I can hit it right here on the hub or on the surface. I'm just going to hit the hub though. There you have it. Now we can take that off and set it aside.
Here we have the old brake set for the front of the 2013 Camry and here's our new brakes from 1A Auto. I bought the racing, the slotted and vented rotors. They're a few bucks more and our Camry has a nice little V6 in it. So I want to give it a little performance braking. Nice cross mild, crosscut. They're balanced out. You'll actually see them balance in mild, vented and slotted on both sides, coated on the inside. The pads, the shims have ear tabs on them just like the ones I was showing here that don't. They just have these little pins, divots, and they slide off. These will stop it from sliding off.
The pad kit comes with whole all new caliper hardware springs and indicators that snap onto the pads, and the shim kits are coated. It has a neon rubber piece on the back there. It stops the rust and it's coated and those would go here. I'm going to replace this hardware. This is the caliper bracket. That's the old stuff. So it saves me from cleaning them up. Plus, these are straight, just metal. They don't have any of the coating background. If you need these parts or any other parts for your car, click on the link below and head on over to 1aauto.com.
Before I put the new rotor on, I'm going to spray the actual hub surface, even though it's brand new and the rotor's new. I'm going to put a little copper anti-seize on that to stop any corrosion from building up. I'm going to put a couple of lug nuts on here to hold this flush against my hub, so when I put caliper together and bracket on, I don't have to worry about it wobbling around. Now we're going to get our bracket ready for our brake assembly.
I'm going to take all the old tins off because I'm replacing it with the new tins. If I was going to save these and I didn't get the tins with my brake kit, I would want to take a brush and clean off all the surface like that and especially down underneath. That's really important, and you can take some parts cleaner and brake cleaner and clean that up. Spray it up and only apply a little bit of grease to the bracket on the bottom side of the tins just that and then place it back down on your actual bracket. Now if you notice on a Toyota, there's an outside anti-rattle clip spring.
You don't want it on the inside. That'll hit the rotor. Those go towards the outside just that that. So there's four of them. They're almost identical except for that you have to replace them with the spring part, the bend of it on the outside. So now I've got new hardware tins. So I'm just going to make sure that my mounting surface is clean of any debris. Like I said, it looks like someone just replaced this caliper at one point. That looks good. I'll take my little caliper grease, take a light coating, put it on all mounting surface. I don't want tons of it. I don't want to build it up. We're going to just paint it. Then I'll take my new tins, mount them just like this. Do the same to the top of the caliper bracket. No grease on the side. Leave it out in the element like that and free to stay clean so the pad slides nice and evenly. Last step in preparing our caliper bracket is the slider pins. So I'm just going to pull this out here. Take the boot off of the lip. Slide that right out.
Now I can feel that grinding inside there. So this caliper is fairly new, like I said. It looks like someone replaced it. But you always want to check these out, even if you out a new caliper on. If I was to order this, just got it in. I'm still going to put more grease in there. They don't seem to put as much grease as I would prefer in there and you can feel it when you put the pin in there. You don't want to feel a metal grinding and I can feel that binding up in there. So you can see the pin has this offset flat spots. I like to put the grease on those flat spots and just take the excess right off. Twist it when I put it down in there and then you'll feel that metal sound, feel it go away. So now that I've done this one, I'm going to do the same thing to this one. So now I can mount my caliper bracket to knuckle. I've took a wire brush to all the bolts to make sure there's no grease or rust or dirt in there.
Now these caliper bolt bracket to knuckle is a 17 millimeter socket and the torque is 79 foot pounds. So I'm going to snug them up and then I'll torque them down to 79 foot pounds. So here we have our brake pads that we're going to install and there is no inner and outer pad on this Toyota brand. It comes with the indicator. This is the brake indicator. So the tight piece goes on that little spot. See that notch? There's a little tab that's going to get locked in. See the tab? So you just push it right over and lock it down in. There we go. So it locked right there. So that is the brake pad indicator. So if you look at it, once it's sitting in, that is at the lowest point of that pad and you'll hear a squeak noise, a little squeal and that just tells you that you're in need of front brakes. Now to install these, I like to put them in at an angle and then I just bring it around and snap it right into place just like that.
Now one of the last steps is to push the caliper piston back before we install the caliper on the actual bracket. So I'm going to take it down from the strut. Take my hanging caliper bracket out of the way. So here's a quick tip. Try to say that. If you don't have the tool to push a caliper piston back in the hydraulic, I like to use an older welder pair of welding lock pliers. You can just put it right into that piston, the hollow part of it and before you push down on it, make sure you open the bleeder. You don't want to push any brake fluid back on anything that has an ABS module and then just squeeze it. Make sure you have a catch pan. Once the piston is bottomed out, tighten the actual bleeder screw back up just enough because you're going to grab it and bleed it. Take your pliers out. Once your caliper piston's pushed back and it's ready before you put it on, you want to put on these anti-rattle clips that come with Toyota. So there's little holes in the side of the pad housing.
You're going to put the one tab in. I'm going to both on one side. Make sure the butterflies are facing each other because you've gotta hold onto the pads once you do this because they're pushing it out. Grab the other tab. If you have gloves like this, I could be a little challenging. There we go. Now, holding that, I'm going to take my caliper. Slide it right over. Nice. Push in the sliders. Get my mounting bolts. There's are 14 millimeter socket. Once you get them bottomed out, we're going to torque them to the factory specs. 14 millimeter socket and the torque specs from caliper pin to bracket is 25 foot-pounds. I'm going to get a wrench to hold that inner pin from spinning. That should be a 17 millimeter. So 14 bolt head and 17 on the inside. We're going to do the same to the top. Last step, I'm going to open this bleeder screw and let it gravity bleed for a few seconds. See the air that came out? You want to bleed it until there's no more air bubbles. Once it's got a steady stream and no air in it, we're going to tighten that up.
Make sure you snug it really good. Take some brake cleaner and clean that up. Make sure you replace the bleeder boot so no dirt gets in there for the future. Now take your lug nuts off so you can remount your tire. Now that the brake job is complete, we're going to pump our brakes up. Make sure the pads sit and then we're going to check our brake fluid. Now I'm going to check my brake fluid and it is actually right at the max line. You can see it right there. So we're doing good. We're going to leave it right there. 19 millimeter socket. I'm going to hand tighten all the lug nuts. Then I'll lower it down and torque it. I'm going to start at the bottom and I'm going to go in a star pattern and the wheel torque for this Camry is 76 foot pounds. Double check everything.
Thanks for watching. Visit 1aauto.com for quality auto parts shipped to your door, the place for DIY auto repair and if you enjoyed this video, please click the subscribe button.

BKA12058