Replaces


Recommended for your 2005 Subaru Legacy
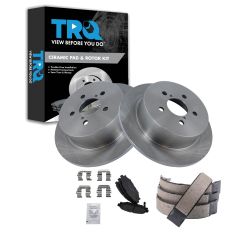
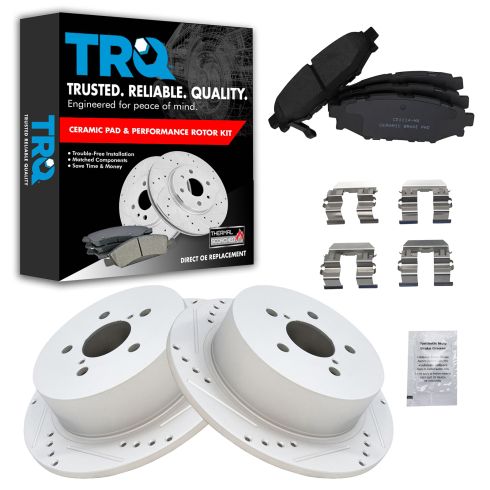
Part Details
Specifications
About TRQ:
TRQ is a trusted brand dedicated to making every repair a success story by combining premium parts with easy installation. Each TRQ part is engineered by a team of automotive experts to meet or exceed OEM standards, delivering enhanced performance and maximum longevity. With rigorous in-house testing, the brand ensures superior fit and function across every product line. TRQ also provides customers with best-in-class, step-by-step installation videos—so you can complete repairs with confidence, whether you're a first-time DIYer or an industry professional.
Product Features
Attention California Customers:
 WARNING: This product can expose you to chemicals including Lead and Lead Compounds, which are known to the State of California to cause cancer, and birth defects or other reproductive harm. For more information, go to www.P65Warnings.ca.gov.
Lifetime Warranty
This item is backed by our limited lifetime warranty. In the event that this item should fail due to manufacturing defects during intended use, we will replace the part free of charge. This warranty covers the cost of the part only.
FREE Shipping is standard on orders shipped to the lower 48 States (Contiguous United States). Standard shipping charges apply to Hawaii and Alaska.
Shipping is not available to a P.O. Box, APO/FPO/DPO addresses, US Territories, or Canada for this item.
Expedited is available on checkout to the United States, excluding Alaska, Hawaii.
Final shipping costs are available at checkout.
Created on:
Tools used
Hi, I’m Mike from 1A Auto. We’ve been selling auto parts for over 30 years!
Using a 19 millimeter deep socket and a breaker bar, I'll loosen the lug nuts with the vehicle on the ground. I'll raise and support the vehicle. With the lug nuts loose, I'm going to use the socket and finish removing them. This wheel is nice and loose. I'll take it off and put it aside.
I'm going to take a flat bladed screwdriver and just wedge it in here, and then pull the caliper to the outside. This will compress the piston inside. It'll make it easier to pull it off just like that. You can see the piston. That actually moves really nicely on the slides so I know it's not seized and the piston went in there nice and smooth. This caliper's in good shape.
Now to remove the caliper's slide pin bolts, there's a bottom on and a top one, 14 millimeter. We're going to start with the top on. Spin it out. We'll do the same for the bottom one. We'll take our caliper off, and I'm just going to rest it on top of the suspension arm here. Just going to pop our pads out of the caliper bracket using a flat bladed screwdriver in here. Do the same for the other one.
I'm going to take a mallet here and just kind of wedge it in between them because I'm not reusing these. So those pads are really stuck in there. They should have a little bit more grease on the ends so they slide better. Now to remove the caliper bracket bolts, there's a bottom and a top on. I'm going to start with the top one. These are 14 millimeter. If they're really stiff, you can use a dead blow mallet. Just hit on it. Break them free. I'm going to switch to a ratcheting wrench to make this a little quicker. Do the top one the same way. I'm going to hold the bracket so it doesn't fall. Take the bracket out.
So you should have the parking brake off before you try this to get the rotor off because the parking brake assembly is inside of here with brake shoes and a rust ridge will sometimes build up on the inside, preventing you from just easily pulling this rotor off. I'm going to pop this rubber cap out with a flat bladed screwdriver. That's okay. If it pops inside, that's fine. You'll just get it when we pull the rotor off.
We need to find the adjuster, which is right there at the bottom. There's a star wheel adjuster just below that spring. We're going to turn it and release the tension so that this brake rotor will come off easier. So use a flat bladed screwdriver to push it in towards the car and you'll actually feel this rotor will get looser because it's pulling the brake shoes in away from the inside of the hub, inside of the hat here. I'm going to spray some rust penetrant around the hub here and inside these threaded holes. Just try to break the seal.
The rotor might be rusted to the hub a bit. Let's see if it's going to break free. I'm going to tap it with a dead blow mallet around it. It's a little loose. We're going to take some metric bolts. These are 8 by 1.0 thread pitch. I'm going to thread them in, and I'm going to use them to push the rotor off. I'm just going to use the appropriately sized socket for the bolts. I'll just turn it off.
You can start to see it's pushing it off. You just kind of go evenly back and forth. Sometimes, it's a lot easier than hitting it a bunch of times with a hammer. That's nice and loose now. You can actually pull that right off. Here we go and inside, you can see the parking brake assembly. It just drops a little rubber plug that I pushed inside there. Save that. We're going to reuse it.
Now just pushing in, it goes inside of the car in this adjuster wheel. It's pulling the adjuster in, which in turn, pulls the parking brake shoes in and it releases them from that outer rotor hat. On the inside, you can see where their brake shoes for the parking brake were riding, and then the rust ridge that builds over time and that rust ridge can make it hard to pull this rotor off unless you compress or retract those parking brake shoes in.
I took out the caliper slides by just pulling them in and out. Those are working nicely. They don't need to be cleaned or lubricated. Then reuse the hardware. It's stainless. You're just going to clean it with brake parts cleaner and a wire brush. You do that to the other side.
Now would be a good time to inspect your parking brake hardware. This all looks in good shape. It's not a very old car. Just going to take some brake parts cleaner and spray this down. All right, just going to spray the inside of the brake rotors with brake parts cleaner. Make sure it's nice and clean. I'll install it. I'm going to adjust the parking brake, turn it so I can see that star wheel again. Before, I was going under the spring to loosen it.
Now I'm going to go above the spring just a few turns to bring it out. It's hard to tell how far it's dragging because you're getting the resistance from the differential. So I just want to bring it out a little bit and then afterwards, we're going to go inside the car, pull it out a little bit more and we're going to pull up on the parking brake handle and it will self-adjust the brake shoes out to meet the new rotor. Don't forget. Reinstall that little rubber plug that keeps weather out of there. It just pushes back in.
We're going to put some copper anti-seize on the caliper mounting bolts. I'll install the caliper bracket—get the top one started. Might have to move the bracket around. Get that threaded in. Get the bottom on threaded in. Use the ratcheting wrench and just tighten these down. Get them snug and then we'll do a quarter turn more. Here's out original pad for our vehicle and a brand new one from 1AAuto.com.
So you can see here, this is worn to 6 millimeter and brand new pad has 8 millimeter. It's not really that worn. But we're going to show you how to replace it anyways. Using the same design, the inside pad will have the wear indicator. This is an outside pad. This will work great and fit great in your vehicle.
Just going to give the brake pads a quick clean with some brake parts cleaner. Don't have to soak them. Get rid of any dirty or grease. Take a little caliper grease and we'll put it on the ears. This one will go on the inside. Line it up. Push it in place and the same for the outside pad.
We need to push our piston back into the caliper so it can fit over the new brake pads. Put an old brake pad over it. Put a C-clamp in there and just kind of gently turn it and press the piston into the caliper. That should do it.
Reinstall the caliper and we'll put the slide pin bolts in. Same with the other one. We'll tighten these up just like that. If while you're tightening this, the slide pin bolt starts to spin, you can counterhold it with an adjustable wrench. Just get it situated in there and then tighten it. This one didn't spin on me so I didn't have to do that. We're going to do the same for the bottom one. Just tighten it. Once it gets tight, just stop. You don't want to break them. The copper's moving nicely. I haven't sprayed the face of this brake rotor yet. If you get this caliper on and you forget to do it, no big deal. You can spray it right now as it is. You can just turn it. It's all set.
Put the wheel and tire back on. Hold it up. Get the lug nuts started by hand. You're going to use the socket. Thread these all down. I'm going to lower the vehicle. I'll torque them. I'm going to torque the lug nuts to 89 foot-pounds in a cross pattern.
Now we need to gently pump the brakes to move the pistons out to meet the pads. I'm not going to press it all the way to the floor. Press it about a quarter of the way. Build it up. It'll start to get harder. That's perfect. Now the brake job is done.
At the rear, we want to adjust those parking brake shoes. You're going to hold the button and just pull it up. It'll start to get tighter. We'll see if it latches. A couple more times. It'll start to grab sooner and just do it until you feel it get tighter, lower. That's good there.
Thanks for watching. Visit us at 1AAuto.com for quality auto parts, fast and free shipping, and the best customer service in the industry.
Tools used
Hi, I’m Mike from 1A Auto. We’ve been selling auto parts for over 30 years!
In this video, we will be removing and replacing the rear brake pads and rotors in 2008 Subaru Outback. We're going to take off the lug nuts. It's a 19mm socket and a breaker bar. We're just going to crack em loose before we lift the vehicle off the ground. Take the lug nuts out. Grab the wheel and pull it off.
We're going to take the caliper off. To do that, we're going to take these two 14mm bolts out, and we're going to use a 14mm wrench, and take the bolt out. Now when you're taking the bolt out, if this stud is spinning, you can hold it with some channel lock pliers and take it out. Before we take this bolt out, we're going to break free at the top too. Now we can take them both out.
If this caliper's really tight, take the screwdriver and pry it against the rotor. Squeeze the piston down a little bit, and you can pull it right out. Take a bungee cord and wrap it around the spring, and the caliper's out of the way and secure. Pull our pads off. To take these caliper bolts out, you use a 14mm socket on an extension. Pull that out and pull the rotor off.
Our rotor's nice and loose. If your rotor was stuck on there, you could use a hammer and hit on all this surface right here. You also have some areas where you could put a couple of bolts. You could push the bolts in and tap it, and it will help you take the rotor off.
These are our old brakes, and these are our new brakes from 1aauto.com. As you can see, look at the rotors first, the configuration is the same, the screw holes are the same, the lug holes are the exact same. The rotors are the same height. It's got the same bore for the parking brake, and we'll take a look at the brake pads. You can see the brake pads are the same. The squealer is the same—it's got the same stop squeak on the back. And get your parts at 1aauto.com and you'll be ready to rock and roll.
Now we're going to clean up our caliper bracket. Pull off these pad slides and take our wire brush. Clean this up a little bit. Pull these caliper slides out. Spray them down with brake cleaner. Wash them off. Take the other one out. Spray a little brake cleaner. Spray a little brake clean down here. Clean that up.
Take a little bit of brake grease, put it on the caliper slides, and stick that back in. Do the same on this one. Take our pad slides.We’re going to clean off the backside a little bit. Stick that back on. Same with this one. They're pretty clean, not too bad. Not really rusty. Put this one back on here. Take a wire brush to the top side. That's good.
First, before we install the rotor, we're going to put it on backwards. So we can take some brake parts cleaner and clean the backside of the rotor. Wipe it off. When they make these rotors, they put a protective coating on them so they don't rust on the shelf. Spray brake cleaner on this side and wipe it down.
Install our caliper bracket. Take the bolts from the backside. We're going to torque these bolts for this caliper bracket to 47.9 foot-pounds. Take some brake caliper and brake pad grease. Put it on the ears of the pads Then we're going to put a little bit on the surface here. Be careful, don't get it on your fingers. We're going to slide that in, in the backside. There we go. Do the same with the front one. Put a little bit on the ears, and then put a little on the face. Install that. Those are in.
Take the bungee cord off of the caliper, and we want to compress the piston. We're going to use some channel lock pliers. You can use a C-clamp or a brake caliper tool. That's all the way down. Install the brake caliper. Install the brake caliper bolts. We're going to torque these bolts to 19 foot-pounds. Do this one up top.
Install our tire. Put the lug nuts on. With the torque wrench, we're going to torque the lug nuts down to 90 foot-pounds going in a star pattern. You want to go in a star pattern so that you torque the wheel to the hub evenly. There you go.
Now before you drive away, you're going to want to make sure that you pump the brake pedal slowly multiple times cause there will be an air gap between the brake pads and the caliper so when you pump it, it will push the fluid back to the caliper and compress the brake pads.
Thanks for watching. Visit us at 1AAuto.com for quality auto parts, fast and free shipping, and the best customer service in the industry.

BKA12472