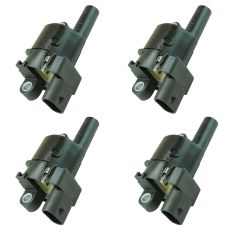
Replaces


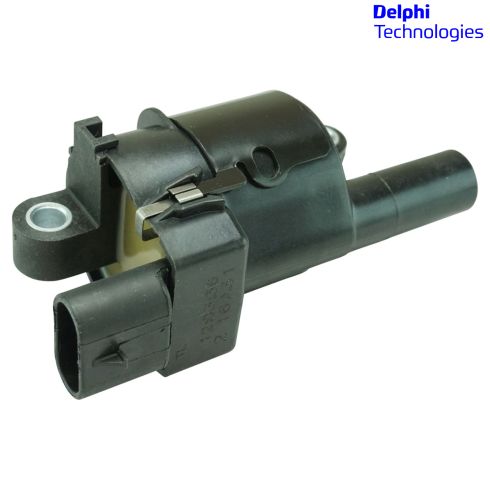

Recommended for your 2009 GMC Canyon
Why Delphi?
As an Original Equipment Supplier, Delphi Automotive products from 1A Auto come directly from the source. You wont have to worry about going to the dealership for Original Equipment - these parts are the exact same as the original. Delphi products come with the same quality from the dealership at a lower cost to you.
The ignition coil pack is a crucial part of your ignition system. It's function is to convert the 12 volt power of your vehicle's electrical system in to 35,000 or more volts. This produces a high intensity spark at the spark plug which then ignites the fuel in the cylinder. Coils in general will wear out over time.
Returns: Parts with electrical components cannot be returned once installed.
Lifetime Warranty
This item is backed by our limited lifetime warranty. In the event this item should fail due to manufacturing defects during intended use, we will replace the part free of charge. This warranty covers the cost of the part only.
Returns: Parts with electrical components cannot be returned once installed.
FREE Shipping is standard on Orders shipped to the lower 48 States (Contiguous United States). Standard shipping charges apply to Hawaii, Alaska and US Territories. Shipping is not available to Canada.
Expedited is available on checkout to the United States, excluding Alaska, Hawaii and US Territories as well as P.O. Boxes and APO/FPO/DPO addresses. Final shipping costs are available at checkout.
Created on:
Tools used
We have to pop off this cover that's on top the engine. That just pops up. There's two points where it pops onto. So you just kind of get them and work them out straight from the back. Just like that. You can see here, this is where it pops on here and here and then these two tabs slide into the back. We're going to set this aside so it doesn't get broken. With our engine cover removed, you can now see the eight ignition coils on this engine. We've got four on each side. There's one, two, three, four, this is on the driver's side. We'll go over to the passenger's side. We've got one, two, three, four and the process to remove and install them is going to be the same for both sides.
This side you might have to move some of these hoses out of the way so you can get to them. But in general it should be pretty straight forward and we're going to show you that on the driver's side of the car. We're going to start by unplugging the coil. So we're going to lift up that lock, pull it out. Take my 10 millimeter socket ratchet with an extension on it, break these free. Before I take it off completely, this is our spark plug down here and the wire, I'm going to pull the wire off. Don't pull the wire, pull it by the boot. If this seems like it's stuck, you can take a small flat bladed screwdriver or if you've got a pick then just sort of work around the rubber to try to loosen it.
Go back to our ratchet, these are pretty loose so I'm just going to use the socket with my fingertips. Grab that bolt and the next bolts. We'll hold this with my other hand so it doesn't fall and we can remove the coil pack.
Here's our old coil pack from the vehicle and our new coil pack from 1AAuto.com. You can see the connectors are the same, it's got these nice metal inserts in the bolt holes. Same setup for the spark plug wire. This'll fit perfectly and perform great. Take our new coil place it on the bracket, it's loose, don't want it to fall. Our bolts, get them started with my fingers.
10 millimeter socket, ratchet extension just tighten these from the wrist, when they start to feel tight I'm going to stop. Going to reconnect our electrical connector at the top. Should push it in so it locks. Take our spark plug wire put it back in. That will click on, that's tight. And our new coil is installed. Okay, so now we're going to put this engine cover back on. So you've got these two little pins here and there's two little clips in the back. But this needs to slide up and into and then over these to lock it down. So it's easier to slide it to the back and get these hooked and then push it down onto these. It's got a little bit of a curve here, there's some heater hose lines on the other side that they need to go over it like this. So you basically just start it and then just slide it down and you can almost see it as it hits those hooks and then you push it over those pins and down and it's on.
Thanks for watching. Visit us at 1AAuto.com for quality auto parts, fast and free shipping, and the best customer service in the industry.
Tools used
Brought to you by 1AAuto.com, your source for quality replacement parts and the best service on the Internet.
Hi, I'm Don from 1A Auto. I hope this how-to video helps you out, and the next time you need a part for your vehicle, think of 1AAuto.com. Thanks.
In this video, we're going to show you how to replace an ignition coil in this 2006 Cadillac CTS. It has the 2.8-liter V-6 engine, and we show you how to replace one of the harder ones, which requires you to pull up the intake plenum. You'll need new ignition coils from 1AAuto.com, various wrenches and sockets, flat blade screwdriver, and a torque wrench to put things back together.
Twist out your oil fill cap, and then pull off your engine cover. Now there's a series of 13mm bolts going all the way back, and you want to just go ahead and remove those. The ones in the back are a little hard to remove, but you want to at least loosen them up as much as you can. For the back ones, we use a small breaker bar and a shallow socket. Using a flat blade screwdriver, loosen up this hose clamp and then pull the air intake box from the front of the intake manifold. Using a 10mm wrench, just loosen up this stud and then twist it free. Then loosen this 18mm bolt. You want to loosen it enough until you can pull that bracket back.
Okay, with all five of these bolts out and that one loosened up, this bracket detached and this detached. You should be able to lift up your manifold enough to access all the coils. Loosen up the 10mm bolt on your ignition coil, and you want to get it out as much as you can and pry out on the tab on this harness and then slide the harness free. Lift up on your intake manifold and pry the ignition coil up, and now you can loosen that bolt more and pull the ignition coil free.
Now, to replace the ignition coil, we can show you on the other side. Just lower the ignition coil into place and twist the bolt back in. Make sure the ignition coil is all the way down, and reconnect the harness. You can see that if you're doing it on this side, you will need to pull that censor out. It just makes it a lot easier, and then it just pushes back in when you're done.
Once you have the harness back in place, push that clip back in. Now you can replace these bolts. We'll fast-forward as Mike does that. Now tighten each of those up preliminarily. Then just torque each of them to 20 foot-pounds. This back one, you just want to tighten firmly by hand, put the stud back in place, and tighten it up with the wrench. Then tighten up that 18mm bolt. Push the air intake box back onto the manifold, and then tighten up that hose clamp. Then take your engine cover, push it back down into place, and replace the oil fill cap.
We hope this video helps you out. Brought to you by www.1AAuto.com, your source for quality replacement parts and the best service on the Internet. Please feel free to call us toll-free, 888-844-3393. We're the company that's here for you on the Internet and in person.
Tools used
Brought to you by 1AAuto.com, your source for quality replacement parts and the best service on the Internet.
Hi, I'm Mike from 1A Auto. I hope this how-to video helps you out, and next time you need parts for your vehicle, think of 1AAuto.com. Thanks.
In this video, we're going to show you how to replace an ignition coil on this 2003 GMC Envoy XL, with the 5.3 liter V8 engine. The items that you'll need for this is a new ignition coil from 1AAuto.com, 7mm socket and ratchet, and a flat blade screwdriver.
Because this is a V8, there's four ignition coils on either side of the engine, four here, and four more here. Each one is held in with two 7mm bolts. Start off by disconnecting the harness. Just lift up on the tab and disconnect it, and then pull and pry off the spark plug wire from the ignition coil, and then remove those two 7mm bolts. Once the bolt's removed, the ignition coil will pull right off.
On the left, is the old ignition coil; on the right, is the new one from 1A Auto. You can see they're identical, and will fit exactly the same. Wipe down the area where the ignition coil goes. Reconnect the harness to your ignition coil to help hold it into place, and then line it up on the bolt holes, and replace those two 7mm bolts, and tighten them up. Reconnect the plug wire, and repeat for any of the other coils you want to replace.
We hope this video helps you out. Brought to you by www.1AAuto.com, your source for quality replacement parts and the best service on the Internet. Please feel free to call us toll-free, 888-844-3393. We're the company that's here for you on the Internet and in person.
Tools used
Brought to you by 1AAuto.com, your source for quality replacement parts and the best service on the Internet.
Hi, I'm Mike from 1A Auto. I hope this how-to video helps you out, and next time you need parts for your vehicle, think of 1AAuto.com. Thanks.
In this video, we're going to show you how to replace an ignition coil on this 2011 Chevy Silverado 1500 with the 5.3-liter V8. It's a similar process on a large variety of GM models from 2007 to 2012. The only tool that you'll need for this is a 10mm socket and ratchet.
We're just going to show you on this ignition coil right here, but you can see there's four on either side since it is a V8. What you want to do first is just disconnect the harness at the top, and then remove these two 10mm bolts right here. Once those screws are out, you can pull the ignition coil away and just disconnect the spark plug wire.
Take your new ignition coil and put it back in place. Plug that harness back in at the top, line up those holes, and replace those two 10mm bolts. We'll speed up here. Notice he threads them in first by hand, and then tightens them up with the socket and ratchet. Then reconnect your spark plug wire and you're all set.
We hope this video helps you out. Brought to you by www.1AAuto.com, your source for quality replacement parts and the best service on the Internet. Please feel free to call us toll-free, 888-844-3393. We're the company that's here for you on the Internet and in person.
Tools used
Brought to you by 1AAuto.com, your source for quality replacement parts and the best service on the Internet.
Hi, I'm Mike from 1A Auto. I hope this how-to video helps you out, and next time you need parts for your vehicle, think of 1AAuto.com. Thanks.
In this video, we're going to show you how to replace ignition coil. On these vehicles, they recommend you replace these coils at 100,000 miles. Also, sometimes if your engine runs a little rough and turns the "check engine" light on and you get a code that says, "Cylinder 1 or Cylinder 3 or something misfiring," that's usually a coil going bad. It is a pretty easy replacement. You'll need a ratchet extension with 8mm and 10mm sockets. If you don't have an 8mm socket, a flat blade screwdriver can help you get the clamps off as you'll see.
Working from the passenger side, you want to remove two bolts that hold the top of the air box: one here and one right here. Now to remove this, you want to remove this intake tube which is a clamp here and a clamp here. Remove that tube and then loosen both this one and this one to pull this apart. I'll speed this up a little bit. You can either use a flat blade screwdriver or an 8mm socket with a ratchet and extension to undo those clamps. This also has a small vacuum line on here. Twist and pull that off, and then this goes up, and there's also a line right back here. Just pull off of there.
This big vehicle has been sitting for a while, so I'm just using a vacuum cleaner to clean up the vacated mouse house that's sitting on the intake. Okay, then take, twist, and get this collar off here. You can see here are our five coils. Pick any one of them, and just remove the 10mm bolt. Each of them have a little gray clip that you just pull on. Use a screwdriver. There's a little tab right in the center. Push the tab down and pull the clip right off.
Then there's just a tab for your thumb. Press that. Remove the lead, remove this 10mm bolt, and then, once you have the bolt removed, just move it around, shake it up and down a little bit, and then the coil comes up and out.
The new coil from 1A Auto is exactly the same as the old one. Put it right down in. You want to just push it straight in. Tighten up the 10mm bolt. Plug your lead back in, and then put the locking tab back in place. Repeat that for any cylinders you need. The cylinder order on these is usually just from front to back: 1, 2, 3, 4 and 5. If you get a code like "number 3 cylinder misfiring," that's usually a bad coil, so you'd replace the number 3 coil.
To put it back together, put this on there. There's a little notch that should stick up right there. I've got my two bolts already kind of in there. Right here is that hose. Push that hose down first. Put this down in place. I'm just kind of maneuvering it into this hose here. Push it into place and twist this hose a little bit off. Push it down onto here. Get it good and tight on there. Hook up the vacuum hose. Use an 8mm socket to tighten up. Just inspect where the hoses go and their housings. Make sure they're nice and tight, and then tighten up our clamps. Again, you can use either a flat blade screwdriver or an 8mm socket. Then we go back to our 10mm socket and then tighten them up and you're all set.
We hope this video helps you out. Brought to you by www.1AAuto.com, your source for quality replacement parts and the best service on the Internet. Please feel free to call us toll-free, 888-844-3393. We're the company that's here for you on the Internet and in person.
Tools used
Brought to you by 1AAuto.com, your source for quality replacement parts and the best service on the Internet. Hi, I'm Mike Green. I'm one of the owners of 1A Auto. I want to help you save time and money repairing and maintaining your vehicle. I'm going to use by 20 plus years experiences restoring and repairing cars and trucks like this to show the correct way to install parts from 1AAuto.com. The right parts installed correctly, that's going to save you time and money. Thank you and enjoy the video.
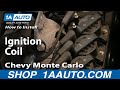
In this video we're going to show you ignition coil replacement. This is an '03 Monte Carlo SS with a 3800 or 3.8 liter. The same engine that's in a ton of different vehicles from the late 90's to the late 2009, 2010 era. The same procedure for all vehicles. The only tool you're going to need is a socket and ratchet with an extension, either 6 mm or a 7/32.
Coil replacement, this is a 2003 Monte Carlo SS. It has got a 3800 V6, pretty typical of a lot of GM cars, great little engine, good power, lasts a long time. The coils for the most part are right on the side of the engine, right here. You can see that there are three of them. Each coil handles two cylinders, so they're really nice and easy to get to on these V6's. This is pretty much the same as the 3.4 liter V6 as well. I'll show you how to replace these. Okay, replacement is really quite easy. You start by removing the plug wires and I do one coil at a time. You don't want to just unplug all these wires. You want to make sure you have to plug them back into the same spot.
I just unplug. I take that one and leave it right up there. I'll take this one that's lower and I'll put it down here. Now I have two bolts here that I have to remove. Okay, those two bolts are 6 mm and actually 7/32 and a standard socket works as well. Okay, then the coil comes right off. You can see that it plugs into two tabs right there. You want to be careful when you raise not to bend those tabs at all. Okay, this is our original coil. This is our coil from 1A Auto. You can see that they're the exact same. Obviously our coil doesn't have the numbers on it; because, it can be used on any of the three positions. Everything's the same. Everything is going to bolt in the same. It has the same plugs there. I am going to re-install the original coil; because, there's nothing wrong with it on this car. I just wanted to show you that.
A good practice when you're re-installing the coil is to put these bolts in, okay. That way when you put it down on you can see that the bolts go into the right place and that you have the coil lined up, okay, so then just kind of lightly work it down on there. Then push those bolts on. I'm going to tighten up with my air ratchet. Now I'm going to finish tightening it up by hand. Never want to use the ratchet to tighten something up; because, you want to know how tight it actually is. Okay, I know I left this top one up here. I'll put that one on and then this bottom one down here. I'm going to put that one on. Just repeat that for the other two.
We hope this helps you out. Brought to you by www.1AAuto.com. Your source for quality replacement parts and the best service on the Internet. Please feel free to call us toll free 888-844-3393. We're the company that's with you on the Internet and in person.
Tools used
Brought to you by 1AAuto.com, your source for quality replacement parts and the best service on the Internet.
Hi, I'm Mike from 1A Auto. I hope this how-to video helps you out, and next time you need parts for your vehicle, think of 1AAuto.com. Thanks.
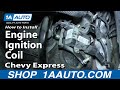
In this video, we're going to show you how to replace the ignition coil on this 2005 GMC Savana 2500 with the 6 liter V8 engine. The tools that you'll need are a 7mm and a 10mm socket and ratchet.
To start off, go to the driver's side of the vehicle and you'll see there is a panel right here and you're going to want to remove these two 10mm bolts that secure that panel and also you'll see that there's a latch back here. Pull that back towards you and it should unhook that clip there, and then you just want to remove those bolts. We'll just fast forward as he does this. Now, with the bolts removed, you can just pull on that panel. Just reach underneath it and pull it out. Be careful not to pull out the panels above it. Now, on the other side, there are two more 10mm bolts securing a panel. You want to just remove these two 10mm bolts and also, like on the other side, you want to pull back this clip and unlatch that and we'll fast forward as he removes these two 10mm bolts. Now, you just want to pry this panel off. It should pry off pretty easily. In the center of the center console, underneath, there's two more of these latch clips and what you want to do is, you want to just push up on the clips and free them, and then, once you have this unlatched, just lift up and pull forward. Pull right out. To make more room for yourself, the engine is behind this panel. What you can do is, you can see it can't come out of this vehicle. The seats are in the way and the seats are only a few bolts if you want to remove them, but if you just want a little bit more room to save time, what you can do is you can just remove . you see these four 10mm bolts inside this panel. You just want to remove those. With those bolts out, you can now pull that panel up and off and remove that little top piece and now, with put the overall access panel being shorter, you can push it under the dash and then you can access those spark plugs and ignition coils. If we push it under the driver's side, you can see the other spark plugs and ignition coils.
We drew up this diagram to help you out. If you have a code reader and know what ignition coil is misfiring, this will tell you which ignition coil that is on your engine. The driver's side, front of the engine spark plug would be one and then it goes back three, five, and seven. On the other side is the evens and it goes two, four, six and eight. In this video, we're going to show you how to replace number eight, but it's the same process for all of them.
Here is ignition coil number eight. You just want to disconnect the harness and remove these two 7mm bolts. There's one on this side and then there's another one just opposite of it on the other side and we'll fast forward as he loosens and removes these. With the bolts out, the ignition coil comes right off and you just unplug your spark plug wires.
Then, get your 7mm bolts and tighten them in by hand to secure the ignition coil in place. Once you have that secured, just use the socket and ratchet to tighten it the rest of the way and we'll fast forward as he does this. Now, you just want to reconnect your ignition coil, just plug in that harness up there and plug in your spark plug wires.
To put the panel back together, what you want to do is you put that top piece on, line up the access panel and you just want to keep pushing it back into place. What you'll just see, you'll see those clips have to line up. There are hooks on the van, on the floor of the van that you need to line the latch hooks up with. Once you have it lined up, you just want to start connecting all those latches. Just hook on to the hook, pull the tab and lock it and you want to do that with all four of them. Now, you can replace the cup holder panel. Just put it into place. Replace those four 10mm bolts. It helps you do it by hand. You can hold on to it and line up all the bolts. Just start it out by hand and then we'll fast forward as he uses the ratchet to tighten the rest of the way. Now, you can put on that little panel right there. Just clips into place. Replace the panel underneath the driver's side, just push all the clips in. You should hear them snap. Then, you just want to replace those two 10mm bolts and we'll faster forward as he does this. Now, you just want to push that panel into place on the passenger side. You just want to line up the clips, push it in and then replace these two 10mm bolts and then you are all set.
We hope this video helps you out. Brought to you by www.1AAuto.com, your source for quality replacement parts and the best service on the Internet. Please feel free to call us toll-free, 888-844-3393. We're the company that's here for you on the Internet and in person.

GN10165