Replaces


Recommended for your 2003 Acura MDX
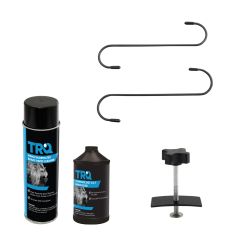
Frequently bought together
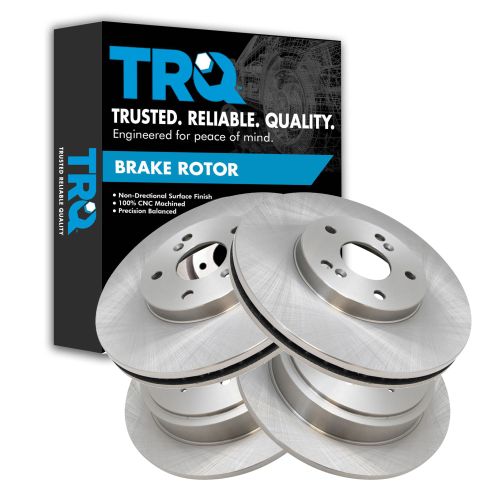
Part Details
Specifications
About TRQ:
TRQ is a trusted brand dedicated to making every repair a success story by combining premium parts with easy installation. Each TRQ part is engineered by a team of automotive experts to meet or exceed OEM standards, delivering enhanced performance and maximum longevity. With rigorous in-house testing, the brand ensures superior fit and function across every product line. TRQ also provides customers with best-in-class, step-by-step installation videos—so you can complete repairs with confidence, whether you're a first-time DIYer or an industry professional.
Product Features
TRQ brake rotors are manufactured using premium G3000 casting alloy to reduce noise while braking and enhance service life. TRQ rotors have a non-directional finish to minimize the break-in period for new rotors and reduce vibrations throughout the rotor’s lifecycle. TRQ recommends replacing brake pads when you replace rotors to ensure even wear and improved component performance. All products are fit and road-tested in our Massachusetts R&D facility to ensure we deliver on our promise of Trusted Reliable Quality.
Attention California Customers:
 WARNING: This product can expose you to chemicals including Lead and Lead Compounds, which are known to the State of California to cause cancer, and birth defects or other reproductive harm. For more information, go to www.P65Warnings.ca.gov.
Lifetime Warranty
This item is backed by our limited lifetime warranty. In the event that this item should fail due to manufacturing defects during intended use, we will replace the part free of charge. This warranty covers the cost of the part only.
FREE Shipping is standard on orders shipped to the lower 48 States (Contiguous United States). Standard shipping charges apply to Hawaii and Alaska.
Shipping is not available to a P.O. Box, APO/FPO/DPO addresses, US Territories, or Canada for this item.
Expedited is available on checkout to the United States, excluding Alaska, Hawaii.
Final shipping costs are available at checkout.

Created on:
Tools used
Hi, I’m Mike from 1A Auto. We’ve been selling auto parts for over 30 years!
If your vehicle is equipped with a wheel lock key, you want to make sure you have this before you start. You're going to use a breaker bar, and these are 19mm. Start with the wheel lock key one. Should always use a breaker bar on the wheel lock key, don't use an air impact, because you can easily break the key. Just get them loose, about half a turn. Should always loosen the lug nuts with a vehicle on the ground. Once you've loosened your lug nuts, raise and support your vehicle. We're going to use a lift for this so it'll make it easier to see what you're doing. But you can do this on jack stands in your driveway. With the vehicle in the air, now we can loosen the rest of the lug nuts. Careful as you loosen the last one, because the wheel might start to slide off the wheel studs.
I'm going to start by removing this 12mm bolt that is holding on our brake hose. Because once this caliper is loose, we need enough slack to bring it up and hang it from our spring. Take some rust penetrant oil and spray it on the threads. Take my 12mm wrench and break this free. Sometimes you have to work it back and forth once the oil's in there. Once it gets loose, I'm going to switch to a ratcheting wrench. I can use this or a 12mm socket ratchet. Pull that out of the bracket. I'm going to put our bolt back into the bracket so it doesn't get lost. Using the 12mm wrench, I'm going to remove the lower caliper bolt so that I can swing this caliper up and remove the pads.
Using a large flat bladed screwdriver or a small pry bar, I'm going to pry the caliper loose. We're going to rotate it up. See, those pads are pretty worn down. I'm going to remove these pads. Just with my fingers, so we can see, I'm just going to move this around—our caliper's sliding, nice little slides, and I can feel the lower slide is moving in and out. So this caliper's in good shape, and it's not seized up. Now I will remove the caliper bracket bolts—there's one on the bottom, one on the top, they are 17mm. You either need to use a rubber mallet or a deadblow hammer to break them free. Once one is loose, start working on the other one. You don't want to remove one completely and then try to loosen up the other one. It'll make it easier if the caliper is locked in place.
Now that they're loose, I'm going to take my 17mm socket and ratchet and use that to take them out, so it's a little easier. Quicker. Now I'm going to switch to the top one. Keep your hand on the caliper, because once this top bolt comes out, it will be loose. You don't want to hang it on the rubber brake hose. You want to have a bungee cord, or a stiff coat hanger, ready. And we're going to hang it from the spring. Put that aside. Use my fingers to get it out the rest of the way. Caliper is loose, going to lift it off the hub.
We're going to take a bungee cord, and we'll hang it from the spring. I'm going to swing the caliper back up, take our pin bolt, just loosely thread it in there so it's not hanging with all its weight on that one caliper bolt.
If you are replacing original rotors, they may have locating screws here and here that you will want to remove. This vehicle has already had the brakes done once, so these screws are not here anymore. Now I'm going to remove the old rotor. If it helps, you can take some rust penetrant oil, spray some around the hub. So this one's a little bit stuck. I'm going to thread on two of the lug nuts so the rotor doesn't fall off. And then using rubber mallet or a deadblow, just going to try to loosen it. So that rotor was caught on the edge of the hub, it's kind of rusty, and this was rusty in here, it was just a tight fit.
Before I put the new rotor on, I want to clean some of this rust off. I'm going to take a wire brush and just brush it off. Just work it around. Mostly going to do this inner hub, where the wheel sits. Now take some brake parts cleaner, and we're going to take off that penetrating oil we sprayed on there. This is our old disc brake and pads. This is our new disc brake and pads from 1AAuto.com. As you can see. The new ones will come with backing plates just like the old ones, shims. And the anti-squeal tabs. And the squealing tabs for the wear indicators.
You can see these pads are pretty worn down. This is a fresh pad, compared to a pad that is basically worn out, and you can see the huge difference. Looking at the rotors, same amount of lug holes, same screw holes to mount them, both ventilated, these should work great and give you a lot better stopping power than these worn out brakes.
Take our new rotor. I'm going to place it on inside out. Take brake parts cleaner. I'm just going to clean it. Now I can flip it and put it on the correct way. Take one of your lug nuts that you're not using, just thread it on there so the caliper doesn't fall off, actually make it a little easier if it holds on there straight while you're trying to put the caliper back on. Take our brake parts cleaner, clean it off. Actually take a rag and get some of the heavier stuff. You want to keep this surface nice and clean, free of oil and grease, because that's where your pads are going to ride.
Now I need to compress this piston back into the caliper because it will not fit over the rotor with the new pads, because it's come too far out. So I'm un-threading it. Just going to hold it in this hand, and put this bolt aside. I will take one of our old pads, and place it just like that. I'm going to take a large C-clamp. I'm just going to thread it down, just kind of go slowly, because it's going to push fluid back up into the reservoir. We can see the piston is being pushed back into the caliper. You don't have to kill this, this should be good right about there. Take the C-clamp off. Get rid of our old pad.
I'm going to unhook the caliper that we've got hanging here on the strut. Don't forget to take the bungee cord or coat hanger out of here that you're using. Take one of my caliper bolts, and I'm going to mount the caliper back up. Might have to move the caliper around so you find the threads in the hole. Might just have to wiggle the caliper around and try to thread the bolt in by hand until you catch the threads. So I've got this one close, I'm going to get it finger tight. I'm going to work on the bottom one.
Take our 17mm socket and ratchet, just going to get it snug right now, I'm not ready to torque these. And the bracket bolt to the hub, the lower bolt from the caliper pin is still out, I'm just going to rotate the caliper up, then take a bungee cord and just hold it up and out of the way while I work. Then I reuse these brake pad clips, they're stainless so they typically don't rust, I'm just going to clean 'em up. Just going to use a flatheaded screwdriver to get them out of here, so I can take them over to the bench and clean them. I'm using the inside of the box just to keep the brake parts cleaner and dirt contained so it doesn't get everywhere and make a mess. Take a little bit of brake parts cleaner, spray it on here. Take a wire brush, brush these out so they're nice and clean. This is where the pads ride. Don't have to be sparkling and new, just get the heavy dirt out of there. So that's a clean one and that's a dirty one. We're going to do the same for both. With our clean brake pad clips we're going to put them back in.
Did get some grease here so I'm going to clean that off with some brake parts cleaner. I'm going to take our new pad, take some brake parts cleaner, just in case you touched the surface by accident, and just spray this with some brake parts cleaner. Make sure it's nice and clean. That already evaporated. Take some brake caliper grease, put a little bit on the ears. This is the inside pad, with the wear indicator. Place it in the bottom first, rotate it up. Make sure my clip is seeded. The inside pad is installed. Install our outside pad. Make sure the pads are nice and tight against the rotor, roll the caliper down. If you get the piston compressed all the way it should just slide right over it.
Take our lower caliper bolt now, goes into the pin. Let's take our bolt back out of the strut bracket here that is holding the brake hose. Place it back where it belongs, put the bolt back in, take my 12mm ratcheting wrench, torque the lower 17mm bolt to 79.6, we're going to do 80 foot-pounds. Now torque the upper caliper back-up bolt, may need to add an extension to your torque wrench to reach it. Torque the lower caliper slide pin bolt 27 foot-pounds. We didn't undo this one, but I'm just going to check it. I'm going to torque the bolt holding on the brake hose to 16 foot pounds. Now you can remove this lug nut you had holding on the brake rotor.
Now we'll finish with the brakes, put the wheel back on. We'll start with our locking load because it's got a nice little tool you can hold it with. The key. Get the wheel seated on the hub. Take the rest of our lug nuts, so you have all your lug nuts sorted by hand, you can snug them up with your ratchet. Just want to get them seated, I will torque the wheel when it's on the ground. Put the wheel lock key on, sometimes you just have to spin it around so it lines up. Take our torque wrench, set to 80 foot pounds. Before you drive the vehicle, gently press the brake pedal about a third of the way, repeatedly, until it gets hard. Once you feel the brake pedal become hard, your job is complete, and you're ready to drive the vehicle.
Thanks for watching. Visit us at 1AAuto.com for quality auto parts, fast and free shipping, and the best customer service in the industry.
Tools used
Hi, I’m Mike from 1A Auto. We’ve been selling auto parts for over 30 years!
If your vehicle's equipped with a locking lug nut, you're going to want to have it ready. Get it to fit on there. These are 19mm. Take our breaker bar, loosen them up a half turn. Once you loosen your lug nuts, raise and support your vehicle. We're going to use a lift for this so it will make it easier for you to see what we're doing, but you can do this on jack stands in your driveway. These are pretty loose now.
Going to take my socket in my hand and undo them with my hands. When I'm doing the last one, just make sure you've got hold of the wheel. It might come loose. This one came off pretty easy, and remove the two 12mm slide pin bolts. You get the top one loose and get the bottom one loose. I'm going to switch to a ratcheting wrench. So put these two slide pin bolts so you don't lose them. I've got a bungee cord here. Just going to place it right there for now. I'm going to work this caliper off.
If it doesn't come off very easily, you can get a large flat-headed screwdriver or pry bar and pry it off. I'm going to take the caliper and our bungee cord and I'm just going to wrap it around the suspension just because we don't want it to fall or hang on this rubber brake line. You don't need to undo the caliper for the brake line. I'm just going to check these slide pins to make sure they're free. They should move fairly easily in and out just like that. If the rubber boot comes off, that's okay, you can just push it back up.
Now we can get the brake pads out. You can use a small flat-bladed screwdriver or a pry bar. I'm going to use a pry bar. Just work them out. Same for the inside. Next, remove the 14mm caliper bolts, caliper bracket bolts. There's a bottom one here and a top one here. 14mm wrench. If they're really stuck, take a rubber mallet or a dead blow. I'm going to hit on the wrench. Those free, I'm going to switch to a ratcheting 14mm wrench.
Those are pretty loose. Use your other hand to hold on to the bracket so it doesn't fall. I'm going to take our bolts that we took out that were holding the bracket on, and thread them back into the bracket so we don't lose them. I'm going to spray some rust penetrant oil around the hub here and on these screws that we need to remove that are holding the brake rotor to the hub. I'm going to use a large Phillips head socket attachment on a 3/8 dry ratchet to remove these. So make sure your parking brake is released.
Parking brake is inside this part of the brake rotor. There might be a rust ridge in there that will catch on the brake shoes. This rotor should come off without too much effort. If it gets really stuck, you can put 8mm x 1.25 bolts in here to help push it off. Before I put the bolts in here, I'm going to spray some rust penetrant oil on the threads. The bolts that I'm using have a 12mm head, so I'm going to use my ratcheting wrench. I'm going to go evenly on each side. Now I've got it free. You can see that's your parking brake assembly, and sometimes they just get held up. A rust ridge builds up in here and the shoes get held up on it.
So now's a good time to inspect your parking brake assembly and replace any parts as necessary. These pads are in really good shape, or shoes. They've got plenty of material on them. Especially on an automatic car—this doesn't get used very much. There is some penetrating oil that got in here from spraying down the hub. I'm going to take some brake parts cleaner at this time and just spray it out. I'm going to make sure these pads stay nice and clean.
Here we have our old rotor and pads from our vehicle. Here is the new rotor and pads from 1aauto.com. You can see that the old pad comes with backing plates and shims as do the new pads. Comes with the wear indicators. These pads are getting pretty thin than the original ones. Now's a good time to replace them. So the rotors are identical. Same amount of lug holes, same screw holes, and same pusher thread holes. Inside it has the same parking brake setup hub. These should fit great on your car and give you great stopping power.
We're also going to switch over this rubber plug. We're going to put it in our new rotor. Just going to push it out from the back. Almost got away from me there. Take our new one, push it in and you're all set. If your hub is really rusty, you should take a wire brush and just knock some of the rust off. This one's in pretty good shape, so I'm going to leave it alone. We'll take our rotor. Going to put it on inside out. Take brake parts cleaner and clean it. Clean the inside, because that's where your parking brake shoes will ride. Now I can flip it over.
We're going to line up these holes with the holes in the hub. So the reason why you clean these brake rotors before you use them is because when they're shipped, they're shipped with a light coating of oil or Cosmoline to prevent surface rust. And you don't want that into your brake pads. I'm going to take our small Phillips head screws here and reinstall them. I'm just going to go until they get tight. All these do is hold the rotor in place while you're working so the rotor's not flopping around while you're trying to. With the rotor installed the correct way, I'm going to take my brake parts cleaner and finish cleaning it. If there's really heavy stuff, you can take a rag, wipe it down.
The wear on this inside pad looks a little bit uneven. It's got a bit of a slope to it. It's not straight. It should be nice and straight, so that typically means that one of these caliper slides may be sticking. This one's a little hard to move. This one's fairly easy to move. I'm going to pull one out. Start with this one. If you need to, you can take a little pick, carefully pop this boot over it. That pin looks a little bit dry. I'm going to wipe it off with a rag. Make sure you don't lose the little rubber piece that's on the end of it.
Take some brake caliper grease and grease it up. Reinsert it back into the caliper. Those can take a little bit of force, usually because there's some air stuck in there. So then what I'll do is squish it in and use my pick and sort of let some of the air out and work that boot back up into the groove. That's got a lot smoother movement on there now. The reason why it's pushing out is probably an air pocket in there. You can just open this up and squish it down. That's okay, we'll push that back together when we put the caliper on. We'll do the same thing for this one.
The boot already came off the little lip here. Take a flat-bladed screwdriver to remove the brake pad clips. These are typically stainless and they don't really rust, just get full of dirt. So we're going to pop them out and clean them. I like to use the old box to keep all the dirt and grit and brake parts cleaner in one place, because we're going to spray them with brake parts cleaner. Take a wire brush, scrub where the pads ride. Take a paper towel and just wipe them down. If you want, you can take your wire brush and clean right here, some of the rust out. A little brake parts cleaner. Same to the other side.
Now we can reinstall our clips. They just snap back into place. Reinstall the caliper bracket on the car. Hold it in place with one hand and take my bolts. Might have to wiggle it around. This one went in pretty easy. I'm just going to thread it down by hand. I'm going to take our inside pad. I'm going to spray it with some brake parts cleaner. I just want to make sure that the surface is clean and it doesn't have any grease or oil on it. I'm going to take a little bit of grease, caliper grease, and put it on the edge. I'm going to start in the bottom slot and push it up against the rotor. That's a little too much. You don't need much. Seat it in the lower tab. Slide it in the upper one.
Before we reinstall the caliper, we need to compress this piston back into the brake caliper, so I'm going to take the old brake pad. I'm going to take our C-clamp and get it sort of in place. It will be a little tricky with one hand. Now I'm just going to rest the rotor on the top of the dust shield. I'll hold it with one hand and just slowly thread it in so it compresses the piston into the caliper. I'm just going to go 'til the pad bottoms out on the edge of the caliper just like that. We can undo our bungee cord. Also take it off the suspension so I don't forget it.
Make sure these pads are nice and tight against the rotor. I'm going to roll our caliper down. You may just need to push this pin in. These pins have little flat spots that will line up with the caliper. That way, as you're threading in your slide pin bolts, they won't spin. You just want to make sure that those are lined up correctly.
Now I've got these caliper slide bolts started by hand. I take my 12mm ratchet wrench. Use a 14mm socket and extension. Torque the top caliper bolt to 41 foot-pounds. Just a 14mm socket and the torque wrench on the bottom one. Watch out for your ABS wire. You may need to move it out of the way. Torque it to 41 foot-pounds. Torque the caliper slide pin bolts to 27 foot-pounds with a 12mm socket.
Reinstall the wheel. Thread the lug nuts on by hand. 19mm socket ratchet. I'm going to snug these lug nuts. The torque wrench set to 80 foot-pounds, torque the lug nuts in a star pattern. Before you drive the vehicle, gently press the brake pedal about 1/3 of the way repeatedly until it gets hard. Once you feel the brake pedal become hard, the job is complete and you're ready to drive the vehicle.
Thanks for watching. Visit us at 1AAuto.com for quality auto parts, fast and free shipping, and the best customer service in the industry.

BRA13684