Hi, I'm Mike from 1A Auto. We've been selling auto parts for over 30 years. We're dedicated to delivering quality auto parts, expert customer service, fast and free shipping, all backed by our 100% satisfaction guarantee. Visit us at 1AAuto.com, your trusted source for quality auto parts.
Your upstream O2 sensors are the O2 sensors that are in front of your catalytic converters on the left or driver's side. You can see it right up here. This is the one we're going to show you. We are going to remove the drive shaft. It just makes it a lot easier to get to that O2 sensor. This truck as a four-inch lift, so there's lots of room to see that upstream driver's side O2. If your vehicle doesn't have the lift, which most don't, you'd be working with less room. It may be a better idea to remove your inner fender some and then access the O2 sensor from here. It might be this way. We'll show you from the bottom.
On the passenger side, you can see it very easily from down below. Actually not very easily, it's up in here. It's actually most reachable right through the wheel well. If you turn your right wheels all the way to the left, you want to access that O2 sensor through the wheel well. We have our vehicle up on a lift. You could put your vehicle securely on jack and jack stands. You could also do this with the vehicle on the ground, especially with this vehicle. With the big tires, there's plenty of clearance. Just make sure you block your tires so the vehicle can't roll.
Twelve millimeter, 12 point socket and then a pry bar to hold the drive shaft in place. Put the pry bar in. We'll fold the axle with a joint with a pry bar. We gave it a try with just a regular socket and ratchet. Unfortunately, on impact tools, they don't make 12 point sockets. We'll just put it on and get them going. Usually once you bring impact tools in, they come apart pretty easily. We're dealing with a rusty New England car, so impact tools are really the only way to go here. Before we separate this, we're just going to mark the flange and the axle, so we can put it together in the same clock position. Hammer, pry bar, to separate the flange from the axle, and then you can pull it back some, and let it down. Now you can easily access the O2 sensor.
Follow the pigtail of the connector up and find the connector. If your sensor's bad, you can always just cut the wiring right here, so you can easily get a socket on there. Or just disconnect the sensor up there and press on a tab here, and just pull it down. To get it out, you could use a seven-eighths, or 22 millimeter wrench. Most likely, if you have an old O2 sensor, you're not worried about cutting the wires, so you can cut the wire and put the closed end on. You could try the open end, but a lot of times, they're in there in a way that the open end can't get a good enough grip. You could use a socket, although this is a little bit close quarters.
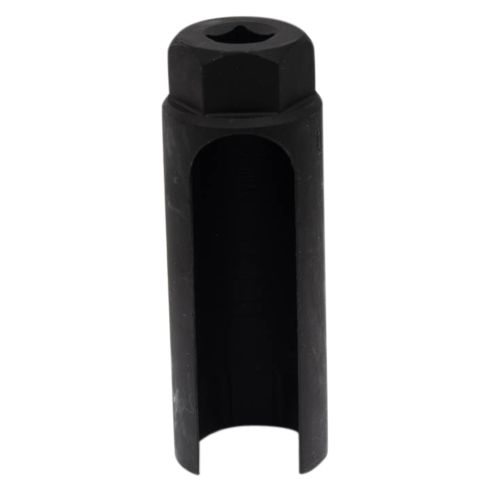
If you wanted, you could take off this bracket, give yourself some more clearance, and use this style socket. But for this, I'm going to go with this style tool, which goes on over the wire, and then down, and onto the sensor. When I put a three-eights ratchet into the O2 sensor socket, and then break it loose, once I get it spinning, it'll come off. The sensor we took out of the vehicle, and it actually looks like a fairly new sensor that was just replaced not too long ago, we will put that back in, because we never replace parts that don't need replaced. There's no trouble codes with the engine. We're just showing you this to show you the process of replacing it. But you can see, if you're going to put a new sensor in from 1A Auto, it's the correct sensor. Comes with a little bit of the anti-seize on there, in case you need to replace it, and the compressible gasket. New oxygen sensor from 1A Auto, if your oxygen sensor's the cause of your check engine light, then a new one from 1A Auto can fix up your problem.
Reinstall, I'm going to pull the cable out of the way, put the sensor in until it's finger tight, then use a wrench. You basically want to install them to about 35 to about 40 foot pounds. Just make sure you're seated, and go another quarter of a turn, so got an eighth, and a quarter.
Take your lead. Make sure your lead's not rubbing against anything hot. Usually the biggest cause of failure of these is if the wires are getting chafed by something or hitting against something hot and melting. Reconnect the lead. It's just hitting the transmission, which is okay there. You want to keep it away from the hot exhaust manifold.
Reconnect the drive shaft, get it centered, the blue mark and the blue mark. Start in your bolts, 12 millimeter, 12 point socket, and a ratchet, and just make sure that they turn nice and easy as they go in and that they're not cross-threaded. Tighten to 70 foot pounds. Use a bar to hold.
Thanks for watching. Visit us at 1AAuto.com for quality auto parts, fast and free shipping, and the best customer service in the industry.