Replaces


Recommended for your 2009 Mercury Grand Marquis
Frequently bought together
Part Details
Specifications
About TRQ:
TRQ is a trusted brand dedicated to making every repair a success story by combining premium parts with easy installation. Each TRQ part is engineered by a team of automotive experts to meet or exceed OEM standards, delivering enhanced performance and maximum longevity. With rigorous in-house testing, the brand ensures superior fit and function across every product line. TRQ also provides customers with best-in-class, step-by-step installation videos—so you can complete repairs with confidence, whether you're a first-time DIYer or an industry professional.
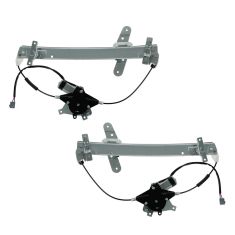
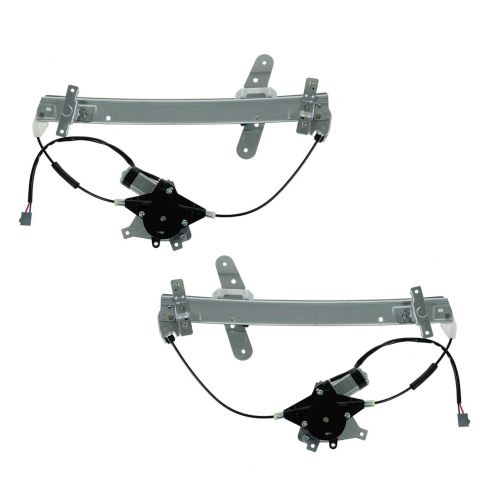
This window regulator is a high quality aftermarket part that meets or exceeds the performance of the original. Subjected to extensive testing and quality control standards, allows us to offer this regulator with our superior warranty!
Attention California Customers:
 WARNING: This product can expose you to chemicals including Lead and Lead Compounds, which are known to the State of California to cause cancer, and birth defects or other reproductive harm. For more information, go to www.P65Warnings.ca.gov.
Lifetime Warranty
This item is backed by our limited lifetime warranty. In the event that this item should fail due to manufacturing defects during intended use, we will replace the part free of charge. This warranty covers the cost of the part only.
FREE Shipping is standard on orders shipped to the lower 48 States (Contiguous United States). Standard shipping charges apply to Hawaii and Alaska.
Shipping is not available to a P.O. Box, APO/FPO/DPO addresses, US Territories, or Canada for this item.
Expedited is available on checkout to the United States, excluding Alaska, Hawaii.
Final shipping costs are available at checkout.
Created on:
Tools used
Brought to you by 1AAuto.com, your source for quality replacement parts and the best service on the internet.
Hi. I'm Mike from 1A Auto. I hope this how-to video helps you out and next time you need parts for your vehicle, think of 1AAuto.com.
In this video, we're going to show you how to remove and replace the driver's front window regulator on this 2000 Mercury Grand Marquis. Obviously, it's the same as the passenger's side. This is also similar for the Ford Crown Victoria, although on some of yours, removing the door panel may be a little bit different of a procedure. Tools you'll need are flat blade screwdriver, Phillips screwdriver, a hammer and punch, a drill with a 3/8" drill bit, 11mm socket with ratchet and needle nose pliers.
Start with a flat blade screwdriver, carefully pry up your switch panel here in the front. Move back and forth and pull up your hands, just shake that back and forth. It comes up and out. Then, again, with your flat blade screwdriver, pry up here and take off your mirror switch. Then, move these connectors and there's little tabs that lock, they lock them on. Pry it from the other side. Pry out down here. Pull up on this connector and get it started. Pull up with a finger on this one. Place it there. Just carefully go in and these little cap just pry that one out going from the bottom so if you scrape something its more difficult to see.
Then, right here, put your screwdriver in up top and you see a little space where the screwdriver goes, and pry that bezel out. Now, there's five Phillips screw to remove; one there, one there, there, one right there and then one right down here at the bottom. Now, I'm going to fast forward as I remove those five screws. They're obviously easy to remove because they're just screws but they try to stay in there. As you're pulling them out or as you're turning them counterclockwise, you may have to reach in with your fingernail and pull them out. Otherwise, just make sure if you can't get out of the panel, just make sure that you need to pull the panel off and if you drop them, you just recover them before you go to the next step.
Once you have those screws out, just lift up on the panel and bring it out. On the back side, there are two connectors. Pull back on a couple of tabs here, disconnect that. Then, pull up on this tab and disconnect that and your door panel is off. I'm going to fast forward here as I do some additional prep. You to remove the speaker, which is just three Phillip screws. Then you pull the speaker out and there's connector at the back. You just push the tab and disconnect it. Then, there's also a small junction block down below that you just hold down with one Phillip screw, remove that and let that hang down. Then slowly pull your water shield down. Be careful not to rip or tear it. You just have to pull it out from the door handle and back and out of your way.
Now, what you want to do is you want to use the punch with a nice point on it and you want to knock out the center of these rivets. Just fast forward as I do that last one, and then there's two down lower on the door that you want to remove as well. They have cable activated regulators and actually, mine works fine. What I'm going to do is when your regulator goes, your cable will basically snap and when you press the button, you'll hear the motor working and sometimes you'll hear a grinding noise or hear the motor work but the window doesn't move.
I'm just going to turn my key on and we'll see the regulator works fine so I'm going to move it up. If you had a broken window regulator, you'll be able to move it by hand at this point. That's what you want to do, you want to move it by hand to the same position I'm moving mine, too. What you're going to want to do is you're going to want to basically move windows about this level and pull your inside door handle off. Taking the screw out, move the handle forward, pull it out and then just pull it up, and twist it forward. What you'll see is you have two more rivets holding the window. You'll want to, just like you did with the other, you want to use the same process and knock the centers of the rivets out and then drill them out.
Now, we'll use a 3/8" drill bit. I'm very light going to drill these rivets. They're nice, soft aluminum so they should come apart pretty easy. You don't want to push hard because you don't want them to spin around. The rivets, you have to drill out. You see, I'm doing the two for the window to the regulator, as well as the other ones that hold the regulator to the door. Now, your window motor is connected right here. Pull down on this tab here and out. You want to take this inner rubber strip, pry it up and off. Then take your punch again and just knock out the rest of the rivets from the window. Now, what I'm going to do is once you get it loose from your regulator, let it down, let your window down. Let the front go down in, just pull this up and out. It wants to get caught on the regulator. Slide out your window up and out. Now, at the top, there's two 11mm bolts, use the socket and ratchet. I'll just speed it up here as I remove those two 11 mm nuts. Get those bolts out. Pull your regulator back out and bring the whole assembly right out through here.
Okay, new regulator from 1A Auto, put it right in. Put right in and reach through. And up and in. And up here just kind of lead them in. And hang these two studs. They come right through here. I'm going to take these nuts. I'll fast forward here as I just take those nuts and start them on with my fingers and get them finger-tight to hold things in place. Okay, now, we're going to take some hardware store bought little screws, a washer and a nut. At the bottom, put those in, washer on the back side and locking style nuts so that they are less likely to come apart. I'm going to fast forward. What I'm doing quite simply is rather than using rivets to put it back together, I'm just using nuts and bolts that I sourced at the hardware store. Obviously, if you had rivets and a rivet gun, you could go that route. Most times, this is easier for people though. Before we tighten it up, pull our lead around and pull it through, plug it right in. I'm using a wrench on the back side, and put a screwdriver on the front side and tighten these up.
Okay. Just like before, just going to speed it up here as I go over all the bolts that hold both the rail to the door, as well as the window motor to the door and make sure they're nice and tight. Additionally I use my 11 mm socket and ratchet and tighten up the two top nuts that hold the top of the rail to the door. Now, take your glass. Make sure they're clear of old rivets here. Now, take your glass, make sure that there's no remnant of the old rivets. Okay, now, take your glass and you can see there's kind of a remnant of the old rivet in there. Use your screwdriver and believe it or not, it's actually very difficult to break this glass. Now, use pliers or screwdriver and make you pry out or remove any of those remaining parts of the rivets from the window.
Now, put the glass in nose first, I insert it. Make sure you get on the outside of the regulator. Just twist it up in place. Looking right through the speaker hole here, make sure that the nose fits into the channel correctly. Back here, make sure that the rear of the window goes into the channel correctly. Slide it right up into place so you can put bolts right through here. Now, what you're going to need is a couple of longer bolts, again, right from the hardware store and install those right through the regulator and into the window. Again, I'm going to speed it up here. Like I said, I just put the bolts right through the regulator and into the window and then the washers and lock nuts on the back side and tighten them up nice and firm.
Now with everything hooked up we can turn our key on. Quick test, make sure it works good. Speed it up here as we disconnect our switch panel and take that upper weather strip and press it back down onto place. After putting our inner door handle in and sliding it back into place, put the screw back in and then put your water shield back up in place. Remember to feed the wiring harnesses through. We'll keep the speed going here as we put the speaker back in place and the small junction block and use the screws to secure them. You'd see I did use a little bit of a painter's tape just to help hold the front of the water shield on.
Okay. Your door panel is designed with hooks on the bottom. You want to lift up your harnesses and you can see that the bottom hooks clip on. You can put your trunk opener, put it right in, plug this upper plug in. Lift your door panel up, main door panel up and make sure these parts are coming up through and make sure your door's lock comes through. Lift the panel up a little bit and then it just slide right down on. I'm going to speed it up here as I put the five Phillip screws back in. The long ones go through the panel. The shorter ones go through that door pole.
Just a little tip: if you have trouble getting one in, you might want to take the panel back off and on some of them, there's clips on behind and sometimes, those clips can get shifted, which makes it hard to get those screws in, but they should pretty much go right in. Just reconnect our harness leads, and turn your switch. Then just work it right down in, push it against the door and down in. Just let it right in, locks in place and these go back into place.
We hope this helps you out. Brought to you by www.1AAuto.com, your source for quality replacement parts and the best service on the internet. Please feel free to call us toll-free, 888-844-3393. We're the company that's here for you on the internet and in person.
Tools used
Brought to you by 1AAuto.com, your source for quality replacement parts and the best service on the Internet.
Hi, I'm Don from 1A Auto. I hope this how-to video helps you out, and the next time you need a part for your vehicle, think of 1AAuto.com. Thanks.
In this video, we're going to show you how to replace a window regulator on this 2004 Ford Crown Victoria. We show you on the passenger's side, but the driver's side is a similar procedure. The items you'll need for this repair include a new window regulator from 1AAuto.com, a flat blade screwdriver, 7mm, 10mm, and 11mm socket and ratchet with an extension, T30 Torx bit, Phillips screwdriver, hammer, punch, drill, 3/8 drill bit, and pliers.
Using a flat blade screwdriver, pry up the switch panel and then pull directly up. Push the tab on these harnesses and disconnect both of them. Pry out this panel behind the door panel and then remove the T30 bolt. We'll just fast-forward as Don does this. Now, lining the outside of the door panel, there are three 7mm bolts. Just go ahead and remove each of those. Pry off this triangular panel, and then remove this 7mm bolt in here. Now you can lift the door panel up and off.
Next, you want to remove your speaker. It's held in with three Phillips screws. We'll just fast-forward as Don removes those. Pull your speaker out, and push the tab on the harness and disconnect it. Next, you want to remove this rail here. Using a punch and a hammer, just hit out the center of these rivets. Then, using your drill and drill bit, just drill out the center of these. You really want to wear safety glasses while you're doing this because of the metal shards. Once you get to a certain point, the rivets will just pull right out. Now that that's removed, you can pull off your water shield.
Now, you want to do the same thing to these two rivets and these three rivets right here. Again, just punch out the centers of each of them. Then drill the rivets out. Now that motor is free, and Don's going to explain to you what to do next.
Our window regulator works fine. It's just a little slow, so that's why we're going to replace it. We have the luxury of being able to lower the regulator to get access to the two rivets that hold the glass to the regulator. In most cases, you're going to be replacing this because it just doesn't work. If it's stuck up or down and you can't get to the rivets, which is through here once we pull it down through here and through here, what you'll want to do is cut your regulator cable on the top and the bottom of the motor with a pair of wire cutters. Here's the wire.
You cut it here, and then that would give you the freedom of being able to move the glass up and down on the regulator. Just have somebody hold it for you while you do it. Now we have access to these two rivets. You want to do what you did to the other rivets. Just punch out the center and then drill them out. You do want to be careful, because they do go through glass here. Be especially careful when you're drilling out those rivets. Just do it nice and slow and use pliers to remove any of the rivet from the back.
Once you've done that you can lift your window up a little bit. Using a flat blade screwdriver, pry off these covers and then remove this weather strip. It just pulls up and off. You want to pull your window up and angle it straight down. Then pull it up and out of the door.
Now disconnect your regulator motor by just pulling back on that tab and pulling the harness free. Now remove these two 11mm nuts at the top of the regulator. Push your regulator back so that those studs come out of the door, turn it sideways, pull it out through this hole here, and your regulator is free.
On the right is the old window regulator; on the left is the new one from 1A Auto. You can see they're identical, and they're going to mount exactly the same. Feed your new window regulator back into place. Just push those studs back into the door and make sure everything lines up. We'll just fast-forward as Don replaces those two 11mm nuts.
In the places where there were rivets, use the 10mm bolts and nuts to fasten the regulator in place. Reconnect your regulator motor harness, and now put your window back down in facing down and then angle it back and push it down into place. Replace that weather strip, and this will help to kind of hold the window in place. Replace these protectors. Just push them together to lock them, and do the same to the other one. Then lower the window down and line it up with the regulator, and replace what was a rivet with those longer 10mm bolts. Now reconnect your switch panel and test out your regulator.
Then you want to line up those bolts with the holes where you removed the rivets through. This gives you a good place where you can tighten up those two bolts. Just tighten them until they're firm. Don't over tighten them because they are through glass. Replace your water shield. Now put that rail back in place and line up the holes. You will need to find two bolts to replace the rivets that you punched out so that you can re-secure this rail. We just used two small 10mm bolts. Reconnect your speaker, line it up, and replace those three Phillips screws.
To replace your door panel, put those lower hooks into place, and then push your harnesses up through that switch panel hole. Line up those other hooks, push the door panel back and down over that lock rod and down into the window sill. We're just going to fast-forward here as Don replaces the three 7mm bolts along the outside, the 7mm bolt inside the door panel, and that T30 bolt. Replace the triangular panel. Replace that panel behind the door handle and reconnect the harnesses. Put the backend of the switch panel in first and push down the front. You're all set.
We hope this video helps you out. Brought to you by www.1AAuto.com, your source for quality replacement parts and the best service on the Internet. Please feel free to call us toll-free, 888-844-3393. We're the company that's here for you on the Internet and in person.

WRA50165