Replaces


Frequently bought together
Returns: Parts with electrical components cannot be returned once installed.
Left Hand Drive:
All of our auto parts are intended for Left Hand Drive USDM vehicles. If your vehicle is Right Hand Drive, please ensure the part is correct for your specific vehicle.
Attention California Customers:
 WARNING: This product can expose you to chemicals including Di(2-ethylhexyl)phthalate (DEHP), which is known to the State of California to cause cancer, and birth defects or other reproductive harm. For more information, go to www.P65Warnings.ca.gov.
Lifetime Warranty
This item is backed by our limited lifetime warranty. In the event that this item should fail due to manufacturing defects during intended use, we will replace the part free of charge. This warranty covers the cost of the part only.
Returns: Parts with electrical components cannot be returned once installed.
FREE Shipping is standard on orders shipped to the lower 48 States (Contiguous United States). Standard shipping charges apply to Hawaii and Alaska.
Shipping is not available to a P.O. Box, APO/FPO/DPO addresses, US Territories, or Canada for this item.
Expedited is available on checkout to the United States, excluding Alaska, Hawaii.
Final shipping costs are available at checkout.
Created on:
Tools used
Hi, I'm Mike from 1A Auto. We've been selling auto parts for over 30 years. We're dedicated to delivering quality auto parts, expert customer service, fast and free shipping, all backed by our 100% satisfaction guarantee. Visit us at 1AAuto.com, your trusted source for quality auto parts.
The blower motor is on the passenger side up underneath. You can see it right there. There's usually a trim panel that goes under here. It attaches with either plugs here and here, or bolts. You would pull those plugs out and then pull the panel down.
Disconnect lead here. Pull down on the tab and out. You'll need a small flat-blade screwdriver, and you're going to pry up on a little tab above here, so that we can pull this connector off. And then, on this lead there's a little tab on the side. Push in and disconnect. And you can see the tab right here, that you want to push on.
Three eight millimeter bolts hold it. One here, close to the side of the vehicle. One over here, and one back close to the floor, back in here. We'll use an eight millimeter socket and ratchet, and these two are pretty easy to get to. The bolt in back you have to do blindly unless you're very small and very flexible. But I've just got a socket and a ratchet. Feel up in there with my hand, figure out where the bolt is, and then get the ratchet and socket up in there. And there's two more seven millimeter bolts. And then there's another seven millimeter bolt it feels like.
I'm using a small extension on this other one. Then the motor comes out. Pull your carpet out, and come down and out. And with the motor out, you can better see where all the screws are. Here's two of the seven millimeter bolts, each side of this tube. The other seven millimeter over here, and then the three eight millimeter bolts that hold the motor frame.
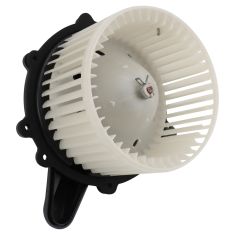
Original motor from the vehicle here on the right, new from 1A Auto. This is actually a much better, simpler design. You're only going to need your three main screws. They go here, here and here. Okay, take those out for now, and I'm going to take these out for now so they don't fall all over the place.
The business side of the motor, exactly the same, okay. It's going to mount in there the same, but again, the motor from 1A Auto is one piece. There's not two different covers and everything. This clip where the wire harness goes on is molded into it so it's going to go in, it's actually going to go in easier. You just need the three bolts to replace it, and mount and function just the same as the original.
On the 1A Auto blower motor, we only need to use the three screws, so I just marked them with blue marks so I'm not trying to put the screws into different holes. Make sure your gasket is in place, pull the carpet down. You want to have this tube kind of facing over toward the driver side. You got to push down on the insulation a little bit, just get it positioned right. The blower cage into the hole, and let's just kind of shove it up into these.
Now, start the second screw. I'll tighten those up before I try to do that back screw. And this last bolt goes right into the back. Reconnect, you put your lead in the motor first, and then you can put this back onto the bracket. And reconnect here. That blower motor resistor.
Thanks for watching. Visit us at 1AAuto.com for quality auto parts, fast and free shipping, and the best customer service in the industry.

HMA84789