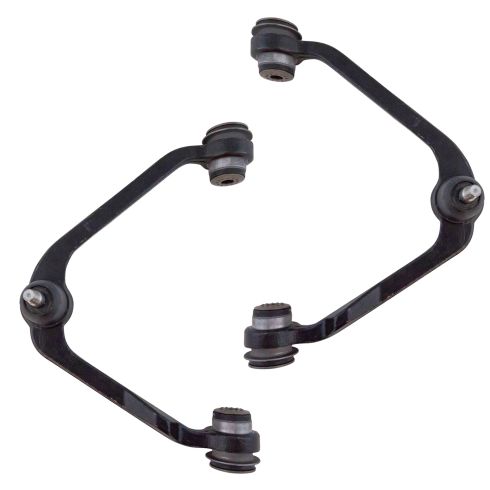
Brought to you by 1AAuto.com, your source for quality replacement parts and the best service on the internet. In this video, we're going to show you how to remove and replace the upper control arm on this 1997 Expedition. At 1A Auto, we sell a nice replacement upper control arm. This takes care of if you have worn out bushings as well as a worn out upper balljoint. Replacing the whole assembly will take care of both those issues. We're doing this on this Expedition, but it's also the same for a lot of different Ford and Lincoln SUVs and pickup trucks.
Tools you'll need are 19 and 21 mm sockets and that could vary depending on what vehicle you're working on, a ratchet, breaker bar, and a pipe for leverage. Some of those bolts can be a little stubborn so having some extra leverage is always good, pliers, penetrating oil, a marker, a balljoint removal tool, a hammer, as well as jack and jackstands.
We're going to start out by removing your wheel. If you don't have impact tools, start with your wheel on the ground. Loosen the lug nuts then raise and support the vehicle, then take the lug nuts off and the wheel off. Once you have the tire off, you're going to want to roll a jack underneath the lower control arm and lift up and support the suspension. Now there's basically three bolts. You've got the balljoint bolt here that you're going to remove. You have to take the cotter pin out first. Then you have two bolts up here that hold it to the frame, and one there and then obviously one right here. The bolts and washers that hold the control arm to the frame are actually what you use to align and set caster and camber. What I'm going to do is I'm going to use a marker and just make a vertical line on them so I have a good reference point to put them back together which gives you a pretty decent preliminary alignment. You will want to have your alignment checked and possibly adjusted after this repair.
What I'm going to do, I'm going to take a black marker and we'll make a line just straight up and that would I know that, that one's in there like that and then same thing over here. Make a line straight up so I know how they came out. Here, I'm using a pair of pliers and just grab in the ends of the cotter pin that have been pushed through and bent and you basically just break them off, that's usually the easiest way then you can pull it out from the other side. There's the cotter pin. I am going to get my screwdriver in here and pry that right out. I'm going to spray that with penetrating oil, also spray my other ones up top here.
Now, I'm going to take a 21mm socket and put it on that bolt. Now, I'm using a hammer just to make sure it's all in there all the way. You're going to want at least a breaker bar and get it on here. Have to reposition my socket here so that I can make sure. I'm actually going to put an extra piece of pipe on my breaker bar. It gives me even more leverage. Get it loose. Now, I could switch to the ratchet and remove it all the way. I'm just going to keep the bolt on there a little bit. I'm going to turn my attention towards these bolts here. Same thing, get our socket on there.
Breaker bar, they seemed to be coming off all right. I loosen up that one a couple of turns then turn my attention towards the rear one. Use a hammer to try and get the socket on there. The bolt or the nut is a little crusty, so I just get it that on there and then it comes part as well. Once we get that bolt or the nut to the end there like that, our hammer, make sure we can get that bolt out. Here we're just making sure that we can get the bolts loose. You don't want to take them out yet, but you do just want to make sure, give him a couple of taps and turn them with a wrench and make sure they're free.
I was pleasantly surprised even though this truck is pretty crusty and rusty, they did come free pretty easily. Now, you're going to want to remove the nut from the upper balljoint and then use a balljoint puller tool to separate the arm, the control arm and the steering knuckle. You can see here I removed that plastic around the upper balljoint then put my balljoint separator tool on and get it in position. I'm going to use this, the 19 mm and you basically just tighten it up until it pops. You see your steering knuckle comes out of the way. Now, I just remove the nuts and washers from the ends of those bolts that hold the frame.
Pull the bolts out. I just kind of put everything right on the frame next to it so I keep the same hardware with the same sides. Take my old control arm out. Use a wire brush and or a screwdriver, just clean off some of the scale on the inside of the frame there then put your new control arm up in place and you just want to start the bolts in. For right now, pay attention to where the marks are that you made on the washers on the bolt heads. Just work them right into place. All right, I've got the bolts in. I'm going to now just put this down and in.
Just start my bolt on. Now, I'm just going to kind of preliminarily tighten these up. I'm going to put my breaker bar on here. I'm just kind of pulling that so that my mark up there is straight up and down the way I marked it. All right, washer on the back, start my bolt on. Once I get the nut on there, I'll use my ratchet and socket and just tighten up that nut snug, you don't want to have it tight, just want to start getting seated and then repeat the same thing for the other frame bolt. I'm going to torque this balljoint nut to 67 foot pounds. Now, insert our new cotter pin and pliers to bend it, pull it through and bend it.
I'm just going to put little grease fitting on with an 8mm wrench or a pair of pliers, and then make sure we grease that upper balljoint. Basically just to install grease there's a small slot on the boot where the grease will start coming up once it's full. Now, we're going to raise the vehicle so that all the weight is on the suspension. I know the space between here, all my weight is on my suspension. I'm going to need my breaker bar. I'm looking at the mark I made to make sure it's still straight up and down. Put that on there to hold that and now I'm going to torque these nuts to 100 foot pounds.
We'll speed things up here as we repeat that for the other bolt and nut assembly. You can put your tire back on and start each lug nut one by one, make sure you don't cross-thread them and tighten them down preliminarily. Torque the lug nuts to 100 foot pounds using a star pattern. Then put your center cap back on and you should be all set. We hope this helps you out.
Brought to you by www.1AAuto.com, your source for quality replacement parts and the best service on the internet. Please feel free to call us toll free, 888-844-3393. We're the company that's here for you on the internet and in person.