Replaces
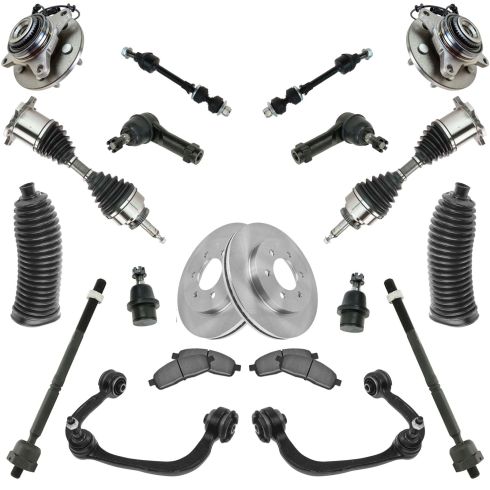
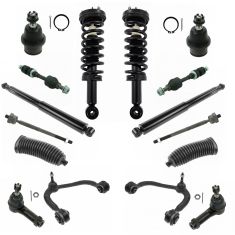
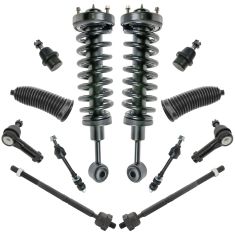
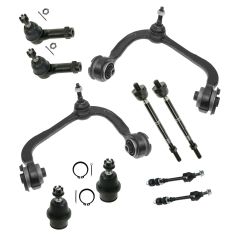
Replaces Ford F150 Lincoln Mark LT Front 10 Piece Steering & Suspension Kit TRQ PSA63442
$464.95
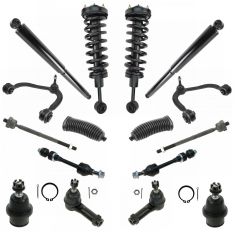
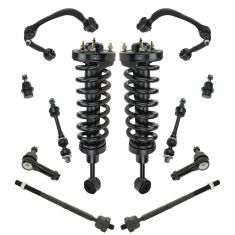
Replaces Ford F150 Lincoln Mark LT Front & Rear 16 Piece Steering & Suspension Kit TRQ PSA71975
$429.95
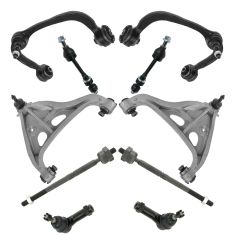
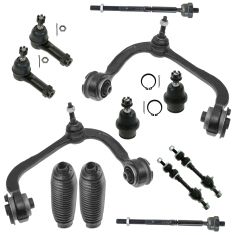
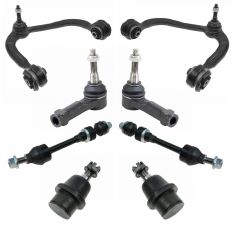
Replaces Ford F150 Lincoln Mark LT Front & Rear 12 Piece Steering & Suspension Kit TRQ PSA59214
$424.95
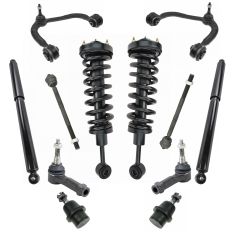
Replaces 2006 Lincoln Mark LT Rear Wheel Drive Front & Rear 16 Piece Steering & Suspension Kit TRQ PSA71977
$416.95
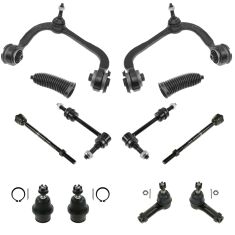
Replaces Ford F150 Lincoln Mark LT Front 12 Piece Steering & Suspension Kit TRQ PSA63396
$389.95
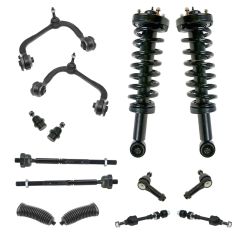
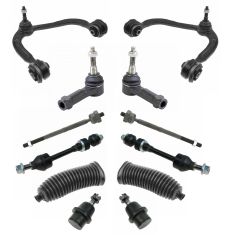
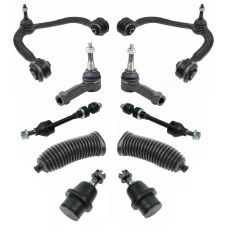
Replaces Ford F150 Lincoln Mark LT Front 14 Piece Steering & Suspension Kit DIY Solutions SUS03944
$389.95
Replaces Ford F150 Lincoln Mark LT Front 14 Piece Steering & Suspension Kit DIY Solutions SUS03032
$384.95
Replaces Ford F150 Lincoln Mark LT Front 12 Piece Steering & Suspension Kit DIY Solutions SUS04088
$304.95
Replaces Ford F150 Lincoln Mark LT Front 12 Piece Steering & Suspension Kit DIY Solutions SUS03670
$190.95
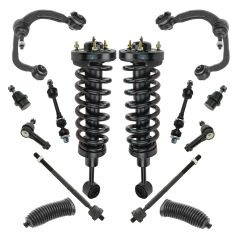
Replaces Ford F150 Front 12 Piece Steering & Suspension Kit DIY Solutions SUS03698
$179.95
Replaces Ford F150 Lincoln Mark LT Front 12 Piece Steering & Suspension Kit DIY Solutions SUS02298
$174.95
Replaces Ford F150 Lincoln Mark LT Front 10 Piece Steering & Suspension Kit TRQ PSA59328
$169.95

Replaces Ford F150 Lincoln Mark LT Front 8 Piece Steering & Suspension Kit TRQ PSA56405
$159.95
Replaces Ford F150 Lincoln Mark LT Front 8 Piece Steering & Suspension Kit TRQ PSA58850
$154.95
Replaces Ford F150 Lincoln Mark LT Front 10 Piece Steering & Suspension Kit DIY Solutions SUS02318
$145.95
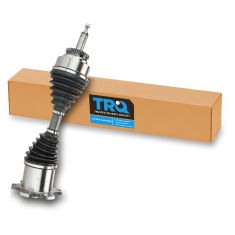
Replaces Ford Lincoln Front CV Axle Assembly TRQ CSA82125
$104.95
Part Details
What are Tapered Bearings and Why Use Them? Tapered bearings use rollers shaped like flat-topped cones and two races angled from the outside in of the bearing. This angle makes the bearing better at handling forces exerted on the bearing during cornering (known as axial load) in trucks and large cars. Your model came from the factory with tapered bearings. Roller ball bearings work well for smaller cars, but replacing a tapered bearing with a roller ball bearing increases wear and failure.
Install Tip: When replacing steering components, have a professional alignment performed afterwards. This ensures proper tracking and even tire wear.
Complete Repair in One Purchase - Stop searching for parts individually and complete your repair with a customized kit or set from DIY Solutions.
High-Quality Parts from Trusted Brands - DIY Solutions' kits and sets are selected from the best automotive brands and include hard-to-find and even obsolete parts you may need for your vehicle.
Guaranteed Fit - DIY Solutions ensures its selected parts are quality-tested to guarantee fit and function.
100% New ComponentsFor quality fit, finish, and easy installation.
Heat TreatedFor longer-lasting life and consistent performance under different road conditions.
Precision MachinedAnd made of brand new components, held to tighter tolerances for better consistency than rebuilt parts.
Replacement Brake Kits Features & Benefits
Item Condition:
New
Attention California Customers:
 WARNING: This product can expose you to chemicals including Chromium (Hexavalent Compounds), which is known to the State of California to cause cancer, and birth defects or other reproductive harm. For more information, go to www.P65Warnings.ca.gov
Lifetime Warranty
This item is backed by our limited lifetime warranty. In the event that this item should fail due to manufacturing defects during intended use, we will replace the part free of charge. This warranty covers the cost of the part only.
FREE Shipping is standard on orders shipped to the lower 48 States (Contiguous United States). Standard shipping charges apply to Hawaii and Alaska.
Shipping is not available to a P.O. Box, APO/FPO/DPO addresses, US Territories, or Canada for this item.
Expedited is available on checkout to the United States, excluding Alaska, Hawaii.
Final shipping costs are available at checkout.


Created on:
Tools used
Brought to you by 1AAuto.com, your source for quality replacement parts and the best service on the Internet.
Hi, I'm Mike from 1A Auto. I hope this how-to video helps you out, and next time you need parts for your vehicle, think of 1AAuto.com. Thanks.
In this video, we're going to show you how to replace a front axle on this 2005 Ford F-150 with 4-wheel drive. We show you on the driver side, but the passenger side is the same procedure. The items you'll need for this is a new front axle from 1AAuto.com, an 8mm, 13mm, and 21mm socket and ratchet, a piece of pipe for some extra leverage, a 12mm 12-point socket, an 18mm and 21mm wrench, pliers, pry bar, hammer, torque wrench, and jack and jack stands.
Start off by prying off the hub cap. Then loosen up these lug nuts using a 21mm socket and ratchet and a piece of pipe for some extra leverage. Once you get each of them loosened up, you can raise the vehicle and remove them the rest of the way. Now pull the wheel off.
Turn the wheel and then remove this 21mm nut at the top of your outer tie rod. Once you remove it, you want to just put it back on just a couple threads. Now hammer the knuckle until the outer tie rod drops down. Now you can remove that nut, and just set your outer tie rod off to the side.
Using a pair of pliers remove this cap and then loosen up and remove that 13mm nut. Then you just want to put it back on, just a few threads, tap it with a hammer and make sure it goes through. Then remove the nut the rest of the way. On the other end of the axle there's a series of 12mm bolts. You just need to use a 12mm 12-point socket and then a pry bar to hold the wheel and just loosen those up. We'll fast-forward as Mike removes all six of those. When you remove that last one, just push the axle down to the side.
Now spray this 21mm nut up here on the bottom of your upper control arm, and then remove that nut and put it back on just a few threads. With the nut back on a few threads, just hammer the wheel knuckle until the upper control arm loosens up. Now just lift up on the wheel knuckle and then remove that nut. You can just set the wheel knuckle off to the side carefully. You don't want it to strain those brake hoses. Then just tap the axle and pull it out of the wheel knuckle. You want to feed the axle towards the left side, towards the front of the vehicle. Just angle it down and pull it down and out.
On the bottom is the old front axle; above it is the new one from 1A Auto. You can see they're identical and they'll fit exactly the same. Making sure they're tightened. Now you can remove the jack and feed your axle back into place. You want to feed it back in the same way that you pulled it out.
Now you can take your upper control arm and push it back into the wheel knuckle. Once you push it through, just put that 21mm nut on there to hold it in place. Line up the axle and replace those 12mm bolts. We'll fast-forward as Mike does this. Now tighten each of those to 60 foot-pounds in a crossing pattern. You can see we torqued that one. Then you want to turn the wheel until you get the one on the opposite side. Then torque that one. You want to just repeat this process with each of them. Now replace this 13mm nut and torque it to 20 foot-pounds. Then replace that cap and just tap it into place.
If any of the lines on the back came undone, make sure you push them back in and re-clip them. Then push your outer tire rod up to the wheel knuckle and replace the nut. Then torque that to 111 foot-pounds. Now just tighten up this bolt on your upper control arm. If the stud spins, use a 10mm socket and ratchet. Then you want to torque this to 111 foot-pounds. Then tighten up the nut on the bottom of your sway bar link. Jack up underneath the lower control arm to simulate a wheel being in place. Torque the lower strut bolt to 150 foot-pounds.
Now we'll fast-forward as Mike replaces the wheel and replaces the lug nuts and tightens them preliminarily. Then he lowers the vehicle and tightens them the rest of the way. Then torque each of them in a crossing pattern to 120 foot-pounds. Then just replace your hubcap and you're all set.
We hope this video helps you out. Brought to you by www.1AAuto.com, your source for quality replacement parts and the best service on the Internet. Please feel free to call us toll-free, 888-844-3393. We're the company that's here for you on the Internet and in person.
Tools used
Okay, friends, to get started on this job, the first thing that we need to talk about is safety. You want hand protection and eye protection at all times. With that said, safely raise and support your vehicle so you have your front wheel off the ground. We're going to remove this center cover, and then we're going to remove the lug nuts as well. Get your wheel off of here. Okay, now that the wheel is off, we have a nice, clear view of our inner tie rod end. We need to loosen this jam nut right here, I like to use a nice big pair of pliers. Give that a little turn, grab it. There we are. Make sure it's broken free.
Now, we're going to remove our outer tie rod end nut. To remove your outer tie rod end, it's best to hit right along the knuckle. If for some reason that isn't working and you don't have a threaded area along the top of your tie rod, you could carefully try to bonk along the top as well. Now that we have the tie rod out off, we can move this around. And that's great because we want to be able to get this caliper off. Something, before we do that that I want to mention, is that this rotor right here is going to have a little bit of weight. To do the lower ball joint, we're going to have to take off this whole unit right there. So, of course, that's going to weigh something as well. If you have an issue with something that's heavy, it's probably a great idea to go ahead and remove the rotor as well but, of course, that'll make more work so you'll have to clean up the surfaces in between the wheel bearing and the rotor.
Next, we need to get our ABS wire off of our brake hose. After that, we're going to remove our two caliper bracket mounting bolts. That's going to relieve the caliper and we're going to move it away from the rotor area. Once you do that, you need to have something ready so you can hang the caliper. You don't want to put any pressure on your flex hose. I've got my little bungee cord ready. Just going to put that in a couple of threads. Remove that bolt. All right. Now, we'll just set this up. Next, we need to follow our ABS wire. If you were to give it a tug, you're going to see this area right here moving around. That's because that's where it's attached to on the backside of the plastic. I'm just going to use this little forky tool, you can use pretty much whatever you've got. Give this a little flex, and I'm going to see if I can get behind there and just relieve it from the plastic.
Okay. Pull this through. Now we need to disattach this. If you were to push on this tab and then draw this away, it'll separate the two. We're going to get this off of here as well. And then, of course, we'll bring the ABS wire all the way down to here and we'll wrap it up so it's as safe as possible. At this point, I always like to move down to the lower ball joint. I'm going to get this cotter pin out of here, and I'm going to loosen up this nut. I'll leave it back on a couple of threads and then we're going to move up to the upper ball joint. Let's get this nut off of here. Just leave that on a couple of threads as well.
Next, we're going to take our hammer and we're going to bonk right along here on our knuckle. You want to be careful not to damage your upper ball joint boot. So, now that we have the upper ball joint out of there, you want to make sure that you tie up the knuckle so it's going to be semi-safe, it's not going to be just flopping down because the next thing we need to do is relieve our lower ball joint. When we do that, we're going to do approximately the same thing. We're going to hit right along here on the knuckle, try to cause vibration, and hopefully, this area will separate.
There you are. As you can tell it's separated, our safety nut did its job, and, of course, the upper area that we tied up is also keeping us safe. So, we've got that untied now, I'm going to relieve the nut. You need to lift up on the knuckle and keep in mind that it's going to be a little heavy. Let's get the knuckle right off of there. And we have a nice, clear view of our lower ball joint at this point. We want to remove this grease fitting right here. Once we've done that, we're going to remove the snap ring and we'll move along.
Get this right off of here, I'll show you what it looks like in a sec. So, this is what the snap ring looks like. You need to go ahead and get some of these little pliers, you get into those little circles, as you squeeze, it spreads it, and it'll come off with the lower ball joint. You could use your hammer, give it a whole bunch of bonks and drive it right out of here, but you might, of course, damage your lower control arm, nobody wants that. I'm going to use the ball joint tool and I'll show you how to press it out. Here's the tools we're going to need. The ball joint press itself, you're going to need a cup that fits over the lip of the ball joint, but still fits on the control arm, and then, of course, you're going to need one of these that has the slot for the stud. Put these like this, just like that. Take your press, put it over, and go ahead and bottom it out. Now, as we drive this down, it's going to push the ball joint through. Once it breaks free, the whole going to kind of flop around. So make sure you have a good grip on it.
You can see it starting to go down, and there's our lower ball joint. Now it's going to be time to get ready to install our brand new lower ball joint. Something to pay attention to is to press this in, you're going to need to get on this lip area right here, except not on this portion, on this portion. As you can tell, the boot's in the way. Take a small pocket screwdriver and just see if you can weasel your way in between the lip and the boot and separate the two. Obviously, be very careful, you don't want to damage the boot. We'll get that out of the way and now we can continue. It's always a great idea to clean down the area you're going to be working. Make sure you clean out that hole, you don't want any debris in or around it. To install our new lower ball joint, you're going to need something that looks like this.
It has a little cupped area. The reason for that is because it needs to go over the hole on the lower control arm where the lower ball joint is going to come up, and then through. If you put a flat plate here, obviously, the lower ball joint is going to be able to come up far enough to be able to put your clip on there. So, we'll say that's there, take your lower ball joint, and then, of course, you need another cup. The lower cup needs to have a hole for the stud to go through and it needs to be just thick enough or wide enough that it can fit along the lip of the lower ball joint. Just like this. Go ahead and line this up. Now we're going to get our ball joint press, put it together, and then, of course, as we start tightening it, it's going to pull this up and into the lower control arm. So, now we need to make sure we align this upper cup up because if it's off by a little bit, it's a possibility we could damage our lower ball joint. Now we're going to tighten this. What you want to pay attention to as you tighten it is to make sure the ball joint is going straight up. If it seems like it's going like this, obviously, you're going to have an issue.
So, you can see right here, it looks like it's starting to go at an angle. I'm going to stop there, relieve tension or pressure, I'm going to move this a little bit and see if I can get that side to go up. As you can see, as I'm pressing this up, you want to make sure you don't have any gap between the ball joint and the lower control arm itself, so I need to continue going up. Once it's bottomed out, leave it just as it is. Hit right on the lower control arm with your hammer a couple of times, just to cause vibration and that's going to settle this in just in case it's a little off-kilter. That's great. Let's get this out of here.
Now, let's get this clip on here. Okay. Make sure it's sitting all the way around. You want to make sure it's inside the groove. If it's not in the groove and it's possible that it could fall off, there's also a possibility that the lower ball joint might not be secure. Now it's going to be time to get our boot on here, just line it up on one side and then take some pliers and just help it up all the way around. You want to make sure it's completely secured so it can keep the moisture out. Make sure it's secure. Let's move along. Something that I always try to pay attention to is the area where the cotter pin is going to go through. Obviously, if we're going to have that big old knuckle on here with the rotor, it's going to be very hard to get a cotter pin in between and inside there. So, use a flat-head screwdriver, use a pick, whatever you need to do, give it a spin, so it's facing front to back. Perfect. Now it's going to be time to get our knuckle on here. Make sure you have your lower ball joint nut in your hand because it's going to make your life much easier, slide it up on, start that ball joint nut on.
Now, we're just going to snug up that lower ball joint nut. The reason for that is because I want to make sure there's no way that it can come loose on me while I continue working. Stop right there, we'll move along. Next, we're going to need to get our upper ball joint into the knuckle. That's going to be easiest if you have a nice pry bar like this. What we're going to want to do is go above the control arm right here, and then find an area in the frame that'll make it so we can go into and be able to pull this down. Leave the bar right where it is, line this up. Go ahead and pull this down now and start your upper ball joint nut.
Now it's time to torque these down. Let's torque this upper ball joint nut to 85 foot-pounds. Now, let's torque this lower ball joint nut to 111 foot-pounds. Now it's going to be time to put in your locking cotter pin. If for some reason you notice that the slots on your nut don't line up with the hole on the ball joint, you need to continue tightening that nut until you get to the next slot. You do not want to loosen it, just check it. Well, that one actually lines up perfect. Go ahead and peen it over. I'm going to grab some pliers and cutters.
Make sure it's 100% peened over and there's no way that that locking clip or cotter pin can come out. Next is going to be time to get our caliper back on there. You want to inspect your bolts, make sure they're in good condition. If for some reason the threaded area looks like it's rotted or it has any type of never-seize or anything inside of it, you need to make sure you clean them up and get off any never-seize. Of course, the area on the bracket where the caliper bolts are going to go to, make sure those are clean as well. Once you have your bolts cleaned up, let's go ahead and get this caliper ready for install.
I'm going to slide the pads over the rotor and then line up the holes for the bolts to hold the caliper to the knuckle. It's a great idea to use a little bit of thread locker if you have access to some, but we'll call it your prerogative. Bottom these out, and then we'll torque them down. Torque these to 148 foot-pounds. Now let's get our ABS wire re-secured. Go ahead and reattach it back to the flex hose going up to where it's going to be secured up here, come up this way, get this back on here. If for some reason any of your clips are broken, you need to make sure that you have your ABS wire secure so there's no way it can get damaged by the wheel as it comes around, or, of course, driving the vehicle in any way. Reconnect this in, give it a nice tug to make sure it's 100% in. Put this all behind the nice plastic here, and then re-secure it in the backside.
Now it's time to get our outer tie rod end into the knuckle. Let's see if I can just turn it a little bit, slide it in here. There we are. Take our nut, If it has a lock, make sure the lock is facing up, of course. Now, we're going to snug it down and then we're going to torque it to 111 foot-pounds. Now it's time to get our wheel back up on here. We'll start on all of our lug nuts, bottom them out. And then we're going to torque them to 150 foot-pounds. Next, you need to get your vehicle so the tire's just barely on the ground so it can't spin. We're going to torque the lug nuts like I said to 150 foot-pounds in a star pattern. Once you've torqued it, make sure you put it back on your center cover, of course. Okay, friends, anytime you do any type of front-end work on your vehicle, it's always super important to make sure you get your vehicle down to a reputable alignment shop. They're going to take care of you and make sure you're going straight on down the road. Be safe out there.
Tools used
Tools used
Okay friends, to get started on this job, the first thing that we need to talk about is safety. You want hand protection and eye protection at all times. With that said, safely raise and support your vehicle so you have your front wheel off the ground. We're gonna remove this center cover and then we're gonna remove the lug nuts as well.
Get your wheel off of here. We need to get this cotter pin off of the outer tie rod end now, and we'll need to get the nut off of there. Use your 21-millimeter socket and remove your nut. I just put this back on there, just a couple threads because now we're gonna use our hammer, and we're gonna hit right along here on the knuckle, being careful not to damage the tie rod. Let's get this off of there. Pull this down.
Next, we need to get the mounting nuts off of the top of the strut area here. There's gonna be three of them. There's gonna be two right here where you can see, and the other one is gonna be located further in. You definitely don't wanna touch this center nut in any way. So I'm just gonna use my 15-millimeter wrench, because it's the easiest thing to get into this space. Put it right up on here, and then, of course, a nice rubber mallet, because I don't want to damage my tool.
I'll get this nice and loose. Do the same to the other two, and then we'll remove the nuts fully. As you can see the inward nut is much easier to get from inside the engine compartment. Let's get this one right off of here. We're gonna leave one of the nuts on here just a few good threads. That way there, there's no chance that this strut can fall out. Moving down the strut, if you were to look, you're gonna see a big old bolt with a nut. Using your 30-millimeter socket, you're going to go right here and remove this nut. And I'm gonna hold the bolt head with some pliers. Now, I'm just gonna drive this bolt out of here.
Next, we're gonna use a nice long pry bar, and we're gonna come right under here. Go ahead and pry and you should see it want to separate. We'll pull it away from the control arm. You can see our safety nut did its job. Remove that nut, and remove your strut unit. The next step is to take off our upper ball joint nut. Take that nut, and just put it back on there a few good threads.
Next, we're gonna use a hammer and hit directly on the knuckle right here. That's gonna shake this free, and you're gonna notice that these two are gonna separate. Pull down on this. Remove the nut. Now as this comes up, your knuckle is gonna wanna fall away. Obviously, you don't want to let it continue to fall, because you could put a tug on your ABS wire or even your brake hose. If you have something as simple as a coat hanger or maybe even one of these bungee cords, it's gonna come in handy.
Next, what we need to do is remove the bolt that comes through from the inside of the strut tower to the outside. I'm gonna hold this nut with a 21-millimeter wrench, and then I'm gonna remove the bolt side. Do the same to the other one real quick, right off of there. Grab onto that upper control arm, and get it right out of here. Now you wanna inspect your bolts. You wanna make sure they're in great condition. If they're rusted, or rotted, or they seem like they're weak in any way, of course, you're gonna wanna replace them. Also, take a peek at your threaded area. If it looks like it's rotted and the bolts or the nut isn't gonna be able to hold on like it should, obviously, try to clean it up, and replace them if need be. These actually look pretty good. I can clean them up a little bit. But, nevertheless, what I'm also gonna do is I'm gonna add a little bit of copper Never-Seez along this area where the bolts are gonna be going through the upper control arm bushings.
Okay, now it's gonna be time to get our upper control arm in here. Let's go ahead and slide it right in. And we remember the bolts go from the inside, and they're gonna go facing out. So go ahead and line up the bolt holes, slide the bolts through, and then, of course, we'll start the nuts, we'll snug them up, and then we'll torque them to manufacturer's specifications.
Now that we have the bolts in there, it's gonna be time to get the nuts on. Something that I want to mention real quick is your nuts are supposed to have a neoprene layer inside there that works as a lock. If you're gonna be reusing your nuts for any reason, maybe you haven't gotten new ones, that's okay. I would just use a tiny bit of thread locker, but we'll call it your prerogative. Let's go ahead and start these.
The next thing we need to do before we go ahead and snug these up is we need to make sure the control arm's sitting so it's pretty much parallel to the ground. So this flat area right here is gonna be parallel. I like to use a nice pry bar. I'll come through this slot right here, and just get it as close as possible. Obviously, if it's a little too high or it's a little too low, it isn't gonna be too big of a deal. But if you tighten it while it's hanging like this, and I try to stretch this, it's gonna cause an issue with the bushings, and eventually wear them out very quickly over time. Let's go ahead and bottom this out. Same to the rearward bolt.
All right, so now we're gonna go ahead and torque these down to 114 foot-pounds. I'd like to note that usually when I'm using a torque wrench, I try to torque the nut side. I'll hold the bolt side and I'll torque the nut side. As you can tell, there isn't very much space here so I'm gonna go the opposite. I'm gonna torque this side. Let's get this untied. And I'm gonna start our upper ball joint nut on here. Just pull this down. Start the nut on there. If you're having a hard time pulling this down, you could just put your pry bar up across here, and then, of course, go into the slot we used earlier. Let's snug this up. Now let's torque this to 85 foot-pounds.
Now it's gonna be time to get the strut up in here. If you were to look, you can see the area that the strut holes are gonna be. So just line that up. Put this right up in here. There we are. Now I'm just gonna start on all three of those nuts real quick. I like to use a little thread locker on those. If it looks like this needs to be twisted a little bit, you can use a long screwdriver or pry bar. Just come right through the bolt hole, and then you can twist it as needed. Once you think it looks pretty good, I'm just gonna take my pry bar, and then I'm gonna push, and lift at the same time. Okay? This is working its way right in there nicely.
Now we need to grab our bolts because we want to have it ready so once we have this lined up, we can go ahead and put it right through. Before we go too much further, we need to make sure we inspect our bolt, clean it, and, of course, make sure the threads are nice and clean and safe. Once we've done that, we'll add a little bit of thread locker, and we'll continue. So I got the bolt cleaned up. You'll notice I put on my thread locker like I said I would, and I also put a little bit of copper Never-Seez on the shanked area here. I wanted to make sure I didn't get any Never-Seez on the threaded area though. With that said, let's get this lined up, and get the bolt in. There we are. Let's get the nut on there. Now we're gonna go ahead and bottom this out, and then we'll torque it down.
So next, we're gonna have to torque this nut to 351 foot-pounds, which just to let you know, is a lot. Most torque wrenches don't necessarily go up that high. A lot of them only go up to 250. Torque it as high as you can. Just keep in mind the torque should be 351. That's torqued. Let's get our tie rod end back in here. Now it's gonna be time to get the nut on here. Just make sure if you've got a locking end, that's facing up. Bottom it out. Torque this to 111 foot-pounds. Torqued. Now, we're just gonna bottom out these strut nuts.
So now we're just gonna torque down these nuts. Something to think about though is before you torque them, you need to either have your wheel on and the wheel on the ground with the weight of the vehicle, or you can use a jack stand, but you need to have the weight of the vehicle forcing down on the strut. Now it's time to get our wheel back up on here. Start on all of our lug nuts, bottom them out, and then we're gonna torque them to 150 foot-pounds.
Next you need to get your vehicle so the tire is just barely on the ground so it can't spin. We're gonna torque the lug nuts, like I said, to 150 foot-pounds in a star pattern. Once you've torqued it, make sure you put back on your center cover, of course.
Tools used
Brought to you by 1AAuto.com, your source for quality replacement parts and the best service on the Internet.
Hi, I'm Mike from 1A Auto. I hope this how-to video helps you out, and next time you need parts for your vehicle, think of 1AAuto.com. Thanks!
In this video, we're going to show you how to replace a front hub on this 2005 Ford F150. We show you on the passenger side but the driver's side is the same procedure. The items you'll need for this are a new front hub from 1AAuto.com, a 13mm, 18mm, and 21mm socket and ratchet with a piece of pipe for leverage, flat blade screwdriver, a pair of pliers, a jack and jack stands and a torque wrench.
Pry off the hubcap, and then, using your 21mm socket and ratchet, loosen up each of the lug nuts. Pull off this cap with a pair of pliers and then loosen up this 13mm nut. Now raise the vehicle and remove the lug nuts the rest of the way. Remove your wheel.
Turn the wheel so you can access the brakes better. To make it easier to get the caliper off, just take a large screwdriver and put it into the brake disk and pry out. You don't have to move it far, just enough to help you get things apart. Then we are going to remove the two 13mm bolts here and one up here. Push in the slides on the bracket and then pull the caliper up and off.
Now pry out your brake pads and now remove these two 18mm bolts on the back of your caliper bracket, and we'll just fast-forward as Mike removes those. Put one of the lug nuts back on and then tap your rotor. Then remove the lug nut and pull your rotor free.
The ABS harness connector is under the hood but actually it's easier to reach it from underneath. You can see I'm reaching up through the inner fender and pressing on the tab and pulling it apart. It does take a little bit of force but you can get it. If everything here is wire-tied, make sure you disconnect that, and then just pull this clip out at the top of this harness. Then you want to remove these four 18mm bolts. Two on that side and two over here. We'll fast-forward as Mike removes both of those, and you can see he uses a piece of pipe for some extra leverage.
Now remove that 13mm nut the rest of the way, and you want to make sure that it can push in and out. That means your axle is going to disconnect from the hub. Now twist in one of those 18mm bolts just a partial way so this doesn't go flying when you hammer it. You just want to hammer it to loosen it up a bit more from the wheel knuckle, then remove that bolt, and your hub should pull free.
On the right is the old hub; on the left is the new one from 1A Auto. You can see they are identical and they'll fit exactly the same. Here is a front shot. You can see same thing, they look identical. Just wipe any dirt off of there or anything. Grease up the set of bearings that's right inside here with some bearing grease. Then just apply a light coat to the engaging wheel for the 4-wheel drive here. That harness lead faces the back. Get it in place. We'll fast-forward as Mike replaces the rest of those bolts and then tightens all of them up. You want to torque each of those four bolts to 95 foot-pounds.
Now replace that 13mm nut, tighten it up, and then just torque that to 20 foot-pounds. Take your ABS wire and unclip it. Then you want to just push this into that bracket right there. Replace this small cap.
Put the rotor into place, and then replace a lug nut to just hold it in place while you put the caliper bracket back on. You put the brake caliper bracket back into place and replace the two 18mm bolts that hold it there. We'll fast-forward as he tightens those up. Then you want to torque both of those to 95 foot-pounds.
Put your caliper back into place. Then replace those two 13mm bolts and tighten them up. Now torque both of these to 25 foot-pounds. Reconnect this clip on the ABS harness. Just work your way down the harness, re-clipping the end to each of those clips.
Remove the lug nut and then put your wheel back into place. Then replace each of the lug nuts and tighten them up preliminarily. Then lower the vehicle and tighten them the rest of the way. Torque each of the lug nuts to 110 foot-pounds in a crossing pattern. Replace your hubcap.
Come up here and reconnect your ABS harness. After doing any work on the brakes, you just want to pump the brake pedal until it firms up. Then do a stopping test from 5 miles per hour, then 10 miles per hour. We hope this video helps you out.
We hope this video helps you out. Brought to you by www.1AAuto.com, your source for quality replacement parts and the best service on the Internet. Please feel free to call us toll-free, 888-844-3393. We're the company that's here for you on the Internet and in person.
Tools used
Tools used
Brought to you by 1AAuto.com, your source for quality replacement parts and the best service on the Internet.
Hi, I'm Mike from 1A Auto. I hope this how-to video helps you out, and next time you need parts for your vehicle, think of 1AAuto.com. Thanks!
In this video, we're going to be working with our 2004 Ford F150. We're going to show you how to remove and replace the front CV axle. We are doing this on the driver's side, but this part and information is going to be the same on the passenger's side.
If you like this video, please click subscribe. We have a ton more information on this truck, as well as many other makes and models. If you need this part for your vehicle, you can follow the link down in the description over to 1AAuto.com.
Here are the items you'll need for this repair: 12mm-30mm sockets, wrenches, socket extension, 12-point 12mm socket, pliers, prybar/breaker bar, torque wrench, flat blade screwdriver, rust penetrant, jack, and jack stands.
Using a pair of pliers, wiggle the cap out of the center of the hub and remove this thirteen millimeter nut at the end of the axle. Break the lug nuts loose with a nineteen millimeter socket and a breaker bar. You only want to crack them loose about one turn. We're going to do this on a lift to make it easier to show you, but this job can be done at home on a jack and jack stand. Once we've loosened the wheel and the axle nut, we'll raise and support our vehicle. Finish removing the lug nuts and remove the wheel and tire from the truck.
We'll remove these six, twelve-point 12 millimeter bolts with a twelve-point socket and ratchet so we can disconnect the axle flange from the differential. You'll need a friend to get inside the vehicle and hold the breaks as you break the bolts loose. We'll rotate it. Remove each one as the get on and off the brakes.
We've soaked all of our hardware in penetrating oil before starting here because these flanges tend to get pretty rusty. This is not somewhere you want to break off a bolt. Have your assistant release the brake pedal. Rotate the axle around a hundred and eighty degrees. Have them reengage the pedal so you can finish removing the hardware. Using a 30 millimeter socket, remove these nuts at the bottom strut bolt. You may have to support the bolt side with a twenty seven millimeter wrench. Remove the nut and bolt.
We've cut the wheel all the way to the left to allow more room. Now, we can pry out from under our strut. Pull it out to the side. Easily remove our axle from the truck. This will take a little bit of work. You're going to have to move it a little. Fight it. You may need a pry bar or a hammer to work it out. Sometimes, they do just come out easily.
Here, we have our old CV axle that we removed from our truck and our new part from 1AAuto.com. As you can see, these parts are nearly identical. We have the same shaft at the end, same threads, and it comes with the new nut. We have the teeth to lock into our hub. Same six bolt flange at the far end. The shafts are a little bit shorter in the center. But, the overall length of the axle is the same. That's what matters here. These boots just come out a little bit farther. These ones here are all torn up and broken. You can see the end cap blew out and let the grease and barrings out of the other end of our CV axle during removal.
CV axles are prone to clicking when taking sharp turns. Most noticeable when the vehicle is in four-wheel drive. But, even when this is turning with the hub and you get it to a steep angle, when you turn the car, it will make a clicking sound. If your CV axle is blown out, making noise, or has snapped and failed completely, preventing your vehicle from going into four wheel drive and moving around underneath the truck, potentially damaging some other components.
This new part from 1AAuto is going to go in, direct fit, just like your original equipment and fix you up right.
Reinstall the CV axle, being careful not to dislocate either of the joints or tear the boot. Put the strut back into place. To reinstall the bottom strut bolt, we're actually just a little bit out of line here. We're going to take a pry bar, put it through this notch in the bottom of the control arm, and push up just a little so our bolt slides in easily. We'll straighten out our wheel. Spin the nut back on by hand. Finish tightening it down with a thirty millimeter socket and ratchet and a twenty seven millimeter wrench to hold the bolt on the other side.
Line up the flange at the rear of the CV axle. Reinstall your twelve-point, twelve millimeter bolts. Get these in as far as you can by hand. Then you'll need your assistant again to work the breaks while you tighten them down with a socket and ratchet.
Reinstall the wheel and tire. Start your six lug nuts by hand. Reinstall that thirteen millimeter nut on to our axle as far as we can. Then put our vehicle back on the ground. Tighten down the axle nut with a thirteen millimeter socket and ratchet. Reinstall the dust cap over the axle nut. Tap it back into place. You can use a rubber mallet or a piece of wood on a hammer. I'm just using the end of the ratchet here because it's handy. Torque the lug nuts to 150 foot pounds. It's very important when torqueing six lug wheels. The cross pattern is different from your standard five lug wheel. You want to make little triangles. We'll skip one lug and, tighten the first three. Then, we'll go across, skip one, skip one again. We'll be tightening the wheels in two small triangles.
Thanks for tuning in. We hope this video helped you out. Next time you need parts for your car, please visit 1AAuto.com. Also check out our other helpful how-to and diagnosis videos.
Tools used
Okay friends. To get started on this job, the first thing that we need to talk about is safety. You want hand protection and eye protection at all times. With that said, safely raise and support your vehicle. So you have your front wheel off the ground. We're going to remove this center cover and then we're going to remove the lug nuts as well.
Get your wheel off of here. The next thing we need to do is loosen this jam nut right here. We're just going to go a little bit so that way there we'll be able to get this tie rod off. There we are. We need to get this cotter pin off of the outer tie rod end now, then we'll need to get the nut off of there. Use your 21 millimeter socket and remove your knot. I just put this back on there just a couple threads because now we're going to use our hammer and we're going to hit right along here on the knuckle.
Let's get this off of there, pull this down. Next, we're going to unscrew our outer tie rod end from the inner tie rod end. Once you get this off of here, just make sure you compare it completely to your new part. Next, I always like to use a little bit of copper Never-Seez along the threaded area. Now it's going to be time to install our brand new tie rod end. Go ahead and screw it right onto this inner tie rod end until it bottoms out with the jam nut. Let's get our tie rod end back in here. Now it's going to be time to get the nut on here. Just make sure if you've got a locking end, that's facing up.
Bottom it out. Torque this to 111 foot pounds. Torqued. Let's get this jam nut snugged back up. There we are. Now it's time to get our wheel back up on here. Start on all of our lug nuts, bottom them out, and then we're going to torque them to 150 foot pounds. Next you need to get your vehicle so the tire is just barely on the ground so it can't spin. We're going to torque the lug nuts like I said to 150 foot pounds in a star pattern. Once you've torqued it, make sure you put back on your center cover of course.
Tools used
Okay, friends, to get started on this job, the first thing that we need to talk about is safety. You want hand protection and eye protection at all times. With that said, safely raise and support your vehicle so you have your front wheel off the ground. We're gonna remove this center cover and then we're gonna remove the lug nuts as well. Get your wheel off of here. Okay. Now that the wheel's off, we have a nice, clear view of our inner tie rod end. We need to loosen this jam nut right here. I like to use a nice big pair of pliers. Give that a little turn, grab it. There we are. Make sure it's broken free.
Now we're gonna remove our outer tie rod end nut. To remove your outer tie rod end, it's best to hit right along the knuckle. If for some reason that isn't working and you don't have a threaded area along the top of your tire rod, you could carefully try to bonk along the top as well. Now we're gonna unscrew our outer tie rod end from the inner. As you do this turning counterclockwise, you wanna count the amount of turns. One, two, and so on. Next, we're gonna fully remove our jam nut here. Sometimes there'll be stuck on there. If that's the case, hold your inner tie rod end with some pliers and then remove the nut.
Now we need to remove our bellows boot right here. To do that, you need to remove your outer clamp right here, and then closer to the rack, you're gonna find another clamp. Remove them both and get the boot off. To do this inner clamp, I like to use a nice pry bar like this and a hammer. And if you come right along this area, you're gonna see a metal piece that comes up. That's actually the clamp. We wanna break that right off. It's a single-time use. Grab our bellows boot, give it a twist, and pull it off the inner tie rod end in the rack. Check your bellows boot. Make sure it is not torn in any way. This one looks great. We'll reuse it. Now it's time to take the inner tie rod end off of the rack. To do that, you can use several things. They have an inner tie rod end tool that'll slide over this and it'll have a little hooky-do that'll grab onto that. Not everybody has access to that. So, I like to use some nice long pliers. You can pretty much find these anywhere. Grab right onto it. And then I'm gonna turn it counterclockwise to break it free. Now, we'll just unscrew it completely.
There we are, friends. Now it's gonna be time to install our brand new tire rod end. I always like to use a tiny bit of thread locker. With that said, at this point, I'm just gonna go ahead and put it in here. I'll screw it until it bottoms out and then we'll snug it up. Now that we have this bottomed out, it's gonna be time to snug it up. I'm gonna go back to using these nice long pliers. When I grab onto this, I'm just gonna give it a nice little tweak to make sure it's locked down. I don't wanna continue twisting so I don't damage the rack though. So, pay special attention to that.
That's nice and tight. Let's go ahead and get this jam nut off of here. Now it's gonna be time to get our bellows boot back on here. When we remove the inside clamp, you probably broke it. If that's the case, go ahead and get yourself a wire tie. I like to just start it and then I'll slide it right over like this. I'm not gonna tighten it down yet. Next, we're gonna put the bellows boot on the power steering rack and we're gonna push as far as it can go so it's completely bottomed out and then we'll go ahead and snug it up. Get that on there. Give it a nice twist. Make sure it's completely situated. That looks great.
At this point, I usually like to use some long nose pliers. It's something that's easy to grip onto and you can give it a twist. And then, of course, we'll trim off whatever's left. There we are. Trim this. Next, I always like to take the bellows boot and I'll just try to push it in a little bit. If you were to look at the inner tie rod end, you're gonna see there's these grooves. Just put a tiny bit of grease or whatever type of lubricant you might have just along that area. That's right where this boot has to ride. The reason for that is because when you go to get an alignment, you don't want the boot being stuck on the inner tie rod end and then twisting as the alignment professional's trying to do his job. Get that up there. That feels great.
Now we're gonna put our clamp back on there. Let's take our clamp, put it right on our pliers here, get it ready. I'm gonna go over the inner tie rod end and then, of course, over the boot. Next, we're just gonna put a little bit of copper never-seize on our threads. That's gonna help prevent things from seizing up. Take your nice new jam nut, we'll put it right on here. Something to mention, anytime you're doing your inner tie rod end, it's always a good idea to replace your outer tie rod end, especially if it looks as though they're in the same condition. Ours looks really great. So, I'm just gonna go ahead and reinstall it. I'm gonna count as I go in. There's one, two, three, and so on. Okay. So, now I just finished up with the exact same amount of turns as when I took it off. Let's go ahead and bring this jam nut down close to the outer tie rod end. Now it's time to get our outer tie rod end into the knuckle. Let's see if I can just turn it a little bit. Slide it in here.
There we are. Take our nut. If it has a lock, make sure the lock is facing up, of course. Now we're gonna snug it down and then we're gonna torque it to 111 foot-pounds. Now we're just gonna make sure our jam nut's nice and snug. Awesome. Now it's time to get our wheel back up on here. We'll start on all of our lug nuts, bottom them out, and then we're gonna torque them to 150 foot-pounds. Next, you need to get your vehicle so the tire's just barely on the ground so it can't spin. We're gonna torque the lug nuts, like I said, to 150 foot-pounds in a star pattern. Once you've torqued it, make sure you put back on your center cover, of course. Okay, friends, anytime you do any type of front-end work on your vehicle, it's always super important to make sure you get your vehicle down to a reputable alignment shop. They're gonna take care of you and make sure you're going straight on down the road. Be safe out there.
Tools used
Brought to you by 1AAuto.com, your source for quality replacement parts and the best service on the Internet.
Hi, I'm Mike from 1A Auto. I hope this how-to video helps you out, and next time you need parts for your vehicle, think of 1AAuto.com. Thanks.
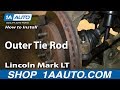
In this video, we're going to show you how to replace an outer tie rod on this 2005 Ford F150. We show you on the driver side but the passenger side is the same procedure. The items you'll need for this is a new outer tie rod from 1AAuto.com; a 7, 10, and 21mm socket and ratchet with a piece of pipe for leverage; two adjustable wrenches; a tape measure; a hammer; a torque wrench; and jack and jack stands.
Start off by prying off the hub cap. Then loosen up these lug nuts using a 21mm socket and ratchet and a piece of pipe for some extra leverage. Once you get each of them loosened up you can raise the vehicle and remove them the rest of the way. Now pull the wheel off.
Now turn the wheel and then remove this 21mm nut at the top of your outer tie rod. Then once you remove it, you want to just put it back on just a couple threads. Spray the nut at the end of your outer tie rod with some penetrating fluid, and then, using two adjustable wrenches, just loosen it up. Now hammer the knuckle until the outer tie rod drops down. Now you can remove that nut and just set your outer tie rod off to the side.
Now measure from the boot on your inner tie rod to the center of your outer tie rod, and just remember that distance. Then you can twist your outer tie rod free. We'll fast forward as Mike does that.
On the left is the old outer tie rod. On the right, is the new one from 1A Auto. You can see they're identical and they'll fit exactly the same. Take your new outer tie rod and twist it into place. We'll fast forward as Mike does that. Now, measure from the boot to the inside of the outer tie rod and make sure it's the same distance. If it is, you're all set. If not, you'll have to move that nut to adjust it.
Now, feed your outer tie rod up through the wheel knuckle and replace that nut and tighten it up. If the studs start spinning when you use your 21mm socket just use a 21mm wrench and a 10mm socket to hold the stud in place and tighten it up. Then torque that to 111 foot pounds.
Now, using two adjustable wrenches just tighten that nut back up, and then put your grease fitting into place on the outer tie rod. Then just tighten it up with a 7mm socket and ratchet. Using a grease gun, just top it off with some grease.
Now we'll fast forward as Mike replaces the wheel, and replaces the lug nuts, and tightens them preliminary, and then lowers the vehicle and tightens them the rest of the way. Then torque each of them, in a crossing pattern, to 120 foot pounds. Then just replace your hub cap and you're all set.
We hope this video helps you out. Brought to you by www.1AAuto.com, your source for quality replacement parts and the best service on the Internet. Please feel free to call us toll-free, 888-844-3393. We're the company that's here for you on the Internet and in person.
Tools used
Okay, friends, to get started on this job, the first thing that we need to talk about safety. You want hand protection and eye protection at all times. With that said, safely raise and support your vehicle so you have your front wheel off the ground. We're gonna remove this center cover, and then we're gonna remove the lug nuts as well.
Get your wheel off here. Okay. Now that the wheel's off, we have a nice clear view of our inner tie rod end. We need to loosen this jam nut right here. I like to use a nice big pair of pliers. Give that a little turn, grab it. There we are. Make sure it's broken free. Now we're gonna remove our outer tie rod end nut. To remove your outer tie rod end, it's best to hit right along the knuckle. If for some reason that isn't working and you don't have a threaded area along the top of your tie rod, you can carefully try to bonk along on the top as well.
So now that we can make this spin around, this is gonna be much easier to be able to get access to this area. One of the first things I like to do is get the ABS wire off of here. I wanna make sure that it's disattached from the flex hose so that when we hang the caliper, we're definitely not gonna put any tugs on it.
Next, we're gonna remove these two bolts right here and take the caliper off of the bracket. Leave that in a little bit. Set those aside. Next, what we need to do is take a pry bar like this, and we're gonna come right in between this area. We wanna get between the caliber and the rotor, and just try to pry it. We wanna do it slowly and we're gonna try to push back the pistons. The reason for that is because the pad on the inside has a couple of little divots that are gonna go into the slots on the pistons.
I'm gonna turn this a little bit. Okay, just a teeny bit. Now I can grab this. I can pull it right off. It's always a great idea to inspect your caliper. Look for any leakage. If you see any fluid coming out from around these seals, more than likely the caliper is no good. Just set this up here for now. We don't want to put any pressure on this flex hose. You wanna make sure it's safe as can be.
Now we're gonna remove these clips from the pads themselves. They come right out at this point. Let's go ahead and get the pads out. Set those aside. Next, I like to push the caliper pistons back. If you look at the caliper, you're gonna notice there's two pistons. Well, that's really great. The only problem with it though is if you try to push back one piston at a time, it's gonna push out the other. With that said, I like to use a pad. Just use one of your old ones, of course, not a new one. And then, of course, your caliper depression tool, whatever you might happen to have this one works great. And now, I'm gonna carefully push in both those pistons at the same time nice and slow. That feels great.
If for some reason those pistons didn't want to push in, you know, you have an issue with the caliper as well. Set this aside so it puts no pressure on your flex hose. Next, we're gonna remove our two caliper bracket mounting bolts. Put in a couple of threads. Now that we've got the bracket off of there, let's get this cotter pin out of the way, and we'll get this little cover as well. Let's remove our spindle nut. Just take your nut, put it back on there just a couple of threads. At this point, we're gonna take our hammer, and we're gonna come from the backside and just try to break this free from the spindle. Make sure your nut's on there to keep you safe.
The rotor is gonna be a little heavy. There it is. Now that that rotor is out of the way, we're gonna inspect the backing plate. You wanna make sure it's in good condition. If yours is in condition like ours, obviously, you might wanna do something about that. I'm just gonna kind of push this so it's gonna be safely and secured, at least, for the purpose of this video, and I'm gonna move along.
Next, what I wanna do is clean up this area right along here. That's the area that the bearing is gonna be going around. If you look at it, and you see that it has a lot of rust or rot or buildup of any sort, you need to make sure you clean that down. I could use something as simple as sandpaper. Now, we need to clean up our braking surface on our rotors. Use a little bit of parts cleaner and a nice clean rag, and wipe it down. Do the same to both sides, of course. And then we'll get ready for an install.
Get our rotor up on here. That's completely in as far as it's gonna go. I'm gonna hold on to it because I don't want it to slide off. Okay, now we're just gonna go ahead and put the nut on there. If you're reusing your old nut, make sure you use some thread locker or, of course, replace the nut. Now, we're gonna torque our spindle nut to 296 foot-pounds. We made our way over to the bench with our caliper bracket. The reason for that is because we need to clean it up and dress it up so it'll be ready for our new brakes. Grab yourself a small pry bar or even a small screwdriver and remove your tins.
Next, what we need is a rag. And we're gonna grab right onto this area right here which is considered your slider, and you're gonna pull it right out. What you'll notice as you start to pull is that the boot wants to come with it. If you go right along this lip right here, it'll pull away, and then you can slide out the slider. Do the same to both. As you pull them out, make sure you have them on the same side that you remove them from. The reason for that is because if you were to clean them up, you're gonna see that one of them has this little rubber boot right here. This is great for vibration dampening and noise reduction, overall, and it's very important that it's on the same side of the caliper bracket that you removed it from.
When you clean up your caliper slider, make sure you get all up inside the lip right here. That's super important because that's where the boots gonna ride. If it's rotted, or rusted, or has any reason that moisture can make its way inside, there's a possibility that you could freeze up your slider inside the tube right here, and then your brakes won't function as they should.
Now that I have both my sliders clean, the next thing I wanna do is carefully remove my boot. If you were to take your small pocket screwdriver and come right along the edge of the metal and the rubber, you should be able to kind of weasel it in there. Once you do, the boot should come popping right out.
At this point, you wanna clean and inspect your boot. Take your rag, roll it around on it, get it nice and clean. If you see any rips, tears, or even if it seems like it's super stiff and it might break, you need to replace it. This one looks pretty great actually. I'll check the same on the other one. And if they're both good, we'll reuse them. Now that we have all that nice and cleaned up, it's time to continue cleaning up the bracket itself. As you can tell, there's nothing on here that we need to worry about damaging so we're doing all right. Inside this area right here is where the sliders need to be, they're gonna go in and out. It needs to be well lubricated. It also needs to be in good condition. So, you wanna make sure you clean that out, inspect it, and then, of course, re-lubricate it when you put in your new slider.
Once you've got it sprayed and cleaned out, just take a peek inside there, and check it out. This one looks great. We'll do the same to the other side, and we'll continue. Now that we have both of our slider ports cleaned up, we wanna clean up the area where those tins were. Remember when you're cleaning this, you wanna clean this area, this area right up here, and then, of course, the edge there, and the edge there. That's gonna be super important on all four corners because that's where the tin is gonna be, and then, of course, the pad.
Now if you don't have one of these tools, you can also use a nice wire brush, and do pretty much the same thing. It might just take a little bit longer. So all four of these corners look great at this point. We cleaned out the inside of those ports. Let's move along. We're gonna use some grease. This is just plain old caliper grease. It's nothing special. I'm just gonna put a little dab here, here, there, and there. With a glove finger or, of course, with the same brush, go ahead and spread it around, and make sure you coat all the areas that you cleaned off, only because this is gonna help keep moisture away and, of course, help with vibration dampening as well.
Now that we have the areas nice and lubed, we're gonna go ahead and install our tins. If you were to look at this area of the tin right there, it kind of pops out a little bit. That's gonna actually press into this area. So, as I bring it, I'm gonna go over these areas here, press this, and then I'm gonna bring this up and in, and make sure it's up against the bracket. That's what holds it in. Same to the other one. That's great. Take a little bit of your lubricant, and go right along this hole right here, and then, of course, the other one.
And now we're gonna do is we're gonna put in our boots. You might need the use of your flathead screwdriver, but more than likely, you won't. Just kind of start one end like that, and then you should be able to push it in with your finger. Give it a nice twist to make sure that the grease has made its way all the way around the inside of that boot. That's gonna keep the moisture out, of course. Looks great. Let's continue on with some more grease.
Now I'm gonna lubricate my slider. Not only do you wanna do the shaft area of the slider, but you wanna make sure you get up into this area right here. That's the area where the boot is gonna ride. That's gonna help keep moisture out as well. That looks pretty great. Slide it on in there, and give it a nice twist. Make sure there's grease everywhere in there. Do the same to the other one.
Let's make our way back over the vehicle, and get our bracket on there. We've got our bolts, and I like to use a little bit of thread locker. I'm just gonna put them right on there. Next, we're gonna snug them up, and then we'll torque them to manufacturer's specifications. Let's torque these to 148 foot-pounds.
Next, we need to prep our caliper. I'm gonna use a little bit more of this caliper grease. I'm gonna go right along that piston right there, this one right here, and then on the other side of the caliper, each one of these three ears. Let's get ready to install our pads. Let's start with the inboard one, same for the outboard. If you find that you have to use a hammer or anything like that to put these in, obviously, you probably didn't clean up the bracket enough. Your pads need to be able to slide around like this.
You're gonna notice that your kit came with these right here. These are to help separate the pad when you release the brake pedal. It's gonna help diminish overheating of the brakes. Put one in the top just like this, facing towards the center, and then, of course, one on the bottom doing the same.
Now let's grab our caliper. We're gonna put it right over this. Just push your pads together, should be able to slide this in. There we are. Take your two caliper bolts, a tiny bit of thread locker, start them in, snug them up, and then we'll torque them down. Torque these to 47 foot-pounds. Let's get this back on here. Now we're gonna put on the lock for the spindle nut. Go ahead and put that over. You wanna try to line it up so the slots that are on it, line up with the hole in the axle. Take a nice new cotter pin. It's a great idea to use a new one, of course. Slide it through and then, of course, peen over the ends so there's no way this nut can loosen up.
Now it's time to get our outer tie rod end into the knuckle. See if I can just turn it a little bit, slide it in here. There we are. Take our nut. If it has a lock, make sure the lock is facing up, of course. Now, we're gonna snug it down, and then we're gonna torque it to 111 foot-pounds.
Now it's time to get our wheel back up on here. We'll start on all of our lug nuts, bottom them out, and then we're gonna torque them to 150 foot-pounds. Next, you need to get your vehicle so the tires just barely on the ground so it can't spin. We're gonna torque the lug nuts like I said to 150 foot-pounds in a star pattern. Once you've torqued it, make sure you put back on your center cover, of course. Let's pump up the brake. You always want to make sure you top off your brake fluid anytime you're done.
Okay, friends, anytime you do any type of front-end work on your vehicle, it's always super important to make sure you get your vehicle down to a reputable alignment shop. They're gonna take care of you, and make sure you're going straight on down the road. Be safe out there.
Tools used
Tools used
Brought to you by 1AAuto.com, your source for quality replacement parts and the best service on the Internet.
Hi, I'm Mike from 1A Auto. I hope this how-to video helps you out, and next time you need parts for your vehicle, think of 1AAuto.com. Thanks.
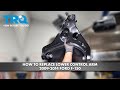
In this video, we're going to show you how to replace the front struts. This is a 2005 Ford F-150. It's exactly the same for any 2004, the new body style, through the 2008, and probably the same for 2009 and up. We show you on the driver's side, but the passenger's side is the same procedure and we do recommend you replace them in pairs. You'll need new front struts from www.1aauto.com, sockets from 8mm up to 30mm, a pipe or a breaker bar for leverage, a 12mm 12-point socket, 18mm and 21mm wrenches, pliers, pry bar, flat blade screwdriver, torque wrench, hammer and jack and jack stands.
Start off by prying off the hubcap. Then loosen up these lug nuts using a 21mm socket and ratchet and a piece of pipe for some extra leverage. Then raise the vehicle, and remove them the rest of the way and take the tire off. You want to life the whole front of the car up and put it on jack stands with both wheels off the ground. Now pull the wheel off. Now turn the wheel, and remove this 21mm nut at the top of your outer tire rod. Then once you remove it, you want to just put it back on just a couple threads.
Now hammer the knuckle until the outer tire rod drops down. Now you can remove that nut, and just set your outer tire rod off to the side. Underneath your control arm, on the bottom of the sway bar link you want to just remove that nut. You can try doing it with an 18mm ratchet, but most likely it's going to start spinning, and the solution for that is an 18mm wrench and an 8mm socket and ratchet. Then you can just remove that nut. You want to spray the bolt that holds the bottom of your strut, and then a 30mm socket. I'm using a breaker bar and a piece of pipe and break that free. Then once you get it going, the bolt will most likely spin. Hold the bolt end with the 27mm socket and take that nut off.
Then spray these 15mm nuts at the top of the strut with some penetrating fluid, and remove two of them all the way. The other one, you just want to leave on a few threads. Using a pair of pliers, remove this cap. Then loosen up and remove that 13mm nut. Then you want to just put it back on just a few threads. Tap it with a hammer and make sure it goes through. Then remove the nut the rest of the way. On the other end of the axle, there's a series of 12mm bolts. You just need to use a 12mm 12-point socket, and then a pry bar to hold the wheel. Just loosen those up.
You can also just have a helper get in the vehicle, and hold the brakes to hold the axle in place. When you remove that last one, just push the axle down to the side. Now spray this 21mm nut up here on the bottom of your upper control arm. Then remove that nut, and put it back on just a few threads. Now with the nut back on a few threads, just hammer the wheel knuckle until the upper control arm loosens up. Now just lift up on the wheel knuckle, and then remove that nut. Now you can just set the wheel knuckle off to the side carefully.
You don't want it to strain those brake hoses. Then just tap the axle and pull it out of the wheel knuckle. You want to feed the axle towards the left side towards the front of the vehicle. Then just angle it down, and pull it down and out. Now, we're just going to check up underneath the control arm a little bit. The vehicle is still supported on the jack stands under the frame. Remove the bolt from the bottom of the strut, and you can see the struts in there are still loose. Make sure the nuts on the top of the strut are removed. Pry the strut out.
Up top is the old strut. Below it is the new one from 1A Auto. You can see they're identical and they'll fit exactly the same. Feed your strut up into place. Push those studs through. Then just replace those nuts at the top to just hold it. You don't need to tighten them up right now. You're just putting them there to hold it in place. Then pry the bottom of the strut back into the lower control arm. Then push that bolt back through. You just make sure it's all the way in. Then replace the nut and tighten it up preliminarily. We'll just fast-forward as Mike goes back over those 15mm nuts making sure they're tightened. Then you can remove the jack.
Feed your axle back into place. You want to feed it back in the same way that you pulled it out. Then just angle it back down into the hub and push it in. Now you can take your upper control arm and push it back into the wheel knuckle. Once you push it through, just put that 21mm nut on there to hold it in place. Line up the axle and replace those 12mm bolts. We'll fast-forward as Mike does this. Now tighten each of those to 60 foot-pounds in a crossing pattern. You can see we torqued that one. Then you want to turn the wheel until you get the one on the opposite side. Then torque that one. You want to just repeat this process with each of them. Now replace this 13mm nut and torque it to 20 foot-pounds. Then replace that cap and just tap it into place.
If any of the lines on the back came undone, make sure you push them back in and re-clip them. Then push your outer tire rod up to the wheel knuckle and replace the nut. Then torque that to 111 foot-pounds. Now just tighten up this bolt on your upper control arm. If the stud spins, use a 10mm socket and ratchet. Then you want to torque this to 111 foot-pounds. Then tighten up the nut on the bottom of your sway bar link. Jack up underneath the lower control arm to simulate a wheel being in place. Torque the lower strut bolt to 150 foot-pounds.
Now we'll fast-forward as Mike replaces the wheel and replaces the lug nuts and tightens them preliminarily. Then he lowers the vehicle and tightens them the rest of the way. Then torque each of them in a crossing pattern to 120 foot-pounds. Then just replace your hubcap and you're all set.
We hope this video helps you out. Brought to you by www.1AAuto.com, your source for quality replacement parts and the best service on the Internet. Please feel free to call us toll-free, 888-844-3393. We're the company that's here for you on the Internet and in person.
Tools used
Tools used
Brought to you by 1AAuto.com, your source for quality replacement parts and the best service on the Internet.
Hi, I'm Don from 1A Auto. I hope this how-to video helps you out, and next time you need parts for your vehicle, think of 1AAuto.com. Thanks.
In this video, we're going to show you how to replace a front axle on this 2004 Ford F150. It's pretty much the same for any 2004 to 2010. This is a 4 wheel drive. You're going to need new axles from 1AAuto.com. We show you the right hand or passenger side axle; the left hand driver's side axle is the same procedure. You'll also need jack and jack stands; pry bar; pliers; 13, 24, and 30 millimeter sockets; a ratchet and a breaker bar; a pipe for some leverage; a 12 millimeter, 12 point socket and ratchet; and a torque wrench.
To start out, raise and support the vehicle securely and then remove your center cap. We remove the cap on the end of the hub. With a 13 millimeter socket, I remove the nut on the end of the axle. Where the end of your CV joint meets the solid axle, there's going to be six 12-point, 12 millimeter bolts. I'm using a 12-point socket to remove those. We're just going to do some fast forwarding here, and you can basically hold on to the tire, or you could have somebody hold the brakes for the vehicle. Loosen up those bolts and remove them. I'm going to remove the bolt with a 30 millimeter socket that holds in the lower part of the strut assembly, so that we can get more room to pull the CV shaft out. I'm going to fast forward here as we remove that nut and bolt. Once you get the nut loosened up you can tap it with a hammer a few times, and make sure that the bolt is loose and will come out. I'm going to use a pry bar and pry out the lower end of the strut assembly from the lower control arm. While I was prying on the lower part of the strut assembly I was able to pull the CV shaft past this. Now I'm going to pull the shaft out. Okay, and we'll just speed up here. Work the axle out and then you actually have to work the lower strut mount out. You can see we'll use a pry bar, and get that moved out of the way and then the axle comes right out.
I'm sliding the CV joint back into place. Now, with the wheel all the way turned out I'm going to go ahead and rescecure where the strut goes into the lower control arm. Then once you get that back in place use the bolt or you can also use a screw driver or a lineup tool, get the hole to line up, get the bolt through, put the nut on the back side, and then tighten it up. You want to tighten that bolt up to about 95 to 100 foot pounds. I'm going to line up the holes on the CV shaft with the solid axle and reinstall the 12 millimeter, 12-point bolts. Once again, we'll fast forward here. We install the bolts first by hand. Make sure they're turning in there and you're not cross-starting any of the bolts. Then tighten them up kind of preliminarily. Then what you want to do is use a cross pattern. Tighten one up, and you want to tighten them to about 25 foot pounds. Tighten one up and then, go to the opposite one, tighten that one up, and just keep with that pattern until they're all tight.
I'm reinstalling the 13 millimeter nut on the end of the axle, CV shaft. Reinstall the cap, and align your center hub cover, the pin here and the hole there.
We hope this video helps you out. Brought to you by www.1AAuto.com, your source for quality replacement parts and the best service on the Internet. Please feel free to call us toll-free, 888-844-3393. We're the company that's here for you on the Internet and in person.
Tools used
Tools used