Replaces
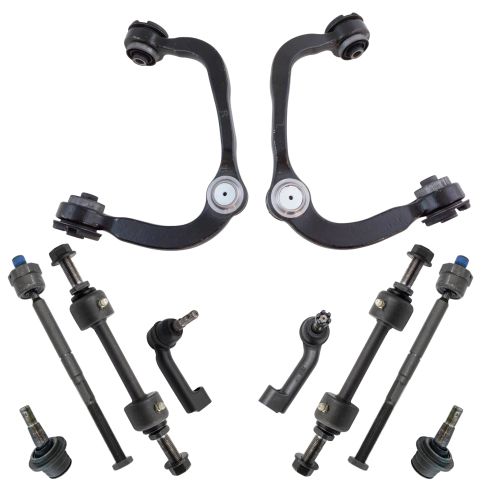
Part Details
Install Tip: When replacing steering components, have a professional alignment performed afterwards. This ensures proper tracking and even tire wear.
Item Condition:
New
Lifetime Warranty
This item is backed by our limited lifetime warranty. In the event this item should fail due to manufacturing defects during intended use, we will replace the part free of charge. This warranty covers the cost of the part only.
FREE Shipping is standard on orders shipped to the lower 48 States (Contiguous United States). Standard shipping charges apply to Hawaii and Alaska.
Shipping is not available to a P.O. Box, APO/FPO/DPO addresses, US Territories, or Canada for this item.
Expedited is available on checkout to the United States, excluding Alaska, Hawaii.
Final shipping costs are available at checkout.


Created on:
Tools used
Okay, friends, one of the first things we need to do to get started on this job is to safely raise and support the truck. After you've done that, remove your center cover here. And then remove all six of your 21-millimeter lug nuts and get the wheel off. Now that the wheel's off, let's go ahead and get this ABS wire disconnected. I'm just gonna come right along here and then remove this 8-millimeter bolt. Now let's go ahead and remove our anchor bolt for our flex hose for the brakes. Let's go ahead and remove this little center cover. Now let's remove our axle nut. Now we're just gonna push on this axle stub here. If it doesn't move, just go ahead and put the nut back on a few good threads, and then give it a couple of loving bonks with a hammer. Now let's go ahead and get our cotter pin out for our tie rod. Set that aside for recycling. Let's remove the nut.
Now we're gonna use a hammer, and we're gonna hit right on the knuckle right here to try to break this free. Now let's remove our upper ball joint nut. Now we're just gonna separate these two. Now, the next thing we need to do is remove the bolt that's gonna be holding the front strut to the actual lower control arm. I'm gonna hold the bolt side on this with a wrench, and then I'll, of course, remove the nut. There we are. The next thing we're gonna wanna do is carefully pull down right along here, and then we can separate these two. Let's just go ahead and spray those mounting bolts from the top there. Now we're gonna go ahead and remove those three mounting nuts. All right. So that's almost off of there. Let's leave it on a couple of threads, and then we'll fully remove the other two.
There we are. All right. So now we're back to our last nut here. Let's make sure we hold up on that front strut so it can't fall out on us. All right. There it is, friends. Now that we have the front strut out of the way, we have a clear view of our mounting bolt that holds our control arm to the frame. I would just go ahead and use the swivel with an extension and then I'm gonna come in right like this. You can, of course, just use a 21-millimeter socket or wrench, and then I'm gonna come to the other side with another 21-millimeter, and I'm gonna hold that nut. It's nice and loose. Let's go ahead and get that nut off of there. There's the bolt. We'll do the same to the other side.
Okay. Get that nut off of there. There it is, friends. Now it's gonna be time to install our brand new upper control arm. Let's go ahead and slide this in. We're gonna line up those bolt holes, start them from the inside going out. Now let's just take a nice pry bar, stick it in here like this so it's holding, and then we're gonna put our control arm on top of it. That's gonna have the control arm so it's sitting in the same position as if we were on the ground. Go ahead and start on both of those nuts, and then we'll go ahead and snug them up. Snug it up. Now let's torque these to 111 foot-pounds. All right, friends, let's go ahead and get our strut up in here. Start all of your nuts, snug them up.
All right. Let's get this lower aspect in. Start the nut on there. Now we're gonna apply a little bit of pressure underneath the lower control arm so we can bring this up so it'd be almost like it's sitting on the ground, and then we'll go ahead and snug this. Go ahead. Let's snug this up. Let's torque this to 406 foot-pounds. Now with pressure still underneath there, let's go ahead and torque these upper mounting bolts as well. We're gonna torque these to 30 foot-pounds. The next thing we need to do is get our axle inside the knuckle as we push the knuckle up. You wanna be very careful not to damage your internal seal.
Now, I'm just gonna take a pry bar, come in and under here, and then I'm gonna try to put the ball joint through the knuckle. Go ahead and start that nut, snug it up, torque it to 85 foot-pounds. What you wanna do next is make sure that you have your slot lined up with the hole on your ball joint stud. If for some reason it isn't, you need to continue tightening until it is. Next, take your cotter pin, go ahead and put it through the slot and the hole, and then, of course, lock it down. Let's get our sway bar back up on here, start on both of the nuts, snug them up, and torque them to 41 foot-pounds. Do the same to the other side of the vehicle. Let's make sure we install our grease fitting. Apply some grease. The next thing we're gonna wanna do is put on our axle nut. I like to use a little bit of red thread locker, bottom it out, and then torque it to 20 foot-pounds.
Now that that's torqued, we're gonna go ahead and install this cover. You wanna make sure that it's not damaged in any way, go ahead and slide it right on there, and bottom it out. Now, before we can continue on to putting the brakes together, we wanna make sure that the hub mating surface and the back of the rotor mating surface is nice and clean. After you've done that, apply a little bit of copper Never-Seez. Let's go ahead and get our rotor back on here. I'm gonna start a lug nut on so it holds the rotor for me. Let's get our caliper reattached. We're gonna use some thread locker, of course, on the bolts. Start them both in, and then we're gonna torque them to 185 foot-pounds. Let's get our vacuum lines reattached. Now we're gonna reconnect in our bracket, ABS wire. Let's snug them up. Let's start resecuring our ABS wire. Make sure you go up and in between the brake line here, just like that.
This looks good for now. Make my way down here. Get a little push clip. It's gonna go into your hole right there. The rest of it should just line up. We'll continue on. Making our way up here, let's make sure we reconnect in our ABS wire, listen for a click, and then, of course, give it a nice tug. After that, you wanna make sure that you secure it back in up here. Make sure everything's nice and secured, and it's definitely not rubbing up against anything, and there's no way it can get caught. Let's get the outer tie rod end on here, snug this up, torque it to 85 foot-pounds. The next thing we wanna do is make sure that our slots line up with the hole in the stud for the tie rod. If for some reason it doesn't, you need to continue tightening until the next one does. Install your locking cotter pin and then lock it down. Let's get the wheel back up on here. Start all of your lug nuts, snug them up, and torque them to 150 foot-pounds.
Torqued. Okay, friends, so that's pretty much it. Aside from making sure you pump up that brake pedal, and then get yourself safely down to an alignment shop.
Tools used
Brought to you by 1AAuto.com, your source for quality replacement parts and the best service on the Internet.
Hi, I'm Mike from 1A Auto. I hope this how-to video helps you out, and next time you need parts for your vehicle, think of 1AAuto.com. Thanks.
In this video, we're going to show you how to replace the front struts. This is a 2005 Ford F-150. It's exactly the same for any 2004, the new body style, through the 2008, and probably the same for 2009 and up. We show you on the driver's side, but the passenger's side is the same procedure and we do recommend you replace them in pairs. You'll need new front struts from www.1aauto.com, sockets from 8mm up to 30mm, a pipe or a breaker bar for leverage, a 12mm 12-point socket, 18mm and 21mm wrenches, pliers, pry bar, flat blade screwdriver, torque wrench, hammer and jack and jack stands.
Start off by prying off the hubcap. Then loosen up these lug nuts using a 21mm socket and ratchet and a piece of pipe for some extra leverage. Then raise the vehicle, and remove them the rest of the way and take the tire off. You want to life the whole front of the car up and put it on jack stands with both wheels off the ground. Now pull the wheel off. Now turn the wheel, and remove this 21mm nut at the top of your outer tire rod. Then once you remove it, you want to just put it back on just a couple threads.
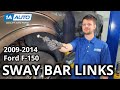
Now hammer the knuckle until the outer tire rod drops down. Now you can remove that nut, and just set your outer tire rod off to the side. Underneath your control arm, on the bottom of the sway bar link you want to just remove that nut. You can try doing it with an 18mm ratchet, but most likely it's going to start spinning, and the solution for that is an 18mm wrench and an 8mm socket and ratchet. Then you can just remove that nut. You want to spray the bolt that holds the bottom of your strut, and then a 30mm socket. I'm using a breaker bar and a piece of pipe and break that free. Then once you get it going, the bolt will most likely spin. Hold the bolt end with the 27mm socket and take that nut off.
Then spray these 15mm nuts at the top of the strut with some penetrating fluid, and remove two of them all the way. The other one, you just want to leave on a few threads. Using a pair of pliers, remove this cap. Then loosen up and remove that 13mm nut. Then you want to just put it back on just a few threads. Tap it with a hammer and make sure it goes through. Then remove the nut the rest of the way. On the other end of the axle, there's a series of 12mm bolts. You just need to use a 12mm 12-point socket, and then a pry bar to hold the wheel. Just loosen those up.
You can also just have a helper get in the vehicle, and hold the brakes to hold the axle in place. When you remove that last one, just push the axle down to the side. Now spray this 21mm nut up here on the bottom of your upper control arm. Then remove that nut, and put it back on just a few threads. Now with the nut back on a few threads, just hammer the wheel knuckle until the upper control arm loosens up. Now just lift up on the wheel knuckle, and then remove that nut. Now you can just set the wheel knuckle off to the side carefully.
You don't want it to strain those brake hoses. Then just tap the axle and pull it out of the wheel knuckle. You want to feed the axle towards the left side towards the front of the vehicle. Then just angle it down, and pull it down and out. Now, we're just going to check up underneath the control arm a little bit. The vehicle is still supported on the jack stands under the frame. Remove the bolt from the bottom of the strut, and you can see the struts in there are still loose. Make sure the nuts on the top of the strut are removed. Pry the strut out.
Up top is the old strut. Below it is the new one from 1A Auto. You can see they're identical and they'll fit exactly the same. Feed your strut up into place. Push those studs through. Then just replace those nuts at the top to just hold it. You don't need to tighten them up right now. You're just putting them there to hold it in place. Then pry the bottom of the strut back into the lower control arm. Then push that bolt back through. You just make sure it's all the way in. Then replace the nut and tighten it up preliminarily. We'll just fast-forward as Mike goes back over those 15mm nuts making sure they're tightened. Then you can remove the jack.
Feed your axle back into place. You want to feed it back in the same way that you pulled it out. Then just angle it back down into the hub and push it in. Now you can take your upper control arm and push it back into the wheel knuckle. Once you push it through, just put that 21mm nut on there to hold it in place. Line up the axle and replace those 12mm bolts. We'll fast-forward as Mike does this. Now tighten each of those to 60 foot-pounds in a crossing pattern. You can see we torqued that one. Then you want to turn the wheel until you get the one on the opposite side. Then torque that one. You want to just repeat this process with each of them. Now replace this 13mm nut and torque it to 20 foot-pounds. Then replace that cap and just tap it into place.
If any of the lines on the back came undone, make sure you push them back in and re-clip them. Then push your outer tire rod up to the wheel knuckle and replace the nut. Then torque that to 111 foot-pounds. Now just tighten up this bolt on your upper control arm. If the stud spins, use a 10mm socket and ratchet. Then you want to torque this to 111 foot-pounds. Then tighten up the nut on the bottom of your sway bar link. Jack up underneath the lower control arm to simulate a wheel being in place. Torque the lower strut bolt to 150 foot-pounds.
Now we'll fast-forward as Mike replaces the wheel and replaces the lug nuts and tightens them preliminarily. Then he lowers the vehicle and tightens them the rest of the way. Then torque each of them in a crossing pattern to 120 foot-pounds. Then just replace your hubcap and you're all set.
We hope this video helps you out. Brought to you by www.1AAuto.com, your source for quality replacement parts and the best service on the Internet. Please feel free to call us toll-free, 888-844-3393. We're the company that's here for you on the Internet and in person.
Tools used
Tools used
Tools used
Tools used
Tools used
Tools used
Tools used
Hi, I'm Mike from 1A Auto. We've been selling auto parts for over 30 years.
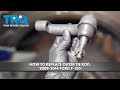
Hey, everyone. Sue here from 1A Auto, and today I'm going to show you how to do an outer tie rod end on a 2011 Ford F-150. If you need this part or any other part for your car, click on the link below and head on over to 1aauto.com.
Just a little friendly reminder. Any time you do any front end suspension or steering repairs pre-set up an alignment appointment with your local garage, or the one that you wish to do so as soon as you're done doing DIY repairs you can ship it on down and get lined up properly.
To remove the tire you need a 21-millimeter socket, and you're going to break the lug nuts free with the pressure of the vehicle on the tire. Now, I'm going to raise and support the vehicle with a two post lift. You can use a jack and jack stands at home. Now that the vehicle is up I can take the lug nuts off to remove the tire. Be prepared. This thing is heavy. When you have a tire that's stuck on the hub, all the lug nuts are off, and obviously, you can't pull it off, always put a lug nut. Just hand thread it a little bit so when it does break free, it doesn't bounce back at you.
Always loosen the jam nut before you take anything out of the knuckle of the tie rod ends because this nut is really tight so you need the leverage to loosen that. This particular model is a 24-millimeter wrench. As you can see the inner tie rod end is spinning, but that's okay. I just want it even. I want it loose. I'm going to loosen the outer tie rod end mounting nut. It's a 21-millimeter socket. I'm going to back that nut all the way off. Now with a good size hammer, you're going to hit the knuckle right here at the outer tie rod end housing, and you're going to loosen up that jam spindle part of the tie rod end.
The object here now is to take this outer tie rod end off the inner, so we have to hold this inner in place and then twist the outer off. I'm going to use a pair of locking pliers, see if I can get a good grip on this, and I'll use the lower control arm as a leverage point. Let's hope that doesn't spin. I have a pair of very large locking pliers. This is almost a must for any front end repair.
Here we have the new outer tie rod end for our 2011 Ford F-150, comes from 1A Auto. It's the same length as the factory, same curve. There is a left and a right when you're looking up the specifications. It comes with this new castle nut and its own cotter pin. If you need this part or any other part for your car, click on the link below and head on over to 1aauto.com.
Just reverse procedure to install the outer, and we line it up to the knuckle, put on the new castle nut and tighten it down. I'm just going to put the castle nut on here tight to stop that from popping out. The outer tie rod end socket is a 21 millimeter on this castle nut, and the torque is 85 foot-pounds, and let's see if the--wow, I lucked out. The cotter pin lined right up. Always, always don't forget to use a new cotter pin. With our tie rod end assembly, it comes with it. Please don't use the old cotter pin. It's worn out. There we go. Now we can put the lug nuts on. Now we're just going to let them out, all the lug nuts right to the hub, lower the vehicle, and we'll torque these down to manufacturer specs 150 foot-pounds in the star pattern.
Okay, now the vehicle has pressure on the tire. I didn't lower it all the way, enough so that there's pressure on the tire, and I can torque my lug nuts 150 foot-pounds, and one more time for safe measure.
Thanks for watching. Visit us at 1aauto.com for quality auto parts, fast and free shipping, and the best customer service in the industry.
Tools used