Replaces
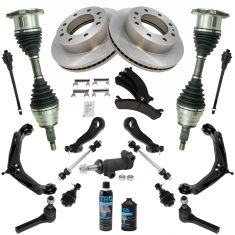
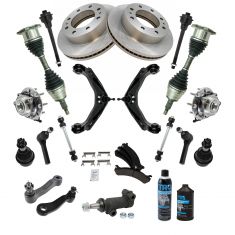
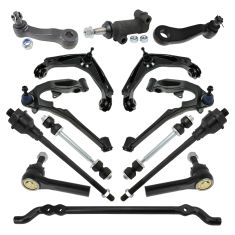
Replaces Chevrolet GMC Hummer Front Steering, Suspension, & Brake Kit TRQ PSA72874
$844.95
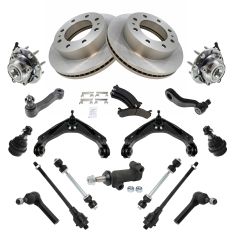
Replaces Chevrolet GMC Hummer Front Steering, Suspension, & Brake Kit TRQ PSA72873
$819.95
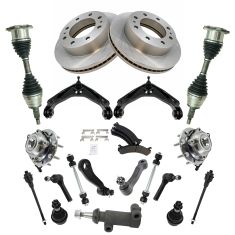
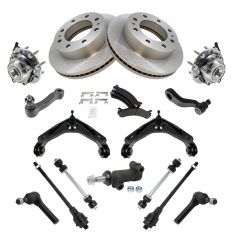
Replaces Chevrolet GMC Hummer Front 22 Piece Steering, Suspension, & Brake Kit TRQ PSA72870
$644.95
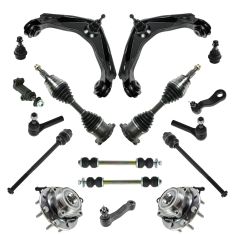
Replaces Chevrolet GMC Hummer Front 17 Piece Steering, Suspension, & Drivetrain Kit TRQ PSA85021
$634.95
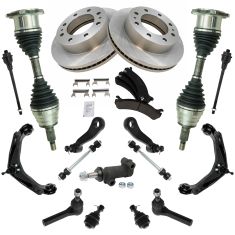
Replaces Chevrolet GMC Hummer Front 22 Piece Steering, Suspension, & Brake Kit TRQ PSA72869
$630.95
Replaces Chevrolet GMC Hummer Front Steering, Suspension, & Brake Kit TRQ PSA72871
$610.95
Replaces Chevrolet GMC Hummer Front Steering, Suspension, & Brake Kit TRQ PSA72872
$609.95
Replaces Chevrolet GMC Hummer Front 14 Piece Steering & Suspension Kit TRQ PSA34564
$594.95
Part Details
Specifications
About TRQ:
TRQ is a trusted brand dedicated to making every repair a success story by combining premium parts with easy installation. Each TRQ part is engineered by a team of automotive experts to meet or exceed OEM standards, delivering enhanced performance and maximum longevity. With rigorous in-house testing, the brand ensures superior fit and function across every product line. TRQ also provides customers with best-in-class, step-by-step installation videos—so you can complete repairs with confidence, whether you're a first-time DIYer or an industry professional.
Attention California Customers:
 WARNING: This product can expose you to chemicals including Lead and Lead Compounds, which are known to the State of California to cause cancer, and birth defects or other reproductive harm. For more information, go to www.P65Warnings.ca.gov.
Lifetime Warranty
This item is backed by our limited lifetime warranty. In the event that this item should fail due to manufacturing defects during intended use, we will replace the part free of charge. This warranty covers the cost of the part only.
FREE Shipping is standard on orders shipped to the lower 48 States (Contiguous United States). Standard shipping charges apply to Hawaii and Alaska.
Shipping is not available to a P.O. Box, APO/FPO/DPO addresses, US Territories, or Canada for this item.
Expedited is available on checkout to the United States, excluding Alaska, Hawaii.
Final shipping costs are available at checkout.


Created on:
Tools used
Brought to you by 1AAuto.com-- your source for quality replacement parts and the best service on the internet.
Hi, I'm Mike Green. I'm one of the owners of 1A Auto. I want to help you save time and money repairing and maintaining your vehicle. I'm going to use my 20 plus years experience restoring and repairing cars and truck like this to show you the correct way to install parts from 1AAuto.com. The right parts installed correctly. That's going to save you time and money. Thank you and enjoy the video.
In this video we'll be replacing the water pump on this '02 GMC Yukon with a 5.3 liter. This procedure is basically the same for many of these engines; the 4.8, the 6.0 liter in the trucks and SUVs. There are some slight differences by year but the general procedure is the same.
The tools you'll need are a flat blade screwdriver, 8, 10 and 15 millimeter sockets and ratchet, pliers, a torque wrench and a catch pan. Obviously, you'll need extra fluid to refill your vehicle afterwards. We're going to begin by using an 8 millimeter socket ratchet or wrench to disconnect our negative battery cable. Then we're going to loosen two clamps; this one here at the front of your throttle body and this one right down here near your air box. Disconnect the battery and then you'll probably want to use a little screw driver or something to break the seal between the plastic and the rubber hose. Then pull the hose from the air box and the hose from the throttle body. Then you lift the whole intake tube right out.
Next we're going to remove two 10 millimeter bolts. One here and one right over here and then pull this little hose out of here. We're basically going to take off the upper fan shroud. You'll want to pull this hose up and out. Work it carefully back and forth and pull up and you should be able to pull that out. Then down here there are little pins. You actually pry the center of them up first. Then once you pry the center up they come right out. There are four of those there, there, and then the same area on the other side; right there and then one right there.
Our next step is to remove the fan here. A large adjustable wrench put it onto that nut. The best way is to use a little old fashioned impact. Obviously you still have the belts on the motor. Once you've broken it loose.
Now we're going to want to remove our serpentine belt. Before you do that, make sure you have your routing diagram here and you know which one you're going to use. If you take this off chances are it's going to be difficult to get back on if you don't have a routing diagram. If you can't read your routing diagram anymore I definitely suggest drawing it on paper so you know exactly how the belt goes back together. This one here is pretty typical of this is a '03 Yukon with AC and all the accessories. Remove the serpentine belt- there's a 15 millimeter bolt right on your tension arm right here. Put a socket wrench on it and just turn it clockwise to release the tension. Pull the belt from the idler pulley and release your tension arm. Now we can take the belt all the way out.
At this point we're going to want to drain the radiator; two ways to do it. Some would say the right way would be to loosen this petcock down here and put your drain pan underneath it. What I prefer to do, because a lot of times those petcocks just break off, is I just release the lower radiator hose which is right down there. You can see the clamp. Then I have my drain pan underneath that. We're looking at the passenger side right down in there. You can see I have my hand and pliers; I'm not going to be able to film this but obviously you want to squeeze the clamp and pull it back off the hose. Pull this out. Now here I'm working those pliers in and I'm squeezing the clamp with the pliers and grabbing a hold of the hose, twisting and shaking it up and down. Pull it off slowly. You can see the fluid starting to drain. Keep pulling it back slowly so that the fluid drains out in a controlled manner.
I've turned my attention to the upper radiator hose. Again, squeezing the clamp, pulling it back and then twisting and I'm using a screwdriver to pry under the hose to get it loosened up. I've disconnected that hose. Make sure no water comes draining out of it. I'm finally turning my attention to the two hoses. These are the heater hoses. They connect into the side of the water pump. Make sure you have your catch pan underneath here as your release these because they do let a lot of water out. All the water comes out of the engine when you release the forward one.
Now you're going to want to remove your belt tension arm because that's going to go on to the new water pump. We're going to remove this water neck here which is two 10 millimeter bolts. More fluid is going to come out and the O-ring; stick it on there a little bit. I remove this clamp off of here. I have six bolts to remove; one, two, three there. Then one, let's see here, one, two and three right there. Now that you have the pump off you want to use a nice sharp razor blade. Make sure you scrape off any remaining gasket material that could cause a bad seal.
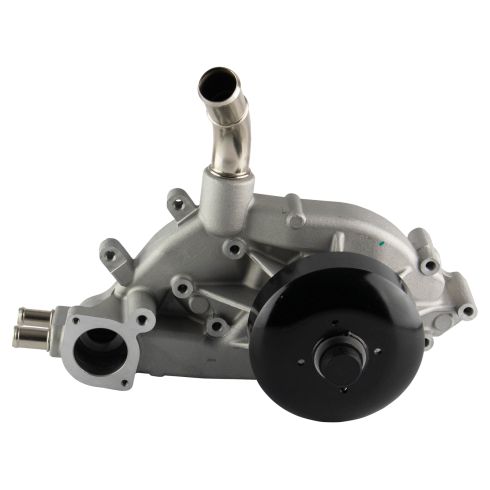
Here's my new water pump from 1A Auto. The exact same as the old one. You can see I put two bolts through and I put my gasket plates on there. Now I'm going to lower it down into place. Guide my bolts in, start this one over here. Put my other two bolts in, make sure they start fine. I'm going to slowly snug them up. I'm not going to make them tight with this. I'm going to get them in most of the way. We're going to torque these. First I'm going to make sure they're snug all the way around. We're going to torque them between 22 and 24 foot pounds.
Here's our thermostat housing. The new water pump comes with a new O-ring for it. Make sure that's right in the groove. Then we want to put it on this with this ear up. Then put these bolts in and you'll torque them to 12 foot pounds. I'm going to hold the thermostat housing against the water pump to make sure that O-ring stays in the groove. We're going to put these hoses back on. So now all my hoses, my little hoses are all together. At this point I'm going to put all the other components on. I put the belt tensioner on.
We're filling the system with a 50/50 mix of the Dex Cool for this GM truck. While you're filling listen for any water dripping out in case you might have forgotten to connect something. Most likely if you followed everything you didn't. It does have a fill cold line and it will pretty much just run right into the engine from here. Reconnect the battery.
I want to start the car up for about 30 seconds or so. You should start the car up a little bit, give it a chance to circulate the coolant but not really get hot. Then check your level of coolant and make sure it's in the right spot.
We hope this helps you out. Brought to you by www.1AAuto.com-- your source for quality replacement parts and the best service on the internet. Please feel free to call us toll free 888-844-3393. We're the company that's here for you on the internet and in person.
Tools used
Hi, I'm Mike from 1AAuto. We've been selling auto parts for over 30 years! We're dedicated to delivering quality auto parts, expert customer service, and fast and free shipping, all backed by our 100% satisfaction guarantee. So visit us at 1AAuto.com, your trusted source for quality auto parts.
In this video, we're going to be working with our 2002 Chevy Suburban. We're going to show you how to remove and replace the water pump on your 5.3L V8.
If you like this video, please click subscribe. We have a ton more information on this and many other vehicles, and if you need this part for your car, you can follow the link down in the description over to 1AAuto.com.
Here are the items you'll need for this repair.
Remove the coolant cap before draining your coolant or lowering the level, as with the cap off, air can flow through and let the coolant drain faster.
Raise and support your vehicle. We're using a lift to make it easier to show you guys what's going on at home, but this job can easily be done in the driveway or your garage with a jack and jack stands. Place a drain bucket under the front driver's side of your radiator. There's actually a little drain hose tucked up here nice and neat. We're going to flip that down and hold it over our drain bucket while we loosen the pet cock and allow the radiator to drain. Loosen the hose clamp just after the mass airflow sensor. This is going to be the second one back from your air box. We'll do this using a flat blade screwdriver.
Wiggle and twist the boot to release it from the mass airflow sensor. You may need to use your screwdriver to help kind of peel it back here. These tend to get stuck on pretty good. We'll also remove the one at the throttle body. We'll need to disconnect the hoses from their clamps here. You can either try prying it out there, or there's also a little clamp at the bottom here that you should be able to compress. Pop loose with a flat blade, and remove the intake runner from the vehicle. Pop this hose clamp out with a flat blade screwdriver, and remove the hose.
Remove the two 10mm screws at the top of the fan shroud with a 10mm socket and ratchet. We're going to use our trim tool from 1AAuto to pop these up. You can also do it with a flat blade screwdrivers or a pair of side cutters. You don't have to remove the center pin fully, just pop it up, and wiggle the rest of the pin out. There's one at the back on each side like you saw there, and then another one here, up by the radiator. That one also has a twin on the opposite side. Pull back, and lift up the upper radiator shroud.
There are a few methods for reaming the large nut securing the fan clutch onto the water pump. Some of these methods include using air hammers, putting a wrench or an adjustable wrench on there and hitting it with a hammer. We haven't had luck with any of these methods, so we're going to use a C-clamp with a rubber boot on the clamp. Clamp the serpentine belt together and onto the water pump pulley to try to keep it from turning. Now, that rubber end really shouldn't damage the belt. We're going to replace our belt anyway while we do our water pump so we're not worried about it anyway. We also haven't had any luck with striking our adjustable wrench, so we're actually going to put a piece of pipe over it and just try to leverage it off there nice and easy. You should be able to spin the rest off nice and easy. We'll now remove our C-clamp.
Before removing your serpentine belt, make sure your vehicle has a belt path diagram under the hood somewhere. If this is missing or faded, you can just draw another one onto the plastic with something like a paint marker. Using a 15mm wrench on the tensioner, rotate the nut clockwise to slack the belt. Pop the belt off of whatever pulley is easiest for you to reach. Let the tension off the pulley and remove your serpentine belt.
You need a 15mm socket, ratchet, and extension to remove the three 15mm bolts on the tensioner bracket. Using a pair of pliers, and we do have a drain bucket setup underneath our vehicle here. Release the clamp on the lower radiator hose at the thermostat housing and move it back. I like to wiggle the hoses or twist 'em to try to get them to release. We'll just tuck that hose up and out of the way. Remove the two 10mm bolts on the thermostat housing. Do this with a 10mm socket and ratchet. We're just going to allow that to hang and drain out in a more controlled fashion. Remove the thermostat and housing from the vehicle. Remove the clamps for the heater core hoses.
Remove them from the water pump as well. Disconnect the smaller hose from the upper radiator hose. Compress the clamp with a pair of pliers. Wiggle the upper radiator hose off of the water pump. You can remove the six 10mm bolts, three on each side of the actual water pump pulley with a 10mm socket, ratchet, and extension. Just make sure when you remove these bolts that you have some method of keeping them organized. These particular ones appear to be all the same length, but with any hardware going into the engine, you'll want to make sure that they all go back and exactly the same place, because a bolt being too long or too short could cause damage or failure.
Once the last bolt is out, and again, we do still have a drain bucket under our vehicle because coolant does pool in the system in certain places where it won't drain. We can remove our water pump from the vehicle, and I'm just going to let it drain down into the pan that we have under the truck. Somehow, the old paper gaskets on our water pump came off really clean. This is not a normal scenario at all, however, if you remove yours and you still have some chunks of the old paper gaskets stuck on there, be sure to scrape 'em off with a razor blade. We'll then dry the surfaces and wipe 'em off with a clean rag or paper towel and probably some brake parts cleaner, just to make sure that everything's good and we get a nice, good seal on our new water pump.
Here, we have our old water pump thermostat that we removed from our vehicle and our new parts from 1AAuto.com. As you can see, these parts are exactly the same, with the same six bolt mounting locations for our water pump to the engine block, a new pulley with the same threads to reinstall our fan and clutch. It even comes as a kit with a new thermostat, which is actually kind of cool on these vehicles. It is part of the housing, so that'll just bolt right in and seal up to the housing nicely. It even comes with a nice new set of gaskets for the back side. We have the same upper radiator hose on it. Our old one is actually why we removed it. It's starting to leak around the top edge here, and that's not really a terrible leak, but we would rather do it now than do it later when the leak becomes more severe and prevents us from driving our vehicle.
We have the same inlet for our thermostat and the same heater core outlet fittings on the end, as well as the three threaded bolt locations for our belt tensioner. If your water pump has failed and is leaking from any of these gasket surfaces, the seal at the bottom, or the hose fittings, this new part from 1A Auto is going to go in direct fit, just like your original equipment, and fix you up right.
Use a clean rag or paper towel, I'm just going to remove all the moisture from the surface that the gasket's going to mount. We're going to spray some brake cleaner with another clean paper towel. Just wipe any dirt and debris and oils that might be on that surface, just to make sure that nothing interferes with us getting a good seal the first time. I've sent all the bolts back through right where they go, and I'm now installing the gaskets onto the bolts just to make 'em a little bit easier to line up. I'll now very carefully set the new water pump into place.
I'm just going to take my 10mm extension and socket off of the ratchet and use those to help line up the bolts. I'm holding it pretty far away right now, and all I'm doing is just sending the bolts through very slowly so we don't knock the gasket out of place. Just going to get all three of 'em started a couple of threads, so we know everything's where we want to go, and then we'll worry about tightening it down. Torque the water pump bolts to 11 foot-pounds. Compress the clamp and reinstall the upper radiator hose.
Reinstall your heater core hoses. Set the clamps back into place. Install your new thermostat and housing assembly, along with the two 10mm bolts. Torque these bolts to 11 ft. lbs.
Reinstall the lower radiator hose, and slide the clamp back into place. Reinstall the serpentine belt tensioner onto the water pump housing cover. Two longer bolts go in the upper holes, and the shortest bolt goes on the bottom. Tighten these bolts with a 15mm socket and ratchet.
Install the belt over the front grooves of the harmonic balancer or crank pulley. Bring the right side over top of the pulley. We'll then go over top of the water pump and loop under the power steering pump. Over the alternator. Under the idler pulley. Now I'll keep this piece in my hand, make sure that everything is seated because this one's kind of tight, you're going to want the room.
Using my 15mm wrench, I'll take the tension off of the tensioner pulley, slide the belt over, double-check that our path is right, all of the belt is properly seated, and then let the tension back on.
Reinstall the radiator fan and clutch assembly onto the threads of the water pump pulley. Again, you should be able to get this pretty much bottomed out by hand. Reinstall your clamp or whatever method you used to keep the water pump pulley from turning. Then tighten it back down with either the right wrench or your adjustable and remove the C-clamp. Lift up on the upper radiator hose, and reinstall the upper fan shroud. There are two little pins, one on each side, that'll help you to align everything, and then we'll reinstall our four plastic clips by popping the basin and then locking the center pin down.
Reinstall the two 10mm screws at the top. Tighten them down with a 10mm socket and ratchet. Reinstall the hoses back into their clips. Reinstall the intake tubing, it's easiest to set it onto the throttle body. Reengage the hoses into their clips. Then get the boot over the air box. Then tighten down both clamps with a flat blade screwdriver.
Be sure that your petcock is closed before refilling the coolant, and that the hose is folded back up into its holder on the side of the radiator.
Refill your coolant. This vehicle uses the orange coolant Dex-Cool. Make sure that it is either pre-diluted or if you buy concentrated full strength that you mix it 50/50 with distilled water. We'll fill it up as much as it'll take, and then back our vehicle outside to finish bleeding the system while it's running. Don't be afraid to overfill it, because once our vehicle runs and gets up to temperature the thermostat will open and that fluid will all go into the engine block.
Set your vehicle with the fan on the lowest speed, set to hot in the vents so you can feel the warm air coming out of the vehicle. This will also open any bypass valves that prevent coolant from entering the heater core when shut off. This is another place that air pockets can build up. Now we'll let our vehicle run up to temp, and keep the coolant topped off in the process.
Now we just had to add just about a gallon of coolant to the vehicle once it got up to temp. Now we'll keep an eye on it, wait for it to finish bubbling, our heat to get hot, and the level to stabilize before we'll finally top off our fluid and take our vehicle for a test drive. Once your fluid is finished bleeding, and it's topped off reinstall your cap and test drive your vehicle.
Thanks for watching. Visit us at 1AAuto.com for quality auto parts, fast and free shipping, and the best customer service in the industry.