Replaces


Frequently bought together
Part Details
About TRQ:
TRQ is a trusted brand dedicated to making every repair a success story by combining premium parts with easy installation. Each TRQ part is engineered by a team of automotive experts to meet or exceed OEM standards, delivering enhanced performance and maximum longevity. With rigorous in-house testing, the brand ensures superior fit and function across every product line. TRQ also provides customers with best-in-class, step-by-step installation videos—so you can complete repairs with confidence, whether you're a first-time DIYer or an industry professional.
Attention California Customers:
 WARNING: This product can expose you to chemicals including Lead and Lead Compounds, which are known to the State of California to cause cancer, and birth defects or other reproductive harm. For more information, go to www.P65Warnings.ca.gov.
Lifetime Warranty
This item is backed by our limited lifetime warranty. In the event that this item should fail due to manufacturing defects during intended use, we will replace the part free of charge. This warranty covers the cost of the part only.
FREE Shipping is standard on Orders shipped to the lower 48 States (Contiguous United States). Standard shipping charges apply to Hawaii, Alaska and US Territories. Shipping is not available to Canada.
Expedited is available on checkout to the United States, excluding Alaska, Hawaii and US Territories as well as P.O. Boxes and APO/FPO/DPO addresses. Final shipping costs are available at checkout.
Created on:
Tools used
Brought to you by 1AAuto.com-- your source for quality replacement parts and the best service on the Internet.
Hi, I'm Mike Green. I'm one of the owners of 1AAuto. I want to help you save time and money repairing and maintaining your vehicle. I'm going to use my 20-plus years experience restoring and repairing cars and trucks like this to show you the correct way to install parts from 1AAuto.com. The right parts installed correctly, that's going to save you time and money. Thank you, and enjoy the video.
In this video, we're going to show you ignition lock cylinder replacement. You might need to do this if your lock cylinders are worn out, or sometimes cars get stolen. We're going to do it on this '99 Venture. This lock cylinder fits a lot of different GM vehicles. The basic procedure is the same, although some of the trim, how to take it apart in your vehicle will be different. Tools you'll need for the Venture are 7mm Socket and Driver, a T25 Torx Bit or a T25 Driver, an E5 Star Socket, and a Bent Tip Awl or similar tool. Most of these tools are not very expensive to acquire.
We're going to take the dash trim apart because it makes taking apart the steering column and trim a whole lot easier to get apart and really, a whole lot easier to get back together. Where you want to start is underneath. There are two trim pins. You can see one right here and one right over here. Reach on each side of those pins, and then pull down firm to release them. With those pins out of the way, there are three 7-mm screws. One there, one there, and then one right over here. For those, I'm going to use the 7-mm socket with the driver. Once again, we'll fast-forward through just taking those three screws out. Once those screws are removed, you just want to grab onto the top of your trim, and pull it out and away.
Now, you're going to want to remove this trim panel around your radio. You kind of pull up on it. You want to lift it up and then out, and then pull it out right there, let it hang like that. Now, you want to move your steering wheel down, and you want to remove the trim around your dash, which you want to grab the side here and pull the top down, and then pull this, the top out first. Now, you want to pull the bottom out, and the left side, the middle, and over here. Something to note ... I forgot to say this ... Obviously, you want to bring your gear shift lever down. Pull your trim out and pull the top up and out. Down here, you've got to pull around the headlight switch, and up, and off. We'll put that to the side as well. You're going to put your steering wheel back up. Up underneath are the two torx screws, one there, and then one there. We'll speed it up, and those are T25 torx screws.
Once you remove those, you want to grab your tilt lever, and just pull it straight out. It just pulls right out. You can grab your trim panel right below your signal here. You can pull it down, and then you can see it hinges back. Same thing on the other side.
From underneath you want to remove two E5star-shaped screws. One right there that's easy to see, and then there's one up in there ... once I slow the camera down ... Where is it? Right there above the wires, where I'm pointing. You want to remove those two screws. What you'll need to remove those screws is a small E5 star-shaped bit or socket. When you remove this one, you want to hold on to this piece of plastic right here, and not let it turn. Now those are off, you can see that your top cover is loose. What you're going to want to do is put your tilt lever back in, tilt your column back down like that.
As you lift the cover up and with a flashlight shining in there, you'll see a small, hit hole right where that arrow is pointing, and you're going to want to use a bent-tip awl or maybe you could even modify a paper clip and put it down in that hole.
I probably should have navigated this videoed this from the other side, but you want to put your awl in, put it in that button, turn your key to the Run position first, then to the Start position, push your key in towards the center of the steering column, push down with that awl, and then pull your awl out, and pull the lock cylinder out. What I'm going to do is remove the plastic cover, and the put the lock cylinder back in so that I can show you without that cover in the way so you can get a little better idea. It' s a little tricky but once you get it, it's easy. You put it back in, and again, turn your key all the way to the Start position as far forward as it goes, then put that all down in there, and pull out. You'll feel it kind of come out a little bit, and then release the awl, and then it will come out all the way.
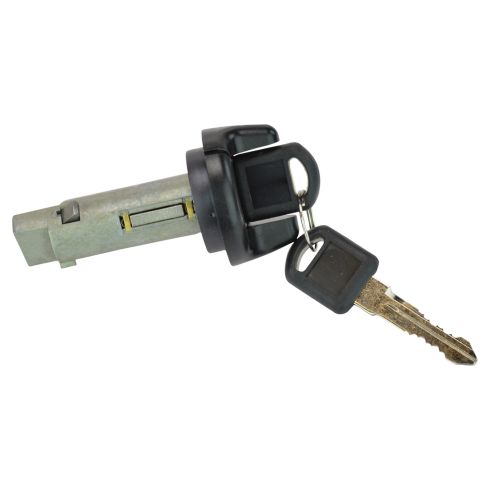
Here's our original lock cylinder, and then on the left is a new lock cylinder from 1AAuto. You can see it's all the same. It comes with keys and everything. It's going to go right in. You just want to make sure you get it all lined up correctly. It's just going to go in just like the original. Now, we can put the rest of everything together. In here, we'll just kind of speed up replacing those E5 star screws for the upper trim panel. Now, we're going to put the trim together. If you don't take your whole dash apart, this is the part that's pretty tough. You can see that hook right there. You want to clip it in to the upper trim of the steering column. On the other side, same thing. We'll get into the upper trim then pull it back. Just make sure you get both sides. I'm kind of shooting this with one hand...
Then on the other side, you need to make sure that -good shot of my chin- that you get it up and around the shift boot right there. Just make sure you feed it up and around that shift boot. As you push it up, make sure the shift boot goes up in there correctly. Once you get it to a certain point, make sure everything's lined up. Put it back together. Make sure that it's all set. Put that back together, then you can put your tilt lever back on. Put our dash piece back on. We're going to feed it down in like this. You need to pull out on the bottom a little bit. Force it in from the top. Force it down in, then I usually get the bottom clip first, then clip the top. It's all set. This piece over here, you want to put in, you want to press it in and down. Lock the top.
Now, you can release your steering wheel back up. I'll fast-forward through putting in those T25screws on the bottom trim panel. Now on this panel, you want to put it back in. There are two locating pins that go in the holes in the dash so you know you're putting it in the right spot. You clip the top in, and then you have your three 7-mm screws at the bottom. We'll put those in and fast-forward through doing that. Once you have those three screws tightened up, you want to just push your push pins back in. You'll reconnect your battery and you should be back on the road and all set.
We hope this helps you out. Brought to you by www.1AAuto.com., your source for quality replacement parts and the best service on the Internet. Please feel free to call us toll-free 888-884-3393. We're the company that's here for you on the Internet and in person.
Tools used
Hi, I'm Mike from 1AAuto. We've been selling auto parts for over 30 years! We're dedicated to delivering quality auto parts, expert customer service, and fast and free shipping, all backed by our 100% satisfaction guarantee. So visit us at 1AAuto.com, your trusted source for quality auto parts.
In this video, we're going to be working with our 1996 GMC Sierra K1500. We're going to show you how to remove and replace your vehicle's ignition lock cylinder. Now, this procedure is very similar on a wide variety of GM trucks and cars from this era.
If you like this video, please click Subscribe. We have a ton more information on this and many other vehicles. If you ever need parts for your car, you can follow the link down in the description over to 1AAuto.com.
Here are the items you'll need for this repair: 8-21mm socket, ratchet, socket extension, 8mm wrench, breaker bar, torque wrench, T25 Torx socket, E5 inverted Torx, flathead screwdriver, steering wheel puller, side cutters, snap ring pliers, 90 degree pick tool
Remove the negative post from your battery using a 5/16s or an eight millimeter wrench. Be very careful, this wrench isn't long enough but if you have a longer one, you may be able to hit the positive battery terminal with it. You want to be very careful you don't do that. Remove the terminal and isolate it from the battery.
Now just so you can see, because it's pretty difficult to show on the back of the steering wheel, there are these notched pins, all four of them on the airbag and these sit in these four holes. What I did to release them is there's openings in the back you can reach through, the flat blade screwdriver and pry them up and out of the way. Pretty difficult to get back there and see that, but you just need to reach in there and pry it out of the way with your screwdriver and it'll pop itself up. Remove the airbag.
There's a little hook on the harness, you need to disconnect to get this out all the way. Remove the orange safety. You may need a screwdriver to release the electrical connector here. Put your seatbelt through the steering wheel. This will help to hold it while you break the 21-millimeter bolt in the center loose. Release your seatbelt and remove it from the wheel. Make sure that the steering wheel is nice and straight and flat. Finish removing the 21-millimeter nut and wiggle the wheel or hit the back sides.
Now if you can't just knock the steering wheel off by hand, you can use a steering wheel polar. This is actually kind of a universal polar. These are available from 1AAuto.com, the same one we have here and it comes with a variety of bolts so pick the ones that fit your vehicle.
Go ahead and thread them all the way and you can just do this by hand, because they'll bottom out in there. If you try to get them much tighter than that, you could risk damaging something underneath. Once those are in, install the center bolt, tighten that down until it bottoms out on the center bolt of the steering wheel. I'm going to try to keep this straight using a 19 millimeter socket and ratchet and holding the wheel straight, tighten down the center bolt. Once it comes free, the wheels should come off pretty easily. Carefully remove the steering wheel. Slide the wire for the airbag clock spring through it.
Remove the snap ring on the clock spring with a pair of snap ring pliers. Simply put the tips of the pliers into the openings on the snap ring. Spread the snap ring and lift it up out of its grooves. Slide the snap ring off. If you have a tilt steering column, make sure that it is tilted all the way up. Grab the lever firmly. Pull that out. Remove the two T25 Torx on the bottom of your steering column cover. Pull down to separate your column, and then push in and pull out to release these hooks in the back.
Now there are two of these inverted T5 Torx that you need, an E5 inverted Torx socket to remove. However, if you have a 6.4 millimeter that's on there pretty snug and as long as you go careful, you should be able to spin them right out. Reinstall the lever for your tilt column if equipped. Push down and remove the lever again, so you don't bump it. It's hard to show and we'll show you when the piece is removed, but there's a small hole in the top of the ignition cylinder that you can get with a hooked pick.
I'm looking through the hole for the hazard switch to see this. What you need to do is push down on that. You want to hold your key like you're trying to start it and then push down on that little hole. You'll feel it released. Slide it out as far as it will go and turn it back some. Remove it fully so you can remove your steering column upper cover.
Now just to give you a better idea of what we were doing with that cover on top and yours will be right here blocking your view but you can look through, reach in to this whole. Key to the start position, push down, pull out, remove your pick, rotate backwards, remove your cylinder.
Reinstall the upper half of your steering column cover. Be sure to line up this little rubber boot for your gear selector lever. Just line up the channels and slide it in there. This is the detent that we had to hit on the ignition cylinder. Slide that back in. Make sure your key isn't all the way before you start doing this. Slide it all the way in, turn it forward and back to make sure it engages.
Reinstall your tilt lever. Place one hand firmly on top of the steering column. Release the lever and slowly allow it to go up. One thing you don't want to do, and I'm just going to do this for demonstration purposes, is just release the lever because that thing really moves. If this isn't aligned, well your shift is not in the right place, you've left a tool in there or even worse if your fingers were in here for some reason, that's going to do some damage. Make sure you let it go up slowly so you can reinstall your lower cover.
Reinstall your two E5 inverted Torx screws into the upper steering column cover. Remove the tilt latch rod again and now these hooks need to slide in and under and then pull forward to engage. Line up the lower boot for your gear selector after you've set the hooks in the back of your column cover. Snap everything back into place. Once it's lined up, reinstall your to two T25 Torx screws on the bottom of the column.
Reinstall your tilt lever. Carefully reinstall the harness for your clock spring and then pull the alignment pin out of your new part.
Reinstall your wheel onto the splines. Now one of the cool things about these wheels is they have a keyed spline so you can see I can't get it on and then it lines up and falls right in. Install the 21-millimeter nut as tight as you can toward the steering wheel nut to 29-foot pounds.
Make sure to attach the harness back into its clips as well as the one on the airbag, but we'll reconnect our connector and install our safety tab first. Slide the bag into place and just push it in firmly to engage all four clips. Now the most important step anytime you work on your airbags or anything that has to do with the airbag system, just put your key in, turn it to the run position, then reconnect your negative battery terminal. Remember to tighten this down with a 5/16s wrench. Now the reason we do this in the order that we did is power just came back on in the vehicle and our key is already on.
If anything bad had happened with the airbag like it shaved wire or some other issue, the bag would have deployed now while we're out here safely under the hood, rather than once we get the vehicle and turn the key and we're sitting right in front of it. While airbags are meant as a safety device in improper conditions, they can be very dangerous.
Thanks for watching. Visit us at 1AAuto.com for quality auto parts, fast and free shipping, and the best customer service in the industry.

ILA41522


