Replaces
Part Details
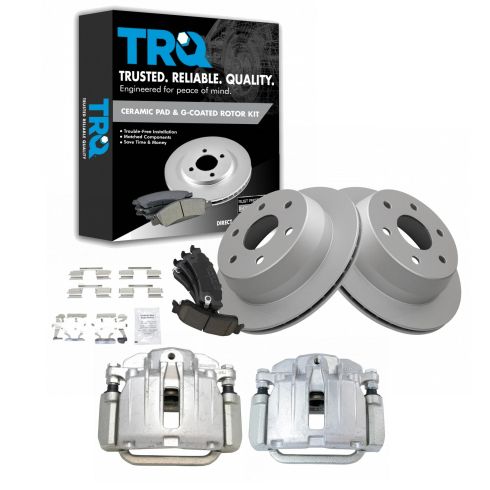
TRQ brake kits are designed to restore your brake system to like-new performance. TRQ brake pads are positive molded, thermal scorched, chamfered, and utilize a multi-layer shim for enhanced performance and service life. TRQ G-coated rotors have long-lasting rust prevention, perfect for wheels with large openings that expose the rotor and rotor hat during daily drives. All products are fit and road-tested in our Massachusetts R&D facility to ensure we deliver on our promise of Trusted Reliable Quality.
Product Features
Premium Electrostatic Coated Brake Rotor Features and Benefits
Premium Positive Molded Brake Pads Features and Benefits
Item Condition:
New
Attention California Customers:
 WARNING: This product can expose you to chemicals including Lead and Lead Compounds, which are known to the State of California to cause cancer, and birth defects or other reproductive harm. For more information, go to www.P65Warnings.ca.gov.
Lifetime Warranty
This item is backed by our limited lifetime warranty. In the event that this item should fail due to manufacturing defects during intended use, we will replace the part free of charge. This warranty covers the cost of the part only.
FREE Shipping is standard on orders shipped to the lower 48 States (Contiguous United States). Standard shipping charges apply to Hawaii and Alaska.
Shipping is not available to a P.O. Box, APO/FPO/DPO addresses, US Territories, or Canada for this item.
Expedited is available on checkout to the United States, excluding Alaska, Hawaii.
Final shipping costs are available at checkout.


Created on:
Tools used
Tools used
Okay, friends. One of the first things we have to do is safely raise and support the vehicle. Once you have your wheels off the ground in the rear, we're going to go ahead and remove all six of these lug nuts. Remove your wheel. Now that the wheel's off, we have a clear view of the brake hose right here. If you're doing just one caliper, we're going to take these hose pinchers right here and pinch this hose. If you're doing both calipers, you can go ahead and pinch that center flex hose. I'll go right here. I'm gonna come up from the top because it's a little easier to get to. Snug that up.
Now we're gonna remove this banjo bolt right here. Before you do that, try to clean off any of this dirt that might be around. I'm gonna use my 12-millimeter to remove that. Just be careful because brake fluid is going to come out. When brake fluid comes out, you need to have a nice collection bucket, and you need to make sure you have hand protection and eye protection. Here we go. Looks like there's minimal brake fluid but there is some. We've got our little banjo bolt on our gasket here. We'll set that aside. We are not going to reuse it. That's not reusable.
Go ahead and get your banjo bolt right out of the line. Take a peek at that banjo bolt. Make sure that it has the other gasket on there. Remove that gasket, recycle that as well. Take a look at your flex hose here. You want to make sure that you have a good connection point on there. Any area that the gasket's gonna ride needs to be free and clear. If it's dirty, clean it up. Look at the other side and do the same. The next thing I like to do is just kind of plug this hole up with something. If you have something plastic, or even if you want to try to put the banjo bolt in there, just to kind of prevent any brake fluid from shooting out at you, especially in your face. Cover that up.
Now we're going to remove these bolts right here. These are the mounting bolts and they're 18-millimeter. They'll hold the bracket to the actual differential itself. There's one. Hold that caliper. Remove your caliper. One of the first things that you need to do is double-check to make sure that your caliper matches up with the original. You want to double-check on the backside that the bleeder screw is on the corresponding side of the caliper. And aside from that, it should pretty much be the same, whether it's from one side to the other. Once you're sure you have the right caliper, we'll continue on by removing these two bolts that hold the caliper to the bracket.
Take the caliper off the bracket, set it aside. With the caliper bracket over on the bench, I just want to show you areas that you're going to want to clean up. You want to clean up this area right along here and right there, the same right here. If you were to take your tin and you were to put it over it, any area that touches...If you were to take your tin and put it right over the bracket, you'll be able to see exactly where you need to clean up. Any areas that the bracket is going to touch up against this tin need to be nice and smooth, and they also need to be lubricated.
Just take your little brush, clean up in between there, clean up all this right here. If there's any really tough areas that don't seem like they want to break free but they're raised up, use a nice screwdriver or whatever you might have and just kind of kit up any of that crud or anything like that that might be on there. Now, once you've cleaned all the mounting areas for where your tins are going to go for your brake pads, you're going to come right here to the sliders. Grab that, pull it right out. Take your rag, clean it up. Inspect the slider, make sure it's in good condition.
If it looks like it's pitted or it's going to cause restriction going in and out, you either need to clean it up better with a wire wheel or replace it. If you were to look inside here, you're going to need that to be nice and clean as well. You can do something as simple as maybe using a bore brush, something like that inside there. Of course, you don't want to damage the boot though. So you'd want to be very careful. Get out as much of the crud as you can inside there, make it as clean as possible. Maybe even take a nice rag, twist it, put it right inside there, and get out as much as possible.
I'm going to use some nice silicone here. This is Moly grease. It's great for calipers. You want to make sure you get right up along this area right there. If you can see where that lip is, where my finger is, get some grease all up on there. It's going to be super important because that's going to help keep moisture out right along this seal. Slide that in there. Give it a nice twist. Move along. Those sliders are in there. Let's go ahead and go right along the bracket. Let's go right in this area.
As you can see, I have it along all ridges going along. Now I would put my tin on here. If I can get this lined up, slide it down. Do the same to the other side. Now let's grab the other portion of our caliber. We're also going to grab this tin right here. When you go to install this tin, you want to make sure you have it in this direction. You want to have the smaller end, or the area with the smaller prongs, facing away from the piston, not facing towards the piston. If you put this in backwards, you could damage the boot.
We're going to take it just like this coming down at this angle, slide it all the way back up against there. Make sure it's not hitting anywhere, and then push this down. Should want to lock in. Make sure that it can not pop up and out of there. You can just lift up on it. Take a look from the backside. You can see that I have my ears holding it in and then this one right there is also holding it in. You can give it a nice push and it's definitely not going to fall out. Let's grab our old caliper and we're just gonna get the pads out of there. We'll bring those over to the vehicle.
Let's grab our caliper bracket and our caliper bracket bolts. If you have any leftover thread locker on them, make sure you clean it off. And if you want to put on some new, it's probably a great idea Put this right over. Start in both of your bolts before you tighten either of them down. Now let's bottom them out and then we'll torque them to manufacturer specifications. Let's go ahead and torque these to 148 foot-pounds. Now it's time to install our brake pads. When you go to install it, you want to make sure that you have your squealer, or the wear indicator, facing down. That's it. I've got that one right here. Slide that in. And then my outer pad, I'm going to do the same thing. My wear indicator facing down.
Now we're going to take our caliper here. We're going to use some more of that Moly grease going right around the piston here. And we're also going to come right up along these ears. Pretty much anywhere where the pad's going to ride up against or touch up against. You want to make sure you have some form of lubricant and that'll help with vibration dampening and noise reduction. Take that caliper, slide it right over those pads. Here we are. Grab your two new bolts. A little bit of thread locker is probably a good idea. Torque these to 31 foot-pounds.
Let's go ahead and grab onto this little rubber plug there. Get that out. We've got our banjo bolt. The caliper came with a brand new one. It also came with two brand new gaskets. Take your banjo bolt, put one of your gaskets on there. Hold on to that other one. Go ahead and grab that flex hose. You're going to take the bolt, banjo bolt with the gasket go through. Take your other gasket and put it on the backside of that banjo bolt between where it's going to connect onto the caliper. And then go ahead and start that in by hand. Go ahead and snug this up. Bottomed out right there. Let's continue on just maybe an eighth of a turn.
There we are. Give your hose a nice wiggle, make sure that it can not pivot around and there's no way that this banjo bolt can loosen up. Let's go ahead and remove those pliers. Make sure that your hose is not twisted in any way. If it's making a little curly-cue or a pigtail or anything like that, you need to remove it or move your caliber and re-spin it so it's straight. Do is get this little off of the bleeder. Save that. We'll use a 10-millimeter. We'll just break this free real quick. There we are.
Now I'm just going to close it up lightly here. We'll get inside the vehicle and I'm going to pump up the brake until it's a semi-firm pedal. It's not going to be super firm because there isn't any fluid inside the caliper yet. Now that we have that pumped up, we're going to start off by opening this bleeder screw. And we're just going to wait a minute until we see some fluid coming out of here. I'd like to see a nice steady stream of fluid rather than a whole bunch of air bubbles. This is great. We've definitely got fluid coming out here at this point.
I can give the hose a little wiggle. See if I can get out any little bit of air that I can at this point. I'd say that that's close enough. Let's just go ahead and close it right down. You don't need to tighten it up very much because at this point we need to continue with the correct bleeding process. Now, the next thing that we're going to want to do is get up and make sure we double-check the brake fluid level. We want to make sure that the fluid's nice and level. Once we've done that, we're going to need a second person or you can continue on by doing the single-person bleed but it's easier with a second person.
So we'll have the second person get inside the vehicle and they're going to pump up the brakes for us. Go ahead and pump. So now they say holding. So I'm going to open this up and we're going to watch for fluid and air coming out. Now I'll close it up. I'll have them pump again. Go ahead and pump. I'm going to open it up. I'm going to watch for air bubbles again. You notice when it's an air bubble because it'll come shooting out kind of sporadically, it'll look like a big old mess just spraying.
So that one started off with a couple of little splats and then it went ahead and turned into a nice solid stream. So I think we're doing all right but let's do it one more time to be sure. Go ahead and pump. Now I got another air bubble there. I'm still going to continue pumping because why not? I like to make sure that there's zero air inside of the hydraulic system. It's very important. Go ahead and pump. So now with that pump, I got nowhere. That was a nice, solid stream of fluid.
At this point, it's probably a great idea to just do it one more time just to make sure that there's no air inside of the hydraulic system. That was a nice solid stream the whole way. At this point, I'm going to grab that bleeder, make sure it's nice and snug. We'll clean it up a little bit. Make sure you put your rubber boot back on there. That's very important. It's going to keep the moisture and debris out of your bleeder screw. And then, of course, I would clean up the rest of my corresponding area.
Now it's going to be time to get the wheel up on here. Let's start on those lug nuts and then we'll bottom them out and we'll torque them to 140 foot-pounds. Let's torque them. Double-check them if you want. And if you have a center cover, put that on as well. After we make sure we double-check that brake fluid, give it a wiggle. It looks as though this is low. There's the maximum line. Open this up. We're going to add some DOT 3 brake fluid. Bring it right up to that maximum line. Make sure you close it back up. Down the road you go.
Tools used
Tools used
Okay, friends, one of the first things we have to do is safely raise and support the vehicle. Once you have your wheels off the ground in the rear, we're gonna go ahead and remove all six of these lug nuts. Remove your wheel. Now, that the wheel is off, we have a clear view of our caliper. If you were to be able to see behind this tin, you're gonna be able to see where the caliper piston is. We need to be able to push that piston back.
To do that, if this shield wasn't here, you can come in between and just slowly pry, or if you do have that shield where you can come is right up along here, just get in between the pad and the caliper, and then slowly pry as well, and just keep working your way back and forth until the piston is all the way in.
The next thing that we need to do is remove our caliper bolts. These are the bolts that are gonna hold the caliper to the bracket. I like to hold onto my slider, so it can't spin. I'll leave that bolt loose, but leave it in for now. Do the same to the other one. I can get both these bolts outta here. Hold onto that caliper so it can't fall. Slide it off. I always like to take a peak at my caliper to make sure that it's not leaking any fluid along where the boot should be. Set this aside. Now, let's remove those brake pads. Set those aside.
Now, we have a clear view of our brake caliper mounting bolts. Remove them both. And then put in a couple threads. Remove the bracket. At this point, you wanna give your rotor a little wiggle. If it doesn't seem like it wants to break free, grab a lug nut, start it on there a few threads. Now, with your hand protection and eye protection, of course, we're gonna go ahead and give it a bonk with a hammer to break it free. You can come right up along the top here.
If that doesn't work and you're not reusing your rotor, of course, you could, of course, bonk on the braking surface, or even better than that, from the backside. Remove your rotor. Now, it's gonna be time to prep the brand new rotor. To do that, you wanna make sure you clean the braking surface. A little bit of parts cleaner, a nice rag. Get off any of the coding that might be on there. It should come with a little coding on there to prevent against rust. Go ahead and flip that over.
Now, you can see the other braking surface. We'll clean that. And now, we also wanna make sure we clean this area right along here, because this is where the emergency brake shoe is gonna ride. Now, at this point, you have a clear view of your e-brake shoe and of course of the axle mating surface where it's gonna connect onto the rotor. If you're axle looks as though it's in poor condition, maybe it's got a lot of rust, or rot, or debris, or anything like that all over it, you'd, of course, wanna sand it down, make it look nice and smooth, and then code it just like this with some copper Never-seez.
Before we go ahead and put the rotor on there, we also wanna take a look at this right here. This is your emergency brake shoe. If you happen to notice that your emergency brake shoe doesn't have any meat on it, maybe it looks a little bit more like this one where it's literally just a solid shoe of metal and it has no more breaking material, you need to go ahead and replace that. And if you need instructional video on how to do that, we have it. We get a nice new coding of Never-seez on there after we cleaned it down. We've got our rotor. Carefully, slide it up on here. We get the rotor on there.
Now, what we need to do is head up our vehicle in neutral, so that we can spin our rear wheels. And we just kinda wanna push in and give this a little spin, and listen for a scraping noise. I can hear a very minor scraping noise there. So that tells me that I don't have very much drag from my e-brake shoes to the inner portion of my rotor. If you put your rotor on, maybe it was a difficult time pushing on, and you went to turn it, and it just didn't want to turn at all, your e-brake shoes are probably over adjusted and you're gonna have an issue.
If that was the case, you would just pull this off and then you can look down here at your adjuster. With the caliper bracket over on the bench, I just wanna show you areas that you're gonna wanna clean up. You wanna clean up this area right along here, and right there, the same right here. If you were to take your tin and you were to put it over it, any area that touches that... If you were to take your tin and put it right over the bracket, you'll be able to see exactly where you need to clean up. Any areas that the bracket is gonna touch up against this tin need to be nice and smooth, and they also need to be lubricated. Just take your little brush, clean up in between there, clean up all this right here.
If there's any really tough areas that don't seem like they wanna break free but they're raised up, use a nice screwdriver or whatever you might have, and just kinda clean up any of that crud or anything like that that might be on there. Now, once you've cleaned all the mounting areas for where your tins are gonna go for your brake pads, you're gonna come right here to the sliders. Grab that, pull it right out. Take your rag, clean it up. Inspect the slider, make sure it's in good condition. If it looks like it's pitted or it's gonna cause restriction going in and out, you either need to clean it up better with a wire wheel or replace it.
If you were to look inside here, you're gonna need that to be nice and clean as well. You can do something as simple as maybe using a bore brush, something like that inside there. Of course, you don't wanna damage the boot, though, so you'd wanna be very careful. Get out as much of the crud as you can inside there, make it as clean as possible.
Maybe even take a nice rag, twist it, put it right inside there, and get out as much as possible. I'm gonna use some nice silicone here. This is Moly grease, it's great for calipers. You wanna make sure you get right up along this area right there. If you can see where that lip is, where my finger is, get some grease all up on there. It's gonna be super important because that's gonna help keep moisture out right along this seal.
Slide that in there. Give it a nice twist. Move along. Those sliders are in there. Let's go ahead and go right along the bracket. Just go right in this area. As you can see, I have it along all ridges going along. Now, I would put my tin on here. See if I can get this lined up. Slide it down. Do the same to the other side. Let's grab our caliper bracket and our caliper bracket bolts. If you have any leftover threadlocker on them, make sure you clean it off. And if you wanna put on some new, it's probably a great idea.
Put this right over. Start in both of your bolts before you tighten either of them down. Now, let's bottom them out and then we'll torque them to manufacturer specification. Let's go ahead and torque these to 148 foot-pounds. Now, it's time to install our brake pads. When you go to install it, you wanna make sure that you have your squealer or the wear indicator facing down. And so I got that one right here. Slide that in. And then my outer pad, I'm gonna do the same thing. My wear indicator facing down.
What I'm doing now is I'm lubricating the mating points where the pads gonna touch up against the caliper. So right along that piston, and then of course, both of these ears. Awesome. See if we can slide this over. Grab your bolts. If you want to use some threadlocker, once again, you're prerogative. Now, let's torque these to 31 foot-pounds. Hold that. There we are. So now, let's just go pump up the brakes.
Now, it's gonna be time to get the wheel up on here. Let's start on those lug nuts. And then we'll bottom them out. And we'll torque them to 140 foot-pounds. Let's torque them. Double-check them if you want. And if you have a center cover, put that on as well. Let's make sure we double check that brake fluid. Give it a wiggle. It looks as though this is low. There's the maximum line. Open this up. We're gonna add some DOT 3 brake fluid. Bring it right up to that maximum line. Make sure you close it back up, down the road, you go.