Replaces


Frequently bought together
Returns: Parts with electrical components cannot be returned once installed.
Attention California Customers:
 WARNING: This product can expose you to chemicals including Lead and Lead Compounds, which are known to the State of California to cause cancer, and birth defects or other reproductive harm. For more information, go to www.P65Warnings.ca.gov.
Lifetime Warranty
This item is backed by our limited lifetime warranty. In the event this item should fail due to manufacturing defects during intended use, we will replace the part free of charge. This warranty covers the cost of the part only.
Returns: Parts with electrical components cannot be returned once installed.
FREE Shipping is standard on orders shipped to the lower 48 States (Contiguous United States). Standard shipping charges apply to Hawaii and Alaska.
Shipping is not available to a P.O. Box, APO/FPO/DPO addresses, US Territories, or Canada for this item.
Expedited is available on checkout to the United States, excluding Alaska, Hawaii.
Final shipping costs are available at checkout.
Created on:
Tools used
Brought to you by 1AAuto.com, your source for quality replacement parts and the best service on the Internet.
Hi, I'm Mike from 1A Auto. I hope this how-to video helps you out, and, please, next time you need parts for your vehicle, think of 1AAuto.com.
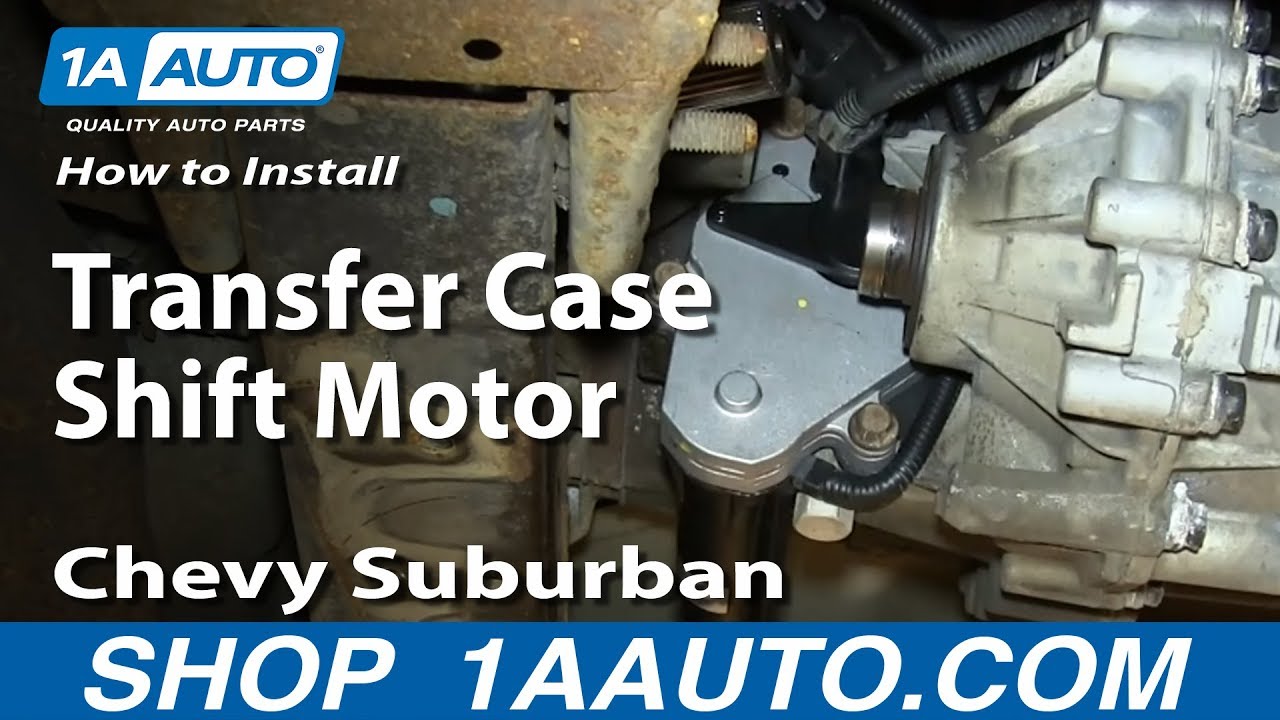
In this video, we're going to show you how to replace the transfer case shift motor on this 2002 Chevy Suburban. It's the same part and similar process on these Suburbans from 2000 to 2002. The items you'll need for this are a new transfer case shift motor from 1AAuto.com, 15mm socket and ratchet, 11mm wrench, a marker and jack and jack stands.
Start off by removing these four 15mm bolts, and we'll just fast forward as Mike does this. Once those are removed that pan will pull forward, and then you want to come up here and remove these four 11mm bolts. We'll fast forward as Mike uses an 11mm wrench and an extra wrench to give him some added leverage. Mark right here and right here, so you can line these up again the same way when you put it back, and then up by your transfer case shift motor just pull back this cover, and then you want to just pull the driveshaft out and then lift it up. It should pull out, and then just push this side toward the outside of the vehicle.
Pull up on the tab on the harness and disconnect it, and then pull this other harness just up and out. It's easiest to use a flat blade screwdriver and just pry down on the tab and disconnect the harness. Then, remove these three 15mm bolts. Now, you can pull the transfer case shift motor back, and then, down and out.
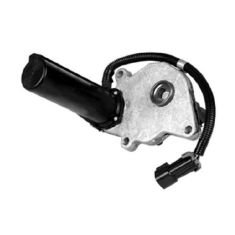
On the left, is the old transfer case shift motor; on the right, is the new one from 1A Auto. You can see they're identical and they'll fit exactly the same. Remove this plastic cover and then you just want to pull this gasket off your old transfer case shift motor and transfer it over to your new one. Wipe down the area where your transfer case shift motor goes, and then reconnect the two harnesses for your transfer case shift motor. Then you just kind of set the motor up there.
You'll want to put your new motor in the same position as the truck was when you took it apart. In this case, ours was in 2 Hi, so we select the 2 Hi button, shut the key off and you can hear the motor switch, and then turn the key back on and it will indicate that it's now in 2 Hi, and so we can proceed. You should be able to push it into place. Now replace those three 15mm bolts and tighten them up. You want to torque those to about 45 foot-pounds. Now, push that harness back into place, and then, push your driveshaft back into place, and set it back in, making sure those dots line up that you marked earlier. Then, push this cover back into place and replace those two 11mm bolts on the bottom and the two 11mm bolts on the top, along with those brackets that they hold in place. We'll just fast forward as Mike does this.
Now, you just want to put that plate back up into place and replace and tighten up those 15mm bolts. Once you've done that, you're all set.
We hope this video helps you out. Brought to you by www.1AAuto.com, your source for quality replacement parts and the best service on the Internet. Please feel free to call us toll-free, 888-844-3393. We're the company that's here for you on the Internet and in person.
Tools used
Brought to you by 1AAuto.com, your source for quality replacement parts and the best service on the internet.
Hi. I'm Mike from 1A Auto and I hope this how to video helps you out and the next time you need parts for your vehicle, think of 1AAuto.com. In this video we're going to show you how to replace a transfer case shift motor. We're going to show you what it sounds like when one goes bad and it can't get its job done. We'll show you the whole replacement.
Tools you'll need for the job. You'll need a new transfer case shift motor from 1A Auto. Jack and jack stands. I put a star next to that because, generally, these trucks are high enough off the ground that you can do this without having to jack it up. Just make sure you set your parking brake and block the tires. You'll also need 11mm wrench. A large screwdriver, a small pry bar. A 15 millimeter socket with a ratchet and extension and either a shop light or a flashlight to give yourself some visual aide.
I got my key on. I have my chimes go off so you can hear. I'm just going to let my truck roll and I'm going to press and I'm going to listen for the shift case motor with the door open. You can hear the shift motor trying to work. Actually try in here to get you a better listen.
Okay, generally when you can hear it trying to do that but it can't get the truck in the four wheel drive, that's the basically the best sign that the transfer case shift motor is worn out, it's gotten too old and it can't get its job done.
If you come up from the driver's side door, you can see here is your transfer case. Go in front of this cross member and right here is your transfer case shift motor right next to the front drive shaft. We're going to have to remove the front drive shaft which is pretty easy. You want to remove the four bolts right here. I got an 11mm wrench. I'm going to stick another wrench on here for some extra leverage. Take a screwdriver and put it up through there to hold the shaft in place. Loosen up each bolt and take them off.
I'm going to speed it up here. You can see, I just, like I said with each bolt, use that wrench, hook it on there for some extra leverage then spin the drive shaft. Put your screwdriver back up in and loosen up the bolts. Once you get them loose a few turns they usually, generally, come out just by hand.
I'll take the big screwdriver, I put it up in there and break the drive shaft free. Put your drive shaft back through in that a little bit. We have a little clip here and carefully remove this. Make sure all the needle bearings come ...
I apologize there, I didn't realize how bad the camera angle was when I was shooting it. What I did was I pulled one of the ujoint caps off. That just gives you a little extra room to be able to slide the drive shaft forward. You just want to be careful not get the part of the drive shaft where the cap goes on. You don't want to get that dirty and you don't want to get any dirt inside the cap while you're doing the other steps.
This rubber flange here is going to give you some resistance and as you're trying to bring the shaft forward. You can peel that off like that. There's four 15mm bolts holding this, skid plate on remove them. Move the front of the drive shaft and have the yolk on the front axle around until you can get the drive shaft forward and you can get the back of the drive shaft out of the transfer case. Bring the drive shaft down and get it out of the way. Your transfer case motor, right here. There's a connection here. Pull back on tab that's on top, disconnect that. There's another connector right back here and it's actually in a bracket. I'm going to use a pair of pliers to squeeze the pin on the other side and pull it out the bracket and disconnect it. Disconnect it by probably using a flat blade screwdriver, maybe I can do it with my fingers.
We're going to speed up at this point. There are three bolts that hold the transfer case shift motor in place. As you can see, I just show you starting out with a wrench, a socket and an extension. The bolts usually come fairly easily. After a little while I lose my patients though and just grab the air activated impact wrench and zip them out quickly.
You see my motor has some age to it. That's all actually aluminum corrosion. It's probably the original motor and it's even starting to break in places. New motor from 1A Auto. It's got the correct lead on it and as well as the plug. We're going to reuse our gasket. These gaskets are meant to be reusable. Put it on there. Our motor up through here and make sure that your harness doesn't get in the way. Good enough place, I'm kind of peeking, I can see the backside through the motor. You're going to feed it in diagonally a little bit. Get it on there, snap one of the bolts in. Make sure the bolts go in by hand so they're not cross-threaded. First, I'm just going to make sure they're in correctly. Make sure they go in pretty easy.
Once I'm satisfied that they're pretty much in there correctly, I get my impact wrench back out just for speed and tighten them preliminarily. I never tighten anything up with the impact wrench. I go back to the hand tool and do the final tightening. With these bolts, you want them about 35 to 40 foot pounds.
I'll take my harness up here, I'll plug it in and put it back on its clip and my harness here plugged in. I take my drive shaft, guide it into the transfer case. Right back in. Press this rubber guide on so it's back in place. Up here, I'll just make sure there's no dirt. A little bit of dirt on there. I don't want to wipe too much of the grease or anything off. Make sure there's no dirt on there. Make sure all our needle bearings are in place. Put that back on. Probably need to pull that right out. Push the drive shaft back and put this into place. Once it starts in place, start on one of these collars.
Start the collar on. I don't tighten it up much right now. I want to flip it over the other side, start the other collar on and make sure that the u joint goes evenly into the axle and then tighten it up slowly. Again, make sure and you're tightening it up evenly and then these bolts should be tighten to right about 20 foot pounds which I just usually a small wrench and pull it as tight as I can using the screw driver to hold the drive shaft in place. Reinstall your skid plate and you should be all set.
Same test, key on, let the truck start rolling. Hit four wheel drive, you can hear it. Go right in and out of four wheel drive. It's working well.
We hope this helps you out. Brought to you by www.1AAuto.com, your source for quality replacement parts and the best service on the internet. Please feel free to call us toll free, 888-844-3393. We're the company that's here for you on the internet and in person.

600-901