Replaces
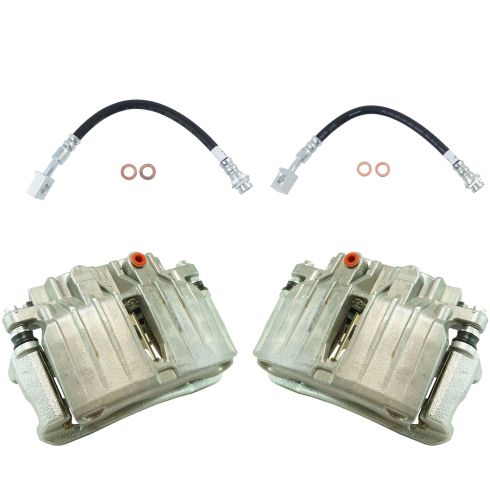
Part Details
Item Condition:
New
Attention California Customers:
 WARNING: Cancer and Reproductive Harm - www.P65Warnings.ca.gov.
Lifetime Warranty
This item is backed by our limited lifetime warranty. In the event this item should fail due to manufacturing defects during intended use, we will replace the part free of charge. This warranty covers the cost of the part only.
FREE Shipping is standard on orders shipped to the lower 48 States (Contiguous United States). Standard shipping charges apply to Hawaii and Alaska.
Shipping is not available to a P.O. Box, APO/FPO/DPO addresses, US Territories, or Canada for this item.
Expedited is available on checkout to the United States, excluding Alaska, Hawaii.
Final shipping costs are available at checkout.


Created on:
Tools used
You can take the center cap off, use a straight blade screwdriver. Take that off. Use a 22-millimeter socket to take off the lug nuts. Take the wheel off. Take these two caliper bolts out. I'm going to use a 12-millimeter socket, and then a 16-millimeter wrench just to hold the slide from spinning. Loosen these up. Now, I'll just use a screwdriver to pry the caliper off. Pull that out. And you can use a caliper hanger and just support it from the upper control arm right there, just to make sure there's no tension on the hose. Slide it over here. Take the brake pads off, just use the same straight blade screwdriver. And take an 18-millimeter socket, take these two caliper bracket bolts out. Take these bolts out and slide the bracket right off. I want to separate the bracket from the caliper. I'm going to use a 12-millimeter socket to take these two bolts out.
Now, before we put these anti-rattle clips or brake pad clips on, just use a little brake grease. Just put it right there. It's just going to prevent some corrosion on the caliper bracket. And you can put the clip down and give it a nice thin coat right on top. Do the same for the other side. And take the caliper bracket, slide it in position. Take the caliper bolts get those started. You can put some thread locking compound on them. Now, I'm going to torque these bolts to 122-foot-pounds. Now, take the brake pads with the wear indicator facing to the top. Slide those in position. Now, we're going to install this clip on the caliper itself. Just line it up. This piece goes towards the inside and just slips in like that. That looks good. Now, take the caliper and line the caliper up. Get the bolt started. Now, I'm going to use a 16-millimeter wrench to prevent the caliper slide from spinning, and then tighten this bolt to 31-foot-pounds. Do the same on the top one.
Now, we want to top off the brake fluid before we attach the lines, or even disconnect the lines, because we don't want this brake fluid to go too low, or then it's going to be harder to bleed the system. And take the cap off, wipe it off first with a rag. Make sure you use the appropriate brake fluid. I'm just going to top it off all the way to the top. Looks good. I'll just put the cap back on. Now, I'm going to use a nine-sixteenths line wrench and slide it over the fitting over the line. Just try to loosen it up. Just pay attention to the line, make sure the line isn't twisting. If it's twisting a little bit, you can just give it a couple taps with a hammer. It's looking good. So that's pretty loose, so that's good. And then I'm going to...before I take this off, I want to take the clip off that holds the hose on to the bracket right there. You can try to use a pick. Just slide it in here and then just try to slide it out. If it's pretty rusty, it's probably not going to come out that easy. Just work it back and forth. And sometimes you can get a straight blade screwdriver in between here just try to pry it out. Here we go. You can just pry that off, right? Now, I'll take this fitting off. It's a little bit tedious, but...
Now, you kind of have to work fast a little bit, but don't stress out. You don't have to work too fast. You can always put more brake fluid. Add more brake fluid to the master reservoir if you have been doing this for too long. All right. So with that out of the way, I will take the hose off. I'm just going to use a pry bar and a hammer. Just give it a tap on the top. There we go. And slide that out. Now, before I put the new hose in, I just want to clean this hole out. Now, you want to take the new hose, and it is indexed. There is a smoother part on the bottom, so line that up with the bracket and that's good. And then put that clip on. We can get a new clip to replace the clip. Slide that in position, use a hammer, give it a tap. It's good. And just take the fitting, line the fitting up. You want to make sure it's lined up real good, and then you should start it by hand, but this fitting's rusted on there pretty good on the line, so I'm going to have to start it with a wrench, right. And then tighten this up. Sometimes it helps to use the next size wrench just for getting this started. Makes it a little easier. And then when you go to tighten it up, use the correct size and go back for the nine-sixteenths wrench and snug this up.
Now, take this cap off of here. Take your banjo bolt, put some new washers on them, or gaskets, copper gaskets. We'll line this up, and then we're going to torque this banjo bolt to 30-foot-pounds. Now, I'm going to take the cap off the bleeder right here. Just use a pick or something, or even a little screwdriver. And make sure you have a drain bucket underneath, or something to catch the fluid, and loosen up this bleeder screw. I'm just going to let it gravity bleed first, right? Now, take your cap off, double check your fluid level. Before you bleed it, top it off.
Now, we had the brake line off for about 10 minutes. I only lost about that much fluid, which isn't too bad. So it only went down a little bit. So, if you had to go about 10 minutes, it's probably acceptable. Put the cap back on. Now the fluid started coming out of the bleeder, so it's gravity bled. I'm going to use a 10-millimeter wrench snug this up, and then if you have any other calipers or brake hoses to replace, now you can move on to the next one. Do all those before you perform a complete brake system bleed.
Now pump up the brake pedal, just go slow. So the pedal's still very spongy. Now what we're going to do is hold the brake pedal down and open the bleeder up. So with someone else pushing down on the brake pedal, go ahead push it down. When it's holding, I'm going to open up the bleeder slowly. You can see some air bubbles come out, then I'll close it. Then I'll say, "Okay, you can let up, and then push it down again." And have them hold it, open it up. More air bubbles came out. "Let up, and hold it." Some more air bubbles came out. And it doesn't look like there's anymore air, so I can close this one up, tighten that, put the cap back on. Just spray this area down with some brake parts cleaner and move on to the next wheel. Now, you want to double-check your brake fluid level. Just use a rag, wipe it down, give it a shake. And there's a max line and min line. Double-check it. It looks good. Adjust accordingly.
If for any reason, before you were bleeding the brake fluid, or before you were replacing the calipers, if the fluid level got below the master cylinder, you're going to need to do an automated bleed. Afterwards, you're going to need a scan tool and a pressure bleeder. But if you had the fluid up to par, you should be all set. And reinstall the wheel. Put the lug nuts on. Now, I'm going to torque these lug nuts to 140-foot-pounds in a star pattern to tighten the wheel down evenly. And just go around again, double-check. And reinstall the center cap.
Tools used
I'm gonna use a 22-millimeter socket, remove the lug nuts, take the wheel off. Now, remove the wheel. Wanna loosen up this brake line, I'm gonna use a 9/16 line wrench. Just line that up. Just try to break it free. And before I loosen this up too much, then I'm gonna take this clip off right here. Take a right angle pick, just try to get underneath the clip. Just try to slide this up. And then use a straight-blade screwdriver and just try to pry it up some more, and slide that off. And before you pop this off completely, it's a good idea to check your master cylinder reservoir and make sure there's plenty of brake fluid. You don't want to have all the brake fluid come out while you're doing this.
And take that off, slide down line out. And to prevent a lot of the brake fluid from coming out. You can take a little cap and just plug off the end of it, that'll just slow it down. Now we can take the brake hose off the caliper, just use an 11-millimeter socket, and I'll loosen up the bolt. You might want a drain bucket underneath to catch some of the brake fluid. And take the banjo bolt off. And then you wanna take these seals off as well. You don't wanna reuse those. Take that one off there. And take your new hose and some new seals. Put them on the banjo bolt, put one on, and then this goes through the hose and then the other seal goes on the other side. Just like that. Make sure the hose is facing upwards and take a torque wrench and I'm gonna torque this to 30 foot-pounds. Now line the hose up and take that clip. I'm gonna get that clip started. We just give it a little tap. That's good. And then you can take this little cap off the brake line they're lined up and start threading the line on and tighten that down.
Take a 10-millimeter wrench and open up the bleeder screw. Double-check your master reservoir and we're just gonna let this gravity bleed out. Once you get a nice steady stream, you wanna make sure this bleed screw is closed. And then have a partner get in the vehicle and pump the brake pedal. Go ahead pump the brake pedal, there's a little bit of an air gap in between the caliper and the brake pads. And once the pedal starts getting hard, then you know that's filled up. So about five times, pump it up, and then hold it and then while they're holding it, open up this bleed screw.
Little bit of air came out and then close it. All right, pump it again and hold it. While they're holding it, open it again. See if there's any air, maybe a little bit of air came out that time. Then one more time. Pump it up and hold it and open it up one more time. And no air came out that time. So we're good. Snug that up. All right, give it a pump. That was good. All right, put the cap back on. You clean that up with some brake parts cleaner and then double check your fluid level and adjust accordingly.
And it's a good idea to go for a road test and after you're done, come back and take a look and make sure you don't have any leaks and reinstall the tire. Put the lug nuts on, I'm gonna torque these to 140 foot-pounds in a star pattern or across pattern to tighten the wheel down evenly. I'll just go around again, double-check. Then you check the brake fluid level after you're done and adjust accordingly. You wanna make sure you always maintain fluid in the reservoir while you're doing the procedure.
Tools used
Gonna take the center cap off, use a straight blade screwdriver. Take that off. Use a 22-millimeter socket, take off the lug nuts. Take the wheel off. Take these two caliper bolts out. I'm gonna use a 12-millimeter socket and then a 16-millimeter wrench just to hold the slide from spinning. Loosen these up.
Now just use a screwdriver, pry the caliper off. Pull it out. And you can use a caliper hanger and just support it from the upper control arm right there. Just make sure there's no tension on the hose. Slide it over here. Take the brake pads off. Just use the same straight blade screwdriver. And take an 18-millimeter socket, take these 2 caliper bracket bolts out. Take these bolts out and slide the bracket right off.
I want to separate the bracket from the caliper. I'm gonna use a 12-millimeter socket. Take these two bolts out. Now, before we put these anti-rattle clips or brake pad clips on, just use a little brake grease. Just put it right there. That's just gonna prevent some corrosion on the caliper bracket. You can put the clip down and give it a nice thin coat right on top. Do the same for the other side.
And take the caliper bracket, slide it in position. Take the caliper bolts, get those started. You can put some thread-locking compound on them. Now I'm gonna torque these bolts to 122-foot-pounds. Now take the brake pads with the wear indicator facing to the top, slide those in position.
Now we're gonna install this clip on the caliper itself. Just line it up. This piece goes towards the inside and just slips in like that. That looks good. Now take the caliper and line the caliper up. Get the bolt started. Now I'm gonna use a 16-millimeter wrench to prevent the caliper slide from spinning and then tighten this bolt to 31-foot-pounds. Do the same on the top one.
Now we want to top off the brake fluid before we attach the lines or even disconnect the lines because we don't want this brake fluid to go too low, or then it's going to be harder to bleed the system. And take the cap off, wipe it off first with a rag. Make sure you use the appropriate brake fluid. I'm just gonna top it off all the way to the top. That's good. Now we'll just put the cap back on.
Now, if you were not going to replace the brake hose when you're replacing the caliper, you would take this bolt out right here, the banjo bolt, and you're gonna replace the two gaskets on there. You're gonna use an 11-millimeter socket to take those out, put 2 new gaskets on, and then attach it to the caliper. We're gonna replace the hose in our video.
Now, take this cap off of here, take your banjo bolt with some new washers on them or gaskets, copper gaskets. Line this up. And then we're gonna torque this banjo bolt to 30-foot-pounds. Now I'm gonna take the cap off the bleeder right here. Just use a pick or something or even a little screwdriver. And make sure you have a drain bucket underneath or something to catch the fluid and we'll loosen up this bleeder screw. I'm just gonna let it gravity bleed first. Now, take your cap off. Double-check your fluid level before you bleed it, top it off. Now we had the brake line off for about 10 minutes. I only lost about that much fluid, which isn't too bad. So it only went down a little bit. So if you had to go about 10 minutes, that's probably acceptable. Put the cap back on. Now, the fluid started coming out of the bleeder, so it's gravity bled. I'm gonna use a 10-millimeter wrench, snug this up, and then if you have any other calipers or brake hoses to replace, now you can move on to the next one. Do all those before you perform a complete brake system bleed.
Now pump up the brake pedal, just go slow. So the pedal is still very spongy. Now what we're gonna do is hold the brake pedal down and open the bleeder up. So it's someone else pushing down on the brake pedal. Go ahead, push it down. When it's holding, I'm gonna open up the bleeder slowly. You're gonna see some air bubbles come out, then I'll close it, then I'll say, okay, you can let up, and then push it down again and have them hold it, open it up, more air bubbles came out. Let up. And hold it. Some more air bubbles came out. And doesn't look like there's any more air. So I can close this one up, tighten that, put the cap back on, just spray this area down with some brake parts cleaner and move onto the next wheel. Now you want to double-check your brake fluid level. Just use a rag, wipe it down, give it a shake. And there's a max line and a min line. Double-check it. Looks good. Adjust accordingly.
If for any reason before you were bleeding the brake fluid or before you were replacing the calipers, if the fluid level got below the master cylinder, you're gonna need to do an automated bleed afterwards. You're gonna need a scan tool and a pressure bleeder. But if you had the fluid up to par, you should be all set.
Reinstall the wheel. Put the lug nuts on. Now we're gonna torque these lug nuts to 140-foot-pounds in a star pattern to tighten the wheel down evenly. And just go around again, double-check. And reinstall the center cap.
Tools used
I'm gonna use a 22-millimeter socket, remove the lug nuts, take the wheel off. Now remove the wheel. Now use a 12-millimeter socket, take this caliper bolt off. I will do the same on the top one. And if you have to, you can use a wrench on the stud if the caliper slide is spinning. Then you can hold that. Now grab the caliper, just twist it a little bit, that'll compress the piston and slide it up. And you can use a brake caliper hanger. And just find a spot to hang it from, would be somewhere in the frame over here. Just as long as the brake hose doesn't have any tension on. It's good right there. Now I will take the brake pads off. And use an 18-millimeter socket and take these two bolts out. And take those bolts out and slide the bracket right off.
Take the new bracket. And we'll just take a little caliper lube and just grease the caliper, and put these caliper slides on, or anti-rattle clips. And just take and give it a nice thin coat of more caliper grease. Now take the bracket and slide it over the rotor. And take the bolts, you can use some thread-lock adhesive on them, and get those started. And now I'm gonna torque these bolts to 129 foot-pounds. And take the brake pads and slide those on. Brake-warning indicator goes to the top. And same on the inside, goes on the top. And take the caliper and just slide it in position. Take the bolts, get those started. Then I'm gonna use a 16-millimeter wrench, put that on the caliper slide and then torque this bolt to 31 foot-pounds. And do the same for the top.
Now just take the old caliper and we're gonna take this bolt off, take the banjo bolt off. We wanna do this pretty quickly. It's a good idea to double-check your reservoir for the brake fluid and make sure it's topped off so you don't lose all the brake fluid. You can see one of the seals, or washers, stayed right there. And we wanna take the other washer off the other seal. Put the seal on, and slide it through the hose. And the new seal on that side as well. And get this started. I will tighten this down. And take a torque wrench and I'm gonna torque this to 30 foot-pounds.
Take a 10-millimeter wrench and open up the bleeder screw. Double-check your master reservoir. And we're just gonna let this gravity bleed out. Once you get a nice steady stream, you wanna make sure this bleed screw is closed. And then have a partner get in the vehicle and pump the brake pedal. Go ahead, pump the brake pedal. There's a little bit of an air-gap in between the caliper and the brake pads. And once the pedal starts getting hard, then you know that's filled up. So about five times. Pump it up and then hold it. And then while they're holding it, you're gonna open up this bleed screw, a little bit of air came out, and then close it. All right, pump it again and hold it.
While they're holding it, open it again. See if there's any air, maybe a little bit of air came out that time. And then one more time. Pump it up and hold it. And open it up one more time. And no air came out that time so we're good. Just snug that up. All right, give it up a pump. Feels good. All right, put the cap back on. You can clean that up with some brake parts cleaner and then double-check your fluid level and adjust accordingly.
And it's a good idea to go for a road test and after you're done, come back and take a look and make sure you don't have any leaks. And reinstall the tire. Put the lug nuts on. Now I'm gonna torque these to 140 foot-pounds in a star pattern or a cross pattern to tighten the wheel down evenly. And I'll just go around again to double-check. Then check the brake fluid level after you're done and adjust accordingly. You wanna make sure you always maintain fluid in the reservoir while you're doing the procedure.
Tools used
Brought to you by 1AAuto.com, your source for quality replacement parts and the best service on the Internet.
Hi, I'm Don from 1A Auto. I hope this how-to video helps you out, and next time you need parts for your vehicle, think of 1AAuto.com. Thanks.
In this video, we're going to show you how to replace the rear brakes on this 2002 Chevy Suburban. We show you on the passenger side, but the driver's side is the same procedure. The items you'll need are new brake pad and rotor kit from 1AAuto.com; 12, 18, and 22 mm socket and ratchet with a piece of pipe for extra leverage; flat blade screwdriver; large C-clamp; torque wrench; brake grease; brake cleaner; and jack and jack stands. Start off by loosening up these lug nut covers and we'll fast forward as Don does this. Once those are all loosened up, you can pull the hubcap free. You want to loosen the lug nuts preliminarily, raise the vehicle and remove them the rest of the way, unless you have air powered tools. Then, you can do it while it's up in the air.
To inspect your brakes, run your finger along the rotor, check for any deep grooves. You can look in here for the life of this brake pad and then through here for the life of the other brake pad. Remove these two 12mm bolts and we'll fast forward as Don does that. Use a large C-clamp. You put it on this end on the back of the caliper and on this brake pad and twist it in. This is going to push the caliper piston in and make it easier to pull the caliper up and off. Remove the large C-clamp, pull the caliper free, and set it aside. Pry up the brake pads.
Remove these two 18mm bolts and use a piece of pipe to help break it free. We'll fast forward as Don removes those two bolts. Pull your caliper bracket off. Pull the rotor off.
On the right is the old rotor and brake pads. On the left are the new ones from 1A Auto. You can see they're identical and they're going to fit exactly the same. Spray your rotor with some brake cleaner and wipe it down. Re-grease your caliper slides and apply brake grease to the tabs on either side of your brake pads.
Slide your new rotor into place and then twist on a lug nut to hold the rotor in place while you put the caliper bracket back on. Put your caliper bracket back into place and replace those two 18mm bolts and we'll fast forward as Don tightens those up. You want to torque these to about 85 foot-pounds.
To reset your caliper pistons, you want to put a brake pad in front of the pistons and twist the large C-clamp until it pushes the pistons in. Push your brake pads back into place and put your caliper back down into place and replace those two 12mm bolts. We'll fast forward as Don does this and tightens them up. You want to tighten these to about 30 foot-pounds.
Put your wheel back into place, and then, replace your lug nuts and tighten them preliminarily and we'll fast forward as Don does this. Lower the vehicle, and torque the lug nuts to 100 foot-pounds in a crossing pattern. Then, replace that hubcap and tighten up each of your lug nut covers.
Before taking the vehicle out on the road, you want to pump the brake pedal until it firms up, and then do a stopping test from five miles per hour, and then ten miles per hour and you're all set.
We hope this video helps you out. Brought to you by www.1AAuto.com, your source for quality replacement parts and the best service on the Internet. Please feel free to call us toll-free, 888-844-3393. We're the company that's here for you on the Internet and in person.